Repository for the Max in a Box instagram series. This setup has been tested on macOS only, and relies on macOS's inbuilt "screencapture" CLI to screen capture the patching. This would definitely be feasible on Windows too but I currently have no plans to implement it/port it.
- SwitchAudio Source for automatic switching of the defaults macOS audio device before and after recording.
- Loopback to easily re-route audio internally
- ffmpeg for automatic cropping and trimming
- A Full-HD monitor (This step is necessarly to leverage the patch locking, resizing and screecapture to then auto-crop via ffmpeg. Any screen can be used tweaking accordingly the values.)
In order for the patch to do everything automagically you'll have to change a few paths in the "sixty-sec-rec" execturable that are hardcoded (sorry for this, I'll probably make them relative in the future if you request it!)
- The screencapture command should contain a path to the recs folder inside Max-in-a-Box and a custom name for your recording. (i.e.
~/path/to/your/folder/Max-in-a-Box/recs/custom-name.mov) - The ffmpeg command should contain first the path to your newly recorded screen recording (i.e.
~/path/to/your/folder/Max-in-a-Box/recs/custom-name.mov) and then a new location where the cropped file will be located (i.e./path/to/your/folder/Desktop/custom-name-CROP.mp4)
Optional
- The mv command takes the original recording (the non cropped one) and moves it out of the recs folder freeing up the space for a new recording and archiving it elsewhere. If you want to do the same, this line should contain first the path to your newly recorded screen recording (i.e.
~/path/to/your/folder/Max-in-a-Box/recs/custom-name.mov) and then a new location where the original file will be moved (i.e./path/to/your/folder/Desktop.mov)
The SwitchAudio Source tool doesn't need to be set. It just requires to be installed and to have an audio source called "Max in a Box" to switch to and from. To see how to create an audio source with this name, see the following section called "Loopback".
Loopback enables seemless internal audio routing. Whilst being very expensive, it provides users with 20 minutes of free usage at every start. This is perfect for a project like Max in a Box due to it's inherent time constraint. Even if we were to run out of time, all you need to do is just restart Loopback. For loopback to work with the system create a new audio source that looks like this:
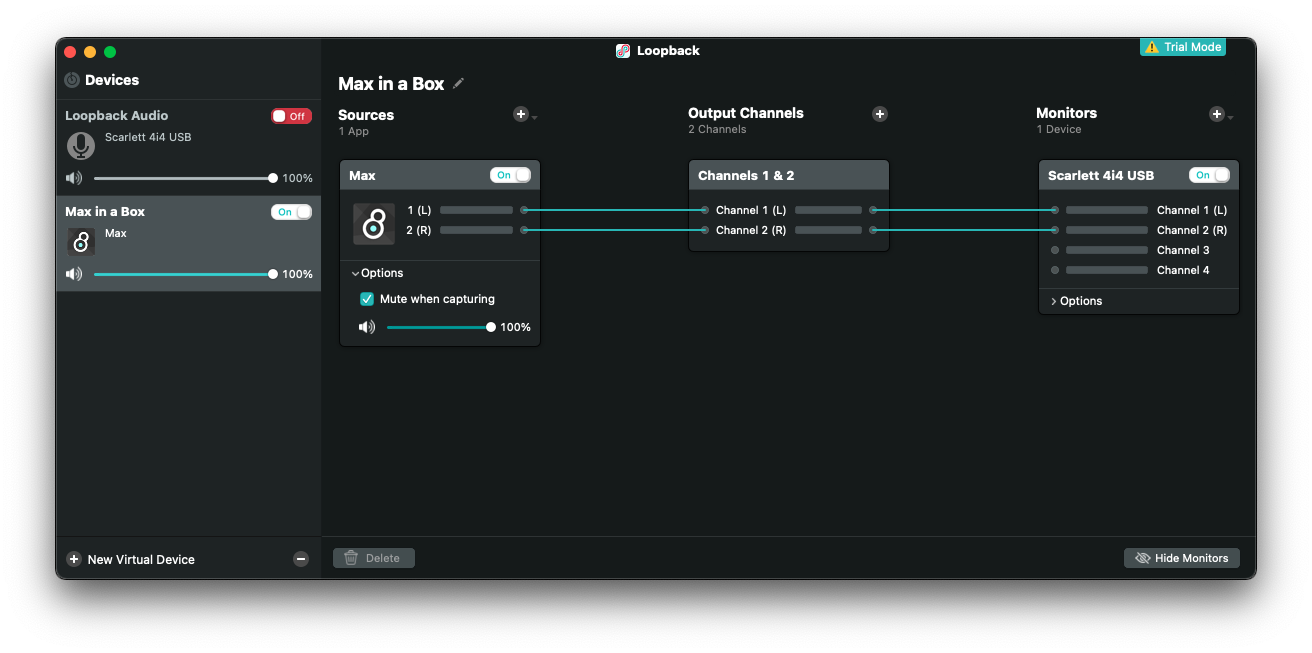
This will enable you to record and monitor the Max patch at the same time. You can swap Loopback with any other audio routing tool (Soundflower, Blackhole, etc...) but I find Loopback to be excellent.
Once the system is set, there are three things left to do in order to have a smooth experience.
- Open a Terminal window (to avoid lag when launching the script)
- Open LoopBack
- Press the toggle in the top left of the patch.
After a 3 second countdown, the DAC will automatically turn on, and will stay on for a total duration of 60 seconds at the end of which the screen recording will stop, and the script will do all the cropping and moving.