This repository contains the source code for the NoesisGUI Unreal integration.
This is just a short guide on how to install and build the plugin from the source code on this repository. For your convenience, you can download a ready to use version of the plugin directly from our website. If you do so, you can skip the installation instructions and jump directly to our First steps with NoesisGUI and Unreal.
Please, use our forums and tracker to submit bugs and feature requests.
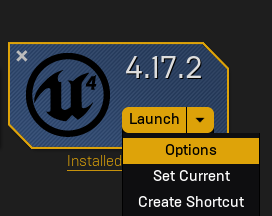
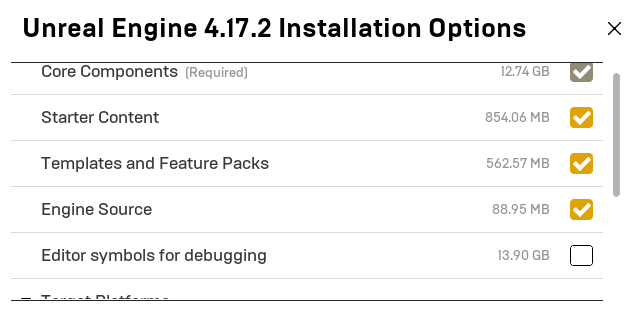
- Unreal Engine, with source code. This can be either a pre-built version installed through the Epic Games Launcher, or a version built by yourself from the source in GitHub. To install a pre-built version of Unreal Engine, please refer to the document Installing Unreal Engine and follow the instructions there. For instructions on how to get a copy of the Unreal Engine source code and how to build it, please refer to the README.md document on their GitHub repository. If you're using a version of Unreal Engine installed trough the Epic Games Launcher, make sure you have the engine source code installed. To verify you do, go to the Unreal Engine tab in the Epic Games Launcher, then go to your library of installed components. From there, at the top, look for the Unreal Engine version with which you wish to use NoesisGUI, and from the drop down list next to the Launch button, select options. Make sure the Engine Source option is selected. If it isn't, click on the tick box next to it and then click Apply to download it.
- Download and install Python. Additionally, you need to install the following modules:
configparser(both on Windows and Mac),pywin32(on Windows) andpyobjc(on Mac). If you're not sure how to do this, for your convenience we provideInstallPythonPrerequisites.batandInstallPythonPrerequisites.commandthat will check these prerequisites and will install the required packages for you. Please, read the following section Plugin installation for more details. The installation scripts have been tested with Python 2.7 and 3.6. Other versions may work, but they are untested.
-
Copy the contents of this repository into
[UE4Root]/Engine/Plugins/NoesisGUIif you want to use it as an Engine plugin, or[ProjectRoot]/Plugins/NoesisGUIif you choose to use it as a Project plugin. We'll refer to the directory where you install the plugin as[NoesisGUIRoot]from now on.[UE4Root]is the directory where you installed the engine from the Epic Games Launcher, or the directory where you cloned the GitHub repository. With versions of Unreal Engine built from the source code in GitHub you can use the NoesisGUI Unreal Engine plugin as either an Engine plugin or a Project (Game) plugin. However, if you're using an Epic Games Launcher version of the engine, you can only install the plugin as a Project plugin. For more information about Unreal Engine Plugins, please refer to the Plugins documentation. -
Download the NoesisGUI Native SDK (C++) from our developer portal and extract it into
[NoesisGUIRoot]/Source/Noesis/NoesisSDK. -
If you haven't installed the required Python modules, or you want to verify they are correctly installed, you can execute
InstallPythonPrerequisites.batandInstallPythonPrerequisites.commandfrom the Command Prompt on Windows or Terminal on Mac. Navigate to the plugin directory and execute them from there. These will test whether the required modules are installed or not, and will install them if they're not present. You only need to install them once, so you don't need to perform this step every time you update the plugin or Unreal Engine. -
Install the plugin by executing
InstallPlugin.batfrom the Command Prompt on Windows orInstallPlugin.commandfrom the Terminal on Mac. If you're targeting more than one platform, you can pass them as arguments like this:InstallPlugin.command Mac IOS. The installer uses the same platform names as Unreal. The valid platform names areWin64,Mac,IOS,Android,PS4andXboxOne. The host platform (Win64orMac) is always built, as those binaries are required to run the editor. If you've installed the plugin as a project plugin the installer will enable it automatically by adding it to your.uprojectfile, as described in First steps with NoesisGUI and Unreal. IMPORTANT: You will need to perform this step every time you update Unreal Engine or get a new version of this plugin or the NoesisGUI SDK. -
Even after these steps, sometimes the Editor will warn you that the modules NoesisRuntime and NoesisEditor are out of date when you try to launch it. This may happen if you're running a configuration other than Development or if you've changed to a different engine version. Just click accept so the modules are rebuilt to target the correct version of Unreal Engine.
If all the steps so far have been successful, your Unreal Engine install should contain the following directories. Please note that only the directories relevant to the NoesisGUI plugin are listed here, and that your installation may contain additional files and directories that have been omitted here for clarity.
[NoesisGUIRoot]
+-- Binaries
+-- Config
+-- Intermediate
+-- Resources
+-- Shaders
+-- Source
    +-- Noesis
        +-- NoesisSDK
            +-- Bin
            +-- Include
            +-- Lib
            +-- version.txt
    +-- NoesisBlueprint
    +-- NoesisEditor
    +-- NoesisRuntime
+-- NoesisGUI.uplugin
After you read this document, we have a few samples so you can see some of the concepts in action:
-
HelloWorld: A minimal sample showing how to present the contents of a XAML on the screen.
-
Buttons: A simple game that shows how you can use
Bindings to implementCommands asBlueprintfunctions. -
Widget3D: A similar UI, but this time presented in 3D using Unreal Engine's
WidgetComponent. -
Login: A slightly more elaborated sample that uses
Bindings to data and functions in aBlueprint, combined with some C++ code for more advanced functions. -
QuestLog: This samples shows how to use
Bindings to more complex data, such asTextures andArrays ofObjects. -
Scoreboard: This sample shows more advanced ways to expose data on
Blueprints so that it can be used inBindings, such as using Getter functions and manually notifying property changes. -
Localization: A sample showing a way to implement content localization using
ResourceDictionarys. -
UserControl: This sample shows how to implement an
UserControlusing a XAML and a C++ code-behind class, and how to use it from another XAML. -
Menu3D: This sample shows how to use
UserControls to implement a multi-panel game main menu. -
TicTacToe: This sample shows how to use XAML and
Blueprints to implement the classic pen and paper game tic-tac-toe. -
Inventory: This sample shows how to implement a drag and drop inventory system UI.
-
ShooterGame: This sample replaces the UI from Epic's ShooterGame sample with NoesisGUI. Some changes were dome to the source code in order to expose data and functionality, but otherwise the UI is done completely in
Blueprint.
-
When you try to build, package or launch your project you get an error complaining about missing libraries
UE4-NoesisRuntime.liborUE4-NoesisRuntime-Win64-Shipping.lib(UE4-NoesisRuntime.aorUE4-NoesisRuntime-Mac-Shipping.aon Mac).- Make sure you ran the installation script, as described in the Plugin installation section.
-
When starting your project editor you get an error because your game module could not be loaded.
- Make sure you enabled the plugin for your project before adding the dependency to the module
NoesisRuntime. If you already had a project created, simply add the dependency manually as described in First steps with NoesisGUI and Unreal.
- Make sure you enabled the plugin for your project before adding the dependency to the module
-
In windows, you get an error stating that
NoesisRuntimecannot be loaded becauseNoesis.dllcannot be found.- Make sure you ran the installation script, as described in the Plugin installation section.