Sensitivity Labels
Request-a-team supports the application of sensitivity labels to a created team.
To use this functionality sensitivity labels must be enabled for Teams, for more information see - https://docs.microsoft.com/en-us/microsoft-365/compliance/sensitivity-labels-teams-groups-sites?view=o365-worldwide.
You will need to have labels created in the Security & Compliance center and published using Label Policies before this will work. Allow 24 hours after creating and publishing labels before you follow this guide.
This functionality needs to be enabled and configured for it to work.
If you have a previous version of Request-a-team then you will need to redeploy it to take advantage of this new functionality. We are working on some documentation on how you can upgrade a previous version.
Note - Due to limitations in the Microsoft Graph API, labels can only be applied using the Delegated permissions model. This means a Service Account (this can be the same one used for Request-a-team) is required. This account must NOT have MFA configured.
The username and password for this account is stored in Key Vault in order to ensure it is as secure as possible.
When this restriction is removed, we will update Request-a-team to use Application permissions, removing the need for a NO MFA Service Account.
We will first cover how the functionality works and then how to enable it.
Sensitivity labels are retrieved from the Security & Compliance center using the Microsoft Graph API. A Logic App named 'SyncLabels' performs this sync. By default, this Logic App is set to run daily, you can change this if desired.
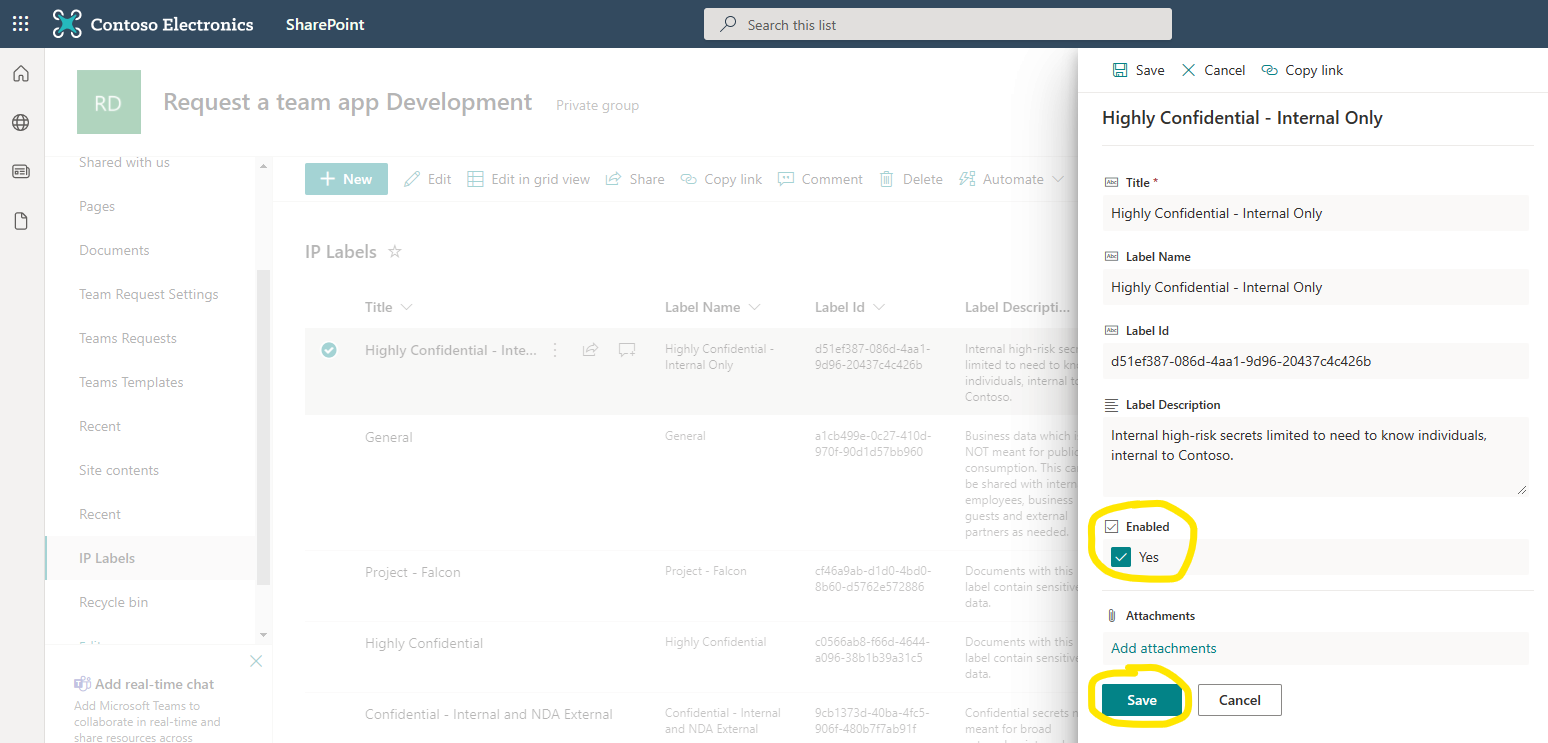
Labels are stored as list items in a SharePoint list named 'IP Labels' in the SharePoint site backing Request-a-team.

For a label to appear in the Power App, the 'Enabled' column must be checked. This column has been added because the Graph API does not allow filtering on labels that can be applied to Sites/Groups vs Document/Email labels and ensures that users cannot select the wrong type of label. You will notice that there may be document/email labels in the IP Labels list. Make sure these are not set to 'Enabled' and that only ones that can be applied to sites or groups are marked as enabled.

You can validate which labels can be applied to sites/groups through the Security & Compliance center.
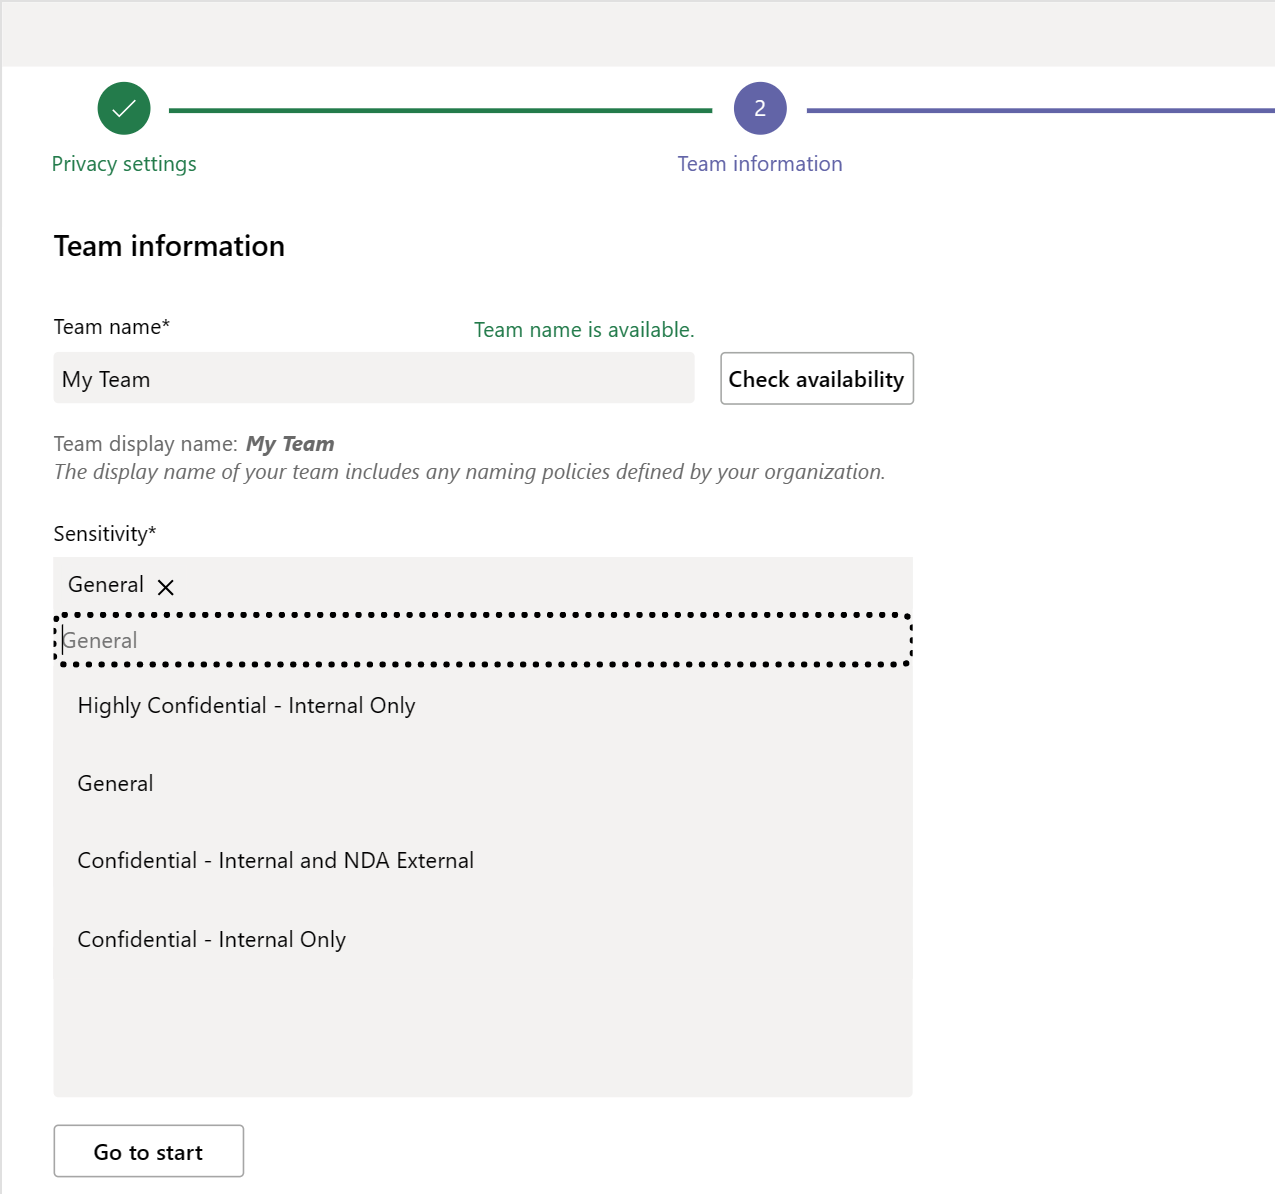
If the functionality is enabled, the labels are shown to the user in a combo box on the Team Information step.
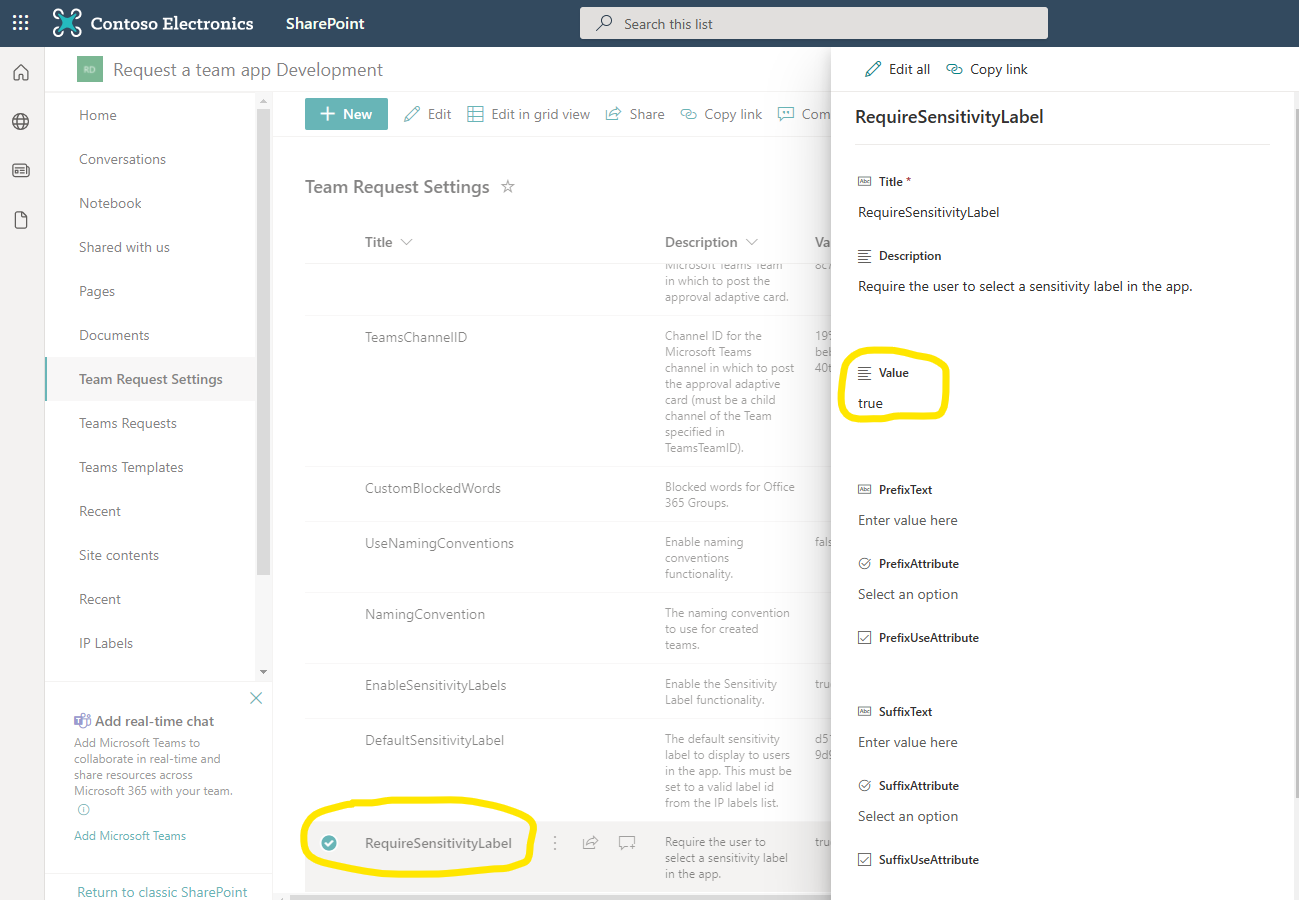
You can set a default label and choose whether to require the user to select a label by configuring the 'DefaultSensitivityLabel' and 'RequireSensitivityLabel' settings in the Team Request Settings list. This will be covered in the Configuration section of this documentation.
There are two ways to enable this functionality:
-
When running the script - A new parameter 'EnableSensitivity' has been added to the deployment script which will enable the sensitivity label functionality. If this is set to true, the functionality will be automatically enabled. This is documented in the deployment guide.
-
Manual Enablement - Follow the steps below to manually enable this functionality. This assumes you have run the latest script to deploy the updated version but did not choose to enable sensitivity at the time.
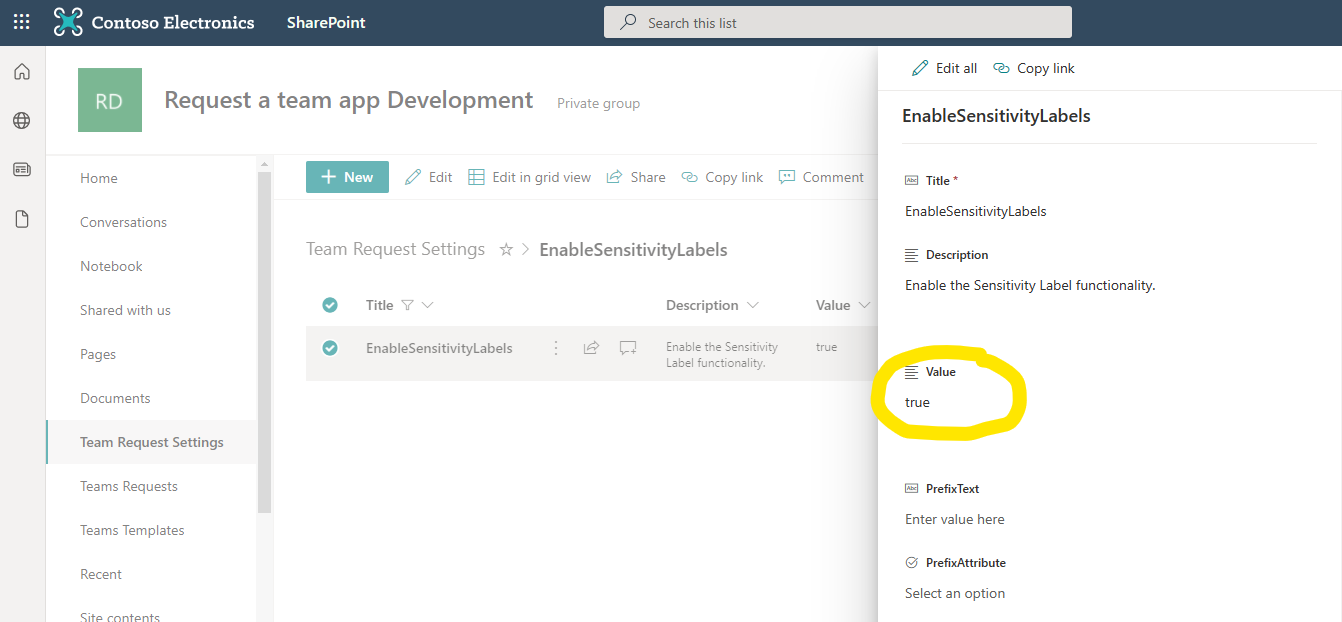
- Navigate to the 'Team Request Settings' list in the SharePoint site.
- Edit the 'EnableSensitivityLabels' list item and set the Value field to 'true'. It will be set to 'false' by default.
- Navigate to the Azure Portal > Key Vaults blade and click on the key vault used for your Request-a-team implementation.
- Select 'Secrets' from the left pane.

- Click 'Generate/Import' and create the following secret:
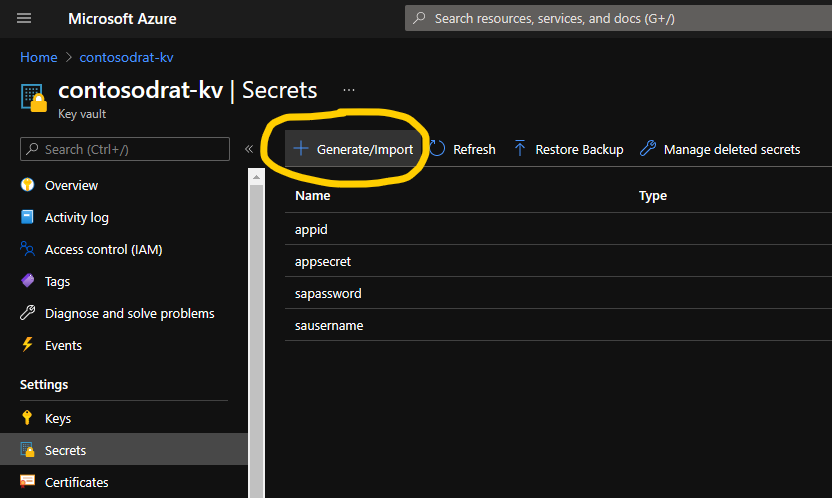
Name: sausername Value: UPN of your service account
Click 'Create' once done'

- Repeat the step above and create the following secret:
Name: sapassword Value: Password for your service account
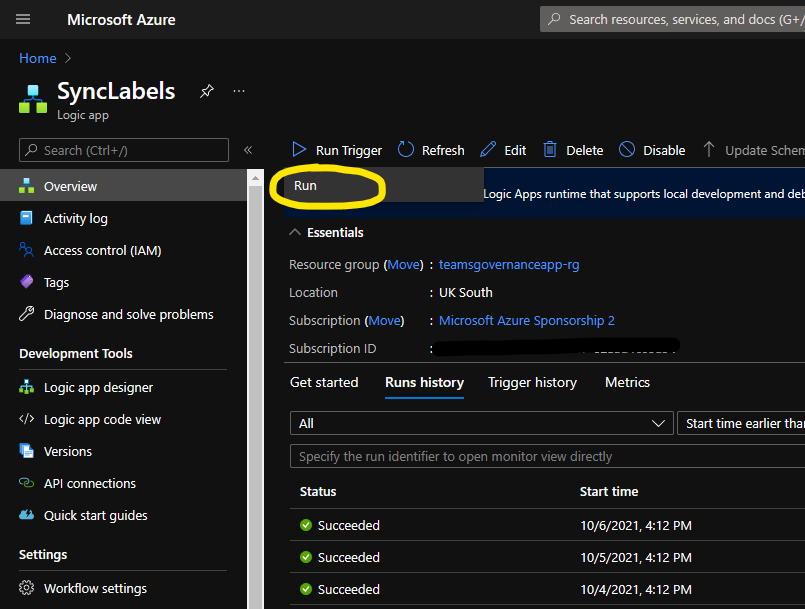
- Locate the Logic App named 'SyncLabels' in the Azure Portal and click on it.
- Click 'Run Trigger > Run' and wait for the run to complete.
- Navigate to the 'IP Labels' list in the SharePoint site and validate that the labels are present (See screenshot of IP Labels list at the top of this documentation). If there are no list items present then the 'SyncLabels' logic app has failed to run. Check the run history of the Logic App and investigate any failures.
Once enabled, this functionality can be configured as follows:
- If not already done, locate the 'SyncLabels' Logic App from within the Azure portal and run it - 'Run Trigger > Run'. This will synchronize the labels into the IP Labels list. (See screenshot above).
- Enable some labels to display in the Power App by editing the list items, setting the 'Enabled' column to 'true' and saving the items.
- Set a default label (Optional) by setting the value of the 'DefaultSensitivityLabel' list item to the label id of your chosen label. The label id must exactly match a valid label id from the IP Labels list. You can find the label id in the 'Label Id' column.

- Choose whether to require the user to select a label (Optional). The default is 'false' which means the user will not be required to select a label and the combo box can be left blank. If you wish to require (force) users to select a label, simply set the value of the 'RequireSensitivityLabel' list item to 'true'.
- The functionality is now configured and when users launch the app to request teams, they should see the Sensitivity combo box. This box will appear for 'Build New', 'From template' and when cloning and editing requests.
If you experience labels not displaying in Teams for created teams or the SharePoint site, you may need to wait 24 hours for these to display. If they still do not display then this may be due to a reported bug which is currently being worked on by the relevant engineering teams inside Microsoft.
If you experience any problems please raise an issue.