How to calibrate the torque sensor
Almost every torque sensors on TSDZ2 is different and reports different values for the same weight on the pedals. Some have low sensitivity / very short linear zone only up to 15 kgs while others up to 45 kgs, as also different sensitivity on left and right pedals. As comparison, riders like me can do peaks of 40 or 60 kgs on pedals without lift the butt from the saddle.
Why this is important? because if you want the best motor response and natural feeling of a bicycle, the torque sensor needs to work/be linear the best possible. Also, this is the only way to trust on the measurements shown on display for the pedal human power.
Here is TSDZ2 1 and TSDZ2 2 the torque sensors measurements - the torque sensor of TSDZ2 2 is way better!!, here the comparison:
TSDZ2 1 torque sensor:
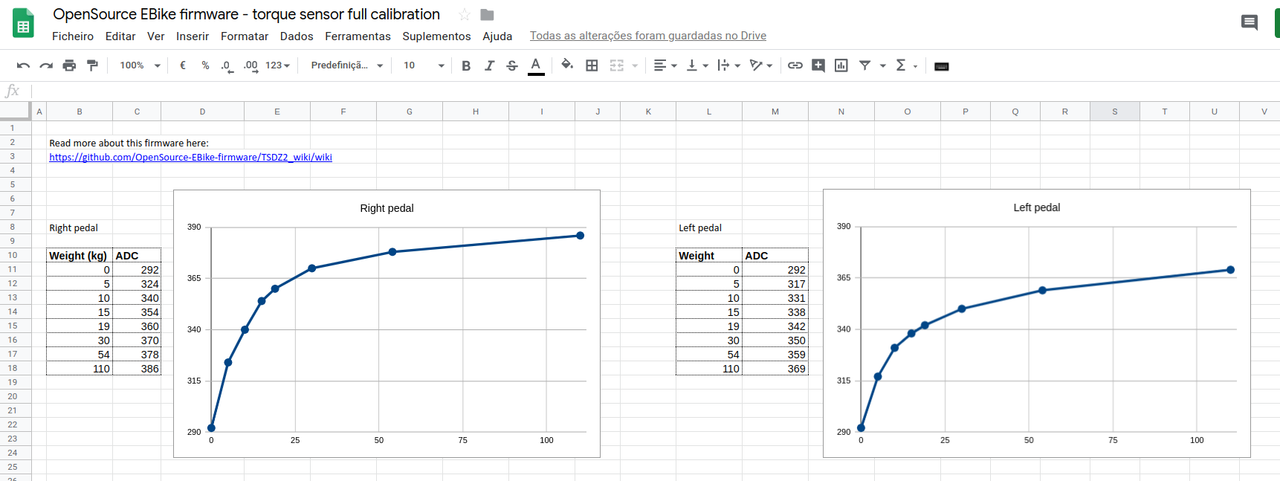
TSDZ2 2 torque sensor:
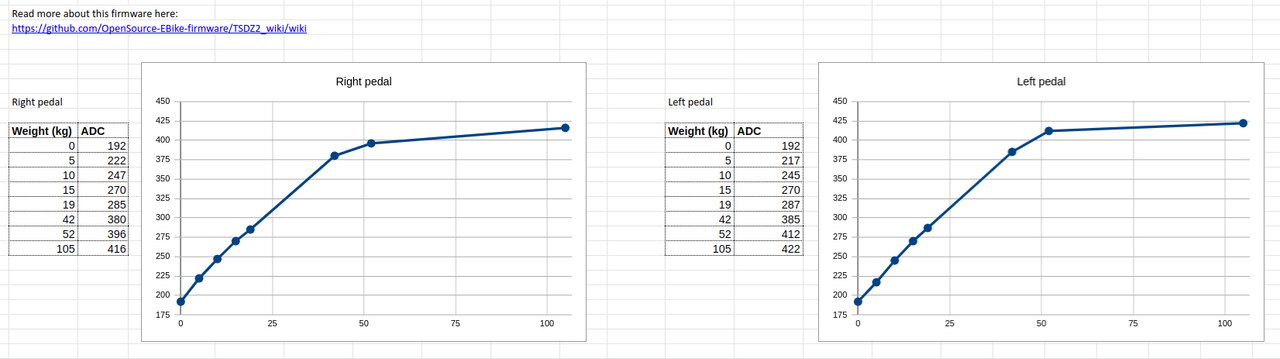
Notes:
- One torque sensor is kind of linear only up to 15 kgs while other up to 45 kgs. The rate/sensitivity are the same for both on this "linear" zone but clearly mine lacks resolution because this zone is very short. I can do peaks of 40 or 60 kgs on my pedals without taking my butt from the saddle.
- One torque sensor seems to measure the similar values for both left and right pedals while the other does not (the left pedal has lower sensitivity).
- The one that is worst on 1. is also worst on 2. So, clearly there are torque sensors that are worst than the others.
The basic idea is that the values the torque sensor reports (raw values) are different for almost every TSDZ2 out there. To normalize the values curve, you need to measure the value on the torque sensor for various known weights. This way the firmware can build a curve and map torque sensor values to actual weight on the pedals.
So you need to have a set of known weights (or use a luggage scale as some have done) and put these weights on the pedals while pressing the brakes so the bike doesn’t move and with crank arms parallel to the ground.
You then write down the torque sensor value and the weight that was on it. For both left and right (they have different values).
Once done, enter them in the google docs to have the curve so you can see if you didn’t make a mistake (curve should not have drastic spikes or you probably made an error in measuring), and you can also use it to interpolate missing weights if you don’t have a good range of available weights.
You then enter all this in the display configurations menu. The weight reported in the firmware after calibration should match the weight in kg of whatever is on the pedal with crank arm parallel to the ground at that moment. In my experience it’s not ultra accurate but should be within a kilo or two of the actual weight in kg.
- go to Technical configuration menu to see torque sensor ADC value in real time
- use weights, your own known weight, weight from other members of your family or friends (mainly others with different value), put them on each pedal only (the pedal crank arms must be parallel to the ground)
- take note of each weight value and ADC value (for your own weight measurement, you can lean the bike against a wall, hold the brakes and stand on pedal)
- choose 8 points, first one with 0 weight value and last one with your weight
- a copy of this calc sheet as seen on the next image. Edit the weight and ADC values on the table and the graph will update automatically, choose the other 6 points near the knee zone as seen on the graph and not on flat zones. You can extrapolate some points if you don´t have the weights, follow the curve on the graph but try to validate with real measurements:
- go to Torque sensor configuration menu and input the data of each point: weight and ADC value

Seeing and validating the pedal side as also the weight measured on the pedals:

Warning: this is optional and is not advised to do since is a very delicate process and risky because it involves disassembling part of the TSDZ2 motor and handle the torque sensor. The coils and the wires of the torque sensor are fragile and you must handle them with care (you can always buy a spare torque sensor on online shops like PSWPower).
Steps needed:
- disassembly the torque sensor (follow the TSDZ2 Repair Manual.pdf file from here)
- you don't need to remove the motor controller or the motor
- you will need to remove the main gear, then the axle and finally the torque sensor
- the coils and the wires of the torque sensor are fragile -- make sure to handle them with care and make sure to disconnect the torque sensor wires from the motor controller otherwise there is a high probability that the wires will break near the torque sensor coil when you remove it!!
- make sure to not loose the 3 small springs that are under the torque sensor coil
- with the torque sensor outside, make sure to hold both coils against each other and aligned (maybe using some adhesive tape). Take care to not use to much force as the coils are fragile.
- connect the torque sensor wire to the motor controller but make sure the TSDZ2 motor is disabled with the brakes are pressed and motor assist at 0
- turn on TSDZ2 on LCD and go to configuration menu, advanced data, and look at torque sensor ADC value
- you will need to adjust the position of the sensor (that black part) and so you will need to loosen the two small screws, as seen on the following picture
- move slightly the sensor (from right to left and keep it far from the little magnets) part until you read an ADC value of 100 up to 120 (note that a value under 100 means that probably the sensor is not detecting the little magnets, then you need to move it to lefMy wife TSDZ2t side)
- now tighten the screws but you will see that probably the ADC value will change as the position of the sensor will change - you need to tighten the screws slowly while keep adjusting the sensor position
- when the screws are finally tighten, you can test the sensor by doing some light force on the top part, like seen on the picture bellow, where I was using a screw driver (but place it on the right side and apply light force that will make that metal parts flex very little to left side). You should see the ADC values increasing and always go the value you calibrated before in the interval of 100 to 120
- assemble the torque sensor
- when assembling the torque sensor, don't forget to install the 3 small springs under the coil, just like they were when you disassembled.
- maybe you can put your motor on horizontal so the springs are in place when you use the hammer to force the torque sensor to go to his place. Please do it in very small steps and make sure the coil, springs, wires, etc are in place. It is easy to damage the coil if it is out of the place.
- after assembly again the torque sensor on the TSDZ2, finally apply force with your feet on the pedals and verify that ADC torque sensor values are the same you expect - please refer to the values on table top.

- If your Torque Sensor is not working, it could be due to a faulty Hall Sensor. Here is how I replaced it:
- Peel off the black stuff to investigate (in my case the Hall Sensor pins / solder pads were torn off.)
- Be extra careful to not harm any of the tiny SMD parts underneath.
- The Hall Sensor is a std "49E / OH49E / SS49E" Hall sensor as found on ebay.
- Just solder it back on - for details, see linked picture below: