Installing the software
There are two ways of downloading our software:
Download the code from Releases page - this code may not be the latest. But it is the most stable one.
Remember to choose your proper version. ARS version is provided to AmateurRadioShop's kit that are selled there. Otherwise just download version without ARS in the name.
If you want to have the newest code download whole source code. There are 2 ways to do this.
First method is using git. Just turn on your Linux terminal and write:
git clone https://github.com/PE5PVB/TEF6686_ESP32
If you are Windows user or you just don't have git installed on your PC just download the code from this link. Or manually by clicking on the green "Code" button (on the home page) and then "Download ZIP"
If you downloaded code from Releases page you can just skip this part.
We recommend using Arduino IDE for compiling the code. If you don't have it installed please visit official Arduino's website to download it.
After installing Arduino IDE you need to download board definitions for ESP32.
- Open Arduino IDE and in File tab select Preferences.
- At the bottom you will see Additional Board Manager URLs field. You need to fill it with:
https://raw.githubusercontent.com/espressif/arduino-esp32/gh-pages/package_esp32_index.jsonThen click OK button - Now we need to open Board Manager. Select Tools > Board > Boards Manager
- Search for ESP32 it should pop up (by Espressif Systems). Then click install
- After installing close the window by clicking Close.
- Select again Tools > Board and from ESP32 list search for ESP32 Dev Module. Then select it.
Now extract your previously downloaded code to folder named TEF6686_ESP32 - Double-click on TEF6686_ESP32.ino file to open it in Arduino IDE.


- If you didn't download libraries please follow these steps. Otherwise move to next step.
- In this step you need to download 3 ZIP libraries (TFT_eSPI, ESP32Time, Hash). Links to them are included in the code (at the beginning of INO file)
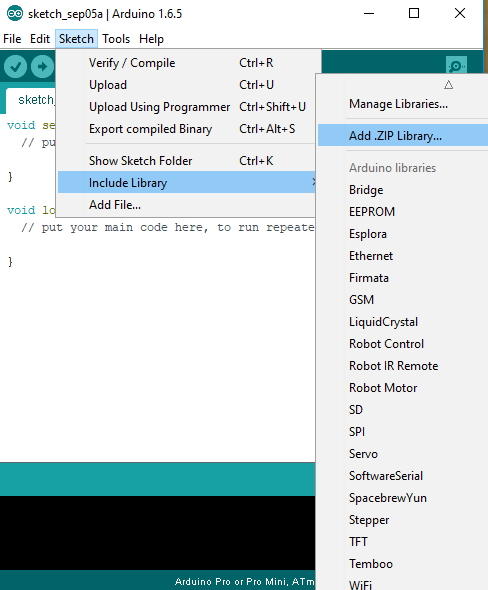
- Don't extract downloaded ZIP files. Move to Arduino IDE and select Sketch > Include Library > Add .ZIP library
- Select downloaded libraries. After adding 3 libraries you can move to the next step.
- In the Arduino IDE Board Manager set the Partition scheme to Huge APP. (3MB APP / 1MB SPIFFS)
- Modifying TFT_eSPI configuration. If you done that before please move to the next step.

- Open your User_Setup.h file (located in Documents/Arduino/libraries/TFT_eSPI folder) with these values:
#define ILI9341_DRIVER
#define TFT_CS          5
#define TFT_DC          17
#define TFT_RST         16
#define SPI_FREQUENCY   7500000
#define SMOOTH_FONT

//#define ARS                 // uncomment for BGR type display (ARS version)

#ifdef ARS
#define TFT_RGB_ORDER TFT_RGB
#endif
- ALL OTHER SETTINGS SHOULD BE REMARKED!
- If you experience QRM noise nearby 90 MHz please consider lowering SPI_FREQUENCY value.
- Now we are ready to compile the code. Click "Verify" button (first on the top left) to verify our code. It should compile your sketch and give "Done compiling" message.
- Select proper COM port. Tools > Port (If you are not sure which port should you select move to step 5a).
- Press WIN+R and type
devmgmt.mscor just run your Device Manager. - Hold your BOOT button* on your ESP32 and plug USB cable from ESP to your computer
- Your ESP32 should pop-up in Ports section with port name in the brackets that you need to select in Arduino IDE
- Hold your BOOT button* on your ESP32 and plug USB cable from ESP to your computer. Make sure that tuner is turned on but the screen is off.
- Extract downloaded ZIP file and run
flash.batfile. - Enter your COM port number (script will list all available ports if not go to step 3a)
- Press WIN+R and type
devmgmt.mscor just run your Device Manager. - Your ESP32 should pop-up in Ports section with port name in the brackets that you need to give in flash.bat script
- The script will upload code to your ESP and end with "Leaving... Hard resetting via RTS pin..." message.
- Turn off your tuner and unplug USB.
- Now you can turn on tuner and enjoy the new software!
- After selecting proper COM port and making sure that ESP32 is in BOOT mode you can click "Upload" button (just next to Verify button)
- Please wait some time and after successful upload Arduino IDE will display "Done Uploading." message.
- Turn off your tuner and unplug USB.
- Now you can turn on tuner and enjoy the new software!
*BOOT button location may differ depending on your tuner version