Manual
- Intro
- Short description of basic functionality
- More Elaborate Description
- Building DSpellCheck
- Thanks
First things first, DSpellCheck was started as the project which should have eventually become decent spell-checking plugin for great text and code editor Notepad++. Was that goal reached or not is left for you to decide in the end, but anyway almost all stuff that I wanted to include in this plugin was eventually included, so I feel pretty content about it. Why spell-checking for Notepad++ is useful? That question arises all the time and the people who asking it of course encouraging to use different programs for spell-checking but I believe that first point is that it's totally depends on user point of view (I guess not everyone is very eager to use programs such as _Microsoft Office+, OpenOffice or LibreOffice for editing simple txt files). But there is more to that of course, I guess even if not everyone uses Notepad++ as C++ editor but at least for HTML, TeX, PHP, and other languages where you do not use some kind of IDE every time, you can consider Notepad++ as one of the best editors, and of course typed text in such files still needs to be checked. I mean in TeX is almost everything is text but still there are some keyword which should be skipped ('cause they are not English words all the time and while doing spell-checking for other language it is even more important), in C++ you probably want to check only string constants and comments. And basically all of stuff like that is the possibility I've tried to put inside this plugin, which I believe makes it pretty much useful for majority of Notepad++ users.
All the hotkeys described here could be change through standard Notepad++ means.
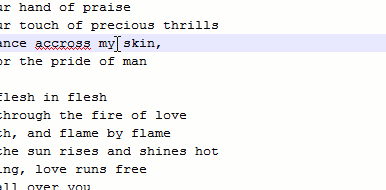
Plugin works like most of spell-checking plugins these days, it just underlines every word which misspelled or seems to be misspelled from speller point of view. When you see that the word is being underlined you can put your mouse cursor over this word and then little red box will appear under it, which you can click and context menu with some suggestions for misspelled word plus two standard options (Add to user dictionary, Ignore for Current Session):
If visibility of this box bothers you, don't worry it will disappear almost on every action that you will be doing except moving mouse cursor. Actually there is an option to make process of getting this menu differently (See link).
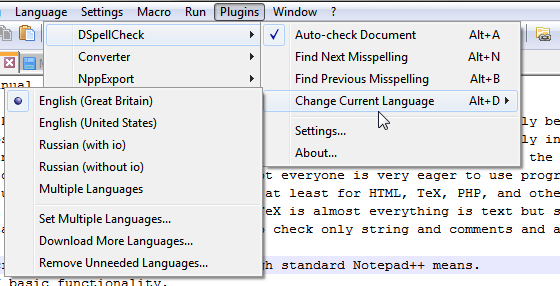
By default plugin either doesn't have any dictionaries at all or have only English (Great Britain) dictionary installed. The easiest way to install more dictionaries is to go to Plugins->DSpellCheck->Change Current Language (or just press Alt+D) then select "Download Languages" or "Download More Languages", choose dictionaries from list you want to download, press button "Download Selected", and then more dictionaries will appear in the list of "Change Current Language" menu which you can select and of course use.
Now we quickly describe all the options available there:
-
Auto-Check Document - Just turn off / turn on work of the plugin. With plugin turned off, no words would be underlined.
-
Find Next Misspelling - The screen will go forward from current text cursor position right to the next misspelled word, targeted word would become selected.
-
Find Previous Misspelling - The screen will go backwards from current text cursor position right to the previous misspelled word, targeted word would become selected.
-
Change Current Language - (Hotkey (by default Alt + D) in that case, calls sub-menu as context menu at current mouse cursor position)
-
Firstly, this sub-menu contains all currently installed languages as items, clicking on one of them will just change your current language used for spell-checking.
-
Multiple Languages item. Multiple languages is a special feature of DSpellCheck (which is I guess very useful for two or more language speakers), you can select several dictionaries you have installed, and word of interest will be considered misspelled only if it's not presented at least in one of them. Though you should always remember that this feature have some limitations - in some cases your suggestions for misspelled word would be taken from dictionary of the wrong language, which is of course incorrect, but in that case if you'll try to add word to user dictionary it will be added to user dictionary for wrong language also. That problem arouses because developers of libraries which were used in plugin didn't seem to think much about using multiple languages at once.
Though I guess this feature is still very useful even with these limitations present.
-
Set Multiple Languages... - After pressing on it, dialog will be shown where you can customize languages which will be used if you press on Multiple Languages item.
Warning: Next two items will appear only if you use Hunspell library (which is used by default)
-
Download More Languages... (or it will be named just Download Languages... if you don't have any) - it will call simple dialog for dictionary downloading.
-
Remove Unneeded Languages... - it will call dialog where you can remove some languages so they'll not bother you anymore with their presence.
Even though functionality and interface of last three dialogs is fairly simple I will describe them more thoroughly a little bit later.
-
-
Settings... - Here you can customize a lot of stuff for plugin's work which I will describe in the next chapter. If everything works good for you, you shouldn't bother yourself with messing with this dialog too much.
-
About... - standard dialog where you can get info about plugin's version, name of the author, GitHub page link and such.

-
Library Combo Box - basically it gives you the choice between two major spell-checking libraries which can be used in DSpellCheck - Hunspell and Aspell. The one selected by default is Hunspell and it doesn't require anything (except perhaps dictionaries) to be installed. For using another choice - Aspell you have to install Aspell library and some dictionaries for it, it you don't know what is Aspell and how to use it, you better abstain from it, though.
But anyway I will give short info about using Aspell here, you may skip it, if you don't care about it:
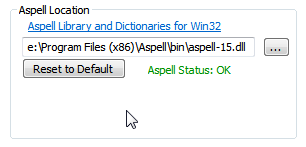
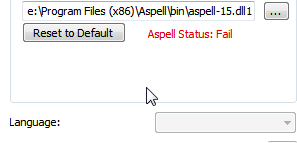
- You just have basically only one option if you're using Aspell and it's path to Aspell library (most likely it's called aspell-15.dll), which is by default installation placed in Aspell folder in bin directory, though if you installed it through normal means DSpellCheck should find it by itself from your registry. Even if you accidentally change it manually you can always click on "Reset to Default" so DSpellCheck will try his luck in finding it once again, if library was found successfully, Aspell status should indicate that everything is OK, though you should have at least one dictionary for it, otherwise status will be "No dictionaries", link to Aspell itself and it's dictionaries is also presented. If library wasn't found status will indicate it:
Further we will describe settings for Hunspell and then move on to settings for both libraries
-
Path setting is pretty straightforward, you can just choose the directory which is or will be used as storage for Hunspell dictionary files.
-
Combo box with settings For All Users and For Current User - there are actually 2 paths stored in DSpellCheck which switched by this combo box - the first one should be used as the one for all users and the second one as for the only current user (possibly with easy access and stuff like that). You have to remember that even if you can download dictionaries to the path For All Users user dictionaries will still be placed in the path For Current User anyway.
-
Reset to Default - simply resets the path to the one being considered as default one. Defaults depend on previous combo box selection though, for the current user default will be %NPP_PLUGIN_CONFIG_DIR%\Hunspell, which is probably something like %appdata%\Notepad++\plugins\config\Hunspell and for all users default is ".\plugins\config\Hunspell" which is directory inside Notepad++ directory. For the package they are the same but don't worry then you can consider all dictionaries available for all users.
-
Download Dictionaries calls dialog with the same name as in Change Current Language menu
-
Remove Dictionaries calls dialog with the same name as in Change Current Language menu
These dialogs will be described further
-
Decode Lang. Names - option to translate Language Names in Hunspell to more user friendly format (i.e. "en_GB" to "English (Great Britain)") or not. It's turned on by default, you can always turn it off if you don't like it.
-
Unified User Dictionary - determines will every word, added to user dictionary, be stored in one unified user dictionary or different one for each language will be used. By default it turned off, even though the plugin behavior in older versions was to store everything in one file. But both types of dictionaries will be loaded anyway, so don't worry, these setting would affect only newly added words.
Next there are options valid for both libraries:
-
Language - it's language you want to use spell-checker with, it's almost no different from the one in Change Current Language, the only difference though is that each time you select Multiple Languages... item, the dialog for choosing which languages will be used in this mode will appeer. (the same as pressing Set Multiple Languages... in Change Current Language).
-
Max number of suggestions - determines how much space of your context menu you would like to permit to be filled with suggestions, a lot of time though number of suggestions will be less than this option allows so all of them will be shown.
-
File types - You can use spell-checker only for some specific file types (for this option you should check Check Only Those) or ignore some of the specific file types (in that case you should check Check Only NOT Those). You could describe files you want to ignore or check only using standard wild card syntax and file name (i.e. abcd.txt) will be matched with it, for common example you could ignore ".gitignore" file because there is totally no sense in checking it, on the opposite you could check only ".txt;.html;*.tex" files, this choice is up to you.
-
Check only comments and strings - very important feature but there is not much of a reason to turn it off, since all it does - it just makes spell-checker search mistakes only if text is written in string, comment or simple text (based on syntax highlighting) so it skips all the keywords. And because all of these good stuff comes of course from syntax highlighting to use it you shouldn't turn it off. The bad stuff is that it doesn't for now work with User-Defined Languages (this will hopefully be fixed in the future releases)
-
Suggestion Control combo box - for suggestions you can choose either using special button appearing under underlined words (which I introduced in the beginning) or put suggestions and other items into Notepad++ standard context menu. Actually Notepad++ menu isn't that big (like for example in Microsoft Visual Studio) so the second choice is pretty much reasonable.
-
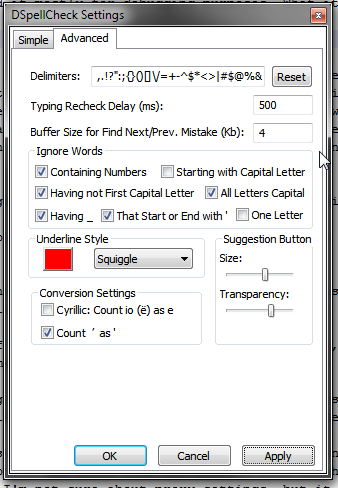
Delimiters - just the list of symbols which will be used by spell-checker to separate words. Possibly you may want to remove or add some specific ones for your singular case. You should remember though that standard whitespace symbols like space, tab, carriage return and new line will be always considered as word delimiters to make things easier for spell-checker. The other thing - for adding Unicode symbols you can either copy them directly or use standard \uXXXX escape combination where XXXX is Unicode hexadecimal code of the symbol.
-
Typing Recheck Delay - determines how fast the text will be rechecked after you change something in it, either by inputting or removing something, pressing Ctrl + z and so on. This settings just controls that word would not be underlined while you are still typing, so you may tune it to make it comfortable for your typing speed.
-
Buffer Size for Find Next/Prev. Mistake (Kb) - this setting that does not matter very much, I added it mostly for debugging purposes. What it's doing is changing the size of how much memory will be used in process of searching for next mistake in document. It surely will change the size of time lag if you will tune it, but it's hard to achieve something seriously better with changing it.
-
Ignore Words settings - Actually the default options chosen here are pretty good, but you may wish still do some tuning for special cases and stuff:
-
Containing Numbers - if word contain any digits and this option is checked the word will not be underlined
-
Starting with Capital Letter - if word starts from capital letter and this option is turned on it will not be underlined, but remember that it also affects the beginning of sentences, so be careful with this one, sometimes it's more reasonable to add all personal, geographical names and stuff like that which start with capital letter to user dictionary.
-
Having Not First Capital Letter - if the word contains capital letter anywhere except the beginning and this option is turned on it would be ignored. It's very useful for standard variable names which sometimes can be found in program comments, something like LengthOfAllRoads for example.
-
All Letters Capital - you may want to not ignore words in previous case but ignore words which have all letters capital, like some abbreviations or some stuff like that.
-
Having _ - this setting is to ignore words having underline (low line) sign in them, the words like this are actually used often in names of variables or functions too (i.e. length_of_all_roads) so it has a sense to ignore such words too.
-
That Start or End with ' - this setting was mostly added because Aspell handle words like this really bad, it just does nothing when you try to add them to dictionary, but anyway most of Hunspell dictionaries don't contain words like this too so most likely you'll have to add them manually.
-
One Letter - all one letter words counted as spelled right. Could be very useful if you're checking text that contains %d, %s and stuff like that, especially if your language is different from English.
-
-
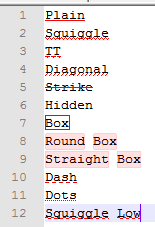
Underline Style - here you can choose color and style in which your misspellings will be underline, all of it is taken directly from scintilla abilities, so there's not much to be proud of. Here how all underline styles look like (not all of them could be described actually):
-
Suggestions Button Options - here you can choose special button (described earlies) size and transparency depending on your resolution and annoyance it gave you (you can make it almost invisible, that's a great power!), not that it matters very much, but you may still like to use it.
-
Conversion Settings - There are just 2 options:
-
The first one is for Cyrillic and probably only for Russian language, shortly, there is common problem with so-called "yo" letter which is written as e in a lot of cases, so for that reason some dictionaries don't contain it, but it was always bothering me why if people writing words correctly (with using yo) they still should get their word underlined as a mistake, so I added this option, so people who prefer to write and not to write yo may both use "yoless" dictionaries and feel fine.
-
The second option is better to stay checked as default, it converts typographic apostrophe (If I remember name correctly) to normal one, there are a lot of Unicode texts where this apostrophe used instead of normal one, but since dictionaries don't bother much about it (some of them actually have encoding without that symbol) so it's better just to convert it to normal one and live happy.
-

That's easiest dialog I've seen in my life, there's warning on top which you can read and ignore mostly (actually I described it at the beginning), list of languages with check boxes (you can press on the language name also) and standard buttons OK and Cancel with obvious functions, so there is nothing hard about it, you just can select multiple languages you'd like to use (considering drawbacks it can give to you).
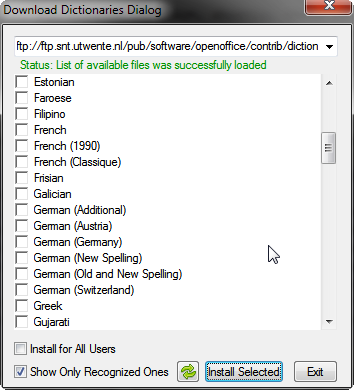
That's a little bit more complicated dialog. On top you can see name of server with directory pointing to some OpenOffice mirror (I added 3 predefined mirrors, hope they will not sue me for that :) ), anyway - you can choose which one to use it based on your download speed from them (possibly results are different for different parts of the world). Also you can input your own server names from which 3 last will be saved and added to this combo box for as long as you need them (Just remember that you have to write full ftp address pointing to the directory where zipped dictionaries are). Anyway if address was resolved successfully and path was pointing to ftp server with anonymous access (I'm not very sure about proxy settings, but it should actually use settings from your Internet Explorer, so you will set it there you'll hopefully be fine), also if path was pointing to directory full of zipped files some which were recognized as Hunspell dictionaries by the name, they will be feed into list box with check boxes after some time taken by doing a request. Check box Show Only Recognized Ones makes visible only languages that can be resolved to user friendly name (even if Decode Lang. Names is turned off). Check box Install For All Users just makes dictionary installed to For All Users dictionary directory. OK after all of that stuff your actions are pretty easy you just have to select some languages by checking them and then press install selected, most likely progress bar will appear, where you can cancel all that stuff or wait silently 'till download will be finished, then the message will appear about which dictionaries were successfully installed (remember you should have access to dictionary directory). Everything should work fine, the only thing you should probably remember for advanced usage is that the only stuff this simple downloader does with .zip file is - it searches for matching by name .aff and .dic files in it's root dir and then extracts them and copies to your dictionary directory. All operations are being done in temp directory and all the intermediary stuff will be erased if no error has happened. OK that's it, mostly the only thing you should know is that basic usage is very simple and gives you ability to download a lot of dictionaries.
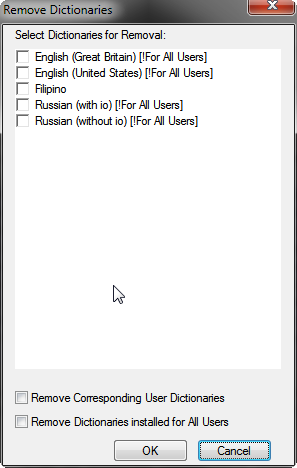
Almost as simple as choosing multiple dictionaries, just choose dictionaries with check boxes and they will hopefully be removed. Check box Remove Corresponding User Dictionaries remove user dictionaries corresponding to actual dictionaries, by default it's turned off, 'cause you will most likely prefer to save them for future usage. Without clicking on check box Remove Dictionaries installed for All Users dictionaries which have [!For All Users!] in their title will not be removed but will be silently ignored, this is done so you would not accidentally spoil the dictionary, someone else have some use for. I added the ability to remove dictionaries, so user wouldn't bother to check dictionary directory (or even 2 directories) manually at all.
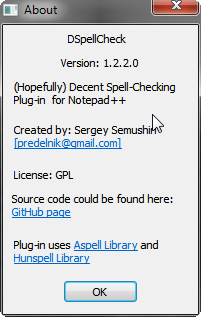
There is not much to tell about this dialog, it is simple basic about dialog telling standard info about DSpellCheck.
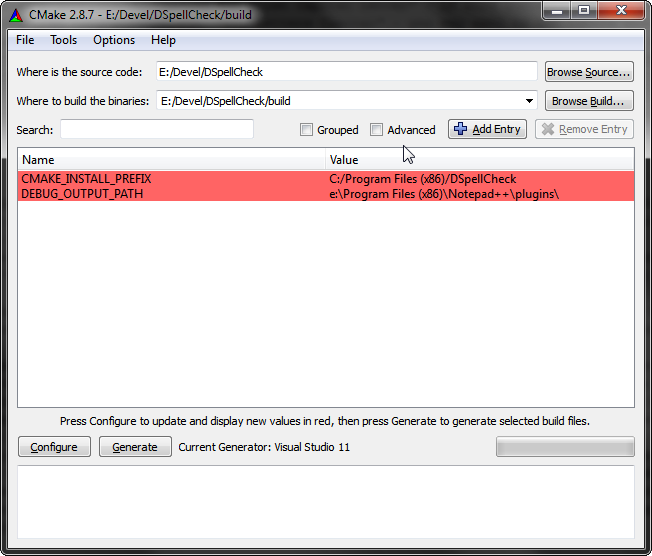
Thankfully nowadays building DSpellCheck is easiest thing ever, all you need to do is download CMake, have some version Visual Studio (2017+, sorry if it's not really easy to get the newest version for you but I intentionally decided to support only the latest one to get the full extent of new features and bugfixes), possibly version for MinGW could be used after a little bit of fixing, but I guess no one needs it anyway. OK after all of that, you just need to clone repository to some folder, create directory with starting from bld, build or bin inside it, then you just need to run cmake-gui and select "path-to-repository\name-of-created-directory" as binary path and "path-to-repository" as source directory then press configure and make. Most likely solution DSpellCheck.sln and project files for several projects statically linked into it will be created, after all of that you just need to compile it, build it and you ready to go, dlls for debug and release versions will appear in your binary directory inside Debug and Release folders respectfully.
Sometimes you perhaps are gonna get message like "Inconsistent values for /Ym between creation and use of precompiled header" that's because of cmake precompiled header module, the only way to fix this for now is to rebuild DSpellCheck project.
There is also a way for easy debugging with Notepad++ - All you need is choose DEBUG_OUT_PATH variable in cmake-gui to your Notepad++ plugin folder, like this:
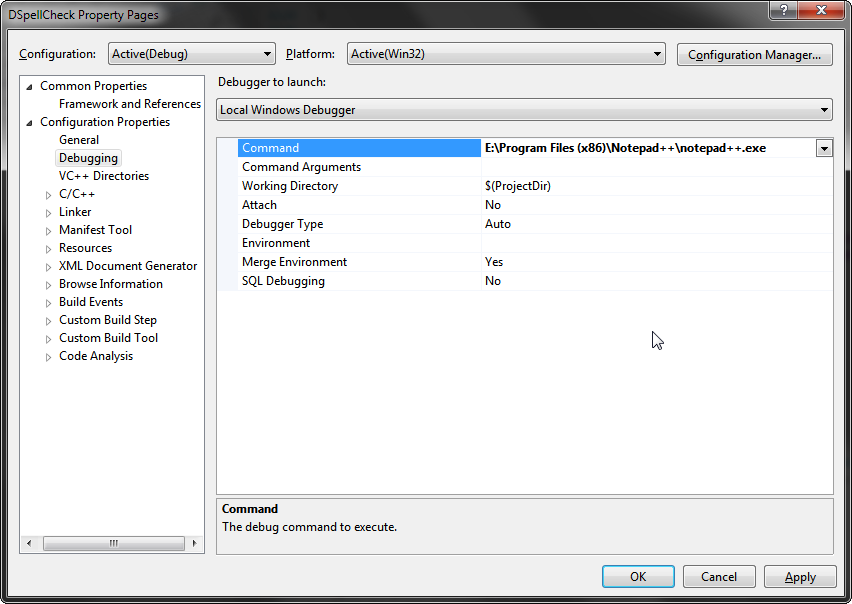
And then in Visual Studio, right-click on ALL_BUILD go to something like Debugging->Command and choose a path to your Notepad++ executable file:
Thanks to everyone who supported or inspired me on doing this project, more specifically:
- Karim Sharif for writing SquigglySpellCheck which served me as inspiration, which allowed me to make a start
- Noah Richards for his spell checker for Visual Studio and blog posts about it.
- Jens Lorenz for creating original Notepad++ spell checker, I took some bits of code from there too
- Neil Hodgson and others for creating Scintilla and adding possibilities for amazing word indication
- David MacDermot for writing simple window class to make a list box with check boxes using winapi
- László Németh for making Hunspell
- Kevin Atkinson for making Aspell
- Authors of commonly used libs such as libiconv, zlib, minizip.
- Don Ho and rest of the Notepad++ team for making Notepad++
- And of course all the people who gave me C++ knowledge and supported me...