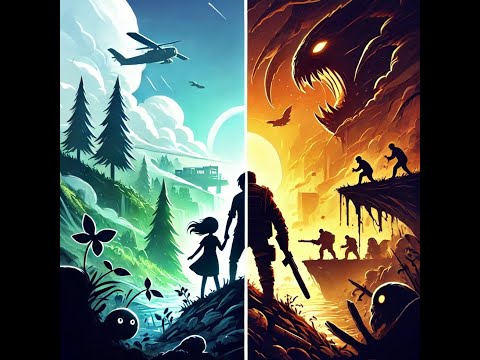
Shadowlands: The Rescue to shooter z elementami fabularnymi osadzonymi w otwartym świecie. Gracz pojawia się na mapie, podziwiając widoki i grafikę przyrody. Podczas eksploracji zauważa dziewczynę i jej ojca spacerujących. Kiedy dziewczyna gubi się w jaskini, gracz rusza, by odkryć, co się stało. Jednakże, wkraczając do jaskini, świat zmienia się z jasnych kolorów na ciemne, wskazując na zło. Gracz zdaje sobie sprawę, że musi uratować dziewczynkę z tego złego świata. Ojciec dziewczyny będzie udzielał mu wskazówek, a broń będzie dostępna w skrzynkach. Podczas podróży gracz będzie walczył z różnymi potworami, zbierając monety i ulepszając broń. Na końcu, musi zmierzyć się z bossem, który porwał dziewczynkę.
Shadowlands: The Rescue is a shooter with narrative elements set in an open world. The player appears on the map, admiring the views and natural graphics. While exploring, they notice a girl and her father taking a walk. When the girl gets lost in a cave, the player sets out to discover what happened. However, upon entering the cave, the world changes from bright colors to dark, indicating evil. The player realizes they must rescue the girl from this wicked world. The girl's father will provide hints, and weapons will be available in crates. During the journey, the player will battle various monsters, collect coins, and upgrade weapons. In the end, they must face the boss who kidnapped the girl.
-
StarterAssets - FirstPerson is used for the player controls and camera.
-
Modern Weapons Pack some of weapons models and textures.
-
Shadowlands: The Rescue API used for players authentication
-
Json & MessagePack Serialization for json array serialization (built in library does not provide that)
-
Item & Inventory System by Devion Games used for inventory system, items, shop etc.
Diana Meleshchenkova - Product Owner:
Hubert Zienda - Developer:
Kamil Szot - Developer:
Piotr Grzegorzek - Code KING:
Player cameras are located into Player preflab. There are two cameras. One for only weapon generation - WeaponCamera, second one for rest of layers - PlayerCamera.
It is important to add new layers into PlayerCamera, otherwise you won't be able to see the new layers. You can do this easly by: Open Player preflab -> open PlayerBody -> click on PlayerCamera -> in inspector find "Camera" component -> find rendering -> click on Culling Mask and add your new layers.
API api = new API("http://your-api-url.com");Methods belonging to this class are asynchronous, therefore calling method should be async too
async void MyMethod()
{
    //...
}
In methods belonging to this class, if the response status code indicates failure, it throws an APIException with the error message from the response.
await api.Register("username", "password");This method takes a username and password, creates a User object for JSON serialization, and sends a POST request to the "auth/login" endpoint.
IEnumerable<string> cookies = await api.Login("username", "password");This method takes a username and password, creates a User object for JSON serialization, and sends a POST request to the "auth/login" endpoint. It returns an IEnumerable representing the Set-Cookie headers from the response.
await api.Authenticate(cookies);This method takes an IEnumerable representing the Set-Cookie headers from a previous login response and sends a GET request to the "auth/authenticate" endpoint.
Press f to interact with objects
Press c to open crafting panel
Press i to open inventory
All menus closes on clicking x icon, or when you open pause menu (esc), inventory can be closed by pressing i again, crafting closes when you move, vendor and lootbox closes when you are out of range
Items can be unstacked by holding shift and clicking on item.
Make sure to use tag Item container for game object holding item container script (used for closing them when pause menu is opened).
-
In Unity's top menu, navigate to Tools -> Devion Games -> Inventory System -> Editor.
-
In the Items tab, ensure that the chosen database on the left is "ShooterItemDatabase".
-
Press the '+' sign near All to add a usable item.
-
Provide the new item with a Name, Icon (64x64px), and Model.
-
Press 'setup' to create a prefab for the item.
-
Add a Description for the item, set the Stackability options for the item.
-
Define the Actions that occur when the item is used (press 'add action').
-
If the item is a single-use item, ensure to add a built-in 'remove item' action (and in item option choose item type).
If collectible item falls of map try to increase model size or change to other type of collider.
-
Select the prefab of the item and add mesh to mesh collider (or replace it with sphere/box collider).
-
in Trigger script set user distance and remove left click from trigger type.
-
Choose ItemPickup Action Template
Dont set can buy back - its bugged
-
In Unity's top menu, navigate to Tools -> Devion Games -> Inventory System -> Editor.
-
In the Item Group tab choose Vendor group and add item to this group(if you want it in default vendor automatically).
-
In the Items tab, ensure that your item has checked "Is Sellable" option and set the price.
-
In Unity's top menu, navigate to Tools -> Devion Games -> Inventory System -> Editor.
-
In the Item Group tab set is craftable to true
-
Crafting duration means how long it takes to craft item, ingredients are items needed to craft item.
-
In InventorySystem/ActionTemplates folder, press right click -> Create -> Devion Games -> Triggers -> Action Template.
-
Make sure WindowName property is set to ItemContainer Name property (Inventory game object).
Item container script from inventory and similiar prefabs provides callbacks (events executed on specific cases). In our case we utilize OnInventoryShow and OnInventoryHide events to prevent player from moving camera and shooting when inventory is open.
ItemContainerCallbacks.cs
internal event Action<int> OnItemContainerCountChanged;
private int _itemContainerCount = 0;

public void OnItemContainerShow()
{
    _itemContainerCount++;
    OnItemContainerCountChanged?.Invoke(_itemContainerCount);
}

public void OnItemContainerHide()
{
    if (_itemContainerCount > 0)
    {
        _itemContainerCount--;
    }
    OnItemContainerCountChanged?.Invoke(_itemContainerCount);
}
We utilize observer design pattern to notify other classes about Item container reference count change. When callback is invoked, we call event passing item container count. Then classes handling this event can react accordingly.
Here we prevent player from shooting when any item container is open.
Shooting.cs
[SerializeField] ItemContainerCallbacks _itemContainerCallbacks;
private int _itemContainerCount;

private void Start()
{
    _itemContainerCallbacks.OnItemContainerCountChanged += UpdateItemContainerCount;
}

private void UpdateItemContainerCount(int itemContainerCount)
{
    _itemContainerCount = itemContainerCount;
}

private void OnLeftClick(InputAction.CallbackContext context)
{
    if (_itemContainerCount == 0)
    {
        // Can shoot
    }
}
Here we prevent player from moving camera when any inventory is open by saving and restoring rotation speed.
First Person Controller.cs
[SerializeField] ItemContainerCallbacks _itemContainerCallbacks;
private float _savedRotationSpeed;

private void Start()
{
    _itemContainerCallbacks.OnItemContainerCountChanged += UpdateItemContainerCount;
}

private void UpdateItemContainerCount(int itemContainerCount)
{
    if (itemContainerCount == 1 && _savedRotationSpeed == 0)
    {
        _savedRotationSpeed = RotationSpeed;
        RotationSpeed = 0;
    }
    else if (itemContainerCount == 0)
    {
        RotationSpeed = _savedRotationSpeed;
        _savedRotationSpeed = 0;
    }
}-
Download obj/fbx with textures
-
Save model in Assets/Models, textures in Assets/Materials
-
Create new material and set texture to it (Base color, Roughness, Normal map)
-
Set material in model