Home
Original AltDrag Documentation: https://stefansundin.github.io/altdrag/doc/
Download the latest build here: https://github.com/RamonUnch/AltSnap/releases
Use the Chocolatey package: https://chocolatey.org/packages/altsnap
After installing Chocolatey use the command prompt and write as follows:
choco install altsnap
choco upgrade altsnap
choco uninstall altsnap
If you want to install/upgrade or uninstall AltSnap.
The chocolatey package is maintained by myself and will in sync with the GitHub release (may be a couple days delay). Other packages are maintained by other people, so I am not responsible for issues relating to those packages. Always double check the source you are using to be sure of what you get. The other packages might not be up to date.
You can use winget (package maintained by crramirez):
winget install altsnap
winget upgrade altsnap
winget uninstall altsnap
If you want to install/upgrade or uninstall AltSnap.
You can also use the Scoop package that is part of the extra bucket
scoop bucket add extras
scoop install extras/altsnap
To install AltSnap
If you want to use the portable version, then download the AltSnapX.XXbin(_x64).zip on the release page and extract the zip in the directory of your choice. If you want to Update AltSnap without loosing the config, then you should not over wright your AltSnap.ini file with the version that is in the zip file (Issue #176).
When you first start AltSnap, you will be able to move and resize windows like on Linux, using Alt+left-click to move and Alt+right-click to resize a window. Resizing direction is chosen according to the closest side/corner that you clicked in the window:

This is far easier than clicking very precisely in the title bar for moving or on the windows sides or corners to resize. This is a huge advantage of Linux that is now ported to the Windows OS.
AltSnap Shows a small icon in the notification area (tray), I suggest you configure your notification area to always show it. A single left-click on this tray icon will disable or re-enable AltSnap. When AltSnap is disabled it will no more interfere with the system, this is advised before launching a video game for example.
Note that those tricks are mostly the same as for the Original AltDrag
- AltSnap will not bring windows to the front by default. Press Ctrl to bring the window to front, or configure AltSnap to do that automatically.
- AltSnap will mimic Aero Snap by default, so try dragging windows to the edges of your monitor. Corners work too!
- If you use multiple monitors, you can hold Ctrl while dragging to trap the window within the current monitor. This is particularly useful if you want to Aero Snap at edges between monitors.
- While dragging, windows borders will snap to each-other like magnets. This behavior can be changed in the config. If you disable it you can still press Shift while dragging to force windows borders to snap to each other.
- If you have automatic snapping enabled, you can temporarily disable it by pressing the space bar while dragging, pressing space again will re-enable it.
- If you are moving a window you can press the right mouse button to toggle the maximized state. Also the Resize6Move combo will snap the window in the corresponding side/corner.
- If you use the scroll wheel to change the volume, you can hold shift to increase the rate the volume is changed. If you use the scroll wheel to change the transparency, you can hold shift to decrease the rate the transparency is changed.
- If you have Scroll inactive windows enabled (Windows 8 and below), you can hold the Shift key to scroll horizontally. Note that this requires that the program has support for normal horizontal mouse wheel scrolling, which not all programs have.
- If you can't move a particular window, try elevating AltSnap. Normal programs can't interact with programs that are started with administrator privileges.
- If you need to Alt+Click on a program and do not want to blacklist the program, you can use the Winkey instead of Alt. If this is not enough or if you do not want to use the Winkey, you can hit Ctrl and release it while keeping Alt pressed and then click.
- Alt+Long Click, will forward the alt+click to the pointed window, you can setup AltSnap so that it never block alt+click but you will no longer be able to use double-click actions.
- A key combo can be used in order to activate AltSnap, this allows using Alt+Winkey+Click to drag windows and leaves alone the Win+Click and the Alt+Click that some programs may require.
- Try to add the Shift modifier key for any action, usually it has an effect.
- FancyZones integration has been added look at the options fore more details.
By default when lunching AltSnap, an icon will be displayed in the tray.
- Icon can be left-clicked to enable/disable AltSnap.
- Icon can be right-clicked to display a menu.
- Icon can be middle-clicked to open the AltSnap.ini file (Advanced users only).
- In the tray menu, the topmost option is to Enable/Disable AltSnap.
- You can also hide the tray. If you want the tray back, lunch AltSnapagain.
- You can also Elevate AltSnapto administrator privilege until next restart.
- You can select the Configure or About option and a dialog box with several tabs will open. See next section for more details.
- Finally you can Exit AltSnap.
- The first thing you may want to modify in this section is the Language. If you think that a translation needs improvement or if you want to make a new translation have a look at Issue #32.
- If you want windows to be automatically focused when you drag them (like when you drag them via the title bar), then you probably want to check the first option Focus Windows when dragging, this way you will not need to press Ctrl.
- If you do not want windows to automatically snap to fill a fraction of the monitor when you drag it towards the edges, then disable the Mimic Aero Snap option. The threshold from the monitor edge at which snapping occurs can be changed in the Advanced tab.
- The Smart Aero Snap dimensions option will set the dimension of the snapped window to the other resized snapped windows. This also implies that a snapped then resized window will still be restored to its pre-snapped size when restored.
- The Smarter Aero Snap dimensions option will make diemntions even smarter by considering any window that is arranged on monitor side/corners, even if they are not technically in the snapped state. Its effects only applies when the Smart Aero Snap dimensions is enabled.
- The Resize other snapped windows with Shift option will resize all windows that are stuck to the current window to stay stuck when you press the Shift key.
- For Windows 8 and below only you can check the Scroll inactive windows option. It is useless on Windows 10 because it is built in by default in the OS.
- You can enable/disable the support of Multiple Document Interfaces (MDI) using the MDI support option see Issue #47 for more details.
- By default AltSnap does resize all the windows. If you want AltSnap to resize only windows that are designed to, you can uncheck this option. If there is a specific list of windows that you want AltSnap to still resize with this option disabled, then have a look at the
AResizelist in the[Blacklist]section of the ini file. - The Snap to Layout with Shift option can be used to manage custom windows layout, similar to FancyZones. See Snap Layout Configuration for more details.
- By default AltSnap blocks the Alt+Click, because the window is moved. If you want to be able to Alt+Click in a window you can enable the Avoid blocking Alt+Click option. Note that it will disable any double-click actions of AltSnap, also if you perform a long click the Alt+Click will always be forwarded, even with this option disabled.
- The Snap windows edges drop-list option serves to select how windows borders will snap to screen borders and possibly outside of windows or finally even inside windows. The option can be disabled and all edge-to-edge snapping can be enabled by holding Shift for the movement. The threshold in pixels for which snapping should occur can be set in the Advanced tab.
- By default when you resize a window from the central region, the windows resizes in all directions. This can be changed to the bottom-right mode or into a Move window and AltSnap will move the windows instead of resizing it, or finally to the Closest side mode and AltSnap will cut the central region with two diagonals and use the closest side mode to resize the window.

- You can finally ask AltSnap to automatically start at logon. Checking the option will add AltSnap to
HKCU\SOFTWARE\Microsoft\Windows\CurrentVersion\Run, If you want you can check Hide tray and/or Elevate to administrator privilege. In this case you will be prompted by the User Account Control (UAC) if you have not disabled it. See Setup autostart section for more options.
Since AltSnap version 1.47 a zone/snap layout can be configured, similarly to the Microsoft Powertoys.FancyZones tool. for this you have to enable the Snap to Layout with Shift (configure with tray menu) option in the General section of the config dialog.
At this point, you can open several Test Windows from the tray menu, arrange those windows as you please. Note that once you have opened one test window, you can open others with the Ctrl+N shortcut. An example is presented below:

Once the windows are in the place you want, hit the Save test windows as snap layout menu entry from the tray. It will ask you for confirmation, hit OK, then all the test windows should close and you can start snapping to the new Snap Layout using the Shift key. In order to extend a window on several zones, add the Ctrl key and drag on the zones you want the window to be extended to (like with FancyZones). You can also point the cursor at a junction between two or more zones and the window will be extended to all the zones that are within the InterZone value that con be configured in the [Zones] section of the .ini file.
Advice: for the best FancyZones integration, once you setup your zones under FancyZones, recreate it with the test windows (using FancyZones), then save them to AltSnap, Once you have done that be sure to check the Restor FancyZones snapped windows option in the Advanced tab of the config.
More advanced configuration can be done via the ini file directly in the [Zones] section:
[Zones]
UseZones=1
; If set to 1, enables Snap Layouts (Zones)
; If set to 3, enables Grid mode (configure below)
; If 4 is added window is extended without Ctrl.
; If 8 is added snapping will occur without Shift ie: 1+8 => UseZones=9.
; Shift will disable Zones instead.
; recomended is UseZones=1 or 9 for normal snap Layout with or w/o shift
; and 3+4 => UseZones=7 for grid mode.

ZSnapMode=0
; Zone snapping strategy
; Set to 0 to snap to the zones pointed by the cursor (default).
; Set to 1 to snap to the zone which center is the nearest from the cursor
; There is always a the InterZone tolerance to snap to several zones.

InterZone=32
; Size in pixels between zones from -128 to +127 (default 32)
; where the window will be snapped to the union of zones.
; If set to 0, you cannot cover more than one zone.

MaxLayouts=4
; Maximum number of layouts that you can switch btween
; Set to 0 or 1 if you want a single layout, 10 max.
LayoutNumber=0
; Currently selected layout (from 0 to MaxLayouts-1)
Since AltSnap 1.49, the zones can be setup in a simple grid mode, for this you need to directly edit the .ini file:
In the [Zones] section:

UseZones=0
; If set to 1, enables Snap Layouts (Zones)
; If set to 3, enables Grid mode (configure below)
; If 4 is added window is extended without Ctrl.
; recomended is UseZones=1 for normal "Custom Snap Layout" mode
; and 3+4 => UseZones=7 for "Grid" mode.

; If you set UseZones to 3 or 7 then you enabled the
; GRID MODE that simply cuts each screen into 'parts'.
; You can set the number of parts below:
GridNx=3
; Number of grid columns
GridNy=2
; Number of grid lines
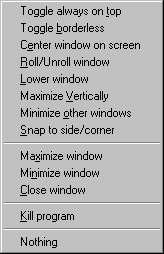
As seen below you can select the action for each mouse button in a drop list. Only 5 buttons are supported because of a limitation of the Window API. For each button an action can be chosen among the following list:
- Move Window: default for the left click. If you double-click it will Maximize/restore the pointed window, If you add shift while double-clicking, it will roll/unroll the window, and if you add Ctrl, it will minimize the window.
- Resize Window: default for the right click. If you double-click it will Aero-Snap the windows on the current monitor depending on where you double-clicked on the window. If you add Shift for the double-click it will extend the double-clicked side/border to the nearest monitor side. If you double-click in the center fraction with Ctrl modifier it will maximize/restore the window.
- Close Window: behaves like clicking on the close button of the window, if you add
- Kill Program: directly kills the program, use with caution!!!
- Minimize window: behaves like clicking on the minimize button in the window.
- Maximize window: Maximize/restore the pointed window; if you press Shift it will minimize the window instead (default for middle click).
- Lower window: pushes the window to the back; if you press shift it will minimize the window instead.
- Roll/Unroll window: Roll/unroll the windows in its title bar.
- Toggle always on top: Forces a window to be always on top of others, click again to disable.
- Toggle borderless: Remove the windows borders and title bar. Use Shift if you want to only remove title bar and not the resizing borders.
- Center window on screen: Center the clicked window on the monitor in which the cursor is.
- Maximize Vertically: Maximize the window vertically in the current monitor without moving, use Shift to maximize horizontally.
-
Minimize other windows: Minimizes/Restore all the other windows like Aero shake or the
Win+Homeshortcut on Windows 7+. If you add shift it will only minimize windows on the current monitor. - Action menu: If you want to have all the above options available use this one: It will popup a menu with all previously listed options.
- Nothing

For the scroll wheel, an action can be selected too but the options are not all the same:
- Alt+Tab: will let you use the scroll wheel to switch focus between windows. It is similar to the Alt+Tab shortcut with the difference that it supports MDI windows and also ignores all the minimized windows.
- Volume: changes the global volume by sending multi-media keys (Window 2000 and later). Use Shift if you want to increase the rate at which the volume is changed.
- Transparency: Adjust the transparency of the pointed window with the wheel. Use shift to decrease the rate at which transparency changes. This action requires Windows 2000 or later and can be more finely configured by editing the ini file.
- Lower window: Lower the window on scroll down, pushes the window to the front with wheel Up, use shift to minimize/maximize.
- Roll/Unroll window: roll the window in its title bar with wheel up and unroll on wheel down.
- Maximize window: Wheel up will maximize the window, wheel down will restore a maximized window and minimize a normal window.
- Nothing
Then you can enable if AltSnap should treat the title bars with a separated action:
- Without hotkey, Then the action selected for the title bar will be performed without having to press the hotkey (Alt).
- With hotkey, Then the action selected for the title bar will be when you press the Hotkey+Click.
AltSnap allows can be activated with a mouse button. You can check the buttons you want to use, however be careful as the button will be reserved by AltSnap if it is checked. This is why I recommend using only extended buttons. Another notable feature is that if the button is also setup for an action, the action will then automatically performed upon its press. so if you set for example Mouse Button 4 to Move window and as an activator (Hotclick) then you simply will need to press the Mouse button 4 in order to move a window.
Finally you can check the Move windows with a long left-click option and if you perform a "long click" ie: hold left-click down without moving the mouse for more than the double click delay, then the window will be grabbed by AltSnap. This may come particularly handy if you have trouble combining the mouse and keyboard. Note that a normal click will always be generated, so if you long click a button it will click it as well! This is not intentional but there is no way around it from what I know. For this reason, only the left-click for the move action is supported.
is one of the most important parts of the configuration and especially the Hotkeys bottom section, which lets you choose with which keys AltSnap will be activated. Default is left and right Alt, but you can also select the left and/or right WinKey or Ctrl. Ctrl is not recommended though because Ctrl+click is a very common shortcut in windows.
By default AltSnap will activate if you press any of the selected Hotkeys, however you can Use a two keys combo to activate and in this case you will need to have two of the keys to be pressed at the same time for AltSnap to activate. in this section you can also chose a key that when pressed will activate an Alternate action that can be set in the Mouse tab and above. This can be used if you want to use a the same mouse button to move and resize a window by using a different key combo more details in the the I got only one buttonsection.

In the top Keyboard section you can select an Action without click: from the same list as the actions available for mouse buttons. this is useful especially for a touch-pad configuration, where you do not want to press a key and click at the same time. Of course it is more intrusive and not recommended for typical keyboard+Mouse config and also the key combo option is also recommended in this case.
Finally you have a few special options that enable keyboard only shortcuts.
- Pause process on Alt+Shift+Pause (Alt+Pause to resume), that can come handy for some special cases but relies on undocumented API available only in Windows XP and later. Use with caution.
- Kill Process on Ctrl+Alt+F4, that insta-kill the pointed program. Be careful with this option and only use it on programs that can not be closed or that take forever to terminate. Again use with caution. If you want more power you can have a look at the AHK script proposed by Yarrio69 (issue #134) Also described below.
-
Suspend/Resume AltSnap based on the Scroll lock state. Checking this option will ensure AltSnap is only enabled when ScrollLock is ON on your keyboard. This useful if you like to disable and re-enable AltSnap often. If you want AltSnap to be enabled when Scroll Lock is OFF instead, you can invert the behavior of this setting by manually editing the .ini file and setting
ScrollLockState=3in the[Input]section. -
Popup an extended character menu when holding an alphabetic key down option will replace the auto-repetition of key with the display of a menu that contains extra characters. Those laters can be any Unicode character, including the extended plane. By default it contains most variants of Latin characters, it can be configured in your translation file. An example is shown for a long press of the u key. Note that also Capital U will display the uppercase variant of the character.

Sometimes AltSnap action interacts with a window in an unintended manner. For example, if you use Alt+Click on a specific window and you do not want AltSnap to move the window you can add the window name to the windows blacklist. All the list are comma separated and take no spaces before the comma. A space can be present in the item itself or before the item.
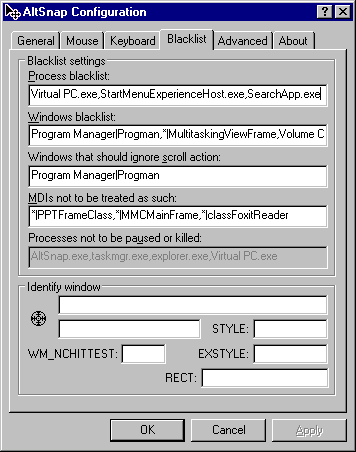
-
Process blacklist: List of programs names for which move/resize from
AltSnap as well as the scroll actions are disabled. Example:
Notepad.exe -
Windows blacklist: List of windows with the title|class format for which
move/resize actions from AltSnap will be disabled
Example:
Program Manager|Progman,|Shell_TrayWnd,*|Notepad -
Windows that should ignore the scroll action: List of windows with the
title|class format that for which the scroll action of AltSnap will not
apply. Example:
*|Photoshop -
MDIs not to be treated as such: List of windows for which AltSnap will not
try to find MDI subwindow. This only applies if the Support MDI is enabled
and by default contains
*|PPTFrameClass,*|MMCMainFramewhich correspond to the PowerPoint window and all the Microsoft Management application such as the services.msc windows or the device drivers window. - Process not to be paused or killed: Only applies for the Pause and kill action when enabled on Alt+Shift+Pause or Ctrl+Alt+F4. These are the program names.
As of version 1.58, the full format of a blacklist is: exename1.exe:title1|class1, exename2.exe:title2|class2, exename3.exe:title3|class3, ... There are also some more formats:
- You can specify the exe name only:
exename1.exe, exename2.exe, exename3.exein this case all the windows from those exe will be blacklisted. - You can specify the title|class only:
title1|class1, title2|class2, title3|class3in this case all the windows with thoseclass|titleformat will be blacklisted whichever the exename. - You can put a star
*character to match everything ie:exename1.exe:*|*is equivalent toexename1.exe*:title|classis equivalent totitle|class
Program names are pretty straightforward to find. However a finer control can be done using the window's title|class information; they can be found for a specific window using the small target in the identify window section of the Blacklist tab. You can include all the possible names by using the *|class format. This is useful for most programs that have a non-constant title, for example Notepad.exe's title is actually the name of the file you are currently editing.
The other way around can be used and you can specify title|* which means that all the windows that have this title regardless of their class name will be blacklisted. This is a much less common usage.
Another useful usage possible since version 1.58 is exename.exe:*|class which will blacklist windows that are of the specific class but only for the specified exename.
On any title|class formatted blacklist you can since version 1.44 use a partial name matching. However it is limited: you can use the format: *end of title|beginning of class* have a look at #64 for an example.
The title can also be empty for example: |Shell_TrayWnd corresponds to the Windows task bar and has an empty title.
A blacklist can be turned into a whitelist by setting ts first element to *|*. In this case The logic of the list is inverted.
Finally more blacklists can be found in the AltSnap.ini file:
-
Snaplist: List of windows with the
name|classformat to which other windows should always snap. By default windows that have no borders cannot be snapped to use*|*if you want to snap to all border-less windows. -
MMBLower: List of windows for which the title bar action should be ignored. Default:
*|CASCADIA_HOSTING_WINDOW_CLASS,*|SDL_appthat corresponds to the Windows Terminal window and all SDL based applications. -
SSizeMove: List of windows to which the WM_ENTERSIZEMOVE / WM_EXITSIZEMOVE messages will not be sent. This is useful for some buggy applications such as iTunes. Keep the default value (
*|iTunes), unless you know what you are doing. -
AResize: List of windows that AltSnap should always consider as resizable. Only applies when
ResizeAll=0. Default:*|SunAwtDialogfor MATLAB's help. To be used if you are not using the Resize All windows option and need to resize a specific window -
NCHittest: List of windows for which AltSnap should try directly to question the ancestor window for the Hit-Test, in order to know where the title bar is. Default is
*|ApplicationFrameWindow,*|SDL_app. You should not modify it unless you know what you are doing.
List of issues in which blacklist was a solution:
- Question about scroll action (Issue #25)
- Full screen application problems (Issue #32)
- Problem with Foxit PDF reader (fake MDI) (Issue #47)
- More scroll problems (Issue #48)
- Problems with Microsoft Windows Terminal (Issue #11)
- Blacklist: Partial Name Match (Issue #64)
- Firefox Picture in Picture (Issue #206)
- The titlebar on the window created by scrcpy isn't detected by altdrag Issue #241
The advanced tab is mostly reserved to very special settings but many of you will want to have a look in order to get the best out of AltSnap. You have a Metric section at the top and a Behavior section at the bottom.
To test metrics options, I advise to click on the Test Window button. it will display a window with the 9 resizing regions drawn.
- Center/Sides fraction (%): fraction of the Central region / sidesregion. default is 24% for both, in very old AltSnap versions it was 33%, You can set any value from 0 to 100. If you set 0 for both, then there will be no central region and just 4 "corner" quadrants. If you set 100 for the center fraction, you will have only the a central region. This can be combined with the Bottom-right center resize mode in order to resize in Bottom-right mode on all the window. Any combination of value can be used, see below for some examples.

- Areo offset (%) Horizontal: and Vertical: Both goes from 0-100% and adjust the position in fraction of the monitor at which the Aero-snapped windows will meet both horizontally and vertically (default is 50:50). For example if you set 66% for the horizontal offset then a window snapped to the left will occupy 66% of the monitor width and the 34% will be use for windows snapped to the right. same for top and bottom fraction using the Vertical option.
- Snap Threshold (pixels): lets you adjust the distance in pixels between the edges of two windows at which the moved windows will be snapped to the borders of the other or of the monitor. default value is 20 pixels.
- Aero Threshold (pixels): lets you adjust the distance in pixels between the cursor and the side of the monitor below which the window will be Aero-snapped to fill a fraction of the monitor. Default is 5 pixels. You may want to increase this value if you use multiple monitors and want to snap windows between the two monitors without pressing Ctrl or Shift.
- Max snapping speed (pixels): let you adjust the speed (in pixels moved every 32ms) beyond which a AltSnap will no longer try to perform any snapping. This is useful in a multiple monitor setup if you do not like to see windows snap/unsnap on their way when moved between monitors. The default value is 65535 which disables the speed calculation all-together. good values are in the 10-100 pixels/32ms range. Try with 64 then adjust by testing.
- Opacity when moving: Set this value between 0 and 255, to adjust the transparency of the window when moved or resized it. Lower values are more transparent. Use 0 or 255 to disable the option. If you like to have translucent windows while moving 176 is a good starting value, then adjust with your taste.

- Allow multiple instances of AltSnap: By default, only one instance of AltSnap can be launched in a session. In some cases you may want to have more than one instance of AltSnap in order to have more keyboard/mouse combo. In general it is not recommended because the memory of snapped windows is not shared between the two AltSnap instances.
- Automatically re-maximize windows when changing monitor: With this option checked, the dragged window will maximize to the new monitor if it was maximized when the dragging action started. If you use this option you can still press Shift or Ctrl before releasing the click to prevent auto-re-maximization.
- Maximize windows snapped at top: This option is enabled by default and concerns the aero-snapping behavior when you push a window to the top of the monitor, it will be maximized (like with Windows 7+). If this option is disabled, the window will fill the top half fraction of the monitor instead. You can always use the Shift key to exchange the two behaviors.
- Invert shift behavior for double-click aero snapping: By default when using the double-right-click, the window is aero-snapped to the corresponding monitor side/corner and if you press the Shift key, the windows borders will be extended instead. With this option you can invert the behavior of Shift.
- Toggle maximized state with right-click while moving: While moving a window you can press the Resize mouse button and the window maximized will be enabled/disabled. This is useful for multiple monitor setups in particular.
- Restore window with single click like original AltDrag: Older versions Of AltDrag would restore a snapped or a maximized window with a simple Alt+click. With the newer AltSnap this "bug" was fixed and the window is restored only if a drag occurs. If you prefer the old behavior you can enable it here.
- Enable on full screen windows: Older versions of AltSnap were completely disabled on full screen windows. However I found that it can be desirable to be able to move a full-screen window. Uncheck this option if you play many video games (that are full screen windows), and want AltSnap to not interact with them. A full-screen window is defined by it size matching exactly the monitor size and the absence of titlebar.
- Disable AltSnap on Maximized windows: If you check this option AltSnap will no longer interact with any maximized window. This may be a good idea if you find yourself never wanting to drag a maximized window, this is a way to resolve shortcuts interactions. Note that maximized and full screen window are not the same thing, even though they look similar.
- Restore FancyZones snapped windows: Check if you are using Microsoft Powertoy's FancyZones and you want AltSnap to be able to restore the FancyZones-snapped windows to their previous dimensions. Note that the 64 bit build of AltSnap is necessary for this.
- Never restore AltSnapped windows: If you check this option, AltSnap will no longer restore the old size of a window, when moving it. It will still restore windows that have been snapped by Windows via their title-bar.
By middle-clicking on the tray icon, you will see the AltSnap.ini file open in your default text editor. All options can be modified here and even more than with the GUI. Be careful when editing this file to keep track of what you modified so that you can restore the old settings. You can always download the latest commented AltSnap.ini file. It is recommended to comment out changes rather than deleting them, in case you need to refer to them in the future.
Several important settings can be edited only via the ini file to avoid accidental modification.
In the [input] section:
Killkeys=09 2E
; Keys that will disable AltSnap when pressed down!
; Space-separated hexadecimal values.
; All keys from A-Z always disable AltSnap, so do not add them here.
; Default is TAB: 09 (for DisplayFusion's Alt+Tab).
; 2E for the DEL key (for Ctrl+Alt+DEL).
Those kill keys are useful for a Alt+KEY that will focus an elevated window. This avoids the "Alt gets stuck" problem. Note that you can always pres ESC to reset AltSnap's state.
Another hidden setting in this section to lower windows with Alt+MMB on the title bar.
In the [Input] section:
LowerWithMMB=0
; Lower windows by middle clicking on the title bar, without pressing Alt.
; Set to 1 to lower without Alt, 2 to lower with Alt+MMB 3, for both.
When you use the Scroll inactive windows option (available for Win 8.x and below) then you can transform your scroll into an horizontal scroll using the Shift key. This key can be changed. You can set an empty value to disable the horizontal scroll modification all together.
In the [Input] section:

HScrollKey=10
; Key used to transform a vertical scroll in Horizontal scroll
; Applies only when the InactiveScroll option is used
; Default value is 10 ie VK_SHIFT.
If you want to suspend/resume AltSnap based on the scroll lock state, then you can do so via the Keyboard tab of the config. However by default AltSnap will be enabled when scroll lock is ON and disabled when OFF. If you want to invert the behaviour, just set manually the following option to 3.
In the [Input] section:

ScrollLockState=0
; If set to 1, enables AltSnap only if Scroll lock is on.
; Set to 3 if you want AltSnap to be disabled when scroll lock is ON
Inf you want to change the color of the hollow rectangle use the following variable:
In the [Input] section:

FrameColor=80 00 80
; Space separated hexadecimal Color in RR GG BB of the hollow rectangle that is
; used when you disabled the FullWin option/Show window content while dragging
; eg: 00 00 00 for black, FF 00 00 for red, 80 00 80 dark violet...
As stated in the Blacklist section you have also the following extra blacklists in the ini file:
In the [Blacklist] section

Snaplist=*|BaseWindow_RootWnd,*|SkinWnd,*|ChatSkinWnd,*|SpotifyMainWindow,*|USurface_33202,Winamp Playlist Editor|Winamp PE,*|M4W_MainWindow
; List of Windows on that should be snapped to, even though they have no caption.

MMBLower=*|CASCADIA_HOSTING_WINDOW_CLASS,*|SDL_app,*|MozillaDialogClass
; List of windows for which the Titlebar action should not be performed.
; default is MS-WindowTerminal and all SDL programs.

AResize=*|SunAwtDialog
; List of windows that AltSnap should consider as always resizeable
; Only applies when ResizeAll=0
; eg: *|SunAwtDialog for MATLAB's help.

SSizeMove=*|iTunes
; List of windows to which the WM_ENTERSIZEMOVE / WM_EXITSIZEMOVE messages will NOT
; be sent. Keep the default value unless you know what you are doing.

NCHittest=*|ApplicationFrameWindow
; List of windows for which AltSnap should try directly to question the
; ancestor window for the Hittest, in order to know where the title bar is.

Bottommost=*|RainmeterMeterWindow
; List of windows that should be kept below other Windows that are lowered
; by AltSnap. Default is *|RainmeterMeterWindow for Rainmaker skin windows.
Be careful when editing those blacklists to respect the syntax, and to test that the intended effect is obtained.
If you do not like to see the cursor changing when you move/resize a window, you can play with the following value:
In the [Advanced] section

UseCursor=1
; Use 0 to disable any cursor handling (not recommended).
; Use 1 to have all cursors set (default)
; Use 2 in order to disable the Hand cursor when moving
; Use 3 to always use the normal cursor, even when resizing.
; Use 4 to use the ResizeAll cursor for movement instead of the Hand.
If you want to customize the Transparency option, use the following variables:
In the [Advanced] section

MinAlpha=8
; Minimum alpha for the transparency action, from 1-255 (default 8).
AlphaDelta=64
AlphaDeltaShift=8
; Alpha step for the transparency action, from -128 to +127 (default 64).
; The other value is applied when Shift is pressed (default 8).

SnapGap=0
; Gap in pixels from -128 to +127 between snapped windows and monitors sides.
; Use negative values if you want an overlap, default is 0
; I suggest -1 under Win10.
Use negative values for the AlphaDelta* in order to invert the wheel behavior.
You can also modify the duration that is used for the Max snapping speed:
In the [Advanced] section

AeroSpeedTau=64
; AeroSpeedTau to specifies Tau time in milliseconds (default 64).
; Ahat is used for the max snapping speed calculus.
In the [Advanced] section

BLCapButtons=3
; Mouse Buttons for which the caption buttons and the top resizing
; border will not be considered by AltSnap for the Titlebar action.
; Use 0 to include all mouse buttons.
; Use 1 to exclude the left mouse button only.
; Use 3 (1+2) to exclude the left and right mouse buttons (default).
; Use -1 to exclude all mouse buttons and wheel.
; You can specify any value in decimal converted from a bit mask in the order
; of mouse buttons ie: LMB RMB MMB MB4 MB5...MB20 VWHEEL HWHEEL.
; use BLCapButtons=0 if you always want titlebar actions to be applied
; when clicking caption buttons and use -1 if you never want this.
; For a custom value add the numbers corresponding to each mouse button:
; LMB: 1, RMB: 2, MMB: 4, MB4: 8 MB5: 16 MBX: 2^(X-2)
; VWheel: 1048576, HWheel: 2097152 (buttons 21 and 22)
Finally you have the Performances section
in the [Performance] section

RefreshRate=7
; Minimum delay in milliseconds between two refresh of the window.
; I advise a value slightly lower than your refresh rate ie:
; 60Hz monitor => RefreshRate=16
; Max value is 255 (4 Hz), sane values are below 100 (10 Hz).
; Use 0 if you want the most reactivity.

MoveRate=2
ResizeRate=4
; The number of pixels to wait before actually moving the window.
; Use 1 for instant updates. You will have better performance with higher values
; but you will loose precision in moving/resizing. Sane values are below 10.
; Recommended is 1 to 5
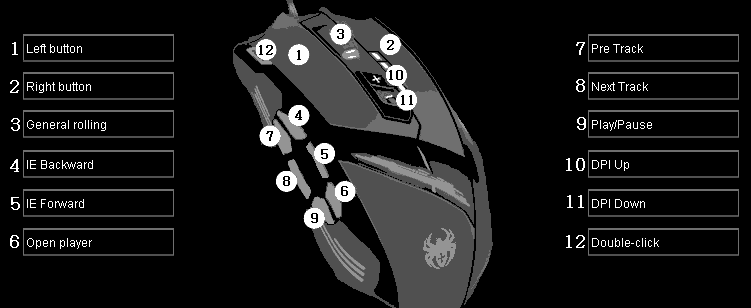
Since AltSnap 1.53 it is possible to use mouse with up to 20 buttons. to do this you must edit the .ini file directly and configure your mouse accordingly. The first step is to assign the extra mouse buttons to keys that you do not want to use. To do this use your specific mouse driver. In my case I could perform this folowing mapping using a Zealot-12 mouse:
Then you need to map those keys as mouse buttons in AltSnap.ini file for this you need to write the scan codes of the desired keys that you want altsnap to consider like mouse buttons. Writh the scancodes in the XXButtons value in the [Input] section:
in the [Input] section
XXButtons=B5 B1 B0 B3
; List of keys that are actually mapped to extra mouse button (6-17)
; You can specify up to 15 values in the button order you prefer.
; Any key specified here will behave like a mouse button for AltSnap.
; Also the key will ALWAYS be unusable outside of AltSnap
; This is intended for mouse buttons that that are mapped by a
; driver to keyboard keys, If possible use keys that does not exist
; on your keyboard ie: F13-F24.
; The extra buttons defined like this are mapped to MB6/7/8/9(B)(T)
; If you set for example XXButtons=7C 7D 7E 7F, then:
; the F13 key will be mapped to MB6, F14 to MB7 etc.
; MB20 is the maximum button. Those buttons can be added to the Hotclicks
Now those keys are mapped to buttons 6, 7, 8 and 9. Those keys will be unusable in other programs so chose wisely your mapping.
Once those keys are mapped you can use moure mouse actions for example you can set MB8=Minimize. Keep in mind that for each button you have the titlebar variant and also an alternate action ie:
MB8=Minimize   ; Normal action
MB8B=Maximize  ; Alternate action
MB8T=Roll      ; Titlebar action
BM8TB=Lower    ; Alternate titlebar action
There are some useful command line parameters for AltSnap, you can see a short list using the --help, or -help or -? or /? options.
-
-mMulti process mode, it means that a new instance of AltSnap will be started even if it is already running. -
-qQuiet mode. It just means that if a previous instance is detected nothing will be done. Usually AltSnap updates the previous instances' config. It does not do anything in multiple instances mode. -
-hHides the tray icon, also hides the previous instance tray if AltSnap is already running (unless multi process) -
-cOpen the config dialog (can be useful inf you hide the tray and need to see the config).
Finally an action can be executed from the command line. For this you need to be sure to run AltSnap in a single instance mode (no multi), then you can use two different command line options:
-
-afACTIONto execute any desired ACTION on the current foreground window. -
-apACTIONto execute any desired ACTION on the pointed window.
This command line mode can be useful if you want to invoke AltSnap from AHK or Clavier+ or similar software.
Example: AltSnap.exe -apAlwaysOnTop to toggle the always on top flag for the pointed window.
Note that the Move and Resize actions cannot be used this way. Other actions might make no sense when invoked like this.
There are some known bugs that cannot be fixed by modifying AltSnap, as well as some bugs that I still have no no clues on how to fix. Here is a list of the most common problems encountered by my users and how to fix them.
If you are using complex shortcuts implying Alt+clicks or Alt+scroll wheel in a program you probably want to blacklist it so that AltSnap does not interact with it. See the above Blacklists section for more details. Also keep in mind that you can disable temporary AltSnap if you are playing a game, and you can use the Win Key as a hotkey or even a two key combo to minimize interactions with other programs shortcut.
This is a common issue and the reason is that with Windows Vista and later you can have a window in your current user desktop that is elevated to administrator privilege. Those windows will capture the input without AltSnap being informed. This is a very good idea because it means that all normal programs will be unable to check the passwords you type in your admin programs.
If you want to be able to move the elevated windows with AltSnap you need to run it elevated. You can do this temporarily by using the "Elevate" option in the tray menu (the UAC will prompt you). You can also do it automatically when AltSnap starts in the General tab. Finally if you want AltSnap to start automatically in elevated mode without UAC prompt, see the Setup autostart section.
- Kodi window not affected (#161)
This is probably for the same reason as above. By default AltSnap will install in your %AppData% directory, but many of you will prefer to install it in the Program Files (x86) directory. In this later case you need AltSnap to be run Elevated if you want to edit the config, because it is for now saved as AltSnap.ini in the AltSnap directory.
This may occur like with the original AltDrag, only with Windows 8 and below when you enabled the Scroll inactive windows option. I do not know a good way to fix the problem. However, the beep sound can be removed using the following reg teak:
; Disables the system beep sound
; Copy paste this text in notepad,
; then save the file with the .reg extension and double-click it.
REGEDIT4

[HKEY_CURRENT_USER\Control Panel\Sound]
"Beep"="No"
You can also use this command in the command prompt (does not need to be admin-elevated):
REG add "HKCU\Control Panel\Sound" /v Beep /t REG_SZ /d No /f
This is actually a feature, however since AltSnap version 1.53 you will always be able to sanp to a windows that was made border-less via AltSnap. If you want to sanp to a given border-less window you must add it to the Snaplist. See Issue #185 for more details.
By default since Windows XP Microsoft decided to hide the accelerators keys in all the menu and dialog boxes unless you press the Alt key. This is very annoying for all the options you did not learn by heart using older windows and this is also a problem for newer programs. If you want to be able to see the accelerator keys underlined in the action menu, the only way id to enable the global setting to see all accelerators underlined. You can use this reg:
; Enables the underline display of accelerators/shortcut keys.
; Copy/paste this text into notepad,
; then save the file with the .reg extension and double-click it.
Windows Registry Editor Version 5.00

[HKEY_CURRENT_USER\Control Panel\Accessibility\Keyboard Preference]
"On"="1"
Or the following in the command prompt
REG add "HKCU\Control Panel\Accessibility\Keyboard Preference" /v On /t REG_SZ /d 1 /f
You will then see the shortcut keys with an underline:
You then just have to hit the corresponding key to activate the option, ie: the 'T key' to toggle the Always on top state.
This can happen if the the restore/minimize animation is enabled. If you want to fix the problem you need to disable this animation. In general it should not be enabled by default under latest windows, but it may occur on older versions. To disable use this reg:
; Disables the minimize/restore animation.
; Copy paste this text in notepad,
; then save the file with the .reg extension and double-click it.
REGEDIT4

[HKEY_CURRENT_USER\Control Panel\Desktop\WindowMetrics]
"MinAnimate"="0"
If you want a single click configuration there are two options:
- Set the Center resize mode to Move in the General config tab and set the action of your click to Resize. In this case the window will move when you Alt+click on its central fraction and will be resized on the sides/corners. You also probably want to increase the Center Fraction value in the Advanced tab.
- The other way is to use the Invert move and resize action with: option in the Keyboard tab. You can then for example use Alt and Win keys as hotkeys and set the invert key to Win key. In this case using Win+Click will resize and Alt+Click will move. This is just an example!
In the case a program is not responding Windows will not let AltSnap get a handle to the window but will instead give the handle to a "Ghost" window. Because of this It is impossible to kill unresponsive programs in some cases. See issue #134 for more details. You can however use this command to kill all programs that are not responding:
taskkill.exe /F /FI "status eq NOT RESPONDING" /FI "IMAGENAME ne AltSnap.exe" /FI "IMAGENAME ne dwm.exe" /FI "IMAGENAME ne explorer.exe"
This will kill all unresponsive application except AltSnap.exe dwm.exe and explorer.exe
You can include this in an AHK script:
^+!F4::
Run, taskkill.exe
/F /FI "status eq NOT RESPONDING"
/FI "IMAGENAME ne AltSnap.exe"
/FI "IMAGENAME ne dwm.exe"
/FI "IMAGENAME ne explorer.exe"
,,hide
^ = Ctrl
+ = Shift
! = Alt
,,hide = Don't show cmd window
As seen previously you can set up AltSnap to start automatically, however with the default settings the User Account Control (UAC) will prompt you to authorize AltSnap to run elevated. You can disable UAC if you really hate to be prompted but it is not necessary as you can solve the problem without disabling UAC by setting up a schedule task. As described in Issue #52.
SOLUTION 1: Use my config
- Download this AltDrag-task.zip file.
- Extract its content: AltSnap.xml (also included in AltSnap's directory since 1.43)
- In the Task Scheduler, select Action->Import Task... and select the AltSnap.xml file
- Go into the Actions tab, double click on the path to AltSnap.exe and Update it.
SOLUTION 2: Command Line Create task with:
schtasks /create /f /tn "RunAltSnap" /tr "C:\Path\To\AltSnap.exe" /sc onlogon /rl highest /delay 00:10
Check if the task exists with:
schtasks /query /tn "RunAltSnap" /fo LIST
Delete the task with:
schtasks /delete /tn "RunAltSnap" /f
more details in issue #461. SOLUTION 3: Manual config Parameters for the task:
- Run as Users and highest privilege

- Enable AltSnap auto-start even when disconnected from AC Poser:

- Do not kill AltSnap After 3 days!

- Add a 10s delay to startup to avoid AltSnap being lunched before the session fully initialized.
