Installation
To use HAA firmware, it is necessary a compatible chip, enough flash storage, and download needed FullHAABoot file from Official HAA Repo:
| Chip Type | Crystal Freq | Storage | File |
|---|---|---|---|
| ESP8266 | 26MHz | 1MB | fullhaaboot.bin |
| ESP32 | 40MHz | 2MB | fullhaaboot_esp32.bin |
| ESP32 1-Core | 40MHz | 2MB | fullhaaboot_esp32_1.bin |
| ESP32 C2 | 40MHz | 2MB | fullhaaboot_esp32c2.bin |
| ESP32 C2 | 26MHz | 2MB | fullhaaboot_esp32c2_26.bin |
| ESP32 C3 | 40MHz | 2MB | fullhaaboot_esp32c3.bin |
| ESP32 C6 | 40MHz | 2MB | fullhaaboot_esp32c6.bin |
| ESP32 S2 | 40MHz | 2MB | fullhaaboot_esp32s2.bin |
| ESP32 S3 | 40MHz | 2MB | fullhaaboot_esp32s3.bin |
In order to install it, ESPTool must be installed in your system. Installation on macOS
Alternative Third-Party Installation Tools
- Connect your device to your FTDI adapter in flash-mode, connecting GPIO-0 to GND or holding down device button while connecting if it uses GPIO-0.
- Use ESPTool to flash it in your device:
-
For ESP8266 chips: Flash the new firmware with SPI DOUT mode (most compatible):
python3 -m esptool erase_flash
python3 -m esptool -b 115200 --before=default_reset --after=hard_reset write_flash -fs 1MB -fm dout 0x0 fullhaaboot.bin
-
For ESP32, ESP32-C and ESP32-S chips: Use right chip type file.
python3 -m esptool erase_flash
python3 -m esptool -b 460800 --before=default_reset --after=hard_reset write_flash -fs 2MB -fm dio 0x0 fullhaaboot_esp32....bin
-
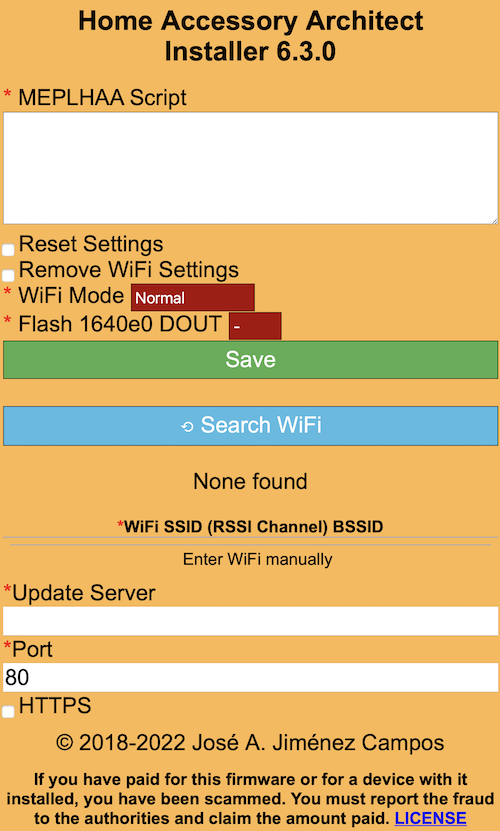
You must configure WiFi network, and you can configure your MEPLHAA Script. At this step, Some devices need additional power to work, and must be connected to mains instead USB adapter. To configure WiFi settings, device generates its own WiFi in AP mode. You must connect to it in order to setup your WiFi network. Simply take your iOS device, go to Setting -> WiFi, and search a SSID with HAA- followed of last MAC address, connect to it, and wait a few seconds until connects.
-
One your device is connected to HAA Wifi, open a web browser (Safari) and type:
http://192.168.4.1:4567A setup web page appears showing you all configuration options. Configure them as your needs and click Save. Remember to configure SPI Flash mode.
- To finish initial setup, click Save button and wait about 10 minutes until process finish (While installation is working, device doesn't show anything, and buttons don't work). After that, if you configured a MEPLHAA Script, you will be able to add your accessory to your HomeKit ecosystem using Home App; if there is not script, device will boot in setup mode.
Note: If installation fails, you must start all process again from step 2.
Accessing Setup mode, you will be able to change configuration or even update firmware OTA.
For security reasons, HAA OTA Installer can only install oficial signed firmwares to prevent unwanted installations of malicious or hacked files.
By default, HAA OTA uses GitHub servers to update firmware. If you want, you can run your own HTTP web server to store and apply HAA updates Over-The-Air and avoid external connections.
To do it, you must access to web UI Setup and set following info:
- Update Server: Hostname or IP address of your server, followed of path. Ex: mynas/haa_updates Last lash must not be pressent.
- Port: Port used by server. Default: 443.
- HTTPS: If checked, server must use HTTPS with SSL or TLS protocol. Default: yes.
Don't worry about using a non-SSL web server, because all necessary files are signed and verified by hardcoded public key of firmware.
In your server, you must load all files from: https://github.com/RavenSystem/haa/releases
Tuning custom server options, it is possible to install a specified version of HAA.
- Update Server:
github.com/RavenSystem/haa/releases/download/<version> - Port:
443 - HTTPS:
Checked
Where <version> is number in format a.b.c
Older versions could be incompatible with actual, then you should save a copy of MEPLHAA script before installing.
Go to HAA Beta releases site and follow instructions about how to configure custom server to use BETA versions channel.
Following software can be use to install HAA firmware. They are developed and supported by their respective authors. If you have any suggestion or issue, feel free to contact them in their GitHub repositories.
- Official Flash Tools for MS Windows
- vglucas' HomeKitFlasher Tool (MS Windows)
- NodeMCU PyFlasher
- Tuya-Convert OTA Version
- Sonoff DIY mode
-
Shelly New Plus, Mini and Pro Devices (ESP32 & ESP32-C) OTA Version:
- Install directly HAA using mgos32toHAA
-
Shelly Old Devices (ESP8266) OTA Version:
- Install directly HAA using mgostoHAA
-
Tasmota to HAA: Open device IP address in a web browser, go to
Firmware Upgrade->Upgrade by file upload, and use this file:- ESP8266 tasmota2haa.bin.gz (Keep it compressed)
- ESP32, ESP32C & ESP32S:
- You need 2 files:
haaboot_esp32...binandotamain_esp32...binfrom HAA releases. Open device IP address in a web browser, go toFirmware Upgrade -> Upgrade by file upload, and use firsthaaboot_esp32...bin. If Tasmota firmware is loaded again after reboot, useotamain_esp32...bininstead. - If Tasmota runs in SafeBoot mode, open device IP address in a web browser, go to
Firmware Upgrade -> Upgrade by file upload, and usehaaboot_esp32...binfile. When you do a fresh install of HAA using OTA, remember to do a complete power cycle to reboot all additional hardware of device.
- You need 2 files:
IMPORTANT: Revert to original firmware using OTA is NOT possible from HAA due to its sign security system and the lack of reflash boot sector feature. A wired connection is needed.
If you are using a Third-Party Installation Tool, it is important that you use these parameters in order to flash device right:
- ESP8266:
| Parameter | Value |
|---|---|
| Baudrate | 115200 |
| Flash Size | 1MB (8Mbit) |
| Flash Mode | DOUT (See SPI Flash Modes Database) |
| SPI Speed | 80MHz or 40MHz |
| Crystal Freq. | 26MHz |
| File | fullhaaboot.bin at 0x0
|
- ESP32, ESP32-C and ESP32-S:
| Parameter | Value |
|---|---|
| Baudrate | 460800 |
| Flash Size | 2MB (16Mbit) |
| Flash Mode | DIO is the most common (See SPI Flash Modes Database) |
| SPI Speed | 80MHz or 40MHz |
| Crystal Freq. | 40MHz or 26MHz (See Requisites) |
| File | fullhaaboot_esp32... type at 0x0
|
Once you configure your MEPLHAA script in Home Accessory Architect firmware using its Setup Mode, you will can pair your device with HomeKit.
In your iOS device, open Home App and follow normal steps to add a new accessory.
QR-Code:

Normal Code:

0218-2017Pairing setup takes about 30 seconds.
Note: If pairing fails, you can un-power your device, re-power it, and start HomeKit setup again (WiFi settings keep configured).
If you want to see UART output to get logs, you can use screen command under macOS
and GNU/Linux after connecting your device to computer (non 230VAC):
If you only want to watch the output of the debug logs then use the following command:
screen /dev/<your_device> 115200To capture the debug logs into a text file for further analysis then
use the following command. The logs will be recorded into a file named
screenlog.0.
screen -L /dev/<your_device> 115200To exit screen mode type: Ctl-a, Ctl-k, and answer 'y'.
When device is installing or updating, you can capture logs from HAA OTA directly from your network with this command under macOS and GNU/Linux:
nc -kulnw0 45678