Implement connecting to OSD via Cleanflight in MWOSD GUI #199
Comments
|
Hi - there is MSP passthrough code already that may be of use. Use 2.0.4 from here : https://code.google.com/archive/p/controlp5/downloads?page=1 Also, for awareness someone is in the process of developing a chrome app. he is making fantastic progress, but will take some time as there is a lot of functionality to replicate. |
|
Just to add... I think you need to find something more interesting to do in your hotel room!! |
|
Yeah, I am lame... The passthrough config option in the MWOSD codebase appears to originate from this: http://www.multiwii.com/forum/viewtopic.php?p=62207 Which is a proposed extension to MultiWii MSP commands that AFAICT is not yet accepted (not in github). However, I like that idea, rather than using the CLI to initiate passthrough, MSP is a better way to do it programatically (via the MWOSD GUI). Therefore, I am modifying Cleanflight to support Passthrough initiation via MSP, and will issue a pull request to CleanFlight and Baseflight. Meanwhile, I will extend the changes already in MWOSD GUI to work with this. The difference between the above proposal and my changes is that the serial port is configurable. The MultiWii version expects the OSD serial port to be In any case, if MultiWii does eventually add this feature, my changes will not stop it from being supported by MWOSD GUI. Also, I found the tools used to compile the GUI (Processing and controlP5) are very out-of-date. Processing 3 is unsupported as is the latest version of controlP5, which is 2.2.5. I reverted to Processing 2 and controlP5-2.0.4 and was able to compile the GUI (thanks for your help!). I have started a Development.md file to document the process of setting up a development environment for the OSD. One last thing... The OSD name, is it scarab or MWOSD? |
|
I do know some that are using the multiwii passthrough so if can leave that available to them in some way, that would be ideal.I think adding a com port into the MSP request would be perfect solution. I think no more multiwii development now.... its been dead for a long time. Its a shame, but can't keep looking back! I musty admit I still use it. Have copter with the boards and they fly nice - so no need for me to upgrade just yet. Good on the processing! The name... Now it covers so many controller options I am thinking maybe MWOSD is no longer the right name! Id like to call it scarab - but would have to talk with the brand name owner. and do want it to remain neutral although he has been the most generous of supporters. Lucky if get $10 a month in donations and I am seriously out of pocket with all the kit I've purchased for this so having a copter from multiwiicopter was a dream |
|
Do you have any desire to see things updated to newer tool versions? |
|
For GUI - don't care! |
|
@ShikOfTheRa, my goal is to make working with the OSD a bit easier. I have in mind two methods to accomplish this:
Right now you have to find a .hex file to upload, which you can grab from Arduino's console output when you do a verify of the OSD firmware code. You can then open the MWOSD GUI, connect, then click UPDATE and browse to the .hex file Arduino generated. My idea is that we could possibly provide one or several compiled .hex file firmware so users could avoid using Arduino altogether. Is this something you are willing to do? Do you think this is feasible? I am thinking some basic popular sets of options. Anything that is not precompiled would have to be user generated after customizing config.h using the method above (Arduino verify). This would mean that the OSD could be installed physically into the copter, then flashed and configured in place using only the MWOSD GUI (when using a compatible FC). I committed a working firmware updater to my fork. This is by no means DONE, just WORKING. Be careful, I have bricked my OSD several times while testing and had to recover via burning the bootloader :-). My next step is to implement 1 above and then make sure I can load firmware via FC passthrough. The only complication is that the baud rate changes for firmware uploading (57600 vs. 115200) and I am not sure how I will handle this, but I have some ideas. |
|
Also, I have started a Chrome app, mwosd-configurator is the working name right now. I plan to implement only a few things:
However, implementing the rest of the GUI is a daunting task. Do you have a handle on what is most important? The only stuff I use is Font upload and the toggles for enabling/disabling boxes. |
|
For 1: For 2: Maybe use one of those “travis” online build type applications that can automatically compile with preset defines. Dumps them into a folder on github that will ship with GUI?. For Chrome App – there is someone already working on this and is in quite advanced stages. Suggest maybe hook up with him. Error414 on fpvlab or github Personally I use the GUI simulator features a lot – it’s one of the prime tools for developing the OSD. I’m happy to keep maintaining the current crap just for that purpose though. I have never used it though so only think thats what it can do...! Not sure if normal end users need that. Error 414 has a lot of the screen stuff working now. |
|
@btimby Does it work for you with the unmodified bootloader? Standard bootloader jumps to the app without waiting for the upload and software reset doesn't trigger upload mode (only hardware DTR does).
I've been experimenting with optiboot bootloader (it works on 115200 by default, so no need to change the passthrough port speed). I've modified optiboot to trigger upload mode on watchdog event, then I modified soft reset code in OSD to trigger watchdog ( Now I can trigger bootloader upload mode via OSD configurator. While in this mode flashing via Arduino IDE works for me without DTR. I'm experimenting with FTDI at the moment, didn't try via the FC passthrough yet. My test setup: |


|
OK, so I've flashed OSD via
Modification to optiboot: In https://github.com/Optiboot/optiboot/blob/master/optiboot/bootloaders/optiboot/optiboot.c#L484 remove Modification to OSD This method has pros and cons. Pros: once you trigger reset, it will stay in upload mode until you power cycle, no need to catch the exact moment to upload, can be easily flashed via Arduino IDE. There is no delay on normal boot which is a plus. Cons: modification to OSD code is needed. If you flash unmodified OSD code by accident, you will no longer be able to trigger upload mode via software. Another con is that it stays in upload mode after you flash the new code or trigger a reset via OSD configurator, you have to power cycle it to boot normally, this one is minor, though. That is because uploader code in the bootloader triggers reboot via watchdog as well, and loops back into upload mode. Another possible solution without OSD code modification would be to modify the bootloader so that it waits for upload 1-4 seconds on every boot. This will delay the boot a bit, but you will be always able to upload the new code, even without triggering reset via OSD, just catch the moment after OSD power cycle. Some FCs power OSD when you plug in USB. When OSD is powered by USB, you will have no way to power cycle only OSD without FC, so passthrough mode will cancel on FC reset. For the clean solution we can probably separate normal restart via the stock And the worst thing is that bootloader modification is absolutely needed, this is not something that anyone can perform easily. Stock Arduino bootloaders go into upload mode only on hardware reset via DTR pin (both stock optiboot and If anyone wants to give it a try, I can give you a jump start to save some time, here is the modified optiboot bootloader. |

|
@CrazyCoder It is great to see your progress. Here is what I know. I modified the UI to perform flashing. I compile via Arduino, then nab the hex and can flash it to the OSD. This is done using the software reset, so with the stock bootloader, soft reset DOES put the OSD into programming mode. However, my current hurdle is that the BAUD rate is different. So, the process in the UI flashing code is:
The problem with this is during passthrough, the serial BAUD is controlled by CleanFlight and there is no mechanism to adjust it. It was suggested by someone during passthrough implementation that it may be necessary to add HAYES control code handling to CF. This would actually be really nice for several reasons.
I will share with you the code and procedure to perform the flash via UI that I describe above. |
|
@btimby Interesting. Does it mean that your OSD had some different bootloader rather than |
|
I did not modify the boot loader. I am testing with a cheap Chinese clone MinimOSD from Goodluckbuy. Admittedly I don't know what firmware was on it originally, but I have since used Arduino to unbrick it via ICSP and the firmware flashing still works. |
|
Which bootloader did you flash via ICSP when unbricking? According to |
|
I am using Arduino 1.0.5 and I clicked "Burn Bootloader". I had to solder pins to MinimOSD and make a cable for my USBasp beforehand. |
|
Which board did you use in Arduino IDE? I've checked 1.0.5 bootloader source and it should work the same: |
|
Arduino Pro or Pro Mini (5V, 16Mhz) w/ ATMega328 |
|
I am new to Arduino, usually I have to Google things like the board setting before flashing etc. Above is what my board was set to from the last time I flashed the OSD. And whatever bootloader it came with worked... |
|
OK, that is really weird. Pro Mini is set to flash ATmegaBOOT_168_atmega328.hex bootloader which is compiled from ATmegaBOOT_168.c which doesn't go to upload mode on soft reset. If anyone has an explanation, it would be great to see it. But if you say that it works, it's probably a good thing. How much delay is there while you can upload? |
|
Have you looked at the reboot method that OSD F/W is using? IIRC it does a Line 659 in 7fbfcd7 |
|
Yes, I did. I've tried different methods. I may need to try with the stock bootloader again since I've flashed optiboot already (to use 115200 speed and avoid changing speed when configuring and flashing). Oh, I can see that the code that skips upload mode is inside |
|
And honestly, the metric I am using for "success" flashing via my STK500 code is that I am receiving correct ACKs from the OSD. While developing the code, I did get failures when I was not following protocol. Fixing those allows the entire process to run through and I was receiving ACKs as the documentation described. Also, the fact that I bricked the OSD several times when my STK500 code was incorrect tells me I was in fact programming the chip. But I did not verify beyond that. |
|
OK, try the stock bootloader, my experience says it works. Here is how I am doing flashing via the GUI: First, you need Processing GUI, an older version. You also need a library called ControlP5. I wrote a simple document describing how to set up for hacking the GUI: https://github.com/btimby/scarab-osd/blob/master/DOCUMENTATION/Development.md The source code for the GUI is here: https://github.com/btimby/scarab-osd/blob/master/OTHER/MW_OSD_GUI_SOURCE/MW_OSD_GUI/MW_OSD_GUI.pde Open that with Processing. You should then be able to run the GUI from source code on your system. I checked in code to perform flashing from the GUI, to use it do this:
Done. This is the code that performs the update: |
|
If you have problems with processing let me know and I can try to help and also update that document. I only recorded the problems I ran into making it work. Newer versions of Processing won't work as the language has changed significantly. |
|
Also, the goal for firmware is to compile some flavors for users, allowing them to select those from the GUI obviating the need for Arduino from an end user perspective. My (our?) ultimate goal is to allow this flashing via passthrough. |
|
Thanks, I now understand why and how it works with the stock bootloader. Will flash it back and give it a try with your patched GUI version. I've already compiled GUI via Processing before, so I know how to do it. I still do some modifications to |
I guess there is a typo, default upload speed for Pro Mini is 57600 and according to your code you open the port at 57600. |
|
:-) Yes, 57600 is correct. I edited my previous comment. |
|
These are my thoughts on HAYES control codes: https://en.wikipedia.org/wiki/Hayes_command_set#Hayes.27_solution Specifically the escape sequence. This would allow you to switch between data (passthrough) mode and command mode. So that a limited number of AT commands could be handled by CleanFlight (reboot, adjust speed etc). Then the OSD GUI could drive the entire process. Timing would be a potential problem as Hayes escape sequence requires a one second pause after the +++ sequence. But it could potentially work like this:
|
|
Actually, the |
|
Trying with the stock bootloader, no luck so far. If you click just RESET in the GUI, does the OSD LED flash indicating it's in bootloader? For me it doesn't happen. OSD just reboots. On power on the LED flashes once, so it goes through the upload mode for a second. |
Did you actually test it via FC serialpassthrough? Did you have DTR pin connected from FTDI? |
|
No, I have only tested via direct connection to FTDI. I will test again here in a few minutes to confirm. I last worked on this 20 days ago according to github ;-). So my memory may be corrupted. I am almost done implementing escape sequence for CF passthrough. |
|
If you have DTR connected, it will go to bootrloader on software reset. When DTR is not connected, it just restarts OSD code and there is no chance for upload. |
|
Ah. So just having the pin connected changes the process of software reset? Below is what I am testing with. Looking at it now, it is a KV modded one probably from Witespy not GLB.
So if I disconnect DTR, it stops working? |

Yes, that is what I'm observing. With DTR the LED flashes on soft reset from OSD GUI, without DTR no LED flash and it starts fast LED blinking right away skipping the upload mode. |
|
Will confirm now. Tested with DTR connected, I see the following on the console. And with DTR cut. |
|
I don't suppose you guys want to get this working on raceflight as well? I'm willing to help out :) |
|
It seems the reboot method |
|
@proggod thank you for the offer. Please read this discussion as we are currently just trying to "get it working" at all. Working with Raceflight seems very far off given current progress ;-). For raceflight, serial passthrough would be needed. A first version of this is in betaflight already (but not cleanflight). I have since added two more functions in my fork:
With this full implementation, it should be possible from the FC standpoint to do what we want. However, getting flashing working on the OSD itself is the blocker ATM. For this we have a proof of concept that is able to flash the OSD, but only if DTR pin is connected. Removing this necessity is required to allow flashing via FC passthrough. |
The above code should do the same, however it doesn't seem to work properly with the stock bootloader. It goes in some weird state with LED flashing without stop and upload not working. Does it work for you? Exactly the same code worked for me with the modified bootloader as I've described above. |
|
Not tried it yet. I am still reading. I have read that using WDT for rebooting can cause an infinite reboot cycle as the watchdog is not cleared by some bootloaders. Perhaps this is what you observe? I have read the possible solutions to this are to modify the bootloader so that it clears the watchdog or to use a long WDT interval and clear it first thing when your application starts. However, this probably would not help for uploading. |
|
Well, if bootloader modification is required, see my comment above for the whole process. It's confirmed to work via FC serialpassthrough, |
|
Seeming that way. |
|
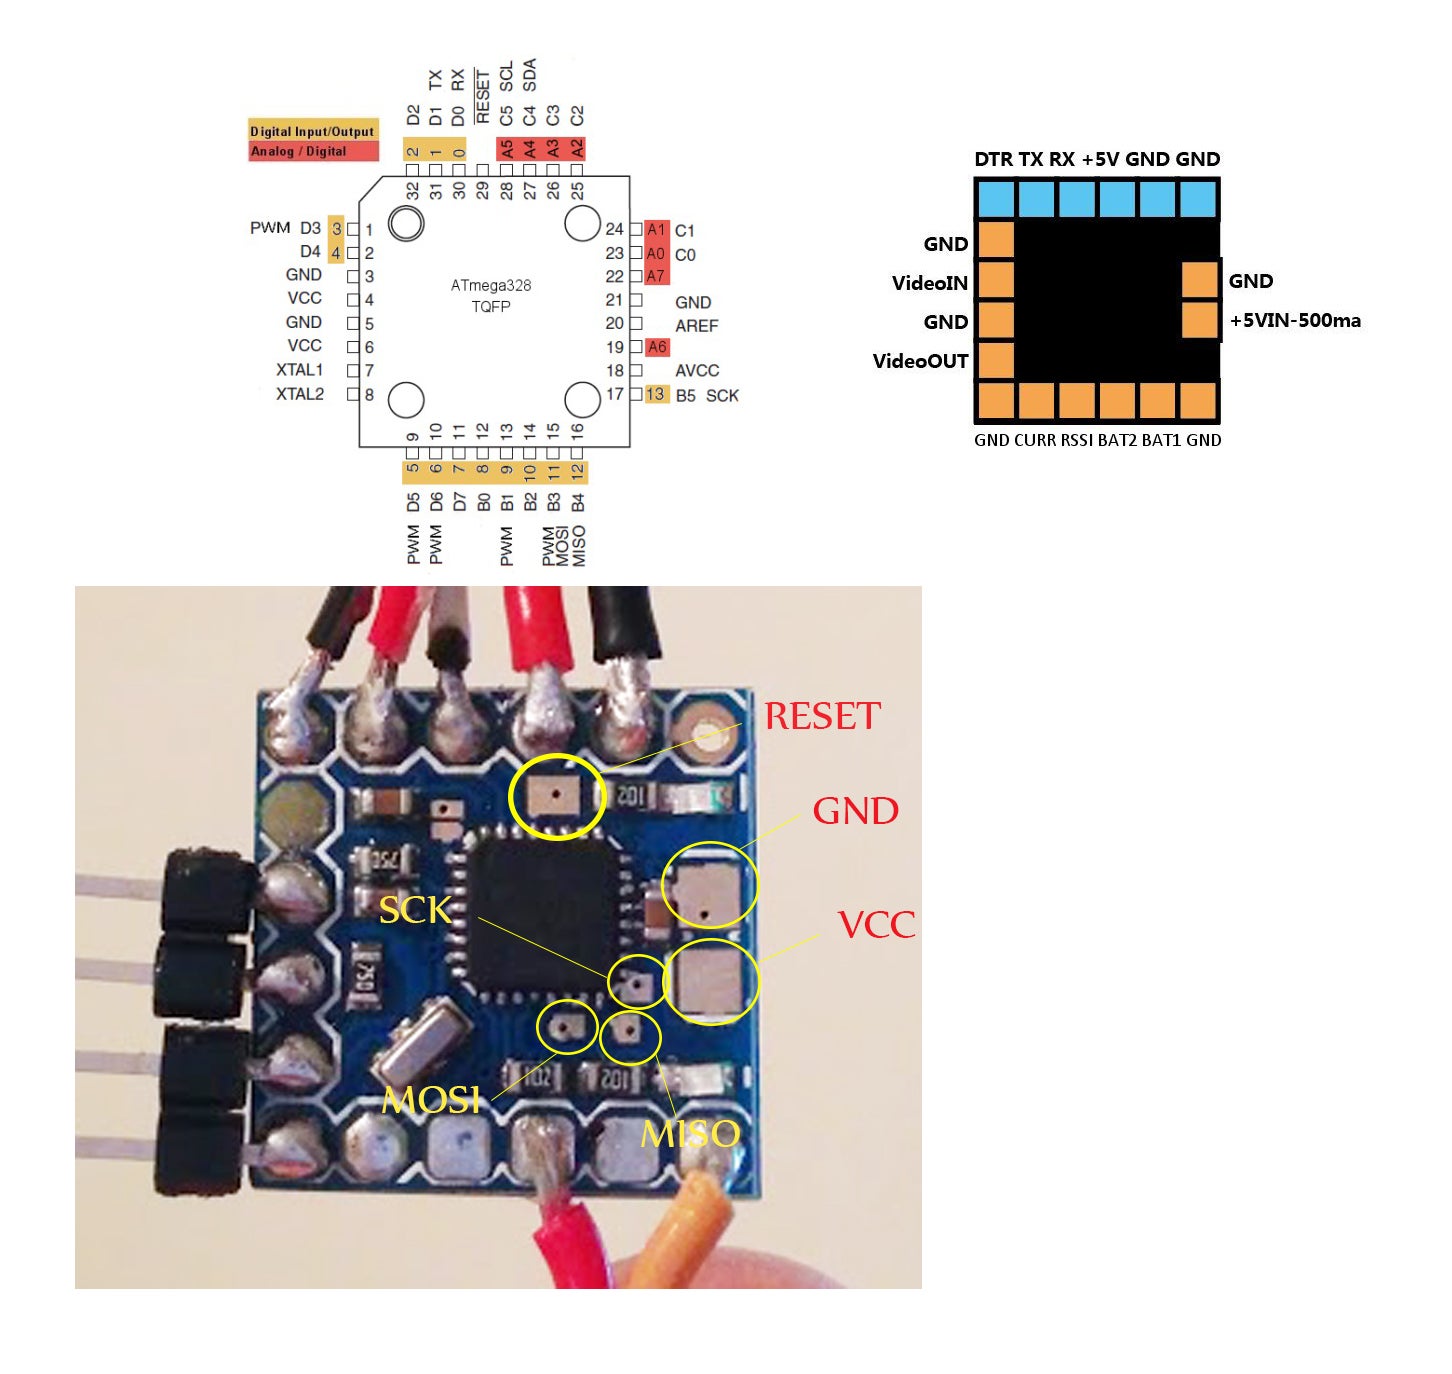
For reference, here are the locations of the ICSP pads on a Micro MinimOSD. http://static.rcgroups.net/forums/attachments/4/8/9/0/7/4/a7808257-164-BOOTLOADER%20FLASH.jpg |
|
@CrazyCoder what about jumping to the bootloader address rather than |
|
@CrazyCoder also, I have not been able to determine WHY just having the DTR pin hooked up makes a difference? It is not like I am using flow control or changing it's state. avrdude does via an Could this simply be jumpered to 5v or something? |
According to the docs, the stock bootloader address is 0x3E00. I've tried it and it didn't work with the stock bootloader. Worked with optiboot. Just noticed that stock one could be larger, so the address might be 0x3C00. Can you try it?
That might work, I've read that wiring directly to 5V is a bad idea, you may need to use a cap or a resistor. Not an expert here and didn't do my googling in this direction. |
|
I've tried different addresses and it doesn't seem to work with the stock bootloader. No LED flashing at all. |
|
This seems to be jumping to the bootloader. I see some faint flashes before the led starts flashing quickly. It looks exactly like when I press the reset button. |
|
However my flashing code in MWOSD GUI does not work. But this could be because of something else. I need to write some specialized tools for testing this. I know there is an MSP python library, I will start hacking something together. The MWOSD GUI is too cumbersome to use for testing. |
|
I've tried your reset code and it doesn't seem to work. It just restarts without one bright LED flash like it does after power on. |
|
btimby - for serial testing sometiems I use processing, but just copy out the bit I want. I hate processing, but in small chunks like that its actually quite quick and easy! |
|
If no objections I'd like to close this in the next week as no updates for a few months. CAn be re-opened if work restarts |
@ShikOfTheRa I am planning to modify the GUI to add the following:
Think of this as the parallel of what BLHeliSuite does for ESC passthrough with CleanFlight. Do you have any thoughts on the above?
I started to work on this by trying to compile the GUI using the Processing IDE. Any tips you can give me to get the correct libraries installed (version numbers etc.) or any other information you can give for developing the GUI? For example, I am having trouble locating a version of
controlP5that allows me to compile the GUI without "undeclared function" errors.I plan to record my findings as a 'Developer' document for the docs directory. This should helo others that want to hack on the GUI. I will be traveling next week and will use this as my entertainment in the hotel room. Pull requests will be inbound.
The text was updated successfully, but these errors were encountered: