Instructions to run the app on localhost:
Setup:-
Clone the repository to your loacl machine
$git clone https://github.com/chirag-optisol/Intelligent-Automation.git
Install essential python libraries
$pip install -r requirements.txt
Move to the frontend folder and install necessary npm packages
$cd frontend
$npm i
Run:-
To start the backend Flask server
$python main.py
To start the Frontend
$cd frontend
$npm start
The App is divided into Two sections -->
- Frontend
- Backend

The frontend folder defines the UI/UX of the app. ReactJS and TypeScript are the primary tools used here.
The backend defines the API layer which the frontend will use to interact with the app. The API's are hosted on a Flask Server and we have plans to move it to FAST API for faster API calls and better documentation. We use Bluprints in Flask to better structure our projects and combine it with our Flask App by registering them.
| File | Description |
|---|---|
| main.py | File to start the Flask Server. |
| learner.py | File to define the RL Agent Training with Selenium. |
| /backend/__init__.py | File to register all the blueprints and connect to the MySQL Server. |
| /backend/models.py | File that defines all the tables for MySQL using Flask-SQL ALchemy. |
| /backend/auth.py | Blueprint that deals with user authentication APIs. |
| /backend/agent.py | Blueprint that deals with the RL Agent training and Inference APIs. |
We also use MySQL Database which interacts with the Flask App using Flask-SQL Alchemy. The database currently only has a Users Table for storing the information of registered users.
The RL Agent is defined in the learner.py and leraner.1.2.py files. We're still experimenting and improving the RL agent as we move forward.
Tech Stack
Frontend : ReactJS, TypeScript
Backend : Python, Flask, Selenium, Numpy, MySQL
Given a State recommend/predict an action in a pre-defined environment based on Q Values. When the RL Agent Interacts with the environment while training, we have to update the Q Values such that, running a certain chain of actions gives us a desirable outcome. We achieve that by giving rewards to the agent for achieveing a certain long term goal.
Reference: Free Code Camp
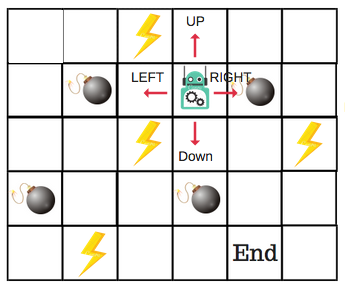
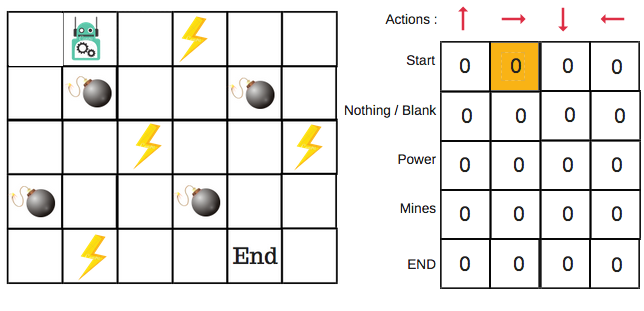
Let’s say that a robot has to cross a maze and reach the end point. There are mines, and the robot can only move one tile at a time. If the robot steps onto a mine, the robot is dead. The robot has to reach the end point in the shortest time possible.
The scoring/reward system is as below:
- The robot loses 1 point at each step. This is done so that the robot takes the shortest path and reaches the goal as fast as possible.
- If the robot steps on a mine, the point loss is 100 and the game ends.
- If the robot gets power ⚡️, it gains 1 point.
- If the robot reaches the end goal, the robot gets 100 points.
Now, the obvious question is: How do we train a robot to reach the end goal with the shortest path without stepping on a mine?

Introducing the Q-Table
Q-Table is just a fancy name for a simple lookup table where we calculate the maximum expected future rewards for action at each state. Basically, this table will guide us to the best action at each state.
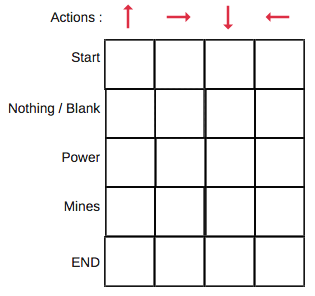
There will be four numbers of actions at each non-edge tile. When a robot is at a state it can either move up or down or right or left. So, let’s model this environment in our Q-Table. In the Q-Table, the columns are the actions and the rows are the states.
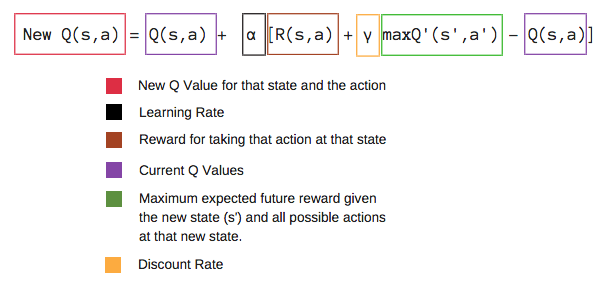
Each Q-table score will be the maximum expected future reward that the robot will get if it takes that action at that state. This is an iterative process, as we need to improve the Q-Table at each iteration. But how do we calculate the values of the Q-table? Are the values available or predefined? To learn each value of the Q-table, we use the Q-Learning algorithm.
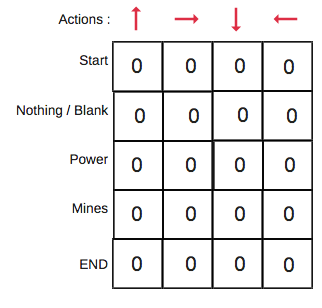
Using the above function, we get the values of Q for the cells in the table. When we start, all the values in the Q-table are zeros. There is an iterative process of updating the values. As we start to explore the environment, the Q-function gives us better and better approximations by continuously updating the Q-values in the table. Now, let’s understand how the updating takes place.
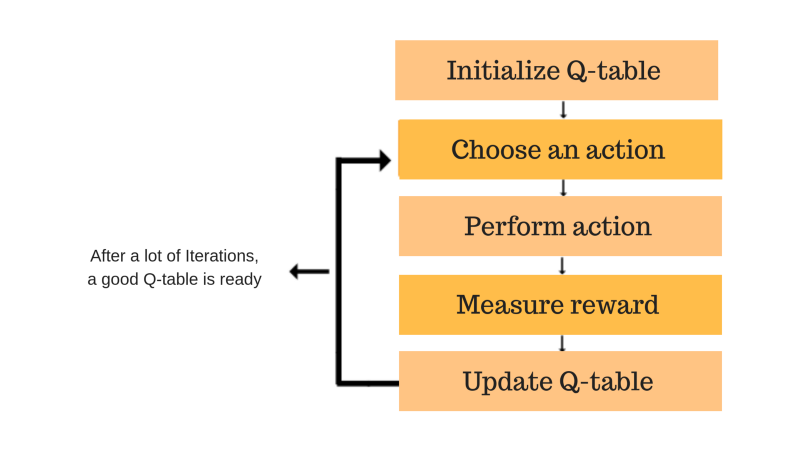
Each of the colored boxes is one step. Let’s understand each of these steps in detail.
Step 1: initialize the Q-Table
We will first build a Q-table. There are n columns, where n= number of actions. There are m rows, where m= number of states. We will initialise the values at 0.

In our robot example, we have four actions (a=4) and five states (s=5). So we will build a table with four columns and five rows.
Steps 2 and 3: Choose and Perform an Action
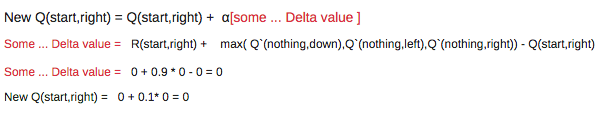
This combination of steps is done for an undefined amount of time. This means that this step runs until the time we stop the training, or the training loop stops as defined in the code. We will choose an action (a) in the state (s) based on the Q-Table. But, as mentioned earlier, when the episode initially starts, every Q-value is 0. So now the concept of exploration and exploitation trade-off comes into play. This article has more details. We’ll use something called the epsilon greedy strategy. In the beginning, the epsilon rates will be higher. The robot will explore the environment and randomly choose actions. The logic behind this is that the robot does not know anything about the environment. As the robot explores the environment, the epsilon rate decreases and the robot starts to exploit the environment. During the process of exploration, the robot progressively becomes more confident in estimating the Q-values. For the robot example, there are four actions to choose from: up, down, left, and right. We are starting the training now — our robot knows nothing about the environment. So the robot chooses a random action, say right.
We can now update the Q-values for being at the start and moving right using the Bellman equation.
Steps 4 and 5: Evaluate
Now we have taken an action and observed an outcome and reward.We need to update the function Q(s,a).
In the case of the robot game, to reiterate the scoring/reward structure is:
- power = +1
- mine = -100
- end = +100
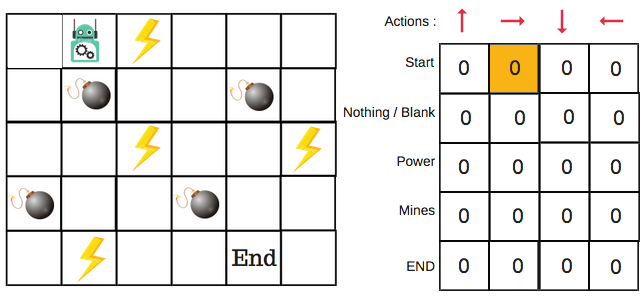
We will repeat this again and again until the learning is stopped. In this way the Q-Table will be updated.
The Intelligent Automation App utilizes Q-Learning to create bots that can do Automation Testing, Form Filling and much more. The concept of environment, state, action and reward can be easily translated to a Webpage setting where the elements of the page can be defined as measureable states. The actions are the ways in which a user can potentially interact with the Webpage. Rewards can be assigned to a certain success messages appearing on the Webpage. Let's have a look at how to apply it to our use-case for form filling.
Lets consider the login page of the Intelligent Automation app for this example:-

We'll extract all the elements in the webpage that has an 'id' to define our states. We can easily search for these elements later by using the find_element_by_id() function in selenium. In this case we'll get 4 states --
- "Signup Button"
- "Username Field"
- "Password Field"
- "Login Button"
We'll need to define a set of generic actions. In this case we'll need just two --
- "Click Button"
- "Set value to a Field"
- "Skip an Element"
We'll need to get the inputs for the action "Set value to a Field", here we'll give two inputs --
- "admin"
- "password"
We dont have to specify which input belongs to what field here, thats the job of the RL agent to figure out. We can give multiple combination of usernames, passwords or some dummy information and the RL agent is supposed to figure out atleast one correct combinations of username and password in this case. With all the information present we can create a Q-Table. The Q Table will look like this after we initialize the Q Values with zeros

Next step will be to define rewards depneding on the goals. For each interaction with the elements we'll induce a small negative reward, this is necessary so that the RL agent learns to get to the objective in the least amount of steps possible. In the training phase we'll randomly iterate over various combination of states and actions until the login is succesful. Whenever a login attempt is succesful we get a Toast with the message 'Login success' we can use this to define the goal for the RL Agent. After the goal is achieved we'll assign a large positive reward to the chain of actions that led to the achivement. This way we ensure that the RL agent achieves the target every episode. After the model is trained for a set number of episodes we'll have an updated Q-Table wherein the action with the highest Q-Value for each state will be the appropriate action to achieve the goal

- Small Negative reward for every interaction with an element.
- Large Positive reward for achieving the goal / passing the assertion test.
After the model is trained for a set number of episodes we'll have an updated Q-Table wherein the action with the highest Q-Value for each state will be the appropriate action to achieve the goal. We can use the updated Q-Table to run the agent on this login page, or generate Automated Test Cases for quality testing of the page.

References: