Advanced Mixin Usage Callback Injectors
If you haven't read the Introduction Series, turn back now, because here be dragons...
Still here? Okay, let's dive in.
If you've read the Introduction Series, you know how to leverage the Mixin processor to merge code you provide into a target class. In fact, even with more complex functionality like Intrinsic Proxies, the code which ultimately ends up in the target class is only ever going to be a blend of original bytecode and new code supplied by you.
Callback Injectors are the first Mixin technology you will learn about where this is no longer the case: with Callback Injectors, the Mixin processor can be instructed to generate new code for us.
Callback Injectors consist of two parts:
- A regular mixin method known as a handler method, this method is added to the target class by our mixin with some custom code within it.
- An injection point definition - this is an annotation which tells the mixin processor where to create instructions inside an existing method (known as the target method) which will invoke our handler method.
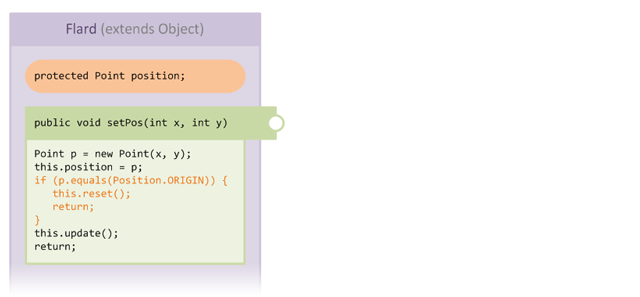
Before we go into too much detail, let's introduce our case study example. The following diagram shows a schematic view of some code in an extremely simple class Flard:
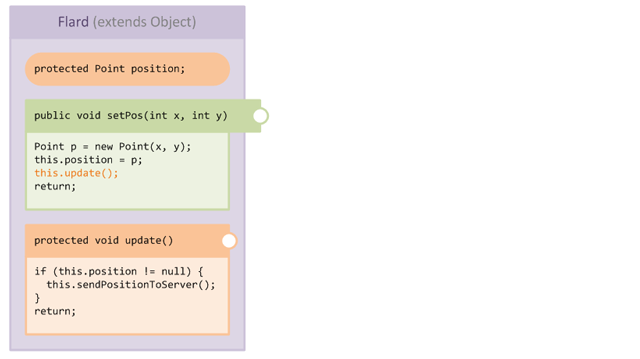
The class Flard contains:
- A
protectedfieldposition - A
publicmethodsetPos - A
protectedmethodupdate
The internal behaviour of Flard is that whenever a property is mutated, the setter for the property always calls the update() method before returning. The update method handles sending the object state to the server when properties are changed.
Notice that even though the methods return
void, I have still included an explicitreturnin the code listing. This is included because - in bytecode terms - there is no such thing as an implicit return, there is always aRETURNopcode in the method bytecode. This is an important fact to bear in mind when we consider Injection Points later on.
Let's consider the flow of execution when the setPos setter is called from some external code:
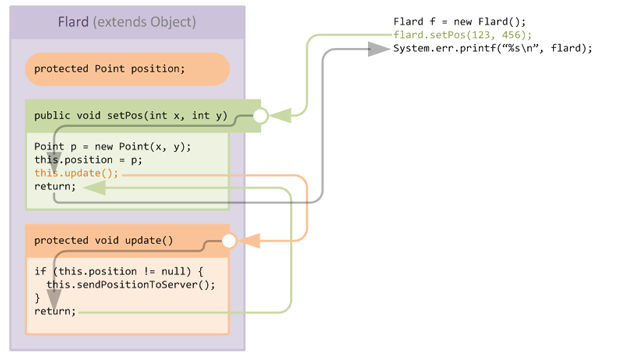
Nothing unusual is happening here, the arrows show exactly what we would expect to happen given the code listings.
So far, so boring. Let's assume that we want to get in on the update() action, we want to add some custom logic - maybe notify some observer class - when update() is called. We already know that we can change the behaviour of the update() method by overwriting it with a modified version and even use Intrinsic Proxy displacement to preserve the original method. However we also know that overwrites have a lot of drawbacks, both in terms of maintainability and also interoperability.
So how do we add custom logic to the method without overwriting it?
Answer: tell the method to invoke some custom of our own custom code!

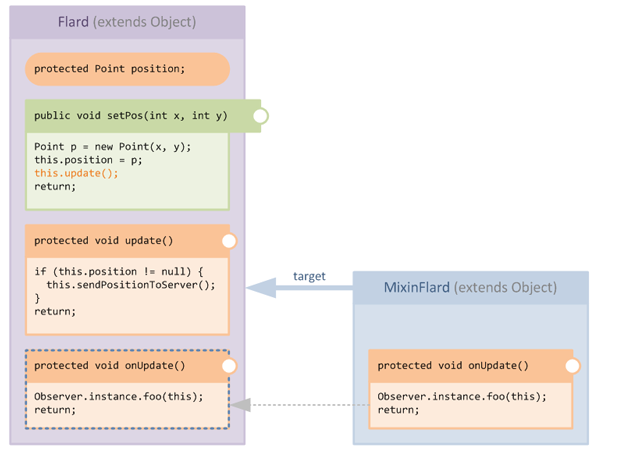
Step one in our journey to discover Injectors actually turns out to be something we know already as well: adding new methods into a target class. The method we will inject is known as a handler and in general we will mark handler methods with the prefix "on", much like the event sink naming convention used in many frameworks.
We will name our new handler method for this example onUpdate, since we will be hooking onto the update method.
Using this nomenclature of
onfollowed by the name of the target method aids readability of the mixin code, since anyone reading the mixin can get an idea of what the method is hooking into without having to inspect the injector's definition.
So let's assume that our first step is to add our new handler method onUpdate into the target class using a mixin. In our example the handler method simply invokes foo on some singleton observer object, imaginatively named Observer:
Well this is great and everything, but our new method is basically going to just sit there and do nothing at this point, so let's look at how we do the actual injecting part of Injectors:
The first thing we need to be able to do before we start is identify parts of the target method. Let's decorate the update() method with markers which show some of the areas we are able to easily identify:

The markers indicate parts of the method's anatomy:
- HEAD indicates a point immediately before the first opcode in a method body, the "head" of the method.
-
RETURN indicates a point immediately before a
RETURNopcode in the method.
There are other points in a method that we will be able to identify but for now we will focus on these simple markers. In injector terminology, these places in a method are known as injection points.
We're now ready to connect the dots. We will start by decorating our onUpdate handler method with an Injector declaration:
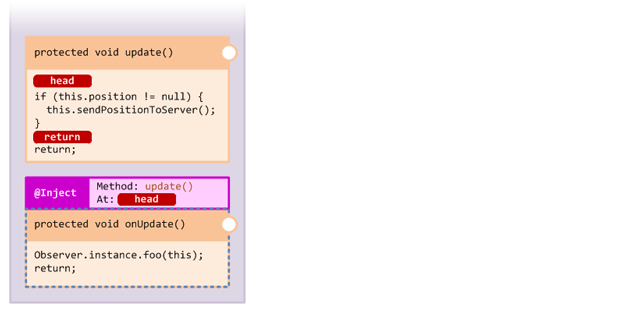
As you can see, the @Inject annotation needs two pieces of information: the method to inject into and the point at which to do so. In code, this looks like this:
@Inject(method = "update", at = @At("HEAD"))
protected void onUpdate() {
    Observer.instance.foo(this);
}
When the mixin processor applies the mixin method, it sees the @Inject annotation and generates code in the target method to invoke the handler method:
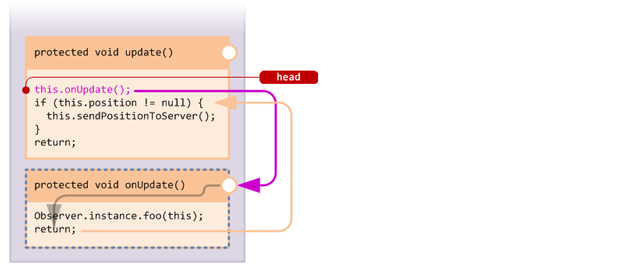
The injected callback to our handler function is shown here in purple. Unlike an overwrite, the original behaviour of the target method is untouched, and our handler method simply receives a callback at the start of the method.
Ultimately, using injectors boils down to the following steps:
- Identify the injection point (more on these below)
- Write your handler method
- Decorate the handler method with an
@Injectannotation to create the injection relationship.
Now we understand the basics, we're ready to dive into the nitty gritty.
The above introduction is simplified for the purposes of introducing the concept of Injectors. In reality, all Injector handler methods must accept a CallbackInfo object in their arguments. This object is generated by the callback and serves as a handle which can be used when making Cancellable Injections (more on those below).
Our example code from above thus looks like this in reality:
@Inject(method = "update", at = @At("HEAD"))
protected void onUpdate(CallbackInfo ci) {
    Observer.instance.foo(this);
}
Our above example is also simplified because the target method takes no arguments and returns
void.
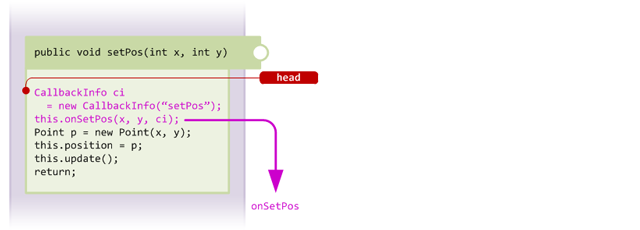
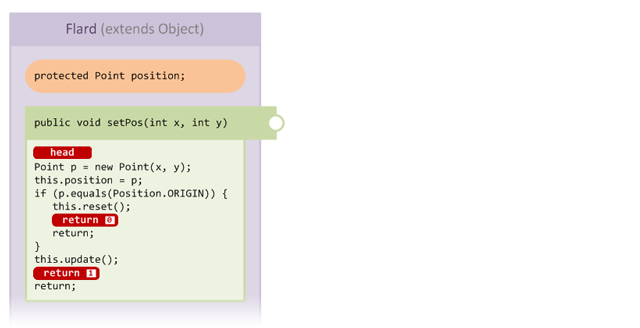
When injecting into a target method which has arguments, the target method arguments can also be passed to the handler methods as part of the injection. Let's take the setPos(int, int) method from the example above:
/**
 * A target method, setPos
 */
public void setPos(int x, int y) {
    Point p = new Point(x, y);
    this.position = p;
    this.update();
}
If we were to create an injector for this method, we could optionally choose to consume the two integer arguments (x and y) in our handler method. We do this by simply adding them to our handler method's signature:
/**
 * Handler method, onSetPos. Note the two int variables x and y
 * which appear before the callbackinfo
 */
@Inject(method = "setPos", at = @At("HEAD"))
protected void onSetPos(int x, int y, CallbackInfo ci) {
    System.out.printf("Position is being set to (%d, %d)\n", x, y);
}
Notice that we still include the CallbackInfo argument. The code injected into setPos now looks like this, notice that the call is passing the x and y arguments when calling our handler method onSetPos:
The method arguments and callbackinfo together provide context for the injection, and allow you to alter the behaviour of your handler accordingly. For example:
/**
 * Handler method, onSetPos
 */
@Inject(method = "setPos", at = @At("HEAD"))
protected void onSetPos(int x, int y, CallbackInfo ci) {
    // Check if setting position to origin
    if (x == 0 && y == 0) {
        this.handleOriginPosition();
    }
}So far, our injections haven't altered the structure of the target method at all, they simply call our handler function allowing it to perform whatever tasks we require, leaving the target method unchanged. Cancellable Injections allow us to create injections which can prematurely return from the target method.
Looking at the code which would be injected by our setPos example from above, we can see that the injected code consists of the creation of a new CallbackInfo instance, followed by a call to our handler method. However now let's alter our injector declaration in the @Inject annotation to include the cancellable flag. We will also add some logic to our handler body:
/**
 * Cancellable injection, note that we set the "cancellable"
 * flag to "true" in the injector annotation
 */
@Inject(method = "setPos", at = @At("HEAD"), cancellable = true)
protected void onSetPos(int x, int y, CallbackInfo ci) {
    // Check whether setting position to origin and do some custom logic
    if (x == 0 && y == 0) {
        // Some custom logic
        this.position = Point.ORIGIN;
        this.handleOriginPosition();

        // Call update() just like the original method would have
        this.update();

        // Mark the callback as cancelled
        ci.cancel();
    }

    // Execution proceeds as normal at this point, no custom handling
}
In the above code, the handler checks whether the position is being set to (0, 0) and performs some custom logic instead, marking the callback as cancelled to cause the target method (setPos) to return immediately after the injection. We can see how his works by looking at the code injected into setPos, which looks like this:
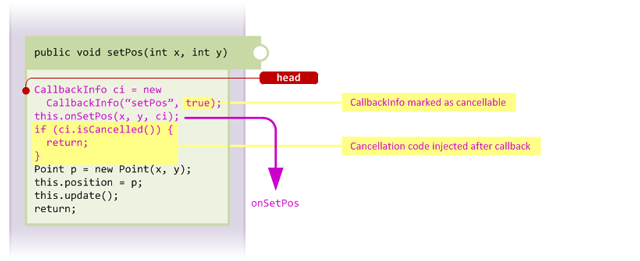
As you can see, marking the injection as cancellable causes the mixin processor to inject code which checks whether the CallbackInfo was marked as cancelled, and return immediately if so.
Note: calling
cancel()on a non-cancellableCallbackInfowill raise an exception!
This type of injection where we inject at the method HEAD and conditionally return is known as a Short Circuit Injection and is a very good replacement for things which would otherwise need to be @Overwrite. It is also possible to write a Short Circuit Injection which always cancels, this type of injector is know as a Permanent Short Circuit Injection or RoadBlock Injection.
Note that in most cases, RoadBlocks are preferable to
Overwrites. This is partly because they allow other transformers to act on the original method without raising errors; but also because keeping our injected code in a separate method makes stack traces much more meaningful when exceptions occur in injected code.
So far, we have encountered two different Injection Points: HEAD and RETURN, and seen examples of the first. Understanding Injection Points is vital when defining all types of Injectors, since the type of Injection Point you choose will depend on what you want the injection to achieve.
The HEAD and RETURN injection points are special because they are the only injection points which are guaranteed to succeed, this is because there will always be at least one RETURN opcode in a method, and naturally there will always be a method "head".
The first thing it's important to know about Injection Points is that they are essentially queries which are run against the method bytecode which will return one or more opcodes which match their criteria. That's right: a single injection point can match more than once.
For an example of this, let's consider the semantics of the RETURN injection point. The RETURN injection point is defined as follows:
-
RETURNmatches all RETURN opcodes in the target method.
The mixin processor will always inject the callback immediately prior to the matched opcode, and thus using RETURN will always inject a callback immediately prior to the method returning.
Let's take a look at an example:
In this example we have modified the setPos method and added some extra logic with an explicit return in the middle of the method. In addition to the implicit return at the end of the method this means there are now two RETURN opcodes in the method body. When we tag the injection points in the method we see that this is reflected in the injection points identified by RETURN:
In order to differentiate the identified opcodes, each opcode identified by the injection point is tagged with a number starting at zero, this opcode index is known as the ordinal and is a zero-based index.
Let's assume we want to write an injector which only places a callback at the first RETURN opcode:
@Inject(method = "setPos", at = @At(value = "RETURN", ordinal = 0))
protected void onResetPos(int x, int y, CallbackInfo ci) {
    // handler logic
}
Specifying the ordinal value inside the @At means we only inject before the first RETURN opcode.
NOTE: You might be asking yourself: What's the difference between this example injection, and for example just injecting into the
reset()method? It would be called at the same point, right?Choosing the right injector target can be pretty subjective, and many times will depend both on what you're trying to achieve with a specific injection, and other factors such as subclassing of the object in question, and what variables are available in scope.
For example, in the method above, injecting into
reset()would raise the callback at the same point, but what ifreset()is over-ridden by a subclass? Thereset()method also doesn't receive a copy of the argumentsxandy, which we may need. Also, what if thereset()method is called from some other point in the code? All of these things should be considered.Choosing the appropriate place to inject will depend heavily on the structure (and hierarchy) of the class in question and precisely what your injection is intended to do. You should consider all aspects of the usage and nature of your injection targets when identifying your injection points.
Before we go any further, there are some key things which should be understood about Injection Points:
-
With very few exceptions, an Injector will place its injected code before the opcode identified by the Injection Point. This should be intuitive, some examples:
-
RETURNidentifies theRETURNopcodes in a method, the injection happens immediately before the method returns -
HEADidentifies the first opcode in a method, the injection happens at the very start of a method -
INVOKE(see below) identifies a method call, the injection happens immediately before the method is called -
Since they are effectively queries, Injection Points may return no results. For example, imagine that in the example above we had specified
RETURNas our query with anordinalvalue of2. Since there are only two RETURN opcodes in the method, the Injection Point will match no opcodes. You can specify acceptable upper and lower limits for injections using constraints. -
Whilst Injection Points are deterministic for a given method, this does not remove the maintenance burden when injecting into a changing codebase. With the exception of
HEAD(which always matches the same point), all injection points - especially those usingordinaloffsets or with other parameterised settings - should be checked when the target codebase changes in order to ensure that they remain correct. -
Defining more complex injection points (more on this below) is one of the few places in Mixin where you will have to get your hands dirty and take a look at the bytecode of a target method itself. This is often necessary so you can pick the most suitable opcode for your injection, a good disassembler will help you immensely here.
As well as the trusty HEAD and RETURN which are the hammer and screwdriver in your Injection Point toolbox, there are a selection of other pre-defined injection points you can use:
| Injection Point | Code Identified |
|---|---|
| INVOKE | Finds a method call and injects before it |
| FIELD | Finds a field read or write and injects before it |
| NEW | Finds a NEW opcode (object creation) and injects before it |
| JUMP | Finds a jump opcode (of any type) and injects before it |
| INVOKE_STRING | Finds a call to a method which takes a single String and returns void which accepts a constant string as an argument. This can be used primarily to find calls to Profiler.startSection( nameOfSection ) |
| INVOKE_ASSIGN | Finds a method call which returns a value and injects immediately after the value is assigned to a local variable. Note this is the only Injection Point which injects after its target |
For more details see the Injection Point Reference
So far, we have only considered injecting into a target method which returns void. When injecting into a method with a non-void return type, injector handler methods will instead need to receive a CallbackInfoReturnable. The CallbackInfoReturnable differs from its parent CallbackInfo in that:
-
CallbackInfoReturnableis generic, with the return type of the method as its type argument - When cancelling a
cancellablecallback with a return type, the value to return from the method can be specified by callingsetReturnValueinstead ofcancel
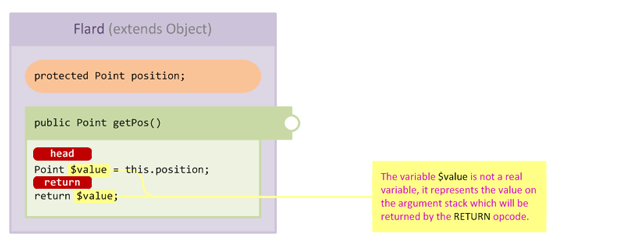
As you can imagine, this is incredibly useful when injecting into getters or when Short Circuiting a method with an inject at HEAD. Let's take a look at an example method which returns a value:
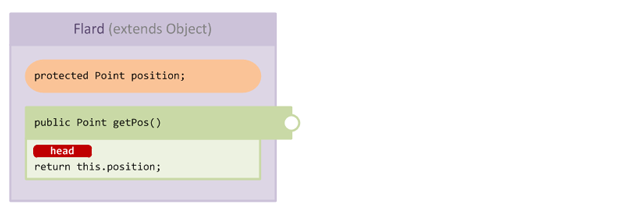
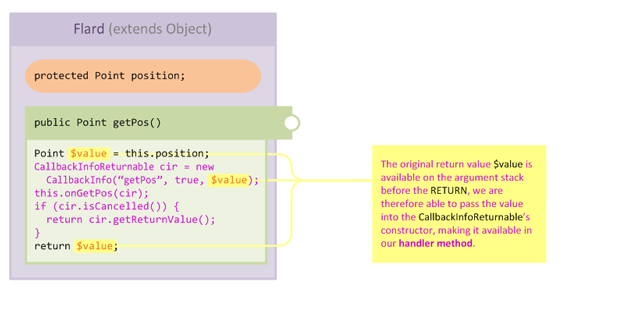
The getPos method is a typical getter method in that its method body simply returns the value of a protected field. Let's add a mixin which injects at HEAD and returns a defaulted value if the field is null:
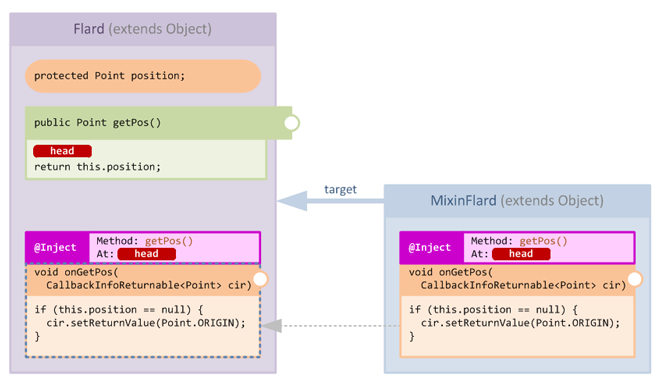
The injector first merges our handler method into the target class, next it injects code into the target method to handle the cancellation.
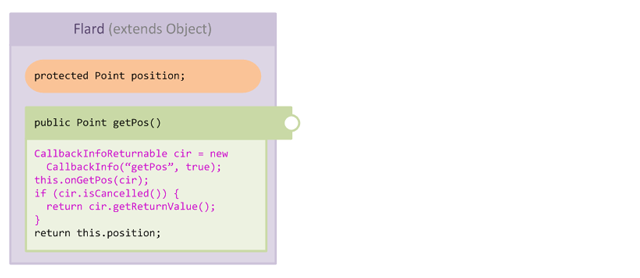
Note how the injected code differs from the void-type short-circuit code shown above. This time the injector returns the value we set in the CallbackInfoReturnable if the callback is cancelled. Our mixin code looks like this
@Inject(method = "getPos", at = @At("HEAD"), cancellable = true)
protected void onGetPos(CallbackInfoReturnable<Point> cir) {
    if (this.position == null) {
        // setReturnValue implicitly cancel()s the callback
        cir.setReturnValue(Point.ORIGIN);
    }

    // Note that if the handler returns normally then the method
    // continues as normal, just like a normal cancellable
    //  injection does if cancel() is not called.
}
As you can imagine, this type of injector is extremely powerful, and is not restricted to HEAD injections, you can use any Injection Point that you wish. Something special happens when using cancellable returnable injections on RETURN however:
You may be thinking "but surely in this very simple method, the HEAD and RETURN basically mean the same thing, right?"
You would be forgiven for thinking that, since it seems like the logical deduction, however in practice the single statement return this.position actually consists of two operations:
- Fetch the value of the field
position - Return the value
The value is temporarily stored in the method's argument stack, you can think of these as temporary, invisible variables which store values as the JVM manipulates them. What this means from a practical perspective is that HEAD and RETURN are actually separate places in the method!
Since we know that a RETURN opcode must return a value, we know that the value is available for us to access whenever we inject at RETURN. The injection processor handles this situation and "captures" the return value into the CallbackInfo passed to our handler:
This approach has a number of benefits:
- The contract of our injector can now be more loosely coupled to the implementation of the target method. In other words, if the target method changes, our handler doesn't need to know about the change, since it only cares about the value being returned.
- If a target method has multiple
RETURNopcodes, the value returned can still be processed without needing additional context - It allows us to make "observer" injections which only inspect the value being returned without actually altering it or needing to worry about the method's implementation.
For example, let's say we alter our example injector above to use RETURN instead of HEAD. All we care about is having the method not return null, so our code becomes:
@Inject(method = "getPos", at = @At("RETURN"), cancellable = true)
protected void onGetPos(CallbackInfoReturnable<Point> cir) {
    // Check the captured return value
    if (cir.getReturnValue() == null) {
        // if it's null, set our fallback value as the return
        cir.setReturnValue(Point.ORIGIN);
    }
}It should be noted that the at parameter of an @Inject annotation is actually an array type. This means that it is quite possible to specify multiple Injection Points for a single injector handler method.
When specifying the target method for an injector, appending an asterisk (*) the method name directs the mixin processor to match all methods with the specified name, regardless of their signature. This allows a single injector to target multiple methods.
Using this syntax makes it impossible to capture method arguments, since the method arguments will vary from method to method. However it makes observer-type injections trivial. For example, consider the following injection:
@Inject(method = "<init>*", at = @At("RETURN"))
private void onConstructed(CallbackInfo ci) {
    // do initialisation stuff
}
This injector injects a callback into all constructors in the class. This is useful if a target class has multiple overloaded constructors and you simply wish to inject into all of them.
Wildcard targets can be used with any method name, however if a wildcard matches methods with both void return types and non-void return types, then the injection will fail with an error because a CallbackInfoReturnable is required for the non-void targets.
Now constructors in java code are fairly straightforward and impose three simple restrictions:
- you must call
superbefore any other code - you must initialise any
finalfields. - as a corollary to point 1, you cannot invoke an instance method inline in the
supercall, any calls made here must be static
However at the bytecode level constructors are much more delicate. Since a compiled <init> method represents a mish-mash of the original constructor code, any field initialisers for the class (duplicated in all constructors), and in some cases synthetic (compiler-generated) code as well (for example in Enum constructors). Because of their nature, they represent a minefield for bytecode-level transformations.
Mixin thus imposes the following restriction on injecting into constructors:
-
The only Injection Point supported for constructors is the
RETURNinjector This restriction is imposed because there is no other sensible way to be sure that the class is fully initialised before calling your handler code.
If you want to inject into a constructor, you must specify RETURN as your injection point.
Like other Mixin capabilities, Callback Injectors are designed to be fail-fast and fail-safe. This generally means that if an injector fails it will generally do one of two things:
- Fail "silently" (unless mixin debugging is enabled) and leave the target method untouched (however the handler method will still be merged into the target class)
- Fail with a deterministic error message: for example when an injector finds its target opcode but the handler method has an incorrect signature.
Injectors are designed so that any failure will not corrupt the method bytecode, it will either succeed or deterministically fail.
Silent failure is usually reserved for Injectors whose Injection Points match no opcodes. This can happen when the target method is altered or replaced and can be extremely useful since "overloaded" injectors can be created to cater for different situations.
However sometimes it may be important that a certain injector succeeds. Perhaps the stability of your application depends on it, or failure is not an anticipated state and the application should be shut down. Either way, it is sometimes necessary to be able to insist that an injector succeeds (and raise a failure state if it does not). This is possible using the expect and require arguments.
The require argument is simple, specifying a value for require declares that the injector must succeed at least this many times.
@Inject(method = "foo", at = @At(value = "INVOKE", target = "someMethod"), require = 2)
private void onInvokeSomeMethodInFoo(CallbackInfo ci) {
    ...
In this example, we expect our Injection Point to match 2 invocations in the target method. Specifying require means that if fewer than 2 injections result, then an error will be raised.
It is also possible to specify a config-wide value for require in your mixin config file.
Sometimes failing at runtime is okay, but when developing your mixins you want to be able to use the require functionality (error when an injection fails) without having to sprinkle require everywhere and then remember to remove it before your code goes into production!
The expect argument allows you to do exactly that. expect works exactly like require, apart from the fact that it is only processed whenever the mixin.debug.countInjections system property is set to true. This allows you to check your injectors are working at dev time, but allow them to fail-fast in production.
You can specify a configuration-wide default value for require in your mixin config file, by including an injectors block, you can override the default value for require for all mixins in your config:
{
   "injectors": {
        "defaultRequire": 1
    }
}Whilst the semantics of require allow you to stipulate behaviour for a single injector, you may encounter a situation where you wish to provide multiple, alternative injectors for a single case. This is useful if your Mixin targets multiple environments, or if another transformer is known to alter a particular target method in a well-defined way.
In these circumstances you may provide two or more injectors in which only one is expected to succeed for a given environment. This of course presents a problem with how you might leverage the require value for those injectors, since if at least one is expected to fail in a given scenario this makes the use of require impossible.
To tackle this situation, declaration of injector groups is supported. Using injector groups allows a min and max number of injections to be specified for the group, thus ensuring that the injections can still be verified as working but only the specified number of injections should occur.
To leverage injector groups, simply decorate each injector handler method with an @Group annotation. The first annotation should also specify min and (optionally) max. If multiple injector groups are used in a single mixin, then a unique name for the group should be specified on all of the @Group annotations in the mixin.
When you define a Callback Injector handler method, your method is merged into the target class using normal mixin behaviour. However this has implications for sub-classing, in particular injectors defined in derived types.
-
Handler methods are renamed before merging - all handler methods are decorated before being merged into the target class. This ensures that if another mixin to the same class defines an identical injector, the two handler methods will not conflict.
-
Handler methods are called using the opcode matching their access level - if your handler method is
privatethen it will be called usingINVOKESPECIAL(static binding), if your handler method is non-private it will be called usingINVOKEVIRTUAL, this will allow you to@Overridethe handler in a derived mixin. -
If you
@Overridea handler method in a derived mixin, it will be renamed to match the decoration of its supermixin counterpart - this is done so that a method in a derived class can never "accidentally" override your handler method.
In general, unless explicitly planning to use override semantics for a particular handler, it is recommended that handler methods be private.
This might seem like a lot to take in, Callback Injectors are powerful and quite nuanced, and as such that's not an unreasonable way to feel! Let's recap the key points to put this all in perspective:
-
Callback Injectors are just regular mixin methods which have the special behaviour of injecting a callback to themselves somewhere else in the target class
-
They always consist of a handler method, a target method and some Injection Points inside the target
-
Callback Injector methods always take a
CallbackInfo, and can take other arguments, such as the arguments of the target method, as well -
Callbacks can be cancellable, allowing a premature return from the target method
-
Different ways of handling failure exist for injectors,
requireis the most useful setting and you should use it often
It's also worth mentioning things that callback injectors cannot, or do not, do:
-
Callback Injectors do not inject the handler code into the target, they only ever inject a callback. If you want to return, use a cancellable injection.
-
Callback Injectors cannot inject arbitrarily into constructors, only
RETURNis valid for constructor injectors
Callback Injectors are the most basic form of injector provided by Mixin. In the following tutorial articles, we will introduce the other, more specialised, injectors:
-
Capturing local variables with Callback Injectors
A secondary feature of regular Callback Injectors, not covered in this introduction, is the ability to capture the local variables at the target location. In this article I introduce the concept of local capture, and the use of surrogates and argument coercion. -
Introduction to Redirect Injectors
Probably the most powerful injector type. Redirect injectors allow a target method call or field access to be "redirected" to a custom callback. This type of injector can be leveraged extremely effectively to "wrap around" a method call, change the return value of a method call, or inhibit a method call altogether. -
Using ModifyArg Injectors to modify method invocation arguments
Redirect's baby brother, this type of injector allows a single argument to a method to be altered on-the-fly using a callback method. -
Tweaking local variables in a method using ModifyVariable Injectors
Whilst delicate and one of the more tricky injectors to use, ModifyVariable injectors are the only injector type which can directly edit the value of a local variable within a method. -
Hooking and modifying literal values using ModifyConstant Injectors
This type of injector can be used to turn a constant value used in a method into a method call to a callback. Extremely useful for hooking into loop logic, conditionals, or other "hard coded" parts of a target method that you wish to alter.