Quick Start
As an introduction to the framework, let's create a simple user interface (also referred to as a screen or screen layer) that will interact with Terasology's in-game systems to display an overview of your game environment.
To get started, create a new module called TutorialNui (or any other name of your choosing). In the new module, navigate to the assets/ui folder and create a new file called environmentInfoScreen.ui. In Terasology, .ui files are JSON-based hierarchical structures that contain information about the layout and structure of the user interface separated from the application logic, and can be created/edited using the in-game NUI editor - they are fairly similar in concept to markup files such as FXML (JavaFX) or Qt UI (Qt).
Add the following starter code to the file:
{
    "type": "EnvironmentInfoScreen",
    "contents": {
        "type": "UILabel",
        "text": "Environment Info"
    }
}- The root element of a
.uifile is always a JSON object. It contains a reference to the type of the screen, its base widget and several optional parameters such as the type of the skin to be used by the screen. - The second line sets the type of the screen to
EnvironmentInfoScreen. When the screen is loaded, the NUI manager will attempt to find a class overridingCoreScreenLayerwith the specified name in the currently loaded modules - if it exists, the screen will be initialised according to its methods. Note that the type of the screen does not have to have the same name as the asset file, though it's a commonly followed and recommended convention. - The third line describes a single base widget, or UI element. Generally this would be a layout - a widget containing one or more widgets that are structured according to the type of the layout. However, a single widget is also a valid option.
- The fourth line sets the
typeproperty of the base widget toUILabel- similarly to the screen, the widget will be rendered based on code from theUILabelclass. The fifth sets ittextproperty (a String) to "Environment Info" - this is a property specific toUILabel. In widgets, all properties that are marked with the@LayoutConfigannotation can be deserialized from the.uifile.
Next up, create a new Java class - org.terasology.tutorialnui.EnvironmentInfoScreen. This file will include the code to initialise and populate the user interface and add event handlers to the interface's control elements. For now, add the following stub to the file:
package org.terasology.tutorialnui;

import org.terasology.rendering.nui.CoreScreenLayer;

public class EnvironmentInfoScreen extends CoreScreenLayer {
    @Override
    public void initialise() {
    }
}Create a new game with the custom module enabled. Once in-game, open the console (hit F1 for console) and type showScreen environmentInfoScreen. If the module has been set up correctly, you'll see a new element added to the in-game interface:
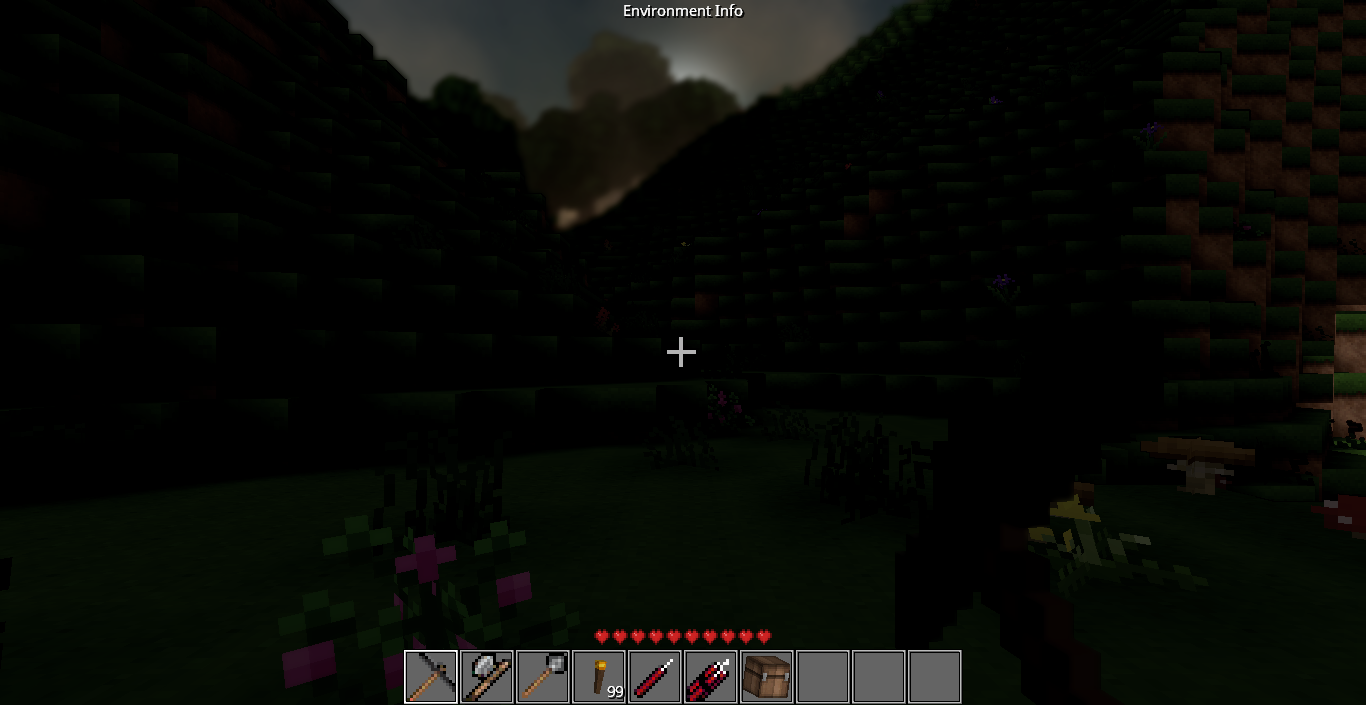
To close the screen, press ESC. (Do not close the game just yet - as changes to a .ui file are tracked by the asset system, changes we make to the screen will be immediately displayed in-game when the screen is re-opened!)
Let's expand the stub screen to a full-fledged layout with three elements:
- A label with a title for the screen.
- A text area that will contain information about the environment.
- A button that will update the info in text area when clicked.
First of all, replace the UILabel with a relativeLayout - a composite widget that stores an array of widgets and renders them according to information stored in the widgets' layoutInfo properties.
{
    "type": "EnvironmentInfoScreen",
    "contents": {
        "type": "relativeLayout",
        "contents": []
    }
}
The layout will contain a single widget of type UIBox. This is a simple widget container which stores another widget and renders it along with a rectangular background. Copy the following code to the .ui file:
{
    "type": "EnvironmentInfoScreen",
    "contents": {
        "type": "relativeLayout",
        "contents": [
            {
                "type": "UIBox",
                "layoutInfo": {
                    "width": 300,
                    "height": 300,
                    "position-horizontal-center": {},
                    "position-vertical-center": {}
                },
                "content": {}
            }
        ]
    }
}
Wrapping the UIBox in a relativeLayout allows us to customize its size and position relative to other elements. This layout-specific information is stored in a layoutInfo object that can be used by any widget located within a layout.
The UIBox itself will contain the three elements we've mentioned previously. Set the content of the UIBox to a relativeLayout to wrap these elements:
"type": "UIBox",
"layoutInfo": {
    "width": 300,
    "height": 300,
    "position-horizontal-center": {},
    "position-vertical-center": {}
},
"content": {
    "type": "relativeLayout",
    "contents": []
}
Finally, place the three objects within the layout:
"contents": [
    {
        "type": "UILabel",
        "id": "environmentInfoLabel",
        "text": "Environment Info",
        "layoutInfo": {
            "use-content-width": true,
            "position-horizontal-center": {},
            "height": 30
        }
    },
    {
        "type": "UIText",
        "text": "",
        "id": "infoArea",
        "layoutInfo": {
            "position-top": {
                "widget": "environmentInfoLabel",
                "target": "BOTTOM"
            },
            "position-bottom": {
                "widget": "updateInfoButton",
                "target": "TOP"
            }
        },
        "multiline": true,
        "readOnly": true
    },
    {
        "type": "UIButton",
        "id": "updateInfoButton",
        "text": "Update Information",
        "layoutInfo": {
            "use-content-height": true,
            "position-bottom": {}
        }
    }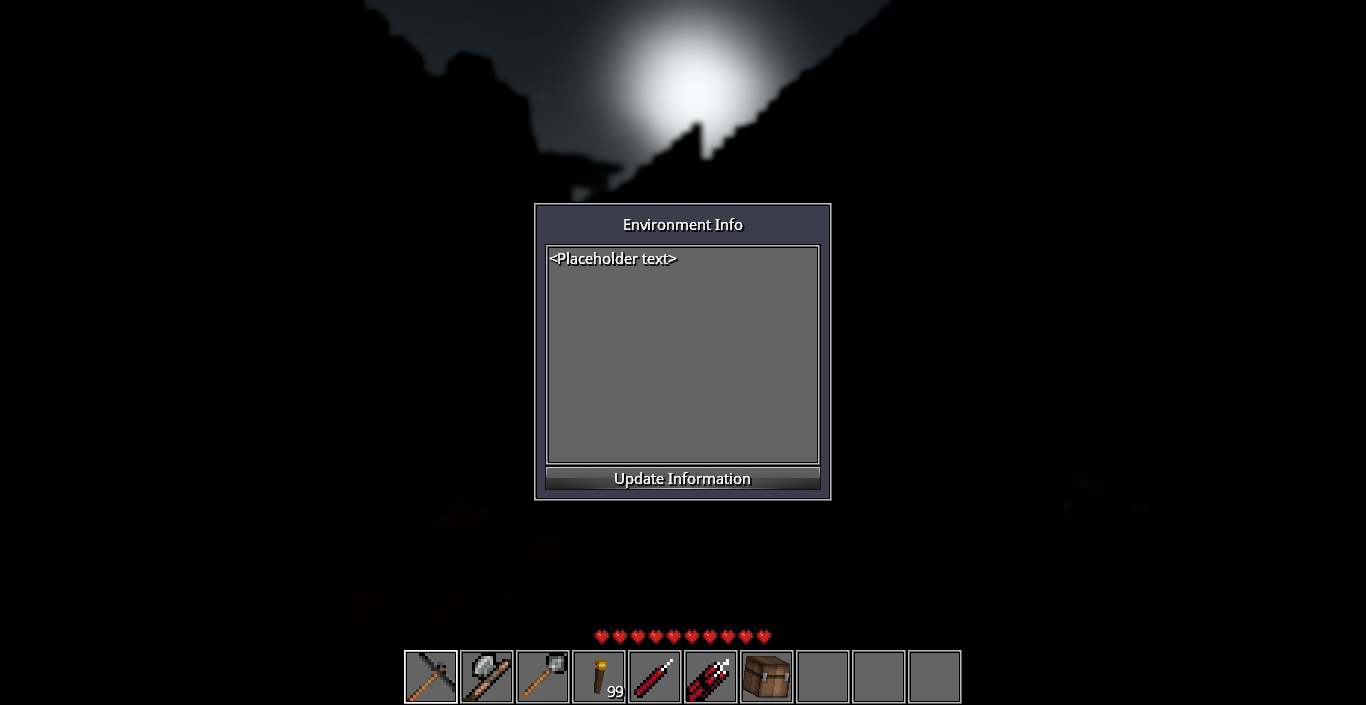
]- The
idfield denotes the identifier for a widget. It can be used in the code-behind class to detect a widget and modify its various properties, as well as in the.uifile itself when a widget reference is required. - For the
UITextwidget, we've used the relativity constraints ofrelativeLayout, placing it at the bottom of theUILabelbut on the top of theUIButton. An alternative approach would be to userowLayout- a specialized layout class that would always place the elements it contains below each other, with a given horizontal spacing between them.
Run showScreen environmentInfoScreen again to view the final interface:
(At this point you can close the game - since we will now be modifying the code-behind class, a restart will be required to apply the changes)
Let's now move to the EnvironmentInfoScreen class to code the functionality that will make the interface display the information about the environment when prompted.
The main function that connects the "controller" class with the underlying .ui file is the find(String targetId, Class<T extends UIWidget> type) method which finds an element with a given id in the widget hierarchy and returns the object it represents. Use the method to retrieve two widgets that we'll be modifying:
package org.terasology.tutorialnui;
import org.terasology.rendering.nui.CoreScreenLayer;
import org.terasology.rendering.nui.widgets.UIButton;
import org.terasology.rendering.nui.widgets.UIText;
public class EnvironmentInfoScreen extends CoreScreenLayer {
private UIText infoArea;
private UIButton updateInfoButton;
@Override
public void initialise() {
infoArea = find("infoArea", UIText.class);
updateInfoButton = find("updateInfoButton", UIButton.class);
}
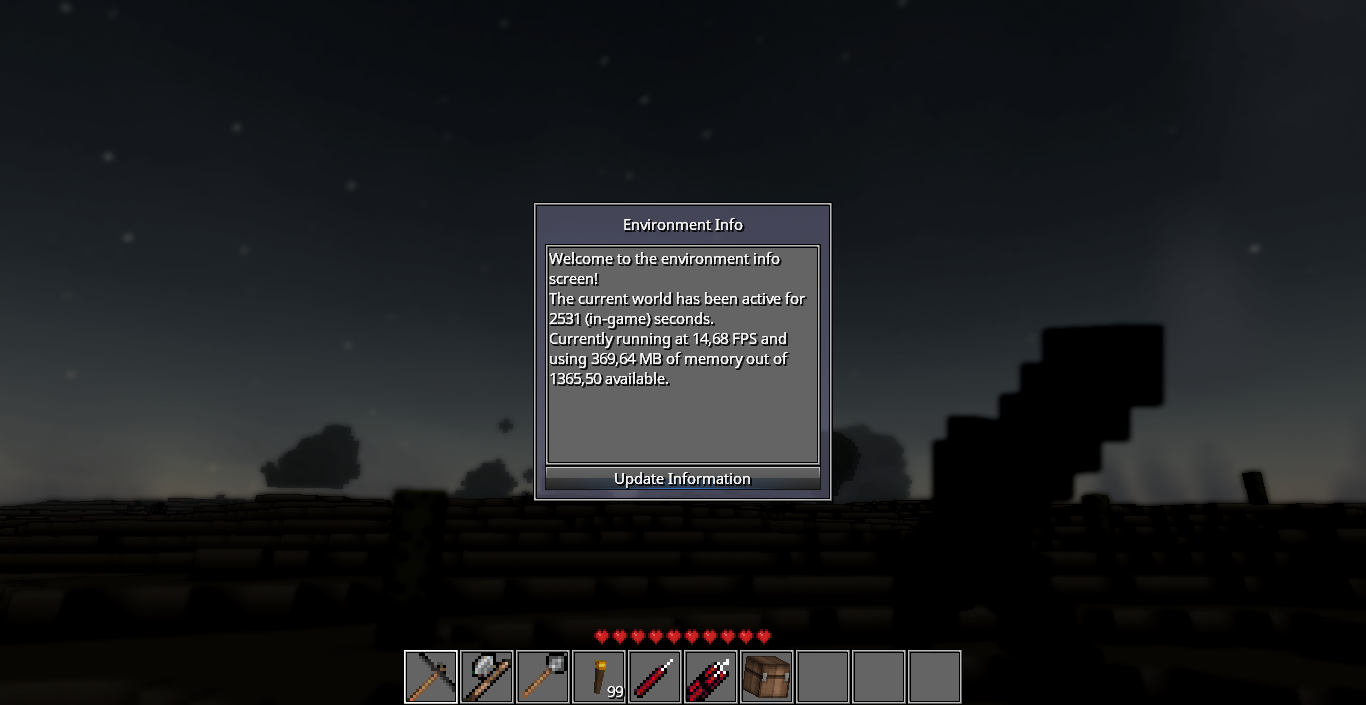
}Let's now change the code so that updateInfoButton changes the value of the infoArea when clicked. This can be done by adding an interaction listener to updateInfoButton - a function that will be ran when a specific action related to the widget is completed (in this case, when the button is clicked). The interaction listener will construct a string containing the status of the environment, then pass it to infoArea using the setText(String text) method.
package org.terasology.tutorialnui;

import org.terasology.engine.Time;
import org.terasology.registry.In;
import org.terasology.rendering.nui.CoreScreenLayer;
import org.terasology.rendering.nui.widgets.UIButton;
import org.terasology.rendering.nui.widgets.UIText;

public class EnvironmentInfoScreen extends CoreScreenLayer {
    private UIText infoArea;
    private UIButton updateInfoButton;

    @In
    private Time time;

    @Override
    public void initialise() {
        infoArea = find("infoArea", UIText.class);
        updateInfoButton = find("updateInfoButton", UIButton.class);

        if (updateInfoButton != null) {
            updateInfoButton.subscribe(button -> {
                final double bytesInMegabyte = 1048576.0;
                double memoryUsage = ((double) Runtime.getRuntime().totalMemory() - (double) Runtime.getRuntime().freeMemory()) / bytesInMegabyte;
                infoArea.setText(String.format("Welcome to the environment info screen!%n" +
                        "The current world has been active for %.0f (in-game) seconds.%n" +
                        "Currently running at %.2f FPS and using %.2f MB of memory out of %.2f available.",
                    time.getGameTime(), time.getFps(),
                    memoryUsage, Runtime.getRuntime().maxMemory() / bytesInMegabyte));
            });
        }
    }
}
Launch the game again, run showScreen environmentInfoScreen and take a look at the final interactive screen. Congratulations, your first NUI-based screen is now complete!
The full code for this tutorial can be found at EnvironmentInfoScreen.java and environmentInfoScreen.ui.