Chromatic correction
This submenu provides tools for a subpixel/nanometer correction of chromatic aberration. In short, it happens when lights of different colors travel in a different way through microscope's optical path, resulting in different images of the same object depending on the color used for imaging, for example:
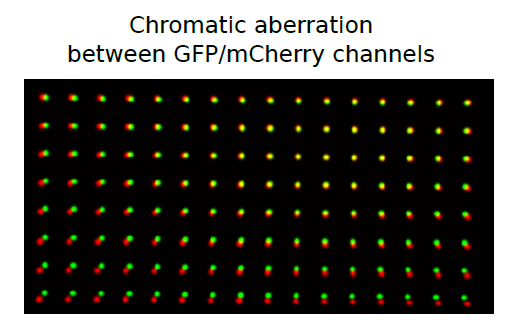
The majority of modern microscope objectives are designed to correct this effect to some extent. Chromatic aberrations are rarely noticeable during regular imaging, but when it comes to a superresolution acquisition (nanoscopy) or single molecule imaging, subpixel differences of 20 or 30 nm are becoming important and need to be taken into account.
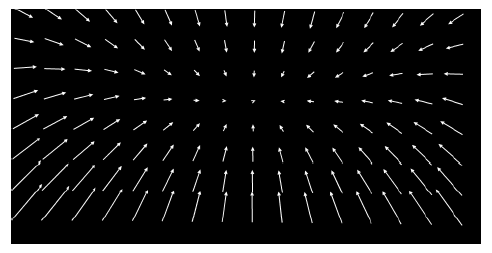
In general, a chromatic distortion of object's image in one channel in comparison to its image in another channel is not limited to regular affine transformations (translation, scaling, rotation, etc). For this reason our plugin uses more flexible continuous smooth B-spline grid registration based on Matlab code/paper described here. As a calibration reference it uses two images (or stacks) of subdiffraction spots acquired in both channels to map the distortion. The final registration precision is on the order of 1-3 nm or less (measured as SD of difference), but it depends on specific optical path, density of calibration spots, etc. The best quick way to estimate it is to do the correction with this plugin for your own setup using two independent images (one used for calibration and another for verification). Here is example of registration map shifts without translational component for above GFP/mCherry channels picture:
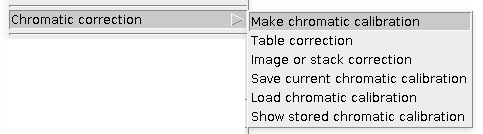
This is a typical workflow: first you need to Make chromatic calibration (click link for instructions), which can be later used for Results Table correction or raw Image or stack correction of warped channel with respect to the reference channel. The calibration can be stored to ImageJ registry and used immediately or saved on a hard drive.
The general idea is that there are two channels: REFERENCE and WARPED. Based on provided calibration images (actually, particles detected on them), the plugin will calculate a transform making WARPED channel image (or Results table) as close as possible to the REFERENCE channel (which remains unchanged). Which channel should be used as a reference and which should be a warped one? Usually "green" (510 nm) channel is optimal for objectives performance, so it is used as a reference. But for the plugin itself, there is really no difference, it will register any two provided channels. So one should keep in mind, that it is not an "absolute" registration, but rather "relative".
NB: After performing calibration, the transform/calibration can be stored in "ImageJ registry" and so further it will be used to warp one of the channels. Keep in mind, that after you restart ImageJ/FIJI, the transform/calibration will still be there. For example, when you run Table correction, the plugin will not ask you for the calibration file/transform. The current stored version of the transform will be used for registration. But you can look at it, save it to a disk or load "to registry" another transform/calibration.
It is the most important/crucial step, so it has its own page with a detailed description (click on the header and read carefully)
This function will apply stored transform/calibration to detection Results table, assuming provided data comes from WARPED channel. Table will be updated, i.e. original results will be overwritten. This option should be used for superresolution localization data.
This function will apply stored transform/calibration to the currently selected (active) image or stack, assuming provided data comes from WARPED channel. It will generate a new registered image/stack, so the original will remain unchanged. Keep in mind, that resulted "warped" image is interpolated, so it is not the best option if you are dealing with single molecule localization data. In this case, you'll get more precise results if you first fit single molecules and then apply Table correction, rather than apply stack correction and than do the fitting. But still, it is a very convenient option to show movies/pictures with included correction, it can be used for a single molecule in vitro assays, live protein imaging, etc.
The plugin will save the current stored in "ImageJ registry" calibration as a text file that can be loaded later.
The plugin will read provided text file with calibration and load it to "ImageJ registry", so it will become the current active correction.
Plugin will output to the Log window details of the current chromatic calibration/transform stored in "ImageJ registry". It is useful if you want quickly check on it since it gives calibration date, image/pixel size and translation shifts in X and Y. In the end, there is a whole bunch of B-splines coefficients, they can be safely ignored.