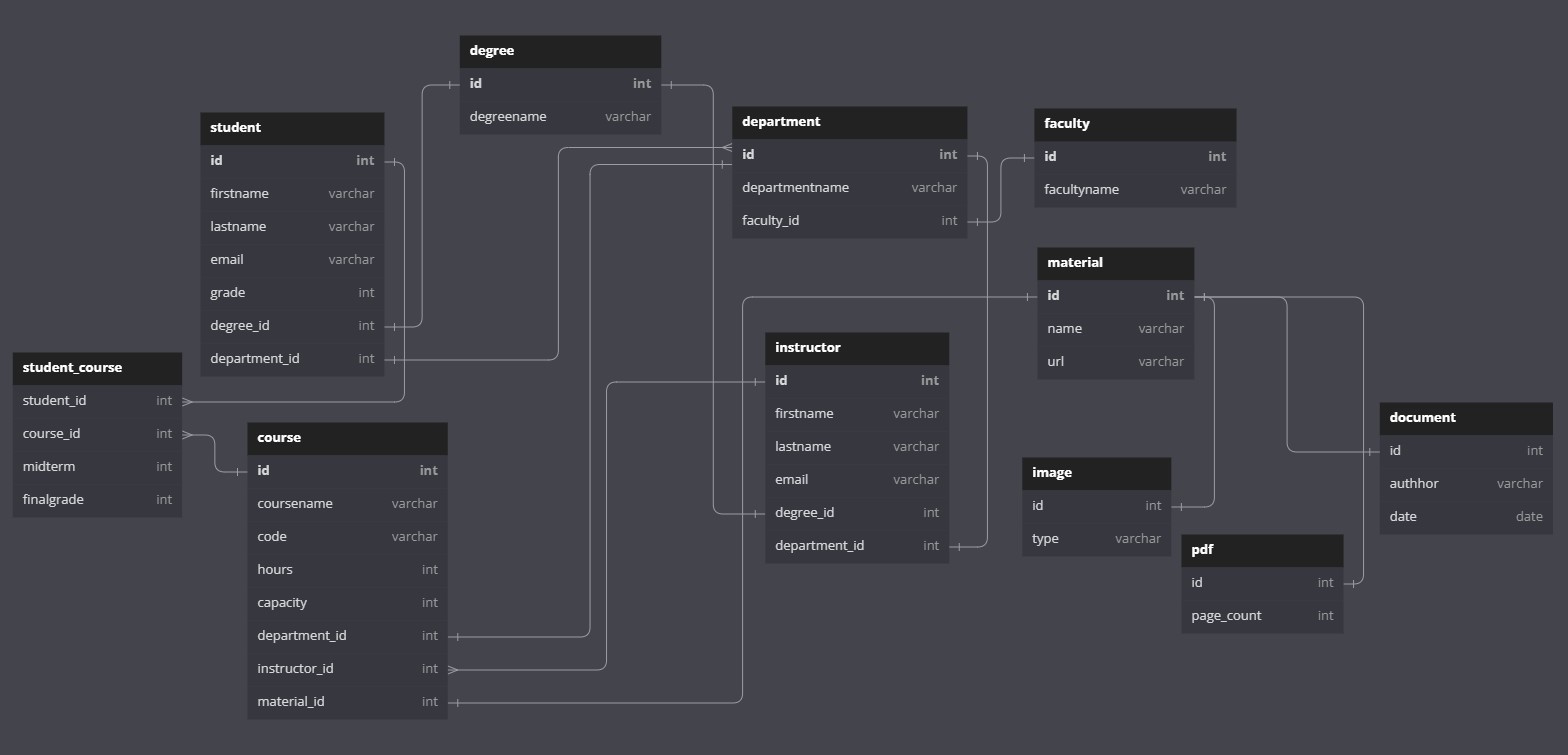
This is a personal documentation and library for me. Since I often use JPA and Hibernate ORM in my projects, I wanted to make my own documentation. There is a database with 1-1, 1-n, n-1, n-n relationships in the project. You can see the tables of the database in the image below.
- What is JPA?
- What is Hibernate?
- Entity Life Cycle
- Recap
- Most Used Annotations
- Relationships
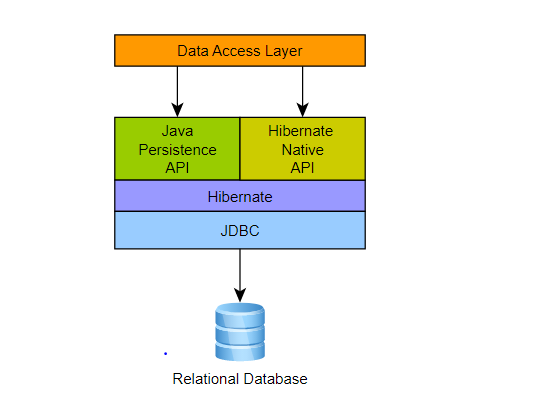
Java Persistence API (JPA) materializes as a defining Java specification, which proves valuable in the persistence of data between Java objects and relational databases. JPA serves as a connective tissue between object-oriented domain models and relational database systems, streamlining data storage and retrieval.
Hibernate is an object-relational mapping (ORM) framework for Java applications that provides an efficient way to interact with relational databases. It simplifies the task of storing, retrieving, and manipulating data in the database by mapping Java objects to database tables and vice versa. Hibernate is an open-source framework that automates much of the repetitive database-related code, allowing developers to focus on business logic instead.
Jpa and Hibernate Architecture
Each Hibernate entity undergoes a transformative journey within the framework, cascading through states of transience, management, detachment, or deletion. Comprehending the intricacies of these states, both in terms of conceptual and technical nuances, is imperative to wield Hibernate with dexterity
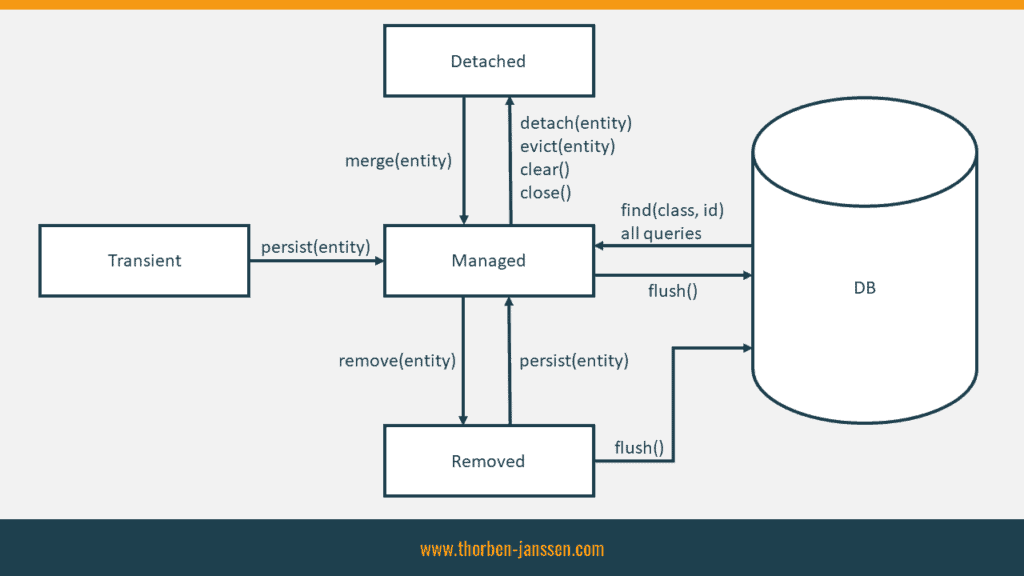
The Persistence Context is a crucial concept in JPA and Hibernate. It represents the environment or context in which entity objects are managed and their state is tracked during interactions with the database. The Persistence Context is typically associated with an EntityManager.
The entity starts in the transient state when it is first created using the "new" keyword. In this state, the entity is not yet associated with the Persistence Context or any database table. It is just a regular Java object.
-
-
To make an entity managed, you need to persist it. Calling the EntityManager's persist() method on the transient entity transitions it to the managed state. The entity becomes associated with the Persistence Context, is assigned an identifier (primary key), and will be synchronized with the database during the next flush or commit operation.
-
In the managed state, any changes made to the entity's properties are automatically tracked by the Persistence Context. The Persistence Context keeps a copy of the entity's original state to perform dirty checking and determine which modifications should be synchronized with the database.
-
-
-
An entity transitions from the managed state to the detached state when it is detached from the Persistence Context. This can happen explicitly by calling the EntityManager's detach() or clear() methods, or implicitly when the Persistence Context is closed or the transaction ends.
-
In the detached state, the entity is no longer associated with the Persistence Context. However, it still retains its identifier and any modifications made to the entity will not be tracked by the Persistence Context.
-
If a detached entity needs to be reattached and have its changes synchronized with the database, the EntityManager's merge() method is used. This merges the detached entity with the Persistence Context, creates a new managed entity with the same state, and returns the managed entity. The original detached entity remains detached.
-
-
The EntityManager's remove() method is used to mark a managed entity for removal from the database. This transitions the entity to the removed state.
-
During the next flush or commit operation, the entity is deleted from the database, and its association with the Persistence Context is severed.
-
After being removed, the entity returns to the transient state. It can be considered as a new entity, and if needed, it can be persisted again to start a new lifecycle.
In a one-to-one relationship, one record in the first table (let's call it Table A) is related to only one record in the second table (Table B), and vice versa. This means that for each row in Table A, there is exactly one corresponding row in Table B, and vice versa. This relationship is relatively rare, as it is typically more efficient to combine the two tables into a single table. Example: Consider two tables, "Employee" and "EmployeeAddress." Each employee can have only one address, and each address belongs to only one employee. Here, the relationship between "Employee" and "EmployeeAddress" is a one-to-one relationship.
Employee Table:
EmployeeID | Name    | Department
-------------------------------
1          | John    | HR
2          | Jane    | Finance
3          | Alex    | IT

EmployeeAddress Table:
EmployeeID | Address
---------------------
1          | 123 Main St
2          | 456 Oak Ave
3          | 789 Elm Rd
In a one-to-many relationship, one record in the first table (Table A) is associated with one or more records in the second table (Table B). However, each record in Table B can be related to only one record in Table A. This is the most common type of relationship found in databases. Example: Consider two tables, "Department" and "Employee." Each department can have many employees, but each employee can belong to only one department. Here, the relationship between "Department" and "Employee" is a one-to-many relationship.
Department Table:
DepartmentID | Name
-------------------
1            | HR
2            | Finance
3            | IT

Employee Table:
EmployeeID | Name    | DepartmentID
-----------------------------------
1          | John    | 1
2          | Jane    | 2
3          | Alex    | 3
4          | Sarah   | 2
5          | Mike    | 3
In a many-to-many relationship, one or more records in the first table (Table A) can be associated with one or more records in the second table (Table B), and vice versa. To represent this relationship in a relational database, a junction table (also known as an associative table or linking table) is used. The junction table connects the primary keys of both tables through foreign keys. Example: Consider two tables, "Student" and "Course." Each student can enroll in multiple courses, and each course can have multiple students. To represent this relationship, a junction table "Enrollment" is used.
Student Table:
StudentID | Name
----------------
1         | John
2         | Jane
3         | Alex

Course Table:
CourseID | Name
---------------
101      | Math
102      | Science
103      | History

Enrollment Table:
StudentID | CourseID
--------------------
1         | 101
1         | 102
2         | 102
3         | 103
In the context of relationships in database management systems, "directional" and "bidirectional" refer to the way data can be accessed and traversed between related tables. Let's take a closer look at each:
In a directional relationship, data can be accessed and traversed in only one direction between the related tables. This means that one table acts as the parent or master table, and the other table acts as the child or detail table. The relationship is established using foreign keys in the child table, which reference the primary key in the parent table. In this type of relationship, you can easily access data from the child table by referencing the foreign key, but you cannot directly access data from the parent table using the child table's foreign key.
Example: Consider two tables, "Author" and "Book." Each book can have only one author, but each author can have multiple books. The relationship between "Author" and "Book" is a directional relationship because you can easily find the books written by a specific author by using the author's primary key as a foreign key in the "Book" table. However, you cannot directly find the author of a specific book using the "Author" table.
Author Table:
AuthorID | Name        | Country
-------------------------------
1        | John Smith  | USA
2        | Jane Doe    | UK
3        | Alex Johnson| Canada

Book Table:
BookID | Title               | AuthorID (Foreign Key to Author Table)
------------------------------------------------------------
101    | The Book of Life   | 1
102    | Beyond the Stars   | 2
103    | Coding Adventures  | 1
104    | Mystery of the Forest | 3
105    | Journey to Mars    | 1
In a bidirectional relationship, data can be accessed and traversed in both directions between the related tables. This means that each table can act as both the parent and the child table simultaneously. The relationship is established using foreign keys in both tables, allowing you to navigate data between the tables in either direction. In this type of relationship, you can easily access data from both tables using their respective foreign keys.
Example: Consider two tables, "Student" and "Course." Each student can enroll in multiple courses, and each course can have multiple students. The relationship between "Student" and "Course" is a bidirectional relationship because you can find the courses a specific student is enrolled in using the "Student" table or find the students enrolled in a specific course using the "Course" table.
Student Table:
StudentID | Name
----------------
1         | John
2         | Jane
3         | Alex

Course Table:
CourseID | Name
---------------
101      | Math
102      | Science
103      | History

Enrollment Table:
StudentID | CourseID
--------------------
1         | 101
1         | 102
2         | 102
3         | 103
In this bidirectional relationship:
- The "Student" table contains information about the students.
- The "Course" table contains information about the courses.
- The "Enrollment" table acts as a junction table, representing the many-to-many relationship between students and courses. Each row in the "Enrollment" table connects a student to a course through their respective IDs.
Now, using this bidirectional relationship:
- You can easily find the courses a specific student is enrolled in by referencing the "StudentID" in the "Enrollment" table.
- You can also find the students enrolled in a specific course by referencing the "CourseID" in the "Enrollment" table.
For example, if you want to find the courses John is enrolled in, you can look for rows in the "Enrollment" table where the "StudentID" is 1. Similarly, if you want to find all students enrolled in the Math course, you can look for rows in the "Enrollment" table where the "CourseID" is 101.
The @Entity annotation in Jakarta Persistence (formerly known as Java Persistence API or JPA) is used to mark a Java class as a persistent entity, which means that instances of this class will be mapped to database records. It is a crucial annotation used in ORM (Object-Relational Mapping) frameworks to map Java objects to database tables.
Here's a simple code example to illustrate the use of @Entity:
@Entity
public class Student {

    @Id
    @GeneratedValue(strategy = GenerationType.IDENTITY)
    private Long id;

    private String name;

    private int age;

    // Constructors, getters, setters, and other methods...
}
In this example, we have a Student class marked with the @Entity annotation. Let's go through the properties of this annotation:
-
@Entity: This annotation indicates that theStudentclass is a persistent entity, and its instances will be mapped to database records. The entity name defaults to the unqualified class name (Studentin this case) but can be explicitly specified withnameattribute. -
@Id: This annotation is used to specify the primary key attribute of the entity. In this example, we have marked theidfield as the primary key for theStudententity. The primary key uniquely identifies each record in the database table. -
@GeneratedValue: This annotation is used to specify the strategy for generating the primary key values. In this example, we have usedGenerationType.IDENTITY, which means that the database will automatically generate unique primary key values (usually through auto-incrementing).
Other properties of the @Entity annotation include:
name: Specifies the name of the entity in the database. By default, it is the simple name of the entity class.schema: Specifies the schema name of the table associated with the entity.catalog: Specifies the catalog name of the table associated with the entity.uniqueConstraints: Specifies unique constraints on the table.
Here's an example that includes more properties of the @Entity annotation:
@Entity
@Table(name = "students", schema = "university", uniqueConstraints = {
    @UniqueConstraint(columnNames = "name")
})
public class Student {

    @Id
    @GeneratedValue(strategy = GenerationType.IDENTITY)
    @Column(name = "student_id")
    private Long id;

    @Column(nullable = false, length = 100)
    private String name;

    @Column(name = "student_age")
    private int age;

    // Constructors, getters, setters, and other methods...
}
In this extended example:
-
@Table: This annotation allows you to specify the table name and other table-related properties for the entity. Here, we have explicitly set the table name to "students" and the schema to "university." We have also added a unique constraint on the "name" column to ensure that each student's name is unique. -
@Column: This annotation is used to specify column-related properties for the entity attributes. In this case, we have used it to set the column name for theidattribute to "student_id" and the column name for theageattribute to "student_age." We have also set thenameattribute to be non-nullable and have a maximum length of 100 characters.
These properties allow you to fine-tune the mapping of your Java entity to the underlying database table. Note that the specific attribute names and properties can vary based on the persistence framework you are using (e.g., Jakarta Persistence, Hibernate, etc.), but the basic concept remains the same.
In Jakarta Persistence (JPA), the @Table annotation is used in conjunction with the @Entity annotation to specify the details of the database table that will be used to store instances of the entity class. The @Table annotation allows you to customize various attributes related to the database table.
Here's an explanation of the attributes of the @Table annotation:
-
name: (Optional) Specifies the name of the table in the database associated with the entity. If not specified, the default table name is derived from the unqualified class name of the entity. Example:@Table(name = "students"). -
schema: (Optional) Specifies the name of the database schema where the table should be created. This is useful when working with multi-schema databases. Example:@Table(name = "students", schema = "university"). -
catalog: (Optional) Specifies the name of the database catalog where the table should be created. This is used in databases that support catalogs. Example:@Table(name = "students", catalog = "university_catalog"). -
uniqueConstraints: (Optional) Defines unique constraints on the table. It is an array of@UniqueConstraintannotations, each specifying a set of columns that should have unique values. Example:@Table(name = "students", uniqueConstraints = { @UniqueConstraint(columnNames = {"name", "email"}), @UniqueConstraint(columnNames = {"student_id"}) })
In this example, we have specified two unique constraints. The first constraint ensures that the combination of "name" and "email" columns is unique, and the second constraint ensures that the "student_id" column has unique values.
-
indexes: (Optional) Defines indexes on the table. It is an array of@Indexannotations, each specifying the columns to be indexed and other attributes related to indexing. Example:@Table(name = "students", indexes = { @Index(columnList = "name"), @Index(name = "idx_age", columnList = "age") })
In this example, we have specified two indexes. The first index indexes the "name" column, and the second index indexes the "age" column and names the index as "idx_age".
-
uniqueConstraints: (Optional) Defines unique constraints on the table. It is an array of@UniqueConstraintannotations, each specifying a set of columns that should have unique values. Example:@Table(name = "students", uniqueConstraints = { @UniqueConstraint(columnNames = {"name", "email"}), @UniqueConstraint(columnNames = {"student_id"}) })
In this example, we have specified two unique constraints. The first constraint ensures that the combination of "name" and "email" columns is unique, and the second constraint ensures that the "student_id" column has unique values.
-
indexes: (Optional) Defines indexes on the table. It is an array of@Indexannotations, each specifying the columns to be indexed and other attributes related to indexing. Example:@Table(name = "students", indexes = { @Index(columnList = "name"), @Index(name = "idx_age", columnList = "age") })
In this example, we have specified two indexes. The first index indexes the "name" column, and the second index indexes the "age" column and names the index as "idx_age". Using the @Table annotation with its attributes allows you to have fine-grained control over the name and structure of the database table associated with your entity class, which can be helpful in various database and schema design scenarios.
@Id annotation is used to specify that a particular field or property in an entity class represents the primary key of the corresponding database table. The primary key uniquely identifies each row in the table.
Here's how the @Id annotation is used:
@Entity
@Table(name = "employees")
public class Employee {

    @Id
    @GeneratedValue(strategy = GenerationType.IDENTITY)
    private Long id;

    private String firstName;
    private String lastName;
    private int age;

    // Constructors, getters, setters, etc.
}
In this example, we have an Employee entity with fields id, firstName, lastName, and age. The id field is marked with the @Id annotation, indicating that it represents the primary key of the employees table in the database.
The @GeneratedValue annotation is also used alongside @Id to specify how the value for the primary key should be generated. In this example, we use GenerationType.IDENTITY, which means that the database will automatically generate the primary key value when a new Employee entity is persisted (inserted) into the database.
There are several other strategies available for generating primary key values using the @GeneratedValue annotation, such as GenerationType.AUTO, GenerationType.SEQUENCE, and GenerationType.TABLE, depending on the underlying database and the requirements of your application.
Using the @Id annotation properly is essential in JPA, as it allows the JPA provider (e.g., Hibernate) to identify and manage entities based on their primary keys, enabling efficient and correct database operations and entity associations.
The @GeneratedValue annotation in JPA is used to specify how the primary key values of an entity should be automatically generated when inserting new records into the database. It is typically used in conjunction with the @Id annotation, which designates the field or property representing the primary key.
The @GeneratedValue annotation has several attributes to define different strategies for generating primary key values. The common attributes are:
-
strategy: Specifies the generation strategy for the primary key value. It accepts one of the values from theGenerationTypeenumeration. Some common strategies are:GenerationType.AUTO: The JPA provider selects an appropriate strategy for the underlying database. It may useIDENTITY,SEQUENCE, orTABLEdepending on the database capabilities.GenerationType.IDENTITY: The primary key value is automatically generated by the database. It relies on an auto-incrementing column (e.g., auto_increment in MySQL) to generate the values.GenerationType.SEQUENCE: The primary key value is generated using a database sequence. ThesequenceNameattribute must also be specified to provide the name of the database sequence.GenerationType.TABLE: The primary key value is generated using a table that stores the last generated key values. ThetableandpkColumnNameattributes must be specified to define the name of the table and primary key column in that table.
-
generator: Specifies the name of the primary key generator to use. This is optional and is typically used in conjunction with thestrategyattribute when using custom primary key generation strategies.
Here's an example of using @GeneratedValue with different strategies:
@Entity
@Table(name = "employees")
public class Employee {

    @Id
    @GeneratedValue(strategy = GenerationType.IDENTITY)
    private Long id;  // Auto-generated using database identity column

    // ...

    @Id
    @GeneratedValue(strategy = GenerationType.SEQUENCE, generator = "emp_seq")
    @SequenceGenerator(name = "emp_seq", sequenceName = "employee_sequence", allocationSize = 1)
    private Long customId;  // Auto-generated using database sequence

    // ...
}
In this example, we have an Employee entity with two primary keys: id and customId. For id, we use GenerationType.IDENTITY, which will rely on the database's auto-incrementing column to generate the values. For customId, we use GenerationType.SEQUENCE with a custom sequence generator named "emp_seq". The sequence generator is specified using the @SequenceGenerator annotation, which provides the name of the database sequence (employee_sequence) to be used and the allocation size (in this case, 1).
Note: The use of multiple @Id annotations in a single entity class represents a composite primary key, which is beyond the scope of this example. It is more common to have a single @Id annotation representing the primary key.
The @Column annotation in JPA is used to specify the mapping of a field or property to a column in the database table. It allows you to customize various attributes of the database column, such as name, length, nullable, uniqueness, etc.
Here are some of the common properties of the @Column annotation:
-
name: Specifies the name of the database column to which the field or property is mapped. If not provided, the default is the name of the Java field or property. -
length: Specifies the length of the column for string-based fields. For example,@Column(length = 100)will create a column with a maximum length of 100 characters. -
nullable: Defines whether the column can hold null values or not. By default, it is set totrue, meaning the column can be nullable. To make the column not nullable, set it tofalselike@Column(nullable = false). -
unique: Specifies whether the column should enforce uniqueness. Settingunique = truemeans the column values must be unique across all rows. -
insertable: Determines whether the column should be included in SQL INSERT statements when persisting an entity. By default, it is set totrue. -
updatable: Determines whether the column should be included in SQL UPDATE statements when updating an entity. By default, it is set totrue.
Here's an example of using the @Column annotation with some properties:
@Entity
@Table(name = "employees")
public class Employee {

    @Id
    @Column(name = "employee_id")
    private Long id;

    @Column(name = "first_name", length = 50, nullable = false)
    private String firstName;

    @Column(name = "last_name", length = 50, nullable = false)
    private String lastName;

    @Column(name = "email", unique = true)
    private String email;

    // Getters, setters, constructors, etc.
}
In this example, we have an Employee entity with four fields: id, firstName, lastName, and email. The @Column annotation is used to customize the mapping of each field to the corresponding database column:
- For the
idfield, we use@Column(name = "employee_id")to map it to theemployee_idcolumn in the database. - For
firstNameandlastName, we use@Column(length = 50, nullable = false)to set the maximum length of the columns to 50 characters and ensure they are not nullable. - For
email, we use@Column(unique = true)to enforce uniqueness on theemailcolumn, meaning that each email address must be unique across all rows in the table.
⚠️ Keep in mind that the@Columnannotation is not mandatory in all cases. If you do not use it, JPA will use default mappings for the fields. However, it provides a way to customize the column mappings to suit your specific database requirements.
The @Enumerated annotation in JPA is used to specify the mapping of an enum type field to the database. It is applied to a field of an enum type to define how the enum's values are stored and retrieved in the database table.
Here are the attributes of the @Enumerated annotation:
value(default): Specifies the strategy to use for persisting the enum value in the database. Thevalueattribute can take one of two values:EnumType.ORDINAL: This is the default value. It stores the enum as an integer value representing the index of the enum constant in the enum declaration. (0-based index)EnumType.STRING: It stores the enum as a string representing the name of the enum constant.
Here's an example of using the @Enumerated annotation:
public enum Gender {
    MALE,
    FEMALE
}

@Entity
@Table(name = "employees")
public class Employee {

    @Id
    private Long id;

    private String name;

    @Enumerated
    private Gender gender; // Defaults to EnumType.ORDINAL

    @Enumerated(EnumType.STRING)
    @Column(name = "employee_status")
    private EmployeeStatus status;

    // Getters, setters, constructors, etc.
}
In this example, we have an Employee entity with two enum fields: gender and status. The gender field uses the default @Enumerated annotation without specifying any attributes, so it will be persisted as an ordinal value (integer). The status field, on the other hand, uses the @Enumerated(EnumType.STRING) annotation, specifying that it should be persisted as a string (the name of the enum constant).
For instance, if you create an Employee object with the following values:
Employee employee = new Employee();
employee.setId(1L);
employee.setName("John Doe");
employee.setGender(Gender.MALE);
employee.setStatus(EmployeeStatus.ACTIVE);
In the database, it would be stored like this:
| id | name | gender | employee_status |
|---|---|---|---|
| 1 | John Doe | 0 | ACTIVE |
Gender.MALE is stored as an ordinal value 0, whereas EmployeeStatus.ACTIVE is stored as a string "ACTIVE" in the employee_status column due to the @Enumerated(EnumType.STRING) annotation.
The @JoinColumn annotation in JPA is used to specify the mapping of a foreign key column in a database table that is associated with a relationship between two entities. It is applied on the owner side of the relationship to define the column that will hold the foreign key referencing the related entity.
Here are some of the common attributes of the @JoinColumn annotation:
-
name: Specifies the name of the foreign key column in the owner entity's table. If not provided, the default is the name of the referenced entity's primary key column. -
referencedColumnName: Specifies the name of the referenced entity's primary key column. If not provided, the default is the primary key column name of the referenced entity. -
nullable: Defines whether the foreign key column can hold null values or not. By default, it is set totrue, meaning the foreign key column can be nullable. To make the column not nullable, set it tofalselike@JoinColumn(nullable = false). -
unique: Specifies whether the foreign key column should enforce uniqueness. Settingunique = truemeans the column values must be unique across all rows. -
insertable: Determines whether the foreign key column should be included in SQL INSERT statements when persisting an entity. By default, it is set totrue. -
updatable: Determines whether the foreign key column should be included in SQL UPDATE statements when updating an entity. By default, it is set totrue. -
columnDefinition: Allows you to provide the SQL DDL column definition for the foreign key column. It can be used to specify additional constraints, types, or other properties.
Here's an example of using the @JoinColumn annotation:
@Entity
@Table(name = "orders")
public class Order {

    @Id
    private Long id;

    private String orderNumber;

    @ManyToOne
    @JoinColumn(name = "customer_id", referencedColumnName = "id", nullable = false)
    private Customer customer;

    // Other fields, getters, setters, constructors, etc.
}
In this example, we have an Order entity that is associated with the Customer entity through a many-to-one relationship. The @JoinColumn annotation is used on the customer field to specify the mapping of the foreign key column customer_id in the orders table, which references the id column of the customers table (referencedColumnName = "id"). The foreign key column is made not nullable (nullable = false) to enforce that each order must have a valid customer associated with it.
The @ManyToOne annotation indicates the direction of the relationship, where many orders can be associated with one customer. In this case, the Order entity is the owner side of the relationship, and the Customer entity would have the inverse side (possibly using the @OneToMany or @OneToOne annotations).
In JPA, the @Inheritance annotation is used to specify the inheritance strategy for a class hierarchy. It is applied to the root class of the inheritance hierarchy to define how the entities in the hierarchy should be mapped to the database.
Here are the attributes of the @Inheritance annotation:
strategy: Specifies the inheritance strategy to use. Thestrategyattribute can take one of the following values:InheritanceType.SINGLE_TABLE: This is the default value. It maps all entities in the hierarchy to a single table. It uses a discriminator column to determine the actual subclass of each row.InheritanceType.JOINED: This strategy maps each subclass to a separate table. It creates a join between the root table and each subclass table based on the primary key and foreign key relationship.InheritanceType.TABLE_PER_CLASS: This strategy maps each subclass to its own table. It creates a separate table for each subclass and duplicates the common fields in each table.
Here's an example of using the @Inheritance annotation:
@Entity
@Table(name = "vehicles")
@Inheritance(strategy = InheritanceType.SINGLE_TABLE)
@DiscriminatorColumn(name = "vehicle_type", discriminatorType = DiscriminatorType.STRING)
public class Vehicle {

    @Id
    @GeneratedValue
    private Long id;

    private String brand;

    // Other fields, getters, setters, constructors, etc.
}

@Entity
@DiscriminatorValue("CAR")
public class Car extends Vehicle {

    private int numberOfDoors;

    // Car-specific fields, getters, setters, constructors, etc.
}

@Entity
@DiscriminatorValue("MOTORCYCLE")
public class Motorcycle extends Vehicle {

    private boolean hasSideCar;

    // Motorcycle-specific fields, getters, setters, constructors, etc.
}
In this example, we have a class hierarchy of Vehicle, with two subclasses Car and Motorcycle. The @Inheritance annotation is used on the Vehicle class to specify the inheritance strategy as InheritanceType.SINGLE_TABLE, meaning all entities in the hierarchy will be mapped to a single table (vehicles). The discriminator column vehicle_type is used to differentiate between the subclasses.
The @DiscriminatorColumn annotation is used to define the discriminator column in the vehicles table, which holds the discriminator value (CAR for Car class and MOTORCYCLE for Motorcycle class).
The @DiscriminatorValue annotation is used on each subclass to specify the discriminator value associated with that subclass (CAR for Car class and MOTORCYCLE for Motorcycle class). This value will be stored in the vehicle_type column of the vehicles table to indicate the actual subclass for each row.
Depending on your application requirements, you can choose a different inheritance strategy based on the complexity and performance considerations of your data model.
The @MappedSuperclass annotation in JPA is used to designate a class as a superclass whose properties should be mapped to the database tables of its subclasses. It is a way to define common attributes and behaviors that are shared among multiple entity classes without creating a separate table for the superclass.
Here are the attributes of the @MappedSuperclass annotation:
- None: The
@MappedSuperclassannotation does not have any attributes of its own.
Let's see an example of how to use the @MappedSuperclass annotation:
@MappedSuperclass
public class BaseEntity {

    @Id
    @GeneratedValue
    @Column(name = "id")
    private Long id;

    @Column(name = "created_at")
    private LocalDateTime createdAt;

    @Column(name = "updated_at")
    private LocalDateTime updatedAt;

    // Constructors, getters, setters, etc.
}
In this example, we have a BaseEntity class with common attributes id, createdAt, and updatedAt. The class is annotated with @MappedSuperclass, which means that the properties of this class will be inherited by its subclasses, but it will not be mapped to its own database table.
Now, let's create a subclass that extends BaseEntity:
@Entity
@Table(name = "products")
public class Product extends BaseEntity {

    @Column(name = "name")
    private String name;

    @Column(name = "price")
    private BigDecimal price;

    // Constructors, getters, setters, etc.
}
In this example, the Product class extends BaseEntity, and it inherits the id, createdAt, and updatedAt attributes from the superclass. However, since BaseEntity is marked as @MappedSuperclass, it will not be mapped to a separate table. Instead, the attributes will be mapped to the products table along with the name and price attributes specific to the Product entity.
By using @MappedSuperclass, you can avoid code duplication and enforce common fields and behaviors across multiple entity classes in your JPA data model.
The @Embeddable annotation in JPA is used to define a class whose instances will be embedded as components into the owning entity's table. It allows you to group multiple fields into a single value type, which is then embedded directly into the entity's table, rather than creating a separate table for the value type.
Here are the attributes of the @Embeddable annotation:
- None: The
@Embeddableannotation does not have any attributes of its own.
Let's see an example of how to use the @Embeddable annotation:
@Embeddable
public class Address {

    @Column(name = "street")
    private String street;

    @Column(name = "city")
    private String city;

    @Column(name = "postal_code")
    private String postalCode;

    // Constructors, getters, setters, etc.
}
In this example, we have an Address class annotated with @Embeddable. This class represents a value type that holds address-related information, such as street, city, and postalCode.
Now, let's use the Address class in an entity:
@Entity
@Table(name = "employees")
public class Employee {

    @Id
    @GeneratedValue
    @Column(name = "id")
    private Long id;

    @Column(name = "name")
    private String name;

    @Embedded
    private Address address;

    // Constructors, getters, setters, etc.
}
In this example, the Employee class has a property of type Address, which is annotated with @Embedded. This indicates that the Address class should be treated as an embedded component within the employees table. The street, city, and postalCode attributes of the Address class will be stored as columns in the employees table.
When an Employee entity is persisted or retrieved, the attributes of the embedded Address object will be mapped to the corresponding columns in the employees table, providing a way to organize related fields without the need for an additional table.
Using @Embeddable allows you to create reusable value types that can be embedded in multiple entities, simplifying your data model and avoiding the need for unnecessary joins in queries.
The @EmbeddedId annotation in JPA is used to specify that a composite key, represented by an embeddable class, is used as the primary key for an entity. It allows you to create an entity with a composite primary key, where the primary key is composed of multiple attributes.
Here are the attributes of the @EmbeddedId annotation:
- None: The
@EmbeddedIdannotation does not have any attributes of its own.
Let's see an example of how to use the @EmbeddedId annotation:
@Embeddable
public class EmployeeId {

    @Column(name = "employee_id")
    private String employeeId;

    @Column(name = "department")
    private String department;

    // Constructors, getters, setters, equals, and hashCode methods (if needed)
}
In this example, we have an EmployeeId class annotated with @Embeddable. This class represents the composite key for the Employee entity, consisting of employeeId and department.
Now, let's use the EmployeeId class as the composite primary key for the Employee entity:
@Entity
@Table(name = "employees")
public class Employee {

    @EmbeddedId
    private EmployeeId employeeId;

    @Column(name = "name")
    private String name;

    @Column(name = "salary")
    private BigDecimal salary;

    // Constructors, getters, setters, etc.
}
In this example, the Employee class uses EmployeeId as its primary key by annotating the employeeId field with @EmbeddedId. This indicates that the EmployeeId class represents a composite key and its attributes (employeeId and department) should be used together as the primary key for the employees table.
With the @EmbeddedId annotation, JPA will automatically handle the mapping of the composite primary key to the corresponding columns in the database table. When an Employee entity is persisted or retrieved, JPA will use the EmployeeId object to construct and interpret the primary key for the database operations.
Using a composite key with @EmbeddedId is useful when your entity's uniqueness depends on multiple attributes, and you want to express that uniqueness as a single primary key. It can be particularly handy for mapping legacy databases or dealing with complex domain models that require composite keys.
In JPA, the @OneToMany annotation is used to establish a one-to-many relationship between two entities. It allows you to define a relationship where one entity (the "one" side) is associated with multiple instances of another entity (the "many" side).
About the @OneToMany annotation:
-
Cardinality: The annotation is used to indicate that one instance of the source entity can be associated with multiple instances of the target entity.
-
Mapping Direction: The
@OneToManyannotation can be used to create both unidirectional and bidirectional associations between entities. -
Unidirectional Mapping: In a unidirectional
@OneToManyassociation, the source entity references the target entity, but the target entity does not have a reference back to the source entity. -
Bidirectional Mapping: In a bidirectional
@OneToManyassociation, both the source and target entities have references to each other, allowing navigation in both directions. -
Use of
mappedBy: In a bidirectional association, you need to specify themappedByattribute to indicate the field in the target entity that maps back to the source entity. -
Cascading: You can use cascading options, such as
CascadeType.ALL, to propagate operations (e.g., persist, update, delete) from the source entity to the associated target entities. -
JoinColumn: In a unidirectional
@OneToManyassociation, you can use@JoinColumnto specify the foreign key column in the target entity's table. -
Orphan Removal: By default, when an entity is removed from the source entity's collection in a bidirectional
@OneToManyassociation, it is not automatically deleted from the database. You can enable orphan removal to automatically delete associated entities that are no longer referenced.
Overall, the @OneToMany annotation is a powerful tool in JPA for establishing one-to-many relationships between entities, allowing you to build rich and complex data models that accurately represent the underlying business logic and data relationships.
@Getter
@Setter
@Builder
@AllArgsConstructor
@NoArgsConstructor
@Entity
public class Department {

    private static final long serialVersionUID = 1L;

    @Id
    @GeneratedValue(strategy = GenerationType.AUTO)
    private Long id;

    private String name;
    private String facultyName;
    private int yearOfFoundation;

    @OneToMany(cascade = CascadeType.ALL, orphanRemoval = true,
            mappedBy = "department")
    private List<Course> courses = new ArrayList<>();
}
public class Course {
private static final long serialVersionUID = 1L;
@Id
@GeneratedValue(strategy = GenerationType.AUTO)
private Long id;
private String name;
private String description;
private int capacity;
private int credit;
// parent department
@ManyToOne(fetch = FetchType.LAZY)
@JoinColumn(name = "department_id")
private Department department;
@ManyToOne(fetch = FetchType.LAZY)
@JoinColumn(name = "instructor_id")
private Instructor instructor;
@Override
public boolean equals(Object obj){
if(obj == null){
return false;
}
if(this == obj){
return true;
}
if(getClass() != obj.getClass()){
return false;
}
return id != null && id.equals(((Course) obj).id);
}
@Override
public int hashCode(){
return 2023;
}
}The mappedBy attibute is a mandatory attribute for bidirectional mapping. The parent object is specified in the @OneToMany annotation and references the name of the child object marked with the @ManyToOne annotation.
    @OneToMany(cascade = CascadeType.ALL, orphanRemoval = true,
            mappedBy = "department")
private List<Course> courses = new ArrayList<>();Setting orphanRemoval to true on the parent side ensures that child objects without references will be removed. According to Case, this attibure must be true or false. For example; A course has to belong to a department, but not necessarily to a teacher. The course is newly opened and may not be taught by any teacher. In this case, orphanRemoval = true in the Parent-Child relationship between Department-Course, but orphanRemoval = false in the Parent-Child relationship between Teacher-Course. If a department is deleted from the system, the courses attached to it must be deleted because a course cannot exist without its department. If a teacher is deleted from the system, the teacher value of the courses linked to that teacher should be marked as null. Courses do not need to be deleted from the system because they can be taken by another teacher.
    public class Department {

    private static final long serialVersionUID = 1L;

    @Id
    @GeneratedValue(strategy = GenerationType.AUTO)
    private Long id;

    private String name;
    private String facultyName;
    private int yearOfFoundation;

    @OneToMany(cascade = CascadeType.ALL, orphanRemoval = true,
            mappedBy = "department")
    private List<Course> courses = new ArrayList<>();
}
public class Instructor {
private static final long serialVersionUID = 1L;
@Id
@GeneratedValue(strategy = GenerationType.AUTO)
private Long id;
private String name;
private String degree;
private String gradSchool;
private int age;
@OneToMany(cascade = CascadeType.ALL, orphanRemoval = false, // ! orphanRemoval = false 'cause we don't want to remove course from db
mappedBy = "instructor")
private List<Course> courses = new ArrayList<>();
}Here is an example of methods marked with the @Transactional annotation in the service layer:
In this example, when a Course object belongs to the Department is removed from the system, it is deleted from the database, because it is marked as orphanRemoval = true in the class of the Department object that is Parent in the Department Course relationship.
@Transactional
    public void deleteCourseFromDepartment(){
        Department department = departmentRepository.fetchDepartmentById(1L);
        Course course = department.getCourses().get(0);

        department.removeCourse(course);
    }
In the example below, when the Course belongs to an Instructor is removed, the Course record is not deleted from the database and is marked as instructor_id = null
    @Transactional
    public void removeCourseFromInstructor()
    {
        Instructor instructor = instructorRepository.fetchInstructorById(1L);
        Course course = instructor.getCourses().get(0);

        instructor.removeCourse(course);

    }
⚠️ Always use helper methods. In this way, you can easily keep objects in sync in the service layer.
public void addCourse(Course course){
        this.courses.add(course);
        course.setDepartment(this);
    }

    public void removeCourse(Course course){
        course.setDepartment(null);
        course.setInstructor(null);
        this.courses.remove(course);
    }

    public void removeAllCourses(){
        Iterator<Course> iterator = this.courses.iterator();
        while(iterator.hasNext()){
            Course course = iterator.next();
            course.setDepartment(null);
            course.setInstructor(null);
            iterator.remove();
        }
}By default, fetching a parent-side entity will not fetch the children entities. This means that @OneToMany is set to lazy. On the other hand, fetching a child entity will eagerly fetch its parent-side entity by default. It is advisable to explicitly set @ManyToOne to lazy and rely on eager fetching only on a query-basis.
FetchType.LAZY and FetchType.EAGER are two options in JPA (Java Persistence API) that determine how the associated entities are loaded when a relationship is fetched from the database. The main differences between these fetch types are related to when and how the associated entities are retrieved:
-
FetchType.LAZY:
- With
FetchType.LAZY, the associated entities are not loaded from the database immediately when the parent entity is fetched. Instead, they are loaded on-demand, the first time the getter method for the association is invoked. - Lazy loading is useful when you want to defer the loading of related entities until they are actually needed. This can help improve performance and reduce unnecessary database queries.
- However, you need to be careful when accessing lazy-loaded associations outside the context of the persistence context (e.g., after the EntityManager is closed), as it may lead to
LazyInitializationExceptionif the associated entities are not loaded.
- With
-
FetchType.EAGER:
- With
FetchType.EAGER, the associated entities are fetched immediately along with the parent entity, at the time the parent entity is loaded from the database. - Eager loading is suitable when you often need the related entities along with the parent entity, and you want to minimize the number of queries required to retrieve the data.
- Be cautious with eager loading, especially when dealing with deep object graphs or large associations, as it may lead to the retrieval of more data than needed, causing performance issues.
- With
In summary, the key differences are:
FetchType.LAZYloads associated entities on-demand (when accessed), whileFetchType.EAGERloads associated entities immediately along with the parent entity.- Lazy loading is generally more efficient when related entities are not always needed, while eager loading can be beneficial when related entities are commonly accessed together with the parent entity.
- Care should be taken with both approaches to avoid potential performance and memory issues based on the specific use case and data model.
⚠️ DONT USE FetchType.EAGER!!!!!!!!!!!!!!!!!!!!!!!!!!!!!!!!!!!
    @ManyToOne(fetch = FetchType.LAZY)
    @JoinColumn(name = "department_id")
private Department department; @ManyToOne(fetch = FetchType.LAZY)
@JoinColumn(name = "department_id")
private Department department;@Repository
@Transactional(readOnly = true)
public interface IDepartmentRepository extends JpaRepository<Department, Long> {
@Query("SELECT d FROM Department d JOIN FETCH d.courses WHERE d.id = ?1")
Department fetchDepartmentById(Long id);
}