Simulation
Testing the code in the simulator is generally a good idea that helps to avoid expensive hardware failures. In this page, we will introduce how to use the provided Docker image to have Gazebo simulation platform that enables SITL Simulator (Software in the Loop) testing of the project's code on ArduCopter.
It is recommended to use the provided Docker image that installs all the requirements on a separate isolated virtual machine, however, if you prefer installing the components on your computer we will list the required components.
- Using Docker
- Running components
- Trail navigation using Google Maps API in Gazebo simulator
- Required Components
Docker is the preferred way to set up a simulation environment as it allows the user to completely isolate all software changes from the host system, as well as have multiple simulation environments on the same machine.
The current configuration assumes all components are installed on an x86 host platform running Ubuntu 16.04. It is also possible to install some components on Jetson while others (like Gazebo etc) - on the host machine. The system should be equipped with GPU and Cuda toolkit installed on it so that you can run Redtail DNN models.
We take advantage of NVIDIA Container Runtime for Docker to passthrough GPU to the docker so that we can build and run Docker containers leveraging NVIDIA GPUs.
To be able to use Nvidia Docker, you need to install one of the supported Docker versions based on NVIDIA Docker supported Docker packages. It is recommended to install Docker CE on your system, here's minimal commands you need to install Docker CE on Ubuntu 16.04. If you need more details please refer to Get Docker CE for Ubuntu | Docker Documentation.
Make sure there is no other/older version of Docker installed on your system:
$ sudo apt-get remove docker docker-engine docker.ioInstall Docker CE using Docker Repository
$ sudo apt install apt-transport-https ca-certificates curl software-properties-common
$ curl -fsSL https://download.docker.com/linux/ubuntu/gpg | sudo apt-key add -
$ sudo add-apt-repository \
   "deb [arch=amd64] https://download.docker.com/linux/ubuntu \
   $(lsb_release -cs) \
   stable"
$ sudo apt update
$ sudo apt install docker-ce
[Optional] You can check if your installation is successful:
$ sudo docker run hello-world The original Rdtail documents suggests installing v1 for full-featured experience.
Note that this setup was tested with NVIDIA Docker v1. There are known issues with v2 (e.g. no OpenGL drivers etc) so, if possible, try using v1 for a full-featured experience.
$ wget -P /tmp https://github.com/NVIDIA/nvidia-docker/releases/download/v1.0.1/nvidia-docker_1.0.1-1_amd64.deb
$ sudo dpkg -i /tmp/nvidia-docker*.deb && rm /tmp/nvidia-docker*.deb
[Optional] I personally prefer not to have to run Docker as su everytime, if you like you can you Ubuntu user to docker and nvidia-docker groups so that you don't need to run containers with sudo anymore:
$ sudo usermod -a -G docker $USER
$ sudo usermod -a -G nvidia-docker $USER
You need to log out and in again for these changes to take effect.
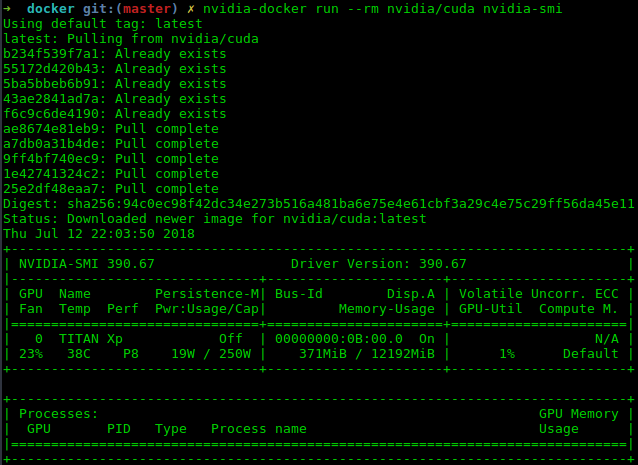
[Optional] You can check if your NVidia Docker in successfully installed and you can access your GPU from inside a container by testing nvidia-smi in a Docker image:
$ nvidia-docker run --rm nvidia/cuda nvidia-smiAfter downloading the required images from Docker hub and creating a container it should show the host's GPU and the NVidia driver installed on the host through a container. If it does, Docker and Nvidia-Docker are installed and ready to use:
The Redtail image is currently not on the Docker Hub so you will have to build it first. Redtail project uses NVIDIA TensorRT 3.0 library which has to be downloaded first. Make sure to download TensorRT 3.0.4 for Ubuntu 16.04 and CUDA 9.0 tar package.
$ cd <Path to Redtail clone>/redetail/tools/simulation/docker
$ ./build_ap_redtail_image.sh <Path to TensorRT-3.0.4 tar file>
Building the image may take some time. If downloading using apt-get takes a very long time or even causes the building to fail due to timeout, please consider changing the main Ubuntu repository. I had to change the repositories addresses to our university's local mirror, you can do so by commenting lines 18 and 19 from the Ardupilot.kinetic file and uncommenting lines 15 and 16.
Once the build is finished, verify it by running docker images command:

Note: make sure to connect all devices like camera or joystick before starting the container.
To create a container, navigate to redtail/tools/simulation and run run_ardupilot_docker.sh script. The script has 3 optional parameters:
run_ardupilot_docker.sh [container_name] [host_data_dir] [container_data_dir] where container_name is the name of the container (default: redtail-sim-v2). host_data_dir is the full path to a directory on the host to mount into the container (default: /data), this is a shared directory between host and the container, it is recommended to set it to the path containing the clone to this repository or can access to the repository's clone from as we need it to install the components in container later. container_data_dir is the full path to the directory in the container to which host_data_dir will be mapped (default: /data)
This script creates a container from the built image anytime you give it a new name. If a container is already built with the same name from the same image, it will start the container, and if a container is already started it will connect to the already running container.
There are several ways to connect to a running container, in the following whenever it is mentioned to "open a new terminal in docker image" you can choose between any of these methods:
- As mentioned, running the
run_ardupilot_docker.shthe script will connect to currently running container and opens a new terminal in it. - Generally when you want to run a new terminal (
bashper se) on any container you can use$ docker exec -i -t <Container name/hash> /bin/bashfor instance if you are running the container with the default name:
$ docker exec -i -t redtail-sim-v2 /bin/bash- I personally prefer to open a Terminal Multiplexer and open as many terminals as I need in it.
tmuxwill automatically install in the container.
The container has catkin workspace created at ~/ws. We have changed the workspace to use the modern Catkin Command Line Tools — catkin_tools, now you can build packages in ~/ws using catkin build instead of original catkin_make. The workspace contains all components except Redtail source code. Redtail sources might be located on the host and shared among all the containers. To create proper symlinks to catkin workspace and build the components, run the following script from the container:
$ ~/build_ap_redtail.sh <Path to redtail directory>Congrats! you are done with the setup and can now Run the components
There are several components that need to be run, usually from different terminal windows connected to the same container.
We have tried to provide ROS launch files that will launch as many as required components at the same time as possible, and make it easier to use. But some components need some time to initialize and be ready for the next component to use it.
Although you can use the default drone in ArduCopter SITL, We prefer to use Gazebo as the backend simulator. To run ArduCopter SITL and get ready for Gazebo to connect to it, run the following commands in a new terminal connected to the container:
$ cd ardupilot/ArduCopter/
$ sim_vehicle.py -f gazebo-iris -D --console --map
You should see the map and console loading, and waiting for Gazebo to connect.
For now, we use the IRIS model in Gazebo as our drone, this will be updated with a drone equipped with a front facing camera when we move to Gazebo 9.
$ gazebo --verbose /usr/share/gazebo-8/worlds/iris_arducopter_demo.world When you run Gazebo for the first time, it will take some time to initialize depending on your computer, be patient, it will run instantly from the next time. When it is fully loaded, you should see the drone is connected to SITL in the SITL console, and a drone should appear at home position on SITL's map.
To be able to control the drone using ROS, you have to use Mavros package which is a bridge between Mavlink protocol and ROS interface. We have prepared a launch file which runs mavros node and connects to the simulator automatically.
$ roslaunch px4_controller ap_sim_mavros.launchIf you have changed the simulator port, running the simulator on another computer (Jetson for example), or using hardware instead of the simulator, make pass the appropriate fcu_url parameter to the launch file.
This launch file launches the ROS joy node required by Redtail controller as well. Make sure you had the joystick connected to the computer before starting the container, otherwise the container would not see it and you have to restart the container. You can check if a joystick presents by checking /dev/input/ folder, you should see a jsX for which X depends on the number and order of connected joysticks. If you have more than one joystick connected and are using one other than js0 please pass the address to the launch file using joy_dev parameter.
The Redtail controller node is the same for ArduCopter, PX4, and APMRover. The correct specification of vehicle_type parameter is very important. We have prepaired a ROS launch file using which you can run the controller for ArduPilot without worrying about the parameter.
Wait for the previous node to fully initialize and make sure it is running properly and mavros is connected to the simulator. In a new terminal connected to the container launch the following ROS launch file:
roslaunch px4_controller ap_sim_controller.launchThe controller sends handshake commands to the FCU, tries to put the drone if GUIDED mode and arm the drone. If the arming is successful it will automatically take the drone off and waits for control commands either from the joystick of DNN.
Now open Gazebo window and see the drone taking off and hovering. Try navigating the drone using the controller (joystick). If you open Gazebo and SITL map side-by-side, you should see the drones in both are moving.
If the axis of your controller does not match the axis of drone, pass the correct joy_type parameter to the launch file.
To perform a full simulation with the DNN and controller using fake video input (e.g. a static image or a video), we have provided trailnet_ap_debug.launch launch file in redtail_debug ROS package.
These are important parameters which should be set to run properly:
-
prototxt_pathis the path to TrailNet cafe prototxt file, in default path it is assumed the redtail repository exists in the root of/data/folder -
model_pathis the path to TrailNet cafe model file, in default path it is assumed the redtail repository exists in the root of/data/folder -
media_pathis the address to the fake media file you want to feed to the network, either a trail image or video -
is_videis to determine if the medi file is an still image or video clip. If set tofalse, the node will publish the image at 30Hz for faking a video.
You can launch the launch file:
$ roslaunch redtail_debug trailnet_ap_debug.launchVerify that there is a /trails_dnn/network/output topic by running rostopic list. As an additional check, the topic can be checked for a data by running rostopic echo /trails_dnn/network/output. The output should be something like this:
    header:
      seq: 96
      stamp:
        secs: 1501020201
        nsecs: 514571455
      frame_id: ''
    height: 1
    width: 1
    encoding: 32FC6
    is_bigendian: 0
    step: 24
    data: [110, 74, 230, 58, 135, 125, 95, 60, 228, 14, 124, 63, 133, 26, 6, 61, 156, 75, 115, 63, 91, 87, 138, 60]
Note that the data is a float array of size 6 in raw byte format which is not very readable. To convert to float array, use the simple Python script:
    import struct
    data = bytearray([110, 74, 230, 58, 135, 125, 95, 60, 228, 14, 124, 63, 133, 26, 6, 61, 156, 75, 115, 63, 91, 87, 138, 60])
    print(struct.unpack('<%df' % (len(data) / 4), data))
Below is the sample output of the network (2 heads, 3-way softmax each). The first head generates the first three values, representing the probability the drone is rotated to the left, the center or the right respectively. The last three values are the output of the translation head, representing the probability the drone is left offset, centred or right offset respectively. In this case, there is a ~98% probability the drone is rotated to the right of the trail, and a ~95% probability the drone is in the center of the trail (not laterally offset):
(0.0017569789197295904, 0.013640767894685268, 0.9846022129058838, 0.03274013474583626, 0.9503724575042725, 0.016887357458472252)
Switch to Gazebo and make sure the drone is hovering. Now press the A button on the joystick and watch the drone fly! Press the B button to disable DNN control. At any time during the flight, you can override DNN behaviour from the joystick.
It is possible to use Google Maps' satellite view as the ground plane for Gazebo simulator. We used this feature to insert the satellite view of trails in Gazebo and use this system to autonomously navigate trails.

We have prepared a Gazebo world which load's SFU's trails in Gazebo and adds a modified version of IRIS quadcopter to the world.
For using this world you need the following requirements:
- A Google API key which you can get from here. Enter your API key (we are only going to use "Static Map" feature) in this line
- The modified version of IRIS drone uses a version of "Small gimball 2D" with fixed angle of 0.6 rad and ROSCameraPlugin for publishing the image on
/camera/image_rawtopic. In order to Gazebo be able to find this model you have to add the address where this model is stored toGAZEBO_MODEL_PATH.
$ export GAZEBO_MODEL_PATH=<Path_to_redtail_cloned_repo>/ros/packages/redtail_debug/gazeboif you are using the docker container this path would be /data/redtail/ros/packages/redtail_debug/gazebo:
$ export GAZEBO_MODEL_PATH=/data/redtail/ros/packages/redtail_debug/gazeboYou can add this to your bashrc to avoid typing it every time you need to launch the world:
echo 'export GAZEBO_MODEL_PATH=/data/redtail/ros/packages/redtail_debug/gazebo' >> ~/.bashrc
source ~/.bashrc- [Optional] if you like your ArduCopter SITL show the correct position and track of the drone on the it's own map (as shown in the video above) you need to add this location in ArduPilot autotest location list and load the drone in that location when you want to run SITL by passing
-L <your_location_name>tosim_vehicle.py. To add the current location that is set in the world file to your locations list in docker image:
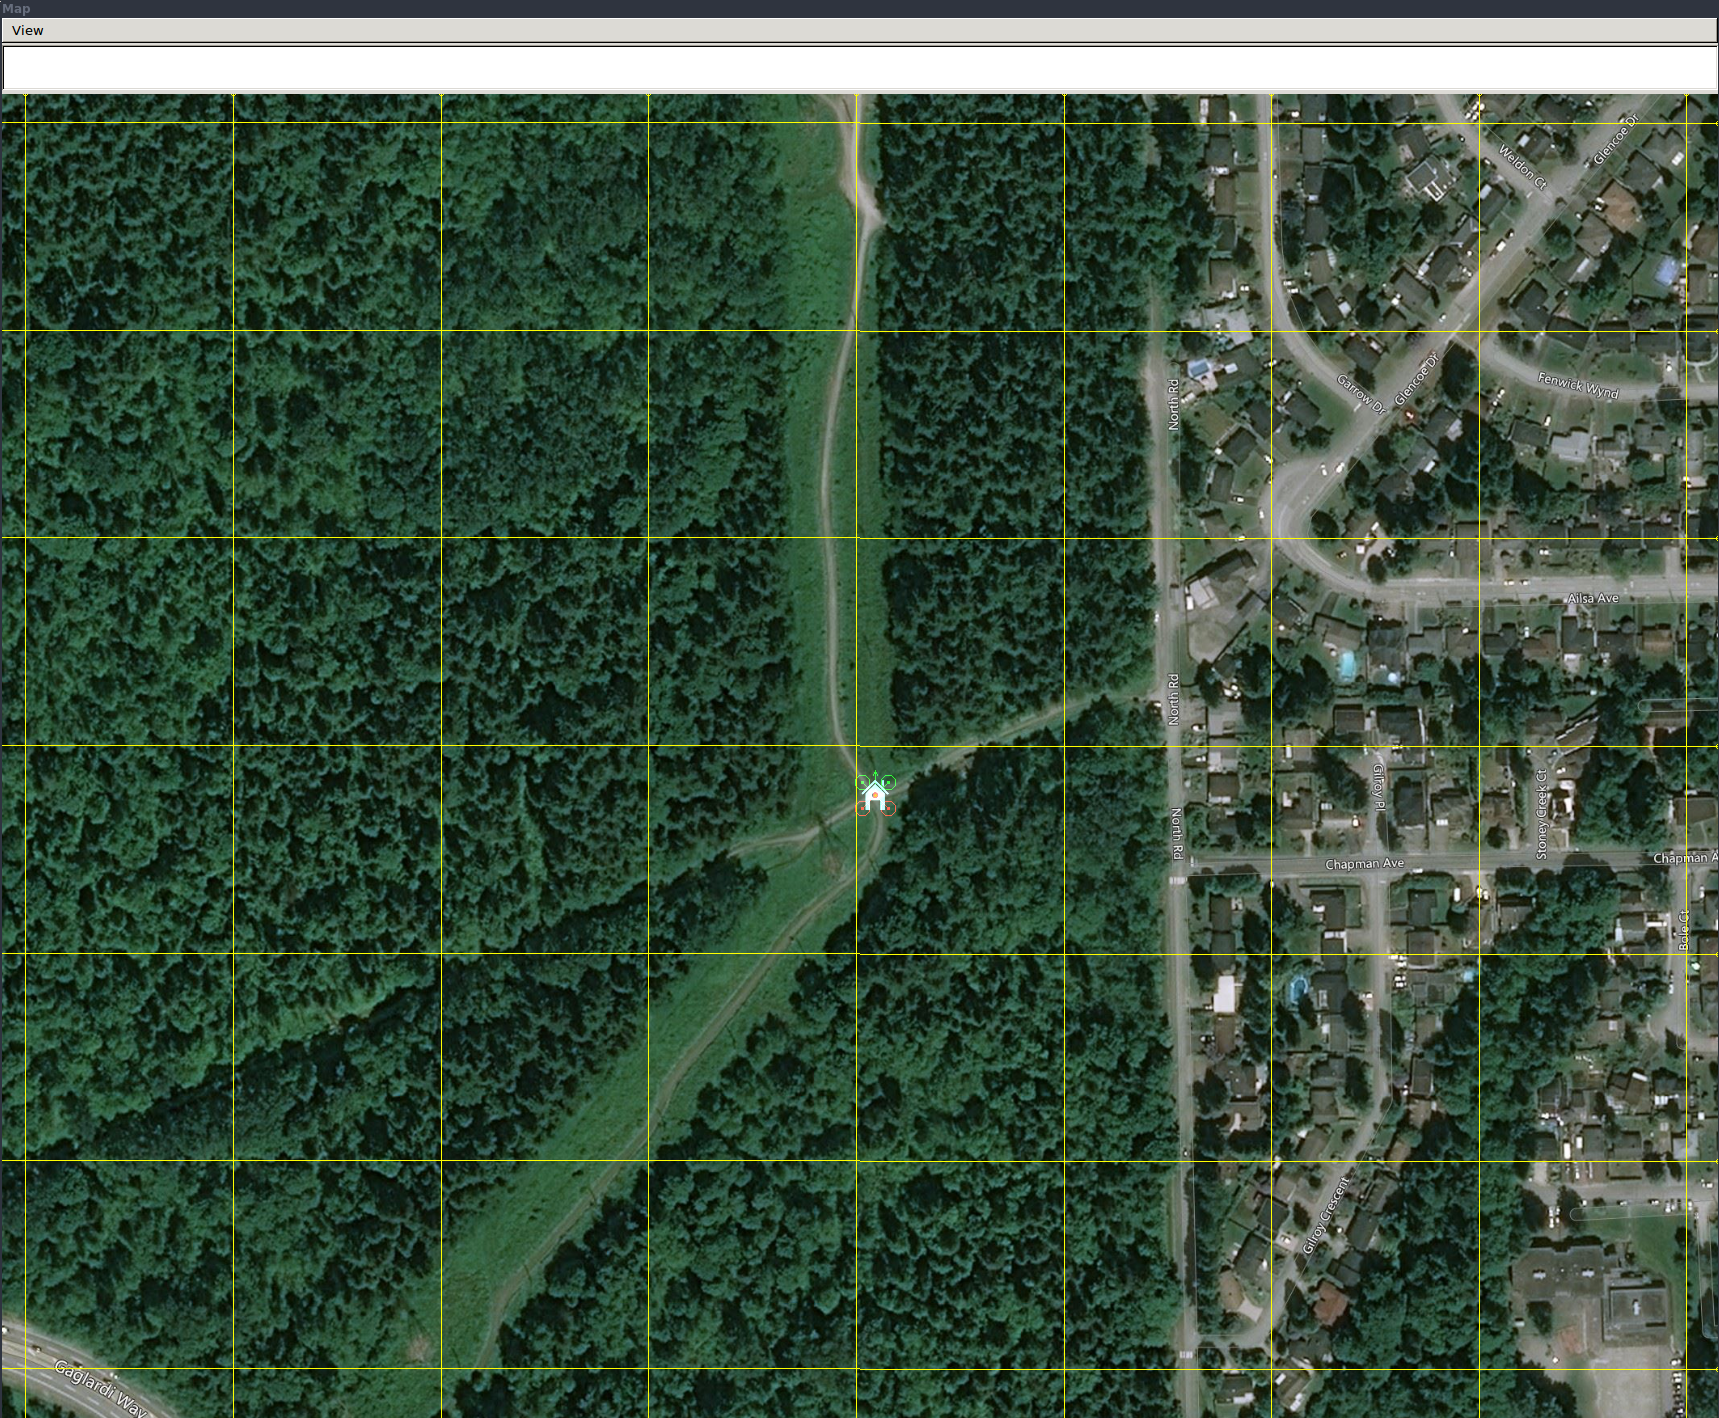
$ echo `SFUTrail=49.2699951,-122.8953930,0,0` >> ~/ardupilot/Tools/autotest/locations.txtIf all the Gazebo setup is done correctly, launching the Gazebo launch file from redtail_debug package will start the Gazebo simulator with Google maps images as ground plane and IRIS landed in the middle:
$ roslaunch redtail_debug ap_gazebo.launchWhich will look like this:

In case you see the following error and Gazebo crashes after downloading the images:

its because boost::rename does now create the destination folder if it does not exist, try creating the models folder for Gazebo yourself and start the simulator:
$ cd ~/.gazebo
$ mkdir models
After running Gazebo, its time to run ArduPilot SITL. In a separate terminal:
$ cd ~/ardupilot/ArduCopter
$ sim_vehicle.py -L SFUTrail -f gazebo-iris -D --map
Which should open ArduCopter SITL:
Make sure your joystick is connected and being detected as /dev/input/js* if it is any address other than /dev/input/js0 pass the correct address using joy_dev argument to the following launch file, in a separate terminal launch mavros so that the ROS controller can talk to simulator:
$ roslaunch px4_controller ap_sim_mavros.launchNow its time to run the Redtail controller, in a separate terminal launch ap_sim_controller.launch:
$ roslaunch px4_controller ap_sim_controller.launchWait for the node to initialise, connect to the drone, and after handshake the drone should takeoff and gain 1.5 meters altitude. After that you can easily control the drone using the joystick controller.
If you wish to use DNN for autonomous trail following, in a separate terminal:
$ roslaunch redtail_debug trailnet_ap_debug.launchPress joystick button 0 (A or X) on the controller and see the drone following trails autonomously using TrailNet, you can stop autonomous navigation by pressing button 1 (B or O) on the controller. To find the correct button on your controller check /joy topic.
It is strongly recommended to use the provided Docker image, but if you prefer to install and run the system directly from your computer, here's a list of all the components inside the Docker image:
- GStreamer
- Gazebo 8
- Ardupilot Gazebo Plugin & Models
- PX4tools
- DroneKit Python
- Pymavlink
- MAVLink
- ArduPilot Project
- ROS Kinetic
- OpenCV 3.3.1 (custom build)
- NVIDIA TensorRT TensorRT 3.0.4 for Ubuntu 16.04 and CUDA 9.0
- Google cloud API key