

Over The Light is my personal project for home automation system that allows you to communicate with smart devices (sonoff) at home safely. The system automatically detects connected devices at home and adds them to the server to allow them to be controlled from the Android app or Wear OS app.
Attention: this project is under construction. The android app, or the server may not be work as expected. Need help or questions? contact me :)
- Dafaq am I reinventing the wheel!?
- Install
- Device Configuration
- Android
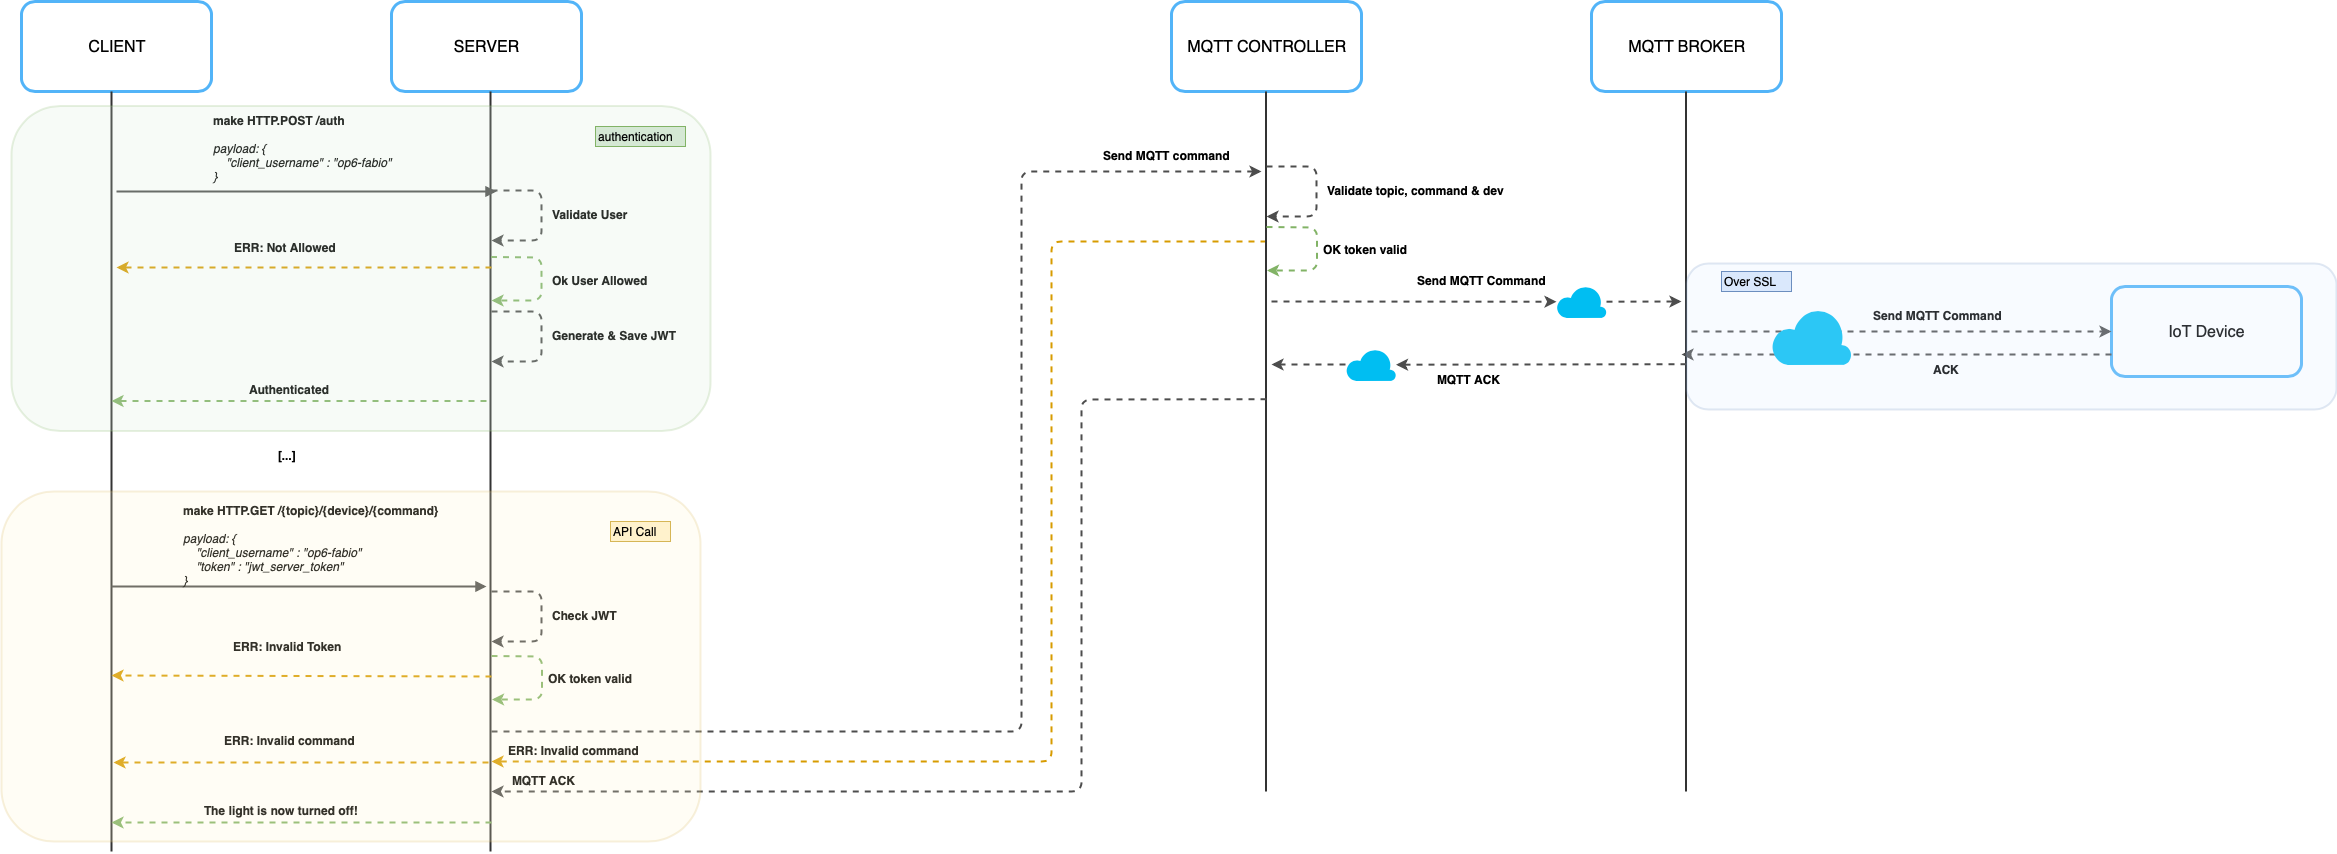
- Auth & API call workflow
- System Workflow - connection
- System Workflow - discovery
- Project Structure
- Related
- Privacy
- PR

dafaq is this repo? why am I reinventing the wheel?
Who has never wanted to try some smart IoT devices in their home? I am among these. ¯\(ツ)/¯
The problem: the official app for this stuff, eWeLink, has several security problems.
- security concerns (clear HTTP traffic to China 🤔🤔 )
- terrible UI/UX
- lack of features
My solution: build my own home automation system.
Smarter. More secure. Sexier.
OTL offers:
- jwt + simmetric key + IP whitelist and authentication checks
- supports all devices on mqtt protocol
- group IoT devices by topic
- single or grouped device control
- timers, actions and schedulers
- available on telegram, android, web and Postman (if you love raw requests 😏😏)
- full customization (block specific commands, APIs, devices, topics)
- compatible with Google Assistant and Alexa
- better logs
- obviusly, sexy UI
To run the entire project you need:
- An instance of MQTT broker server
- For shell testing, MQTT phao/mosquitto
- Modify the
config.jsonfile accordingly - Patience
{
    "MQTT": {
        "MQTT_BROKER_ADDRESS" : "mqtt://z.z.z.z",
        "MQTT_ALLOWED_DEVICES" : [
            "device_1"
        ],
        "MQTT_ALLOWED_COMMANDS" : [
            "ON", "OFF", "getstatus"
        ],
        "MQTT_ALLOWED_ACTION_FOR_COMMAND" : "control"
    },
    "server" : {
        "SERVER_HOST" : "z.z.z.z",
        "SERVER_PORT" : 1234,
        "FILENAME_LOG" : "out-log.log"
    },
    "jwt" : {
        "JWT_ALLOWED_USERS" : [ "user"],
        "JWT_TOKEN_EXPIRATION" : "1h",
        "JWT_PRIVATE_KEY" : "pk"
    },
    "slack" : {
        "SLACK_WEBHOOK": "https://hooks.slack.com/services/zzzz",
        "SLACK_CHANNEL": "#zzzz"
    }
}| Type | Value | Description |
|---|---|---|
| MQTT | MQTT_BROKER_ADDRESS |
MQTT broker address host |
| MQTT | MQTT_ALLOWED_DEVICES |
MQTT allowed devices to control from intranet |
| MQTT | MQTT_ALLOWED_COMMANDS |
MQTT allowed commands to control from intranet |
| MQTT | MQTT_ALLOWED_ACTION_FOR_COMMAND |
MQTT allowed action for command (deprecated) |
| SERVER | SERVER_HOST |
Server IP host |
| SERVER | SERVER_PORT |
Server port |
| SERVER | FILENAME_LOG |
Server log file path |
| JWT | JWT_ALLOWED_USERS |
JWT allowed users |
| JWT | JWT_TOKEN_EXPIRATION |
JWT token expiration in (h) |
| JWT | JWT_PRIVATE_KEY |
JWT signature private key |
| SLACK | SLACK_WEBHOOK |
Slack webhook uri |
| SLACK | SLACK_CHANNEL |
Slack channel to receive info |
Then npm install and node server.js
Imporant note: the mqtt device need to have this format, otherwise the android app don't reconize it
MQTT > Device TOPIC name: ROOM_TYPE$DEVICE_TYPE$DEVICE_NAME
Where ROOM_TYPE is defined into android > helper > RoomTypes.java
Where DEVICE_TYPE is defined into android > helper > DeviceTypes.java
Open the project with Android Studio.
The app UI should look like these 😍 :
Login:

Main:

Room Detail:

The authentication system uses jwt + key + client IP. You can open a larger version of the image HERE

When a new device req. connection call this workflow. You can open a larger version of the image HERE

When a new device req. mqtt discovery call this workflow. You can open a larger version of the image HERE

Each folder of the repo represents a component
droid- Android app
- Wear OS
controller- all the components for back-end
server.jscontains API handlercontroller.jscontains MQTT handler
- all the components for back-end
This project is privacy-oriented. All depends on your bad, or good decision.
- It's your device.
- It's your mqtt server.
- It's your backend.
- It's your mqtt auth.
- It's your symmetric jwt key.
- It's your SSL certificate.
- It's your google account.
- It's your client.
Pull requests are allowed. Maybe. Please read CONTRIBUTE.md first.