Getting Started
After installing Wexflow, the folders C:\Wexflow\ and C:\WexflowTesting\ are created.
The folder C:\Wexflow\ is the main configuration folder of Wexflow and contains the following elements:
- Wexflow.xml which is the main configuration file of Wexflow server. Its path can be configured from C:\Program Files\Wexflow\Wexflow.Server.exe.config for the .NET version and from Wexflow.Server\appsettings.json for the .NET Core version.
- Database/ which contains the database of Wexflow workflow engine.
- Workflows/ which is workflows hot folder if hot reloading is enabled through EnableWorkflowsHotFolder setting.
- Temp/ which is the temporary folder of Wexflow.
- Tasks/ which is an optional folder that can contain the dlls of custom tasks.
- Workflow.xsd which is the XML Schema Definition of a workflow.
- GlobalVariables.xml which contains the global variables for workflows.
- TasksNames.json which contains the names of the tasks. This configuration file is used by the designer.
- TasksSettings.json which contains the settings of the tasks. This configuration file is used by the designer.
The folder C:\WexflowTesting\ contains data of testing scenarios.
The logs are written in C:\Program Files\Wexflow\Wexflow.log. There is one log file per day. The old log files are saved in this format Wexflow.logyyyyMMdd.
In the .NET Core version:
- Windows: The folders C:\Wexflow-dotnet-core\ and C:\WexflowTesting\ are created. The path of the main configuration file C:\Wexflow-dotnet-core\Wexflow.xml can be configured from Wexflow.Server\appsettings.json. The logs are written in Wexflow.Server\Wexflow.log.
- Linux: The folders /opt/wexflow/Wexflow/ and /opt/wexflow/WexflowTesting/ are created. The path of the main configuration file /opt/wexflow/Wexflow/Wexflow.xml can be configured from /opt/wexflow/Wexflow.Server/appsettings.json. The logs are written in /opt/wexflow/Wexflow.Server/Wexflow.log.
- macOS: The folders /Applications/wexflow/Wexflow/ and /Applications/wexflow/WexflowTesting/ are created. The path of the main configuration file /Applications/wexflow/Wexflow/Wexflow.xml can be configured from /Applications/wexflow/Wexflow.Server/appsettings.json. The logs are written in /Applications/wexflow/Wexflow.Server/Wexflow.log.
Workflows can be designed through the UI Designer, XML or JSON.
It is recommended to understand workflows syntax (XML/JSON) in order to become familiar with this workflow engine.
Below is the configuration file of a workflow in XML:
<?xml version="1.0" encoding="utf-8" ?>
<!--
    This is the configuration file of a workflow.
    A workflow is composed of:
      - An id which is an integer that must be unique.
      - A name which is a string that must be unique.
      - A description which is a string.
      - A Settings section which is composed of the following elements:
        - A launchType which is one of the following options:
          - startup: The workflow is launched when Wexflow Engine starts.
          - trigger: The workflow is launched manually from Wexflow Manager.
          - periodic: The workflow is launched periodically.
          - cron: The workflow is launched depending on a cron expression.
        - A period which is necessary for the periodic launchType. It is
          a timeSpan in this format dd.hh:mm:ss. For example the period
          00.00:02:00 will launch the workflow every 2 minutes.
        - A cron expression which is necessary for the cron launchType.
          For example '0 0/2 * * * ?' will launch the workflow every 2 minutes.
        - The enabled option which allows to enable or disable a workflow.
          The possible values are true or false.
        - The approval option which marks the current workflow as an approval workflow.
          The possible values are true or false. An approval workflow must contain
          at least one Approval task or more.
        - The enableParallelJobs option Shows whether workflow jobs are executed in parallel.
          Otherwise jobs are queued. Defaults to true.
        - The retryCount option allows to retry a task a certain number of times in case of
          failure. Defaults to 0 (no retry).
        - The retryTimeout option indicates the waiting time between two tries in milliseconds.
          Defaults to 1500ms.
      - A LocalVariables section which contains local variables.
      - A Tasks section which contains the tasks that will be executed by
        the workflow one after the other.
        - A Task is composed of:
          - An id which is an integer that must be unique.
          - A name which is one of the options described in the tasks documentation.
          - A description which is a string.
          - The enabled option which allows to enable or disable a task. The possible
            values are true or false.
          - A collection of settings.
      - An ExecutionGraph section which contains the execution graph of the workflow.
-->
<Workflow xmlns="urn:wexflow-schema" id="$int" name="$string" description="$string">
  <Settings>
    <Setting name="launchType" value="startup|trigger|periodic|cron" />
    <Setting name="period" value="dd.hh:mm:ss" />
    <Setting name="cronExpression" value="$string" />
    <Setting name="enabled" value="true|false" />
    <Setting name="approval" value="true|false" />
    <Setting name="enableParallelJobs" value="true|false" />
    <Setting name="retryCount" value="0" />
    <Setting name="retryTimeout" value="1500" />
  </Settings>
  <LocalVariables>
    <Variable name="$string" value="$string" />
    <Variable name="$string" value="$string" />
    <!-- You can add as many variables as you want. -->
  </LocalVariables>
  <Tasks>
    <Task id="$int" name="$string" description="$string" enabled="true|false">
      <Setting name="$string" value="$string" />
      <Setting name="$string" value="$string" />
      <!-- You can add as many settings as you want. -->
    </Task>
    <Task id="$int" name="$string" description="$string" enabled="true|false">
      <Setting name="$string" value="$string" />
      <Setting name="$string" value="$string" />
    </Task>
    <!-- You can add as many tasks as you want. -->
  </Tasks>
  <!-- This section is optional and described in the samples section. -->
  <ExecutionGraph />
</Workflow>
For cron workflows, read the following documentation for more details.
Local variables are explained here.
Global variables are explained here.
The name option of a Task must be one of the names listed in the following documentation. You can find the documentation of each task in the Documentation folder of Wexflow.
The execution graph is explained in the samples section.
To learn how to make your own workflows, you can check out the workflow samples availabe in the Designer, in the samples section, and read the tasks documentation available in Configuration folder.
If a new workflow is created or if an existing workflow is deleted or modified, you don't have to restart Wexflow Windows Service so that these modifications take effect. Wexflow engine will automatically detect the changes and reload, add or delete the workflow.
To disable a workflow, you can set the enabled settings option of the workflow to false.
State is transferred between tasks through selectFiles and through selectEntities settings.
This works the following way:
- A task in a workflow does its job and produces files which it stores in a collection.
- Another task (must be in the same workflow) can afterwards reference those files with the selectFiles XML property, specifying the ID of the task that produced the required files. It then can use these files to do its own job.
More visually (from the examples):
<Workflow xmlns="urn:wexflow-schema" id="1" name="Workflow_Invoices" description="Workflow_Invoices">
    <Settings>
        <Setting name="launchType" value="trigger" />
        <Setting name="enabled" value="true" />
    </Settings>
    <Tasks>
        <Task id="1" name="FilesLoader" description="Loading invoices" enabled="true">
            <Setting name="folder" value="C:\WexflowTesting\Invoices\" />
        </Task>
        <!-- some more tasks here -->
        <Task id="6" name="FilesMover" description="Moving invoices" enabled="true">
            <Setting name="selectFiles" value="1" />
            <Setting name="destFolder" value="C:\WexflowTesting\Invoices_sent\" />
        </Task>
    </Tasks>
</Workflow>
selectEntities setting works the same way as selectFiles. The only difference is that selectEntities is designed to be used for tasks that manipulate custom objects from a database or from web services for example. To go further, read this documentation regarding entities.
When you open Wexflow Manager for the first time, you will get a login window.
Here are the credentials to sign in:
- Username: admin
- Password: wexflow2018
You can change the password from the backend.
Wexflow Manager is a simple application that allows you to do the following things:
- See all the workflows loaded by Wexflow Engine.
- See the status of the selected workflow (running, suspended, waiting for approval or disabled).
- Start a workflow.
- Stop a workflow.
- Suspend a workflow.
- Resume a workflow.
- Approve an approval workflow.
- Reject an approval workflow.
- The "Backend" button opens the backend from which you can manage workflows, design workflows, track workfows and have real-time statistics on workflows.
- The "Logs" button allows to view the logs of the day.
- The "Refresh" button allows to reload the list of workflows.
- The "Restart server" button allows to restart Wexflow Server.
- The "Search" button allows to search for workflows.
- The "Help" menu opens the help page.
- The "About" menu shows the version of Wexflow and checks if a new version is available.
To see what's going on in Wexflow, open the log file C:\Program Files\Wexflow\Wexflow.log in a text editor like Notepad++. Notepad ++ will update the log file as it fills up.
The backend is a website that you can host on IIS, Apache, NGINX or any other web server. The backend can also run locally.
The backend gives real-time statistics on workflows. It will let you manage, design and track your workflows with ease and flexibility. You can use the backend to access, configure, manage, administer, and develop your workflows with ease.
When you open the backend for the first time, you will get a login window.
Here are the credentials to sign in:
- Username: admin
- Password: wexflow2018
After you sign in, you can change the password from the "Users" page.
If a user forgot his password, he can click on "Forgot password?" link to reset his password.
When the user clicks on "Submit" button, an email is sent to him with a temporary password that he can change after he signs in.
To allow the backend sending emails, the SMPT configuration must be set in the configuration.
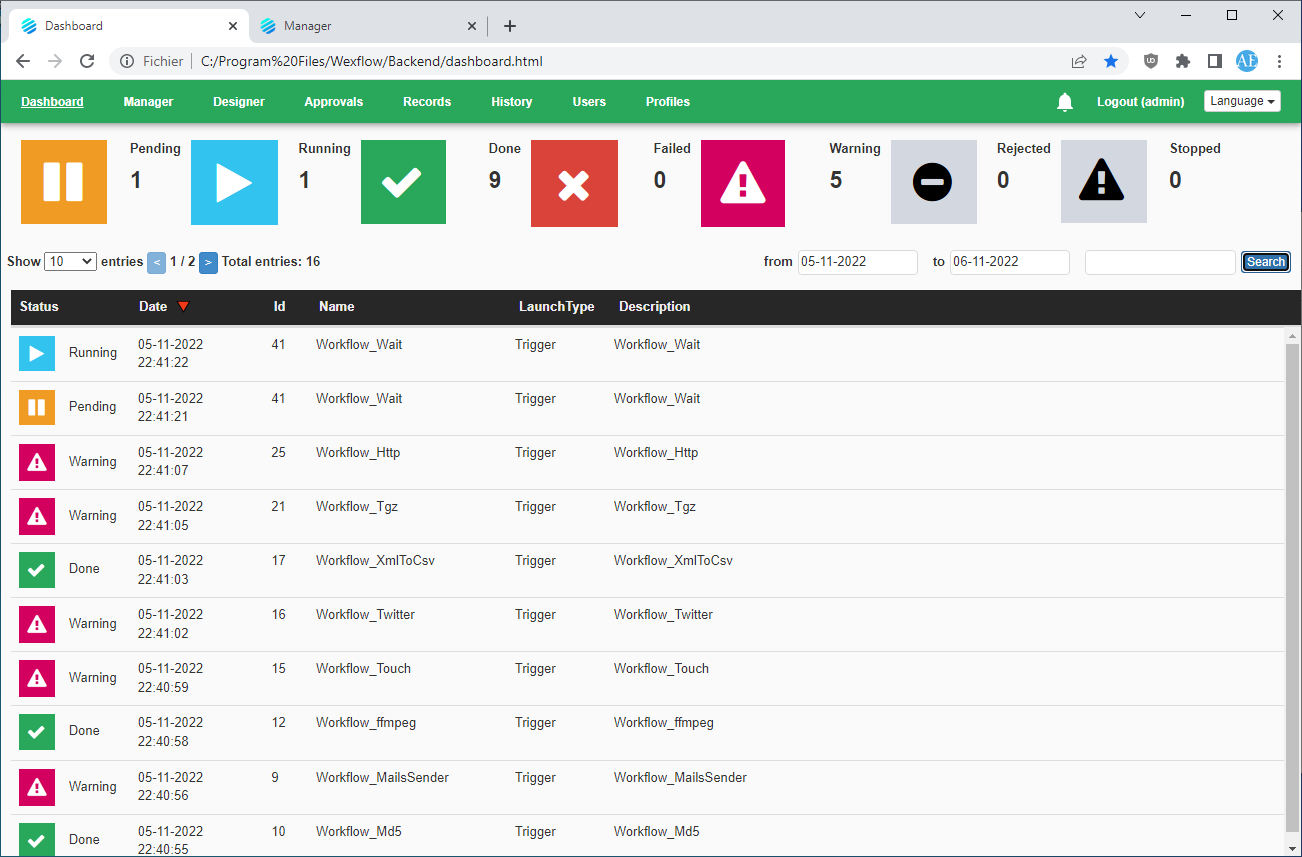
After you sign in, you will arrive on the dashboard page. Wexflow gives you a beautiful dashboard to view real-time statistics on your workflows. Indeed, the "Dashboard" page gives you real-time statistics on workflows and will let you track your workflow server with ease and detail. From the dashboard, you can also filter the workflow entries by a keyword or by date. You can also order the workflow entries by date, by name, etc.

The "Manager" page will let you manage your workflows. From this page you can start a workflow, suspend a running workflow, resume a suspended workflow, stop a running workflow and search for workflows.

The "Designer" page will let you design your workflows. From this page you can create a new workflow, edit an existing workflow or delete a workflow. Using the "Designer" page, we get a nice visual overview of the dependency graph of the workflow. Each node represents a task which has to be run.
Furthermore, the "Designer" page allows to edit workflow files through its Web XML or JSON editor.
Press Ctrl+S to save your workflow.
Press Ctrl+Alt+H in XML or JSON view for keyboard shortcuts.
The "Approval" page will let you view all approval workflows and will let you approve or disapprove workflows.

The "History" page will let you track all your workflows and everything that happens on the workflow server.From this page you will have an overview of all the workflow instances executed on the workflow server. Furthermore, you can filter the entries by keywords or date. You can also order the entries by date, by name, etc.
The "Users" page allows to create new users, change passwords and user's informations, and delete users who have restricted access.
A user who has restricted rights has only access to the "Dashboard" page and the "History" page.
The "Profiles" page allows to assign workflows to users. Once the workflow assigned, the user can run it, modify it and delete it.