i_en_quick_start
- Take chat demo as an example
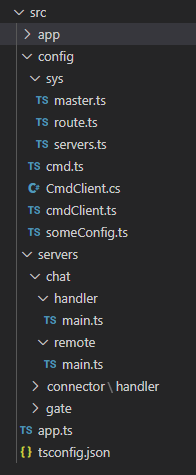
- The basic configuration file is in the
config/sysdirectory.master.tsis the master server port configuration,servers.tsis the developer-defined server configuration, androute.tsis the communication message list. To add a server, you only need to add the corresponding configuration inservers.ts, and all communication messages must be inroute.ts. - The
serversdirectory is the entry for communication messages. For example, chat represents a chat type server. Client messages are received under thehandlerdirectory, and rpc call messages between servers are received under theremotedirectory. The client sends achat.main.chatmessage, the server will receive the message at thechatmethod in theservers/chat/handler/main.tsfile, and callnext()after receiving the message, data can be sent to the client. Developers callapp.rpc("chat-server-1").chat.main.offline(), they will receive it in theofflinemethod in theservers/chat/remote/main.tsfile. -
app.tsis the program entry file - Actively send messages:
- The frontend server uses
app.sendMsgByUid(),app.sendAll(). - The backend server uses
app.sendMsgByUidSid(),app.sendMsgByGroup().
- The frontend server uses
The master server (ie master.ts) reads the configuration file, starts the configured server cluster, and manages all servers. After the logical server is started, it registers with the master, recognizes other logical servers and establishes a socket connection for communication.
{
    "development": {
        "id": "master-server-1", "host": "127.0.0.1", "port": 3005
    },
    "production": {
        "id": "master-server-1", "host": "127.0.0.1", "port": 3005
    }
}The logical server (ie servers.ts) is a server cluster where developers write code. The frontend (clientPort must be provided at the same time) parameter indicates that the server is client-connectable, that is, the frontend server. The server without this parameter is the backend server, and client connections are not allowed.
{
    "development": {
        "connector": [
            { "id": "connector-server-1", "host": "127.0.0.1", "port": 4021, "frontend": true, "clientPort": 4001, },
        ],
    },
    "production": {
        "connector": [
            { "id": "connector-server-1", "host": "127.0.0.1", "port": 4021, "frontend": true, "clientPort": 4001, },
        ],
    }
}
If there are too many server processes, then:
{
    "development": {
        "connector": [
            { "id": "connector-server-1", "host": "127.0.0.1", "port": 4021 },
            { "id": "connector-server-2", "host": "127.0.0.1", "port": 4022 },
            { "id": "connector-server-3", "host": "127.0.0.1", "port": 4023 },
        ],
    }
}
Can be abbreviated as:
{
    "development": {
        "connector": [
            { "id": "connector-server-", "idStart": 1, "host": "127.0.0.1", "port": [4021, 4023] },
        ],
    }
}
According to the port parameter analysis
- When the client sends a message to the
backend server, it needs to provide a routing function to determine which server the message is sent to. as follows:
app.route("chat", function (session: Session) {
    return session.get("chatServerId");
});let res = await this.app.rpc("connector-server-1", false).connector.main.test(msg);-
connector-server-1represents the server be rpc called.falsemeans the message receiver needs to response, otherwise it will trigger a timeout.connectormeans the serverType,mainmeans the filename,testmeans the method. - If
connector-server-1is*, then allconnectorserverType will be called. At this point, the called party cannot return a message. - The message of the rpc call is encoded as
json. - There is a complete code prompt for rpc call, just fill in the declaration file, you can refer to the project code, as follows:
    declare global {
        interface Rpc {
            connector: {
                main: Remote,
            }
        }
    }

    export default class Remote {
        constructor(app: Application) {
        }
        test(msg: string) {
            console.log("rpcMsg", msg);
        }
    }
connector in Rpc indicates the server type, main indicates the file name, and Remote indicates the default class exported from the main file.
The session is bound to the client socket. There are two important fields in the session, uid and sid, sid is the name of the frontend server, and uid is the unique identifier of the socket connection binding (session.bind() method is called in the frontend server to bind a unique uid). When the server actively sends a message to the client, it locates the client based on these two fields. Customized information can be stored in the session through the set() and get() methods. The session in the backend server is a copy of the frontend session every time the frontend server forwards a message (so it is not recommended to store too much information in the session). After the backend custom storage, the apply() method must be called to transfer to the frontend server, or rpc to the frontend server to call the app.getSession() method to get the session, and then modify. Note: When session calls set, it will trigger the internal conversion of session to Buffer. If you get a value and modify it without re-set, this modification will not be reflected in the backend server