DeepRacer Vision Timer provides a vision-based AI automatic timing system and timer for offline competitions using AWS DeepRacer.
-
DeepRacer Vision Timer runs on Python 3.9 (or higher). NVIDIA GPU is required for GPU acceleration.
-
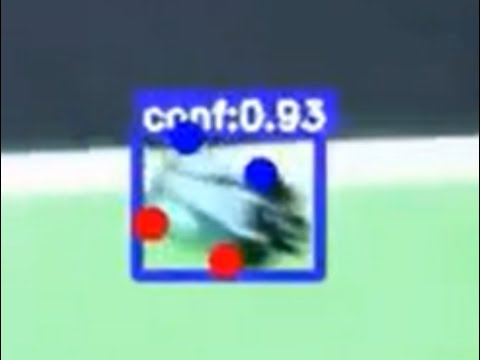
With just a webcam (or IP camera, etc.), you can perform AI-based vehicle departure and track detection. Using AI Pose Detection technology, it tracks the position of the DeepRacer vehicle and its wheels to automate the detection of track departure and start line crossing. Refer to the videos below.
-
It provides a timer viewer (web-based) to manage team records and rankings. Refer to the videos below.
-
Be sure to follow the steps in [1] Prerequisites, [2] Installation, [3] Configuration, and [4] Execution to ensure proper operation. Please read the following instructions carefully.
- Developer Company: AI CASTLE (https://aicastle.io)
- Developer: Dongjae Lee (dongorae@ai-castle.com)
-
Computer
- Python version: 3.9 or higher
- CPU: 8 cores or more
- RAM: 8GB or more
- NVIDIA GPU (optional)
-
Webcam
- Resolution support: qHD(960x540) or HD(1280x720) or FHD(1920x1080)
- FPS: 30 or higher (recommended)
- Can be replaced with an IP camera, etc. (experimental)
-
Webcam Installation
- Install the webcam at a high position so that the entire track can be captured.
- The closer the webcam is installed to the center above the track, the better. Performance may degrade if the track is captured at an angle.
-
Install Python 3.9 or higher: Python Download
-
Install Git: Git Download
- Open a terminal and clone the repository.
git clone https://github.com/ai-castle/deepracer-vision-timer.git
cd deepracer-vision-timer
-
Install the appropriate version of PyTorch for your computer environment from PyTorch Installation.
-
If using an NVIDIA GPU, install PyTorch that matches your CUDA version.
-
Example: For Windows with CUDA 12.1, install as follows:
pip3 install torch torchvision torchaudio --index-url https://download.pytorch.org/whl/cu121
- Install the remaining libraries.
pip3 install -r requirements.txt
-
Check CUDA (NVIDIA GPU) availability with the following command:
python setup.py --check_cuda_available
-
If it shows
Cuda : True, Cuda is available !, the GPU is available. -
Vehicle detection is possible with CPU only, but it may be very slow.
-
The detection model's FPS should be higher than the camera's FPS. FPS information can be checked in the console after running the server. Generally, the camera's FPS is 30.
- CPU: 13th Gen Intel(R) Core(TM) i9-13900HX
- GPU: NVIDIA GeForce RTX 4070 Laptop GPU
- Resolution: qHD(960x540), HD(1280x720), FHD(1920x1080)
- Detection Model: nano, small, medium
-
GPU (CUDA)
Type FHD HD qHD nano 70 fps 80 fps 90 fps small 60 fps 70 fps 80 fps medium 50 fps 60 fps 70 fps -
CPU
Type FHD HD qHD nano 30 fps 35 fps 40 fps small 25 fps 30 fps 35 fps medium 20 fps 25 fps 30 fps
-
Open
config.pywith a text editor and setmodel_typeandmodel_version, then save. -
model_type:nano,small,medium -
model_version: Positive integer greater than or equal to 1 -
Check the latest model version with the following command:
python setup.py --check_model_latest_version
-
The models
nano,small, andmediumprovide more accurate inferences in that order but consume more resources, thus slowing down inference speed. For more details on the models, refer to https://docs.ultralytics.com/tasks/pose/#models. -
Refer to the performance table above to choose an appropriate
model_type. Alternatively, refer to the displayed FPS after execution to find a suitablemodel_type. -
The pre-trained model may not work well in your track environment. In this case, you may need to use a custom model through additional training. Refer to [Using Custom Models] below for more details.
-
If using a webcam, check the list of available local webcams and their indices with the following command. Remember the index of the displayed webcam.
python setup.py --local_camera_check
-
Open
config.pyand setcamera_idxto the index (integer) found above or the path to a test video file (string), then save. -
Example
- Webcam:
camera_idx = 1 - Test video file:
camera_idx = "source/test/test_video.mp4" - IP camera (experimental):
camera_idx = "rtsp://admin:12345@192.168.1.10:554/stream1"
- Webcam:
-
Check the resolution support of the camera corresponding to the index set above with the following command:
python setup.py --check_resolution
-
Open
config.pyand setresolutionto one of the supported resolutions (FHD,HD,qHD). -
Example
- FHD(1920x1080):
resolution = "FHD" - HD(1280x720):
resolution = "HD" - qHD(960x540):
resolution = "qHD"
- FHD(1920x1080):
-
Capture the camera image with the following command:
python setup.py --capture_image
-
If the camera needs to be rotated 180 degrees, set
camera_rotation_180toTrueinconfig.py, save, and run the above command again. -
The captured images will be saved as
source/capture.jpg,source/off_track.temp.jpg, andsource/off_fence.temp.jpg. Especially,source/off_track.temp.jpgandsource/off_fence.temp.jpgwill be used later to set the track and fence outlines.
-
Open
source/capture.jpgwith an image viewer or runpython setup.py --capture_imageto open the image viewer. Then, find and record the coordinates of the two endpoints of the start (finish) line using the mouse pointer. -
Open
config.pyand set the endpoints instarting_line_endpoints, then save. -
Example: If the endpoints are (1050,662) and (1238,897)
######## starting line ########
starting_line_endpoints = [
    [1050, 662],    # point1 : [x1, y1]
    [1238, 897]     # point2 : [x2, y2]
]
-
The start line crossing is detected based on the values entered in
starting_line_endpoints.
-
Use a tool like Paint to color the outer part of the fence in black on
source/off_fence.temp.jpgand save it assource/off_fence.jpg. Refer to the example below.
-
The blackened part is excluded from the model's DeepRacer detection. This prevents errors caused by detecting irrelevant vehicles outside the fence.
-
The black color should be very dark. Some image editors may apply a light brush, so be cautious.

-
Use a tool like Paint to color the outer part of the track in black on
source/off_track.temp.jpgand save it assource/off_track.jpg. Refer to the example below.
-
The blackened part is used to determine whether the detected vehicle's wheels have departed from the track.
-
The black color should be very dark. Some image editors may apply a light brush, so be cautious.

- Open
config.pyand modifytotal_lapsandofftrack_penalty, then save.total_laps: The total number of laps required to complete the race.offtrack_penalty: The penalty (in seconds) applied when the vehicle departs from the track.
-
Open
config.pyand modifytime_zoneto match your region, then save. -
The time zone list can be found at https://gist.github.com/heyalexej/8bf688fd67d7199be4a1682b3eec7568.
-
The time zone set here is used for time-related operations.
-
Open
config.pyand set the list of team names participating in the competition inteam_name_list, then save. -
Example
######## team name ########
team_name_list = [
    "team1",
    "team2",
    "team3",
    "team4",
    "team5",
    "team6",
]
-
The team name list is used to display team records and the timer viewer.
-
Run the DeepRacer Vision Timer server with the following command:
python main.py
-
If the terminal displays the following, it has been successfully executed:
========== start ========= (start) All ready. Start!! (Timer View) - http://localhost:5000/ - http://172.30.1.54:5000/ (Remote Control) - http://localhost:5000/remote - http://172.30.1.54:5000/remote (Logs Control) - http://localhost:5000/logs - http://172.30.1.54:5000/logs -
The terminal will display FPS information in real-time at 10-second intervals:
[FPS] camera : 30 < detect model : 40 < display : 164
- Note that it is preferable for the detect model's FPS to be higher than the camera's FPS.
- If the detect model's FPS is excessively high, use a higher model (e.g., medium) or a higher resolution (e.g., FHD). If the detect model's FPS is low, use a lower model (e.g., nano) or a lower resolution (e.g., qHD).
-
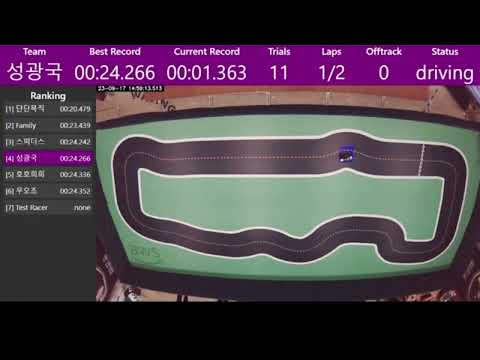
Access http://localhost:5000 or http://{ip}:5000 to view the timer viewer as shown below:

-
If live streaming, use tools like OBS to broadcast.

-
Access http://localhost:5000/remote or http://{ip}:5000/remote to use the remote control as shown below:

-
Observe: Determines whether to use machine inference.
- on: Enables machine inference for automation. Manual control by a person is also possible simultaneously.
- off: Disables machine inference. Only manual control by a person is possible.
-
Auto Start: Determines whether to automatically start the next lap timing after the current lap is completed.
- on: Automatically starts the next lap timing when the current lap is completed.
- off: Does not automatically start the next lap timing when the current lap is completed.
-
Finish Time: The deadline for the current team's run. If this time is reached, the ongoing record is canceled, and the team's run is finished.
-
Status: Indicates the current running status.
- Status types: Waiting, Ready, Driving, Paused, Finished
- Action types: Ready, Start, Stop, Out, Complete
- Action shortcuts: Enter (Start, Complete), Spacebar (Out), Esc (Stop)
-
Refer to the diagram below for the workflow of Status and Action.


-
Access http://localhost:5000/logs or http://{ip}:5000/logs to manage logs as shown below:

-
Incorrectly measured records can be deleted and modified.

-
The pre-trained model may not work well in your track environment. In this case, you may need to use a custom model through additional training.
-
The model used in this project is YOLOv8-pose. For details on model training, refer to https://docs.ultralytics.com/tasks/pose/#train.
-
The dataset format for model training should follow the format below:
0 <x> <y> <width> <height> <px1> <py1> <px2> <py2> <px3> <py3> <px4> <py4>0: The class index of the DeepRacer. This value is always 0.<x>: The x-coordinate of the center of the DeepRacer vehicle's bounding box. (Range: 0 ~ 1)<y>: The y-coordinate of the center of the DeepRacer vehicle's bounding box. (Range: 0 ~ 1)<width>: The width of the DeepRacer vehicle's bounding box. (Range: 0 ~ 1)<height>: The height of the DeepRacer vehicle's bounding box. (Range: 0 ~ 1)<px1>: The x-coordinate of the left front wheel of the DeepRacer vehicle. (Range: 0 ~ 1)<py1>: The y-coordinate of the left front wheel of the DeepRacer vehicle. (Range: 0 ~ 1)<px2>: The x-coordinate of the right front wheel of the DeepRacer vehicle. (Range: 0 ~ 1)<py2>: The y-coordinate of the right front wheel of the DeepRacer vehicle. (Range: 0 ~ 1)<px3>: The x-coordinate of the left rear wheel of the DeepRacer vehicle. (Range: 0 ~ 1)<py3>: The y-coordinate of the left rear wheel of the DeepRacer vehicle. (Range: 0 ~ 1)<px4>: The x-coordinate of the right rear wheel of the DeepRacer vehicle. (Range: 0 ~ 1)<py4>: The y-coordinate of the right rear wheel of the DeepRacer vehicle. (Range: 0 ~ 1)
-
For details on the YOLOv8-pose data format, refer to https://docs.ultralytics.com/datasets/pose/#ultralytics-yolo-format.
-
The base models for additional training can be downloaded from the links below. Use the downloaded models for additional training.
Version nano small medium 1 download download download -
Once the custom model training is complete, save it in the
data/saved_modelfolder with the formatv{model_version}_{model_type}.pt. For example, ifconfig.pyhasmodel_type="small"andmodel_version="custom", it will bevcustom_small.pt.
-
Log records will accumulate continuously during execution.
data/saved_logs/df_logs.pickle: The log file used by the system. It is saved at approximately 1-minute intervals and is used to restore previous records if the timer is unexpectedly interrupted.data/saved_logs/df_logs.xlsx: The log records saved in Excel format. It is saved at approximately 1-minute intervals.data/saved_logs/pickle_history: A folder where previousdf_logs.picklerecords are stored.data/saved_logs/excel_history: A folder where previousdf_logs.xlsxrecords are stored.
-
Delete and initialize all log records with the following command:
python setup.py --clear_logs
- Variables related to the timer system can be set in
hparams.py.