Home
Simulation toolkit based on Geant4 and ROOT
We assume that you have CMake installed (you can check with which cmake) and have ROOT installed in AlcapDAQ.
Also, AlcapDAQ should be in a parallel directory to g4sim i.e:
- YourDir/
| - AlcapDAQ/
| | analyzer/
| | etc...
| - g4sim/
First, we need to clone the g4sim repository:
> cd YourDir
> git clone git@github.com:alcap-org/g4sim.git
Now, we will install a recent version of Geant4 so that we are all using the same version (this step will take a while):
> cd g4sim/
> ./install-geant4.sh
This is in addition to the more obvious changes in the install-geant4.sh file where you just need to change GEANT4_VERSION to 4.10.03.p01.
Modify the CMakeLists.txt
cmake_minimum_required(VERSION 3.3 FATAL_ERROR)
if(POLICY CMP0042)
  cmake_policy(SET CMP0042 NEW)
endif()
if(POLICY CMP0065)
  cmake_policy(SET CMP0065 NEW)
endif()

set(CMAKE_USER_MAKE_RULES_OVERRIDE_CXX
   ${CMAKE_SOURCE_DIR}/cmake/Modules/Geant4MakeRules_cxx.cmake)
Remove or comment out
add_custom_target(G4SIM DEPENDS g4sim)
To compile g4sim:
> source env.sh
> cd cmake/
> cmake .
> make
somehow if the compiled g4sim binary and lib folder is not copied to the g4sim parent folder, one should copy them there.
In general, we will run our simulations in the alcap/ directory using Geant4 macros and configure files to define the geometry and input beam.
The steps to run g4sim are:
> source env.sh # If this is the first time running in this session
> cd ../alcap
> g4sim macros/test_run.mac
This should produce a visualisation like this:
TODO: Add Picture
Here is test_run.mac macro:
/control/getEnv ALCAPWORKROOT

# Get default settings
/control/execute {ALCAPWORKROOT}/macros/resetVerbose.mac
/control/execute {ALCAPWORKROOT}/macros/resetCut.mac

# Get visualisation
/control/execute {ALCAPWORKROOT}/macros/test_vis.mac <--- sets up the visualisation viewer

# Set Output
/g4sim/myAnalysisSvc/set_out_card output/output_default <--- the name of the output file

# Set Gen
/g4sim/gun/ResetGen               gen/gen_gam_tgt <--- use this generator

# Set Geo
/g4sim/det/ReloadGeo              geometry_1217 <--- use this geometry

#       For this run
/run/beamOn  1 <--- fire one particle

/vis/ogl/printEPS <--- print the resulting visualisation
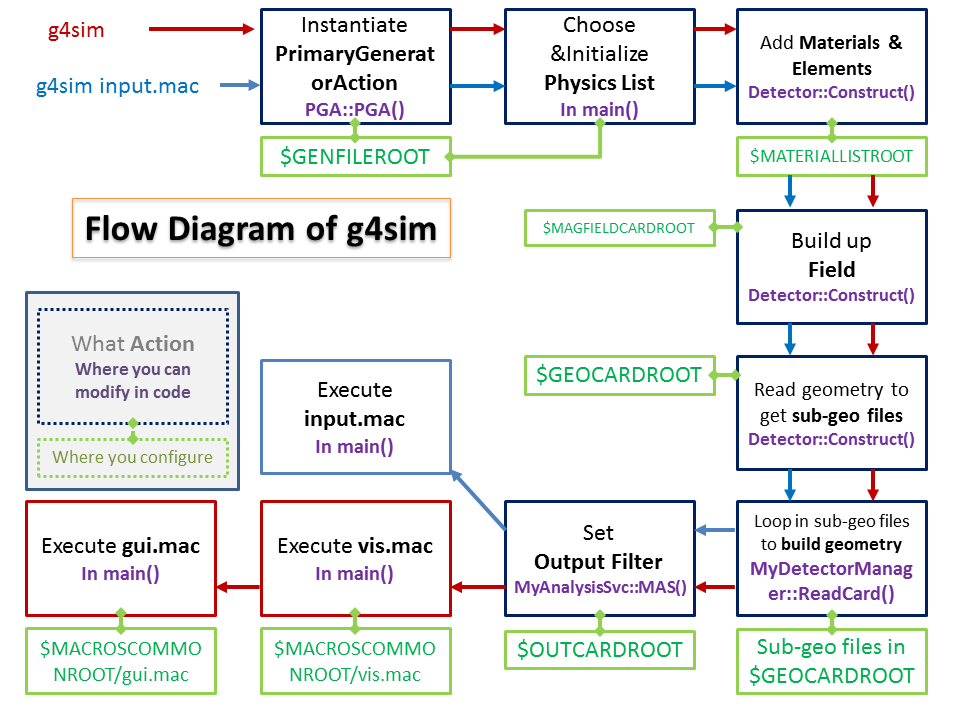
The main thing to note here is that we have overloaded the default generator and geometry with our own. These two files are found in alcap/configure.
Here are the generators we currently have:
gen_mum_up      # Generate muon from upstream before MuPC
gen_gam_tgt     # Generate gamma from target position
In the example above, we used gen_gam_tgt. You can look in the file and everything should be pretty self-explanatory, however more information can be found here.
In the above example we used the configure file geometry_1217:
# The Segment which includes World should be put at the first line!!
        VerboseLevel    1

#ServiceName        ServiceType         FileName
        World           Simple              world_AlCap
        PSI             Simple              sub_all/subgeo_1217
which looks pretty simple, since all the geometry defintions are in subgeo_1217. If you ever need to modify the geometry then look in subgeo_1217 and see here for what everything means.
The default geometry is geometry_1217(should be under the folder alcap/configure) and the default generator is gen_mum_up (which generates muons upstream of the target). Other geometries are also present. These are defined in env.sh:
GENFILEROOT=gen/gen_mum_up
GEOCARDROOT=geometry_R2013/archive/geometry_1217
OUTCARDROOT=output/output_default
NB Because we have defaults you can also run g4sim like so:
> g4sim
> Idle> /run/beamOn 100
For visualisation, the macro test_vis.mac was used in the above example:
/vis/open OGLIX <--- you may need to change this to another visualizer (grep the output for "Current available graphics systems" to see which you can use)

/vis/geometry/list <--- lists the geometries you can draw
/vis/drawVolume <--- without an argument, draw the whole world, but can add a volume name (e.g. ChamberIn) to draw a specific part of the experiment
#/vis/scene/add/volume ChamberIn <--- can also add other volumes

/vis/viewer/addCutawayPlane 0 5.5 0 cm 0 -1 0 <--- need a cutaway plane to see inside of the experiment
/vis/viewer/set/style s <--- draw in solid style (other option is 'wireframe')
/vis/viewer/set/viewpointThetaPhi 70 90 <--- rotate the viewing angle

/vis/scene/add/trajectories smooth <--- add smooth trajectories of the particles
/vis/scene/endOfEventAction accumulate <--- draw all trajectories on top of each other
There are lots of visualisation commands that can be used. Look in the Geant4 manual or in alcap/macros/common/ for vis.mac and setvis.mac for examples.
The output is controlled by the configure/output/output_default configure file and also the declaration of MonitorSDs in the geometry configure file. See this for more information.
An example ROOT macro that counts the number of photons that reach the Germanium detector is located in alcap/scripts.
First, run edit test_run.mac by commenting out the lines for visualisation (/control/execute {ALCAPWORKROOT}/macros/test_vis.mac and /vis/ogl/printEPS) and setting the simulation to run for 10,000 photons.
This shouldn't take too long so once it's done do the following:
> cd scripts/
> root -l ExampleROOTMacro.C
which will print out the number of photons that reached the Germanium:
root [0]
Processing ExampleROOTMacro.C...
There were 27 photons that reached the Germanium detector out of 10000
Acceptance = 0.0027
A list of what the branches mean can be found here.
If you run a simulation that will be used by the rest of us, then make a folder in alcap/scripts and put all your ROOT macros, figures and a Markdown file with an explanation inside so that others can repeat and check your work.
See the example here that we already have.
A figure to show how it works:
