Assignment 6
Responsible TA: Eyal Weiss
In this shorter assignment, we will continue to extend the Arkanoid game.
For consistency reasons, we recommend using 800 x 600 as the size of the screen. However, this is not mandatory (as long as your size is reasonable).
We will be adding the following capabilities:
- A little rest - a "pause" screen.
- Bonus section: A "3... 2... 1... Go" screen.
- Supporting multiple levels.
- End screen - "Game Over" or "You win"
We start by performing some code reorganization which will be useful soon.
A central component of the Game class is the main loop in the run() method.
Recall, the loop probably looks something like this:
public void run() {
   //...
   while (true) {
      long startTime = System.currentTimeMillis(); // timing
      DrawSurface d = gui.getDrawSurface();

      // game-specific logic
      this.sprites.drawAllOn(d);
      this.sprites.notifyAllTimePassed();

      // stopping condition
      if (this.ballsCounter.getValue() == 0) {
         break;
      }
      if (this.remainingBlocks.getValue() == 0) {
         break;
      }

      gui.show(d);
      long usedTime = System.currentTimeMillis() - startTime;
      long milliSecondLeftToSleep = millisecondsPerFrame - usedTime;
      if (milliSecondLeftToSleep > 0) {
          sleeper.sleepFor(milliSecondLeftToSleep);
      }
   }
}
The loop combines game-specific logic (like displaying the sprites and notifying them time has passed, and keeping track of the number of balls and blocks) with frame-rate and time-tracking code. In addition, this loop in Game requires for game to know the GUI object, and we would like to avoid this if possible (the Game should not care about the GUI which is used to display it, all it should care about is the DrawSurface it is drawing on).
We would like to separate the GUI and frame-rate management code (which is general, and can be used in other places) from the actual loop body (which is specific to the Game class). By separating the loop management from the game logic in the loop body, we will be able to re-use the loop in many different places.
One way to achieve this kind of separation is by using template methods:
public void run() {
   //...
   while (!this.shouldStop()) { // shouldStop() is in charge of stopping condition.
      long startTime = System.currentTimeMillis(); // timing
      DrawSurface d = gui.getDrawSurface();

      this.doOneFrame(d); // doOneFrame(DrawSurface) is in charge of the logic.

      gui.show(d);
      long usedTime = System.currentTimeMillis() - startTime;
      long milliSecondLeftToSleep = millisecondsPerFrame - usedTime;
      if (milliSecondLeftToSleep > 0) {
          sleeper.sleepFor(milliSecondLeftToSleep);
      }
   }
}
Here the main loop includes only the gui and frame-management code, while the game-specific
logic and stopping conditions are handled in the void doOneFrame(DrawSurface d) and boolean shouldStop() methods (which could be abstract, and differ from class to class).
One shortcoming of the template-method pattern is that it forces us to use inheritance. We will instead choose a different solution, based on composition.
First, we will take the template-methods and put them in an interface called Animation.
public interface Animation {
   void doOneFrame(DrawSurface d);
   boolean shouldStop();
}
Next, we will put the looping code in its own class, which we will call AnimationRunner.
public class AnimationRunner {
   private GUI gui;
   private int framesPerSecond;
   // ...
   public void run(Animation animation) {
      int millisecondsPerFrame = ...;
      while (!animation.shouldStop()) {
         long startTime = System.currentTimeMillis(); // timing
         DrawSurface d = gui.getDrawSurface();

         animation.doOneFrame(d);

         gui.show(d);
         long usedTime = System.currentTimeMillis() - startTime;
         long milliSecondLeftToSleep = millisecondsPerFrame - usedTime;
         if (milliSecondLeftToSleep > 0) {
             this.sleeper.sleepFor(milliSecondLeftToSleep);
         }
      }
   }
}
The AnimationRunner takes an Animation object and runs it.
Now, we implement the task-specific information in the Animation object,
and run it using the loop in the AnimationRunner class. (Note that now the AnimationRunner has framesPerSecond as a member, which should be set in the constructor. You should use a frame rate of 60 frames per second.)
We can now change the code of the Game class to work with the AnimationRunner.
We will make Game implement the Animation interface, and change Game.run to use the AnimationRunner to drive the Game.
public class Game implements Animation {
   private AnimationRunner runner;
   private boolean running;
   // ...
   public boolean shouldStop() { return !this.running; }
   public void doOneFrame(DrawSurface d) {
      // the logic from the previous run method goes here.
      // the `return` or `break` statements should be replaced with
      // this.running = false;
   }

   public void run() {
      this.createBallsOnTopOfPaddle(); // or a similar method
      this.running = true;
      // use our runner to run the current animation -- which is one turn of
      // the game.
      this.runner.run(this);
   }
   // ...
}
Complete this change, and verify that your game still works as it did before.
Now that we have the Animation interface and AnimationRunner class, lets put them to good use. We will begin by adding an option to pause the game when pressing the p key. We will do this by creating a new kind of Animation, called PauseScreen. It is a very simple animation, that will display a screen with the message paused -- press space to continue until a key is pressed.
public class PauseScreen implements Animation {
   private KeyboardSensor keyboard;
   private boolean stop;
   public PauseScreen(KeyboardSensor k) {
      this.keyboard = k;
      this.stop = false;
   }
   public void doOneFrame(DrawSurface d) {
      d.drawText(10, d.getHeight() / 2, "paused -- press space to continue", 32);
      if (this.keyboard.isPressed(KeyboardSensor.SPACE_KEY)) { this.stop = true; }
   }
   public boolean shouldStop() { return this.stop; }
}
We will now add the following lines to the doOneFrame method of Game:
public class Game ... {
   // ...
   public void doOneFrame(DrawSurface d) {
      // ...
      if (this.keyboard.isPressed("p")) {
         this.runner.run(new PauseScreen(this.keyboard));
      }
   }
   // ...
}
In the game, when we identify the key p being pressed, we start running the PauseScreen animation instead of the Game one. The Game animation will resume as soon as we will return from the PauseScreen animation.
Make sure your game works and supports pausing and resuming.
This section is not mandatory. If you choose to implement it, and implement it correctly, you will gain 12 points bonus.
At the beginning of a level (you currently have only one, but soon you will implement more), we would like to have a few seconds of wait before the game starts. The feature we will add now is an on-screen countdown from 3 to 1, which will show up at the beginning of each turn. Only after the countdown reaches zero, things will start moving and we will start with the game play.
To do this, we will implement a CountdownAnimation and run it before the game at each turn.
   public void run() {
      this.createBallsOnTopOfPaddle(); // or a similar method
      this.runner.run(new CountdownAnimation(...)); // countdown before turn starts.
      // use our runner to run the current animation -- which is one turn of
      // the game.
      this.running = true;
      this.runner.run(this);
   }
Unlike the PauseScreen animation, The CountdownAnimation should display the counting on top of the game screen itself, so that the player will know what to expect when the game starts. For this reason, we pass the SpriteCollection to the CountdownAnimation constructor.
// The CountdownAnimation will display the given gameScreen,
// for numOfSeconds seconds, and on top of them it will show
// a countdown from countFrom back to 1, where each number will
// appear on the screen for (numOfSeconds / countFrom) seconds, before
// it is replaced with the next one.
public class CountdownAnimation implements Animation {
   public CountdownAnimation(double numOfSeconds,
                             int countFrom,
                             SpriteCollection gameScreen) { ... }
   public void doOneFrame(DrawSurface d) { ... }
   public boolean shouldStop() { ... }
}
Implement the CountdownAnimation and add it to the game. Use a countdown from 3 that lasts 2 seconds. Make sure everything works.
Our game only has one level. We will now add support for multiple levels: whenever we clear all the blocks on one level, we move to another, more challenging one. The score should carry on from level to level. If we finish the last level, we win the game.
Levels can differ by:
- The background color.
- The number of balls at each turn.
- The initial angle and speed of the balls.
- The paddle size and speed.
- and, of course, the number of blocks and their layout.
In addition, each level will have a name (such as "Level 1" or "My Cool Level") which will be displayed at the top of the screen.
At this point, we realize that the Game class is actually just playing a single level, not
an entire game. Therefore, now will be a good point to rename the Game class to GameLevel.
In general, whenever we realize that we chose a wrong name for a class or an interface, it is a good idea to think of a better name, and just rename it.
(renaming a class is a bit tedious, but not very hard. In addition, IDEs such as Eclipse have tools to make this task even easier).
The LevelInformation interface specifies the information required to fully describe a level:
public interface LevelInformation {
   int numberOfBalls();
   // The initial velocity of each ball
   // Note that initialBallVelocities().size() == numberOfBalls()
   List<Velocity> initialBallVelocities();
   int paddleSpeed();
   int paddleWidth();
   // the level name will be displayed at the top of the screen.
   String levelName();
   // Returns a sprite with the background of the level
   Sprite getBackground();
   // The Blocks that make up this level, each block contains
   // its size, color and location.
   List<Block> blocks();
   // Number of blocks that should be removed
   // before the level is considered to be "cleared".
   // This number should be <= blocks.size();
   int numberOfBlocksToRemove();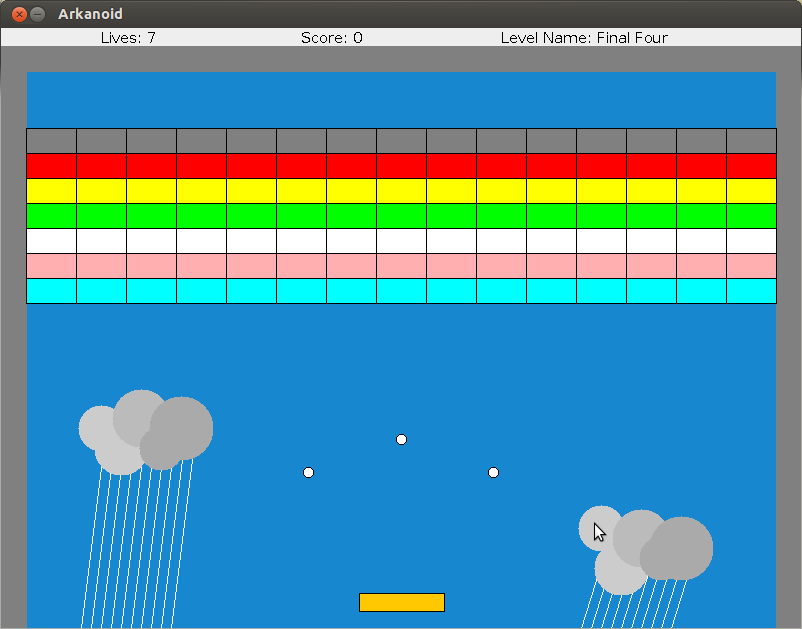
}Create 4 classes implementing the LevelInformation interface. The classes should correspond to the following layouts (notice also the level names displayed at the top):
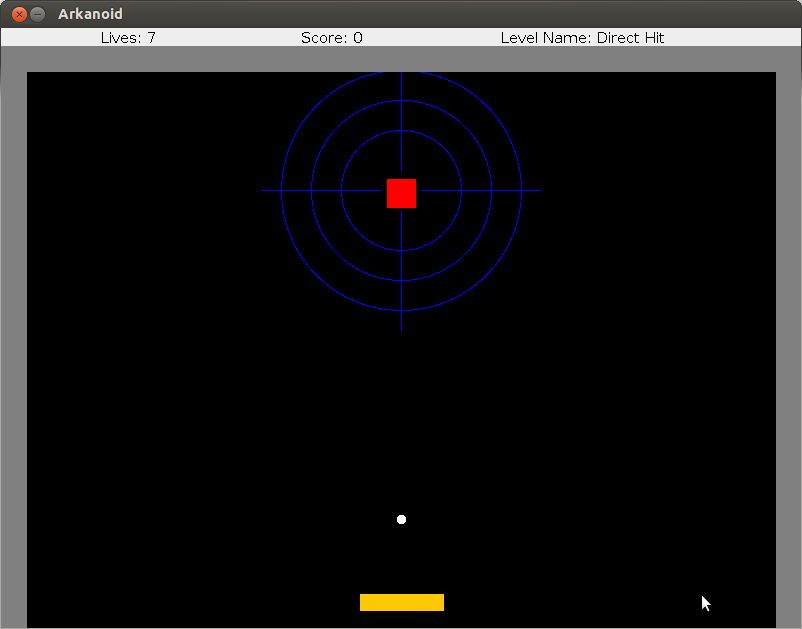


Note that in the first layout ("Direct Hit") we expect the ball to fly directly to the single block and destroy it.
Backgrounds: You are allowed to create plain backgrounds, containing nothing more than a color. However, you can also paint more complex figures using the basic draw commands, similar to the backgrounds you can see in the pictures.
If you choose to draw your backgrounds to look pretty - for example, so that they look similar to the pictures above - you can earn up to 8 points bonus (2 per level). Note that this would be subjectively judged by the testers, and no appeals could be presented regarding this judgement.
Note: you are not allowed to use the drawImage() method for drawing the backgrounds.
Change the constructor of the GameLevel class to accept a LevelInformation as a parameter.
Change the initialize() (and other) methods of the GameLevel class to create the blocks, balls, paddle, etc based on the supplied LevelInformation.
Check that things work: start by playing a single level each time. Modify your main() method to create a LevelInformation, pass it to GameLevel, and then run the GameLevel. Verify that you get different behaviors from the game if you supply a different LevelInformation objects to the GameLevel.
Now that we can support different level layouts, we will add support for moving from one level to the next.
For this, we will create a new class called GameFlow.
This class will be in charge of creating the different levels, and moving from one level to the next.
public class GameFlow {

   public GameFlow(AnimationRunner ar, KeyboardSensor ks, ...) { ... }

   public void runLevels(List<LevelInformation> levels) {
      // ...
      for (LevelInformation levelInfo : levels) {

         GameLevel level = new GameLevel(levelInfo,
               this.keyboardSensor,
               this.animationRunner,
               ...);

         level.initialize();

         while (level has more blocks and balls) {
            level.run();
         }

         if (no more balls) {
            break;
         }

      }
   }
}
Complete the code in the GameFlow class, and create a class with a main method that will
create a GameFlow and run it with the list of four LevelInformation created above.
The score should be kept across levels, throughout the entire game. It should be created and kept at the GameFlow, not the GameLevel, and only passed to the game level as a parameter so it could update it. Make sure that this is indeed the case, and the score is kept across different levels.
As a last touch, we will add an "end screen" to the game. Once the game is over (either the player died, or he managed to clear all the levels), we will display the final score. If the game ended with the player dying (i.e. all balls fall off the screen), the end screen should display the message "Game Over. Your score is X" (X being the final score). If the game ended by clearing all the levels, the screen should display "You Win! Your score is X".
The "end screen" should persist until the space key is pressed. After the space key is pressed, your program should terminate.
Add the needed code in order to support this feature.
We now have several Animation implementations that wait for a key press: the Game Over screen, the You Win screen and the Pause screen (you may have further in your next assignment). This is a good opportunity to remove some duplicate code, as well as to practice object composition and the decorator pattern.
We will extract the "waiting-for-key-press" behavior away from the different screens, and into a KeyPressStoppableAnimation decorator-class that will wrap an existing animation and add a "waiting-for-key" behavior to it.
public class KeyPressStoppableAnimation implements Animation {
   public KeyPressStoppableAnimation(KeyboardSensor sensor, String key, Animation animation)
   // ...
   // think about the implementations of doOneFrame and shouldStop.
}
Change the Game Over, You Win and Pause screens to run forever and not wait for a key-press. Wrap them with the KeyPressStoppableAnimation decorator to gain back the reaction to key-press behavior.
Consider the following piece of code:
// ....
AnimationRunner runner = ...;
Animation a1 = YouWinAnimation(...);
Animation a2 = PauseScreen(...); // also an Animation
Animation a1k = new KeypressStoppableAnimation("m", a1);
Animation a2k = new KeypressStoppableAnimation("m", a2);
runner.run(a1k);
runner.run(a2k);
Here we create two key-stoppable animations, both stoppable using the m key, and run them one after the other. We expect to see the first animation, press m, see the second animation, press m again, and then exit. However, when we press the m key in the first animation, we immediately exit also the second animation.
Why does this bug happen? The isKeyPressed(...) method of the KeyboardSensor asks if the key is down, not if it went down now.
When asking isKeyPressed inside the a2k.doOneFrame(), we get a true response based on the key press that exited us from a1k. This behavior will happen whenever we have two animations in a row that check for the same key press -- the same key press is likely to trigger both the events.
This behavior was already present in our previous code design in which each animation was in charge of checking its own key presses. But now that the key-press checking is centralized in the KeypressStoppableAnimation class, we have a chance of conveniently fixing it in one place.
Fixing the bug: The bad behavior happens when you just entered the animation, checked for a key-press, and caught a key that was already pressed before the animation started running.
A solution would be to verify that the key press started only after the animation started. Here is one way of doing this (assuming we are waiting for the key m):
-
Add an
private boolean isAlreadyPressedto theKeypressStoppableAnimationclass, and have it initialized totrue. -
In
doOneFrame, when you check if the keymis pressed, don't do anything in caseisAlreadyPressed == true. This means that if the key was pressed before the animation started, we ignore the key press. -
In
doOneFrame, if the keymis not pressed, setisAlreadyPressed=false. Now, we know that there was a time point after the animation started in whichmwas not pressed.
Fix KeypressStoppableAnimation to remove the bug described above.
Put all the pieces together and create a fully-functioning game!
Your GUI window should stay as stated in previous assignments (800 width x 600 height).
Create a class called Ass6Game with a main method that starts a game with four levels,
that supports all of the features described above.
When run without arguments, you should start a game with four levels that run one after the other. When run with additional arguments, the arguments should be treated as a list of level numbers to run, in the specified order. Discard (ignore) any argument which is not a number, or not in your levels range.
For example, running the game like this:
java Ass6Game 3
Will run a game with level 3.
java Ass6Game 1 3 2 1 9 1 bla 3 4 3
will run a game with the levels 1, 3, 2, 1, 1, 3, 4, 3.
Your game should behave similarly to the following example: ass6example.jar.
In order to run the example, download it to your computer, and then type (at the console) java -jar ass6example.jar.
The countdown before each turn should start from 3 and last for 2 seconds.
You should support pausing with the p key and resuming the game with the space key.
If you want to make the pause and end-game screens nicer then our examples, feel free to do so!
As always, we provide you with a build.xml file.
You need to submit a file called ass6.zip containing all the classes and interfaces described above, along with the build.xml.
We remind you that compiling your code should work using the command:
ant compileand running it is with
ant runWe also remind you that passing arguments to the java run command can be done like this:
ant -Dargs="1 3 2 1 9 1 bla 3 4 3" runLike in the previous assignment, it is OK to have the hashCode checkstyle error.
You can earn up to 20 bonus points in this assignment. This means that you can get a grade above 100 (up to 120). This grade will be taken into your average exercise score, so it may compensate lower grades in other assignments. However, your overall exercise grade will not be above 100%.
- Yes, you can change signatures to add more arguments to methods and constructors.
- You are allowed to change the code from the snippets we provided here - they are meant to guide your work, not to restrain it.
- You can name the LevelInformation classes (i.e. the classes for level one, two, etc.) as you wish.
Good luck!