This tool can be used to convert a gate-level simulation result of a chip or macro (single block from a larger chip) into a graphical visualization of which portions of the chip are most-active during different portions of the chip's operation. It is designed to work with designs built using OpenLANE on the SKY130 PDK, but it can be extended to work with other tools as well.
In order to run the visualizer, the following dependencies are required:
- Python 3.6 or newer
- Yosys
- SKY130 PDK and open_pdks
- The
PDK_ROOTenvironment variable must be set to the directory which containsskywater-pdkandopen_pdks - The easiest way to install this is using the full OpenLANE install
- The
- The following python packages (can be quickly installed with
pip3 install -r requirements.txt)gdspynumpyopencv-pythonimageiovcdvcdtqdm
- (Optional) Gifsicle
The following are not directly invoked by the visualizer but are needed for the build / simulation
An example design is in examples/spm. This design is based on the spm sample from OpenLANE, and includes the relevant OpenLANE build products (the GDS file and powered gate-level netlist) so OpenLANE is not required to run the example.
To run the example:
cd examples/spm/
sh run-sim.sh # Runs the iverilog-based simulation and generates the VCD log
sh gen-vis.sh # Generates the visualization GIFsTo use the visualizer on a new project, the following steps are needed (assuming all prerequisites have been installed):
-
Build the block from verilog to GDS using OpenLANE (currently, it must be a single design with no pre-hardened macros placed inside). This should produce the GDS layout file (with the default OpenLANE flow, this is produced at
runs/<run name>/results/magic/<design name>.gds) as well as a powered gate-level netlist (this is produced during LVS, NOT during synthesis, so it is atruns/<run name>/results/lvs/<design name>.lvs.powered.v). Copy both of these files into a working directory. -
Create the design testbench in Verilog. Important things that must be done correctly for the testbench:
- Make sure the testbench module has a top-level reg called "status", with a width of 8192 (the string stored in this reg will be shown next to each frame in the visualization, to make it easier to distinguish what actions the design is doing and when). For example:
reg [8191:0] status = "Hello";would create a status register with an initial string value of "Hello" and a maximum width of 1024 characters. - Ensure that power is connected properly. Depending on your PDN config, this may just be a
VPWR/VGND, or it may be something more complex, like avccd1/vccd2/vdda1/vdda2(power) andvssd1/vssd2/vssa1/vssa2(ground). Check the gate-level netlist to ensure that the ports match. - The design must have a clock and reset in order to be used for visualization.
- Ensure that the only things being dumped to VCD are the UUT and the status register, instead of the entire testbench module.
- See examples/spm/spm_tb.v for a full example.
- Make sure the testbench module has a top-level reg called "status", with a width of 8192 (the string stored in this reg will be shown next to each frame in the visualization, to make it easier to distinguish what actions the design is doing and when). For example:
An example testbench:
module my_tb;

reg [8191:0] status = "init";
// Instantiate power, ground, clocks, and other regs here
reg pwr;
reg gnd;
reg clk;

my_design uut (
    .VPWR(pwr),
    .VGND(gnd),
    .clk(clk),
    // other connections here...
);

always #5 clk = pwr && ~clk;

// Include any other logic needed to interface with the UUT

initial begin
    $dumpfile("my.vcd");
    $dumpvars(0, uut);
    $dumpvars(0, status);

    clk = 0;
    pwr = 1;
    rst = 1;
    #20;
    rst = 0;

    status = "test 1: <description>";
    // (Run first test here)
    status = "test 2: <description>";
    // (Run second test here)
    // ...

    $finish;
end

endmodule- Run the testbench using
iverilog(or another verilog simulator). Ensure that the following declarations are specified:FUNCTIONAL,SIM,GL,UNIT_DELAY=#1,USE_POWER_PINS, and that the standard cell library (as well as its primitive library) are specified in the build. If usingiverilog, the following shell commands can be used for a quick/easy setup (for a full script, see examples/spm/run-sim.sh):
# Make sure that PDK_ROOT is defined as the directory containing `open_pdks` and `skywater-pdk` (as explained in the OpenLANE install docs)
export PDK=sky130_fd_sc_hd # Change this to the PDK used by your design

# If PDK_ROOT and PDK are set correctly, this should find the standard cells and primitives
export PRIMITIVES=$PDK_ROOT/open_pdks/sky130/sky130A/libs.ref/$PDK/verilog/primitives.v
export CELLS=$PDK_ROOT/open_pdks/sky130/sky130A/libs.ref/$PDK/verilog/$PDK.v

# Compile the sim
iverilog -o a.out -g2012 -DFUNCTIONAL -DSIM -DGL -DUNIT_DELAY="#1" -DUSE_POWER_PINS $PRIMITIVES $CELLS <gate-level netlist verilog file> <testbench verilog file>

# Run the sim
./a.out
Ensure that the VCD file produced is valid and of a reasonable size (up to ~few hundred megabytes should be fine, larger files may slow down the parser).
- Patch the standard cell models - in some of the SKY130 verilog cell models, there is an unusual
wire 1;generated, which is treated as valid byiverilogbut is invalid foryosys(which is used by the visualizer to parse the netlist). The easiest way to do this is by making a copy of the cells verilog file from above, save it in the working directory, and name ittmp_cells_fixed.v(the primitives file is only needed for the sim, not for the visualization) and then running the following command to patch it:
sed -i 's/wire 1/wire __1/g' tmp_cells_fixed.v- Run the actual visualizer. The following is the command to run the visualizer - the path to the python file may need to be adjusted if not using the repo directory as the main working-directory (see the below sections for more details on how to configure it - Configuration Parameters and Visualization Modes)
mkdir -p build # Create folder to store temporary build products

python3 chip-vis.py --cell_models tmp_cells_fixed.v \
                    --gl_netlist <path to gate-level netlist> \
                    --vcd <path to VCD file> \
                    --gds <path to GDS file> \
                    --prefix "<testbench module name>.uut." \ # Trailing dot is important
                    --status_var "<testbench module name>.status" \
                    --rst "<testbench module name>.uut.<reset signal name>" \
                    --clk "<testbench module name>.uut.<clock signal name>" \
                    --outfile "vis.gif" \
                    --mode 0,1,2,3,4,5 \ # This will generate 6 different GIFs, one with each mode
                    --scale 3 \
                    --downscale 1.2 \ # This may need to be decreased for larger designs (smaller value = smaller GIF)
                    --fps 8 \
                    --build_dir build
-
After the program finishes running, it should output one or more GIF files containing the visualization (multiple if multiple modes are selected). The program is fairly self-verifying, with most assumptions documented as
asserts, so if it fails on your design, please file an issue with details about the design and the error message from the assertion failure. -
(Optional) The GIF files produced may be extremely large (~hundreds of MB) because they are not compressed during creation. However, they can be (effectively-losslessly) compressed down to a fraction of their size (on larger designs, the compressed GIF is often 90% smaller) using Gifsicle. The following command is recommended - it will decrease the filesize significantly without harming quality:
gifsicle -O3 --colors 256 <input GIF filename> -o <outfile GIF filename>
usage: chip-vis.py [-h] --cell_models CELL_MODELS --gl_netlist GL_NETLIST
                   --vcd VCD --gds GDS [--outfile OUTFILE] [--mode MODE]
                   --prefix PREFIX --status_var STATUS_VAR --rst RST --clk CLK
                   [--start_status START_STATUS] [--ignore_ports IGNORE_PORTS]
                   [--scale SCALE] [--fps FPS] [--downscale DOWNSCALE]
                   [--blur BLUR] [--font_thickness FONT_THICKNESS]
                   [--exp_grow EXP_GROW] [--exp_decay EXP_DECAY]
                   [--lin_grow LIN_GROW] [--lin_decay LIN_DECAY]
                   [--filler_prefixes FILLER_PREFIXES]
                   [--phy_prefixes PHY_PREFIXES] [--build_dir BUILD_DIR]

required arguments:
  --cell_models CELL_MODELS
                        Path to verilog models of SKY130 standard cells

  --gl_netlist GL_NETLIST
                        Path to gate-level netlist used for simulation

  --vcd VCD             Path to VCD file from simulation (see docs for format)

  --gds GDS             Path to post-layout GDS of the chip/block to visualize

  --prefix PREFIX       Signal-name prefix in VCD, including trailing dot (should be <tb name>.<uut name>.)

  --status_var STATUS_VAR
                        Signal which is the status-string to show under each frame (should be <tb name>.status)

  --rst RST             Reset signal (inside the UUT)

  --clk CLK             Clock signal (inside the UUT)

optional arguments:
  --outfile OUTFILE     Filename for the output GIF (default: vis.gif). If using multiple modes, a `_<mode>` will be added to the filename (before the extension) for each mode.

  --mode MODE           Comma-separated list of modes to visualize (default: 0,1,2,3,4,5)

  --start_status START_STATUS
                        Status string to wait for before starting visualization (optional)

  --ignore_ports IGNORE_PORTS
                        Comma-separated list of ports in standard cells to ignore (default: VPWR,VGND,VPB,VNB - should not need to be changed)

  --scale SCALE         Integer factor to scale cells by when making frames (default: 3). It is preferred to change the image size using `downscale` and leave this at or close to the default.

  --fps FPS             Frames per second for the resulting gif (one frame = one clock cycle, default: 8)

  --downscale DOWNSCALE
                        Factor to downscale the final frames (default: 1.0). Smaller number yields smaller GIF

  --blur BLUR           Integer factor to blur the frames by (improves look-and-feel of output, default: 7)

  --font_thickness FONT_THICKNESS
                        Font thickness for status text in frames (default: 2.2)

  --exp_grow EXP_GROW   Exponential growth factor for mode 4 (default: 1.2)

  --exp_decay EXP_DECAY Exponential decay factor for modes 3 and 4 (default: 0.8)

  --lin_grow LIN_GROW   Linear growth factor for mode 5 (default: 0.15)

  --lin_decay LIN_DECAY Linear decay factor for mode 5 (default: 0.15)

  --filler_prefixes FILLER_PREFIXES
                        Comma-separated list of prefixes for filler-cells to ignore in visualization (default: FILLER_). This should likely not need to be changed unless there is some other cells (with consistent prefix in the INSTANCE NAME) which need to be ignored.

  --phy_prefixes PHY_PREFIXES
                        Comma-separated list of prefixes for physical cells to ignore in visualization (default: clkbuf_,PHY_,ANTENNA_). This should likely not need to be changed unless there is some other cells (with consistent prefix in the INSTANCE NAME) which need to be ignored.

  --build_dir BUILD_DIR Directory to store temporary build products in (defaults to current directory)
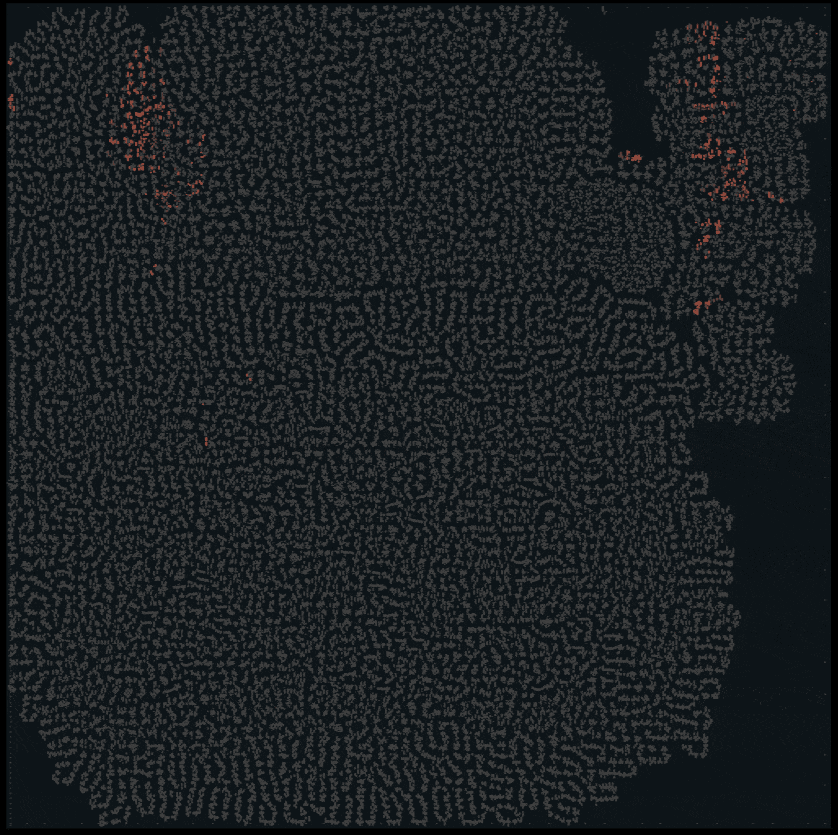
Following are the modes available (below each mode is an example from the spm design). In general, options 2 or 3 (with default exp_decay) are optimal for most designs. One frame in the final GIF corresponds to one clock cycle in the design/testbench.
Mode 0: Highlights cells with output high on each clock cycle.
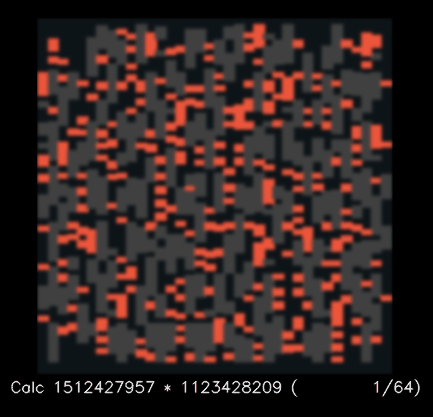
Mode 1: Same as mode 0, but excludes cells with output that is always-high
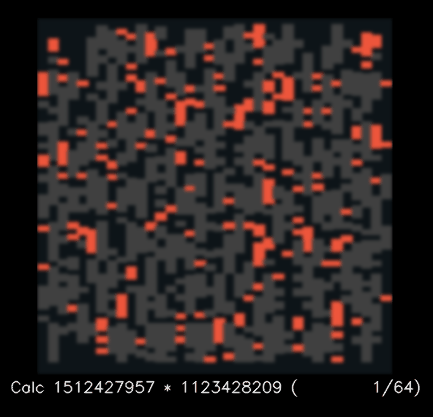
Mode 2: Highlights cells whose output changed (from 0->1 or 1->0) between the last clock cycle and this clock cycle.

Mode 3: Highlights each cell with a brightness based on the number of cycles since its output changed (The exp_decay parameter is used here - it should be between 0.5 and 0.95, with smaller numbers causing the cell to fade faster).
Mode 4: Highlights each cell with a brightness exponentially based on the number of recent output-changes (The exp_grow and exp_decay parameters are used here - exp_grow should be between 1.1 and 1.5 and exp_decay should be between 0.5 and 0.95)

Mode 5: Highlights each cell with a brightness linearly based on the number of recent output-changes (The lin_grow and lin_decay parameters are used here - each should be approximately between 0.05 and 0.3)

If you run into any problems (especially assert failures or other crashes) running on your design, please open a GitHub issue with some details about your design and the exact error that was printed when the program failed. (Or, feel free to send a pull-request if you have any changes/improvements).
Copyright 2020 Anish Singhani
Permission is hereby granted, free of charge, to any person obtaining a copy of this software and associated documentation files (the "Software"), to deal in the Software without restriction, including without limitation the rights to use, copy, modify, merge, publish, distribute, sublicense, and/or sell copies of the Software, and to permit persons to whom the Software is furnished to do so, subject to the following conditions:
The above copyright notice and this permission notice shall be included in all copies or substantial portions of the Software.
THE SOFTWARE IS PROVIDED "AS IS", WITHOUT WARRANTY OF ANY KIND, EXPRESS OR IMPLIED, INCLUDING BUT NOT LIMITED TO THE WARRANTIES OF MERCHANTABILITY, FITNESS FOR A PARTICULAR PURPOSE AND NONINFRINGEMENT. IN NO EVENT SHALL THE AUTHORS OR COPYRIGHT HOLDERS BE LIABLE FOR ANY CLAIM, DAMAGES OR OTHER LIABILITY, WHETHER IN AN ACTION OF CONTRACT, TORT OR OTHERWISE, ARISING FROM, OUT OF OR IN CONNECTION WITH THE SOFTWARE OR THE USE OR OTHER DEALINGS IN THE SOFTWARE.