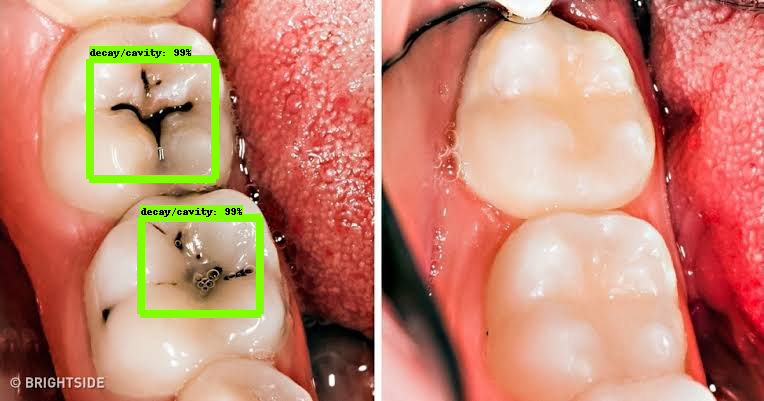
In this project I use tensorflow's to detect tooth decay and possibly early stage cavities. I made my own dataset of images, which was collected from Google Images.
Note:I made a similiar project on this before where I used CNN to classify images into categories- having decay/cavities, not having any decay/cavities. The results weren't convincing enough so I decided to move to Object Detection. The results turned out to be much better.
- The
modelsdirectory is cloned from tensorflow's models repo. - The
labelimg-masteris cloned from this repository. I used it to annotate my images. - The main working directory is the
my_custom_directory: imagescontains our dataset of images with it's corresponding xml files which was created with the help of labelimg.ssd_mobilenet_v1_coco_2018_01_28is the model which I used to train on my dataset. Other models can be found here.- The
trainingdirectory contains the config files for the model and also the label-map which is needed by the model for training and also detection. The model stores it's checkpoints in this directory. trained_inference_graphcontains the graph exported from the trained model using theexport_inference_graph.pyscript which was copied from the object_detection directory.model_main.pyis the script which is used to start the training of the model.generate_tfrecord.pyandxml_to_csv.pywere scripts used from this repo. A really simple and convenient way to convert the xml files created to CSV and then generating Tensorflow records which will be used to train the model. The generated CSV files and the TFrecords are in thedatadirectory.
- Clone the models repo from tensorflow. Follow their installation instructions to setup the environment needed for the project.
- Collect the dataset. I had around 350 images in total
- Annotate the images with the help of labelimg. Run
python3 labelimg.pyto start the application. - Use
xml_to_csv.pyandgenerate_tfrecords.pyto get the final train.records and test.records files. - Select your model and clone it. Get the corresponding config file from
/models/research/object_detection/samplesdirectory. - Edit the config file.
- Create the .ptxt file which will be the label-map. Mine is object-detection.pbtxt.
- Run the model_main.py. I used 40000 steps to train the model.
- Use export_inference_graph.py to generate the graph needed for further prediction. (Use the best checkpoint file for this)
- For further predictions just paste images in the
test_image_dir. - The code to make predictions from trained models were derived from the
object_detections_tutorial.ipynb. I made a few changes to it as the code seemed to render some errors.
Since I trained it in colab, you can find the cavity_detection.ipynb notebook which does all of the above.