![]()
![]()
![]()


The Azure Service Bus is a fully managed enterprise message broker with message queues and publish-subscribe topics. It provides the capability to send and receive messages from Service Bus queues, topics, and subscriptions.
The Ballerina connector for Azure Service Bus allows you to connect to an Azure Service Bus via the Ballerina language.
This connector supports the following operations:
- Manage (Get/Create/Update/Delete/list) a queue, topic, subscription or rule.
- Send messages to a queue, topic, or subscription.
- Receive messages from a queue, topic, or subscription.
The Ballerina Azure Service Bus module utilizes Microsoft's Azure Service Bus JAVA SDK 7.13.1.
Before using this connector in your Ballerina application, complete the following:
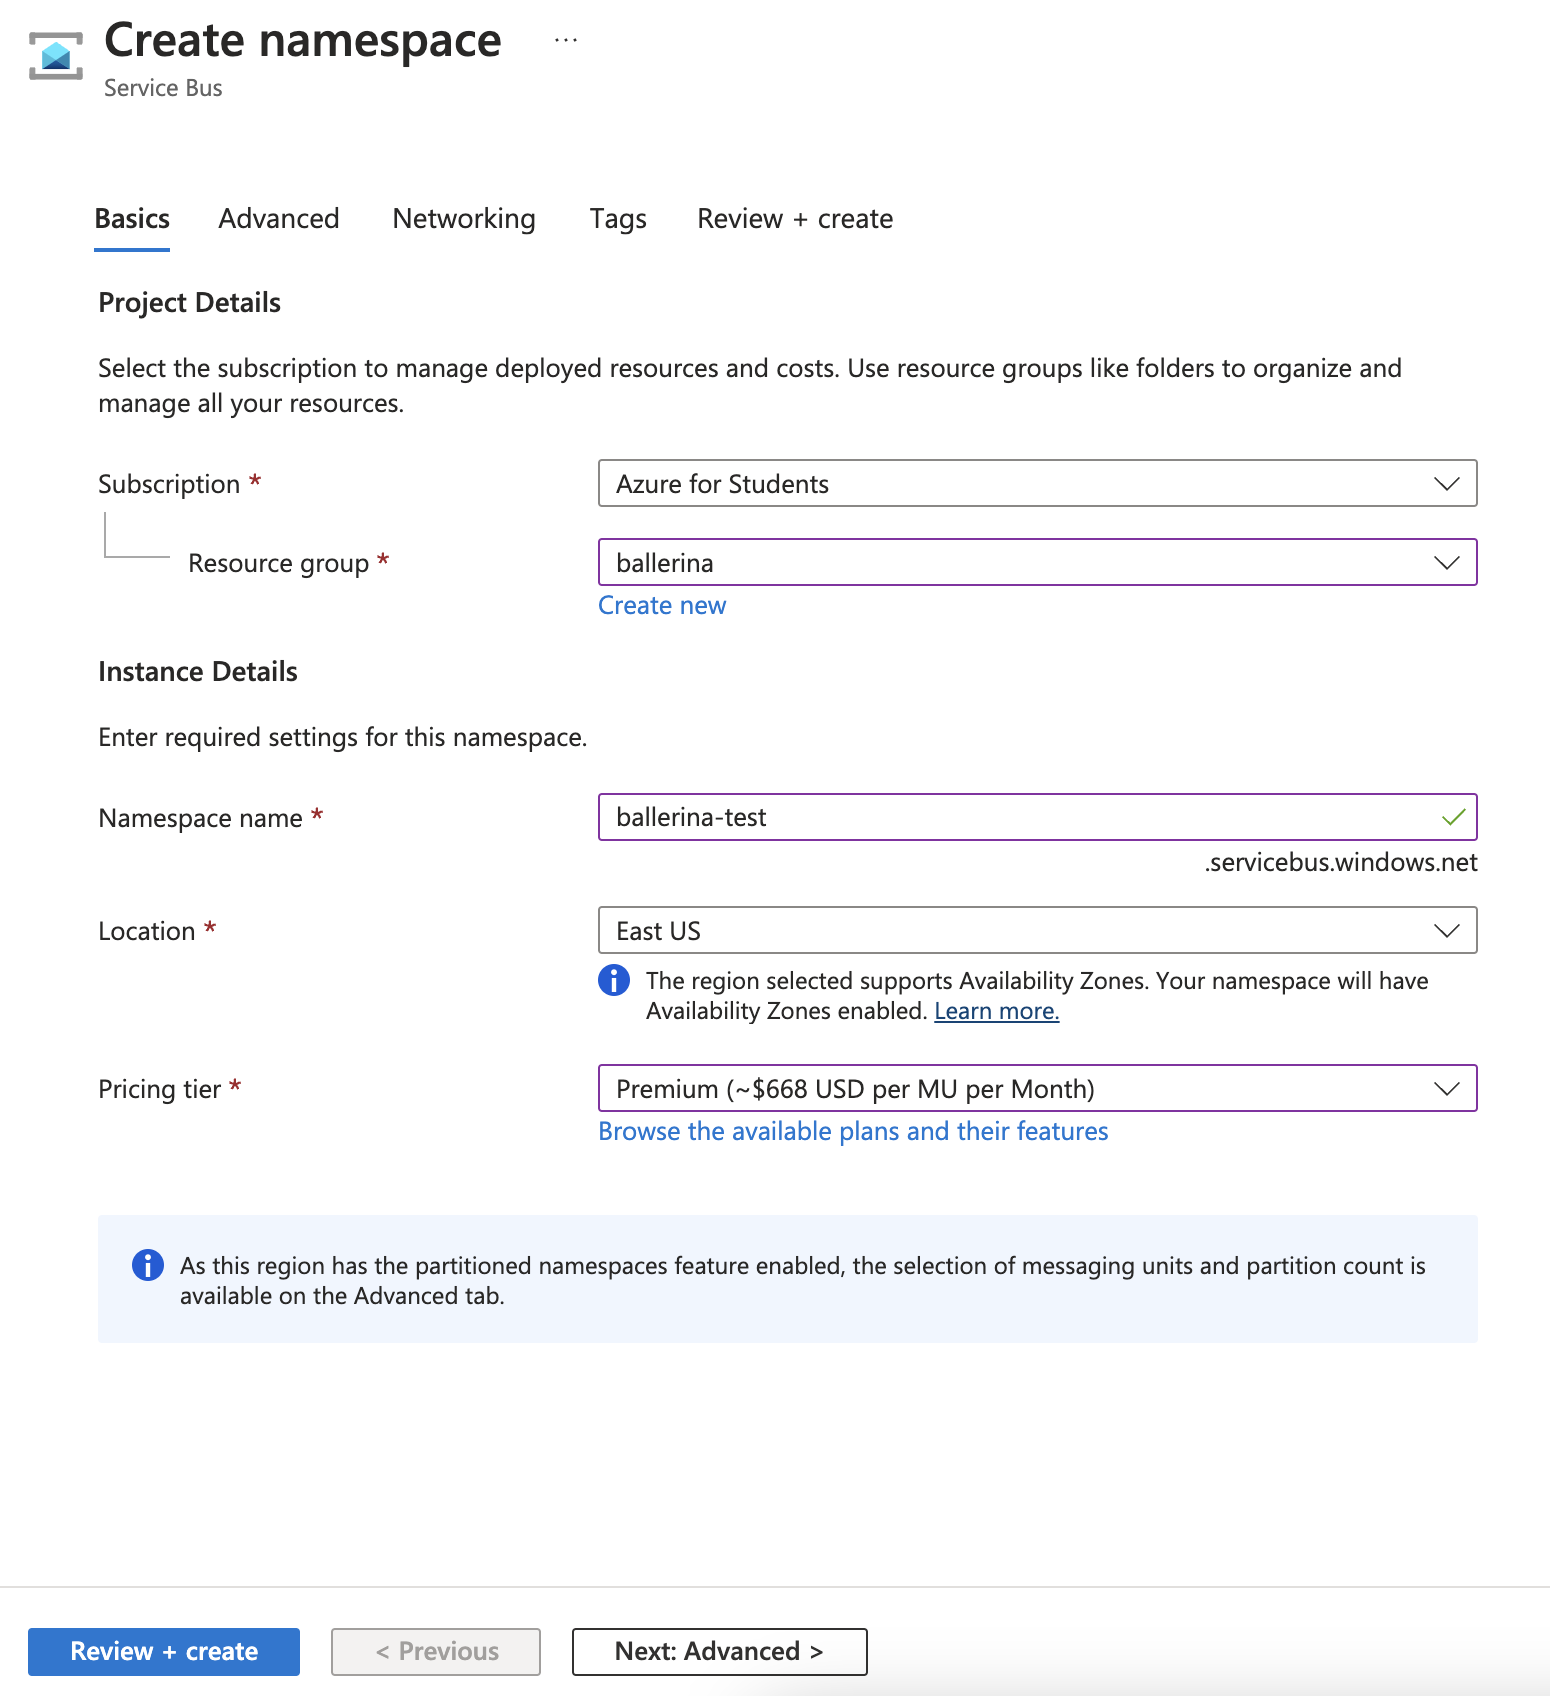
To begin using Service Bus messaging in Azure, you must first create a namespace with a name that is unique across Azure. A namespace provides a scoping container for Service Bus resources within your application.
To create a namespace:
Step 1: Sign in to the Azure portal
If you don't have an Azure subscription, sign up for a free Azure account.
In the left navigation pane of the portal, select All services, select Integration from the list of categories, hover the mouse over Service Bus, and then select Create on the Service Bus tile.

-
For Subscription, choose an Azure subscription in which to create the namespace.
-
For Resource group, choose an existing resource group in which the namespace will live, or create a new one.
-
Enter a name for the namespace. The namespace name should adhere to the following naming conventions:
- The name must be unique across Azure. The system immediately checks to see if the name is available.
- The name length is at least 6 and at most 50 characters.
- The name can contain only letters, numbers, and hyphens “-“.
- The name must start with a letter and end with a letter or number.
- The name doesn't end with “-sb“ or “-mgmt“.
-
For Location, choose the region in which your namespace should be hosted.
-
For Pricing tier, select the pricing tier (Basic, Standard, or Premium) for the namespace. For this quickstart, select Standard.
Notice: If you want to use topics and subscriptions, choose either Standard or Premium. Topics/subscriptions aren't supported in the Basic pricing tier. If you selected the Premium pricing tier, specify the number of messaging units. The premium tier provides resource isolation at the CPU and memory level so that each workload runs in isolation. This resource container is called a messaging unit. A premium namespace has at least one messaging unit. You can select 1, 2, 4, 8, or 16 messaging units for each Service Bus Premium namespace. For more information, see Service Bus Premium Messaging.`
- Select Review + create at the bottom of the page.
- On the Review + create page, review settings, and select Create.
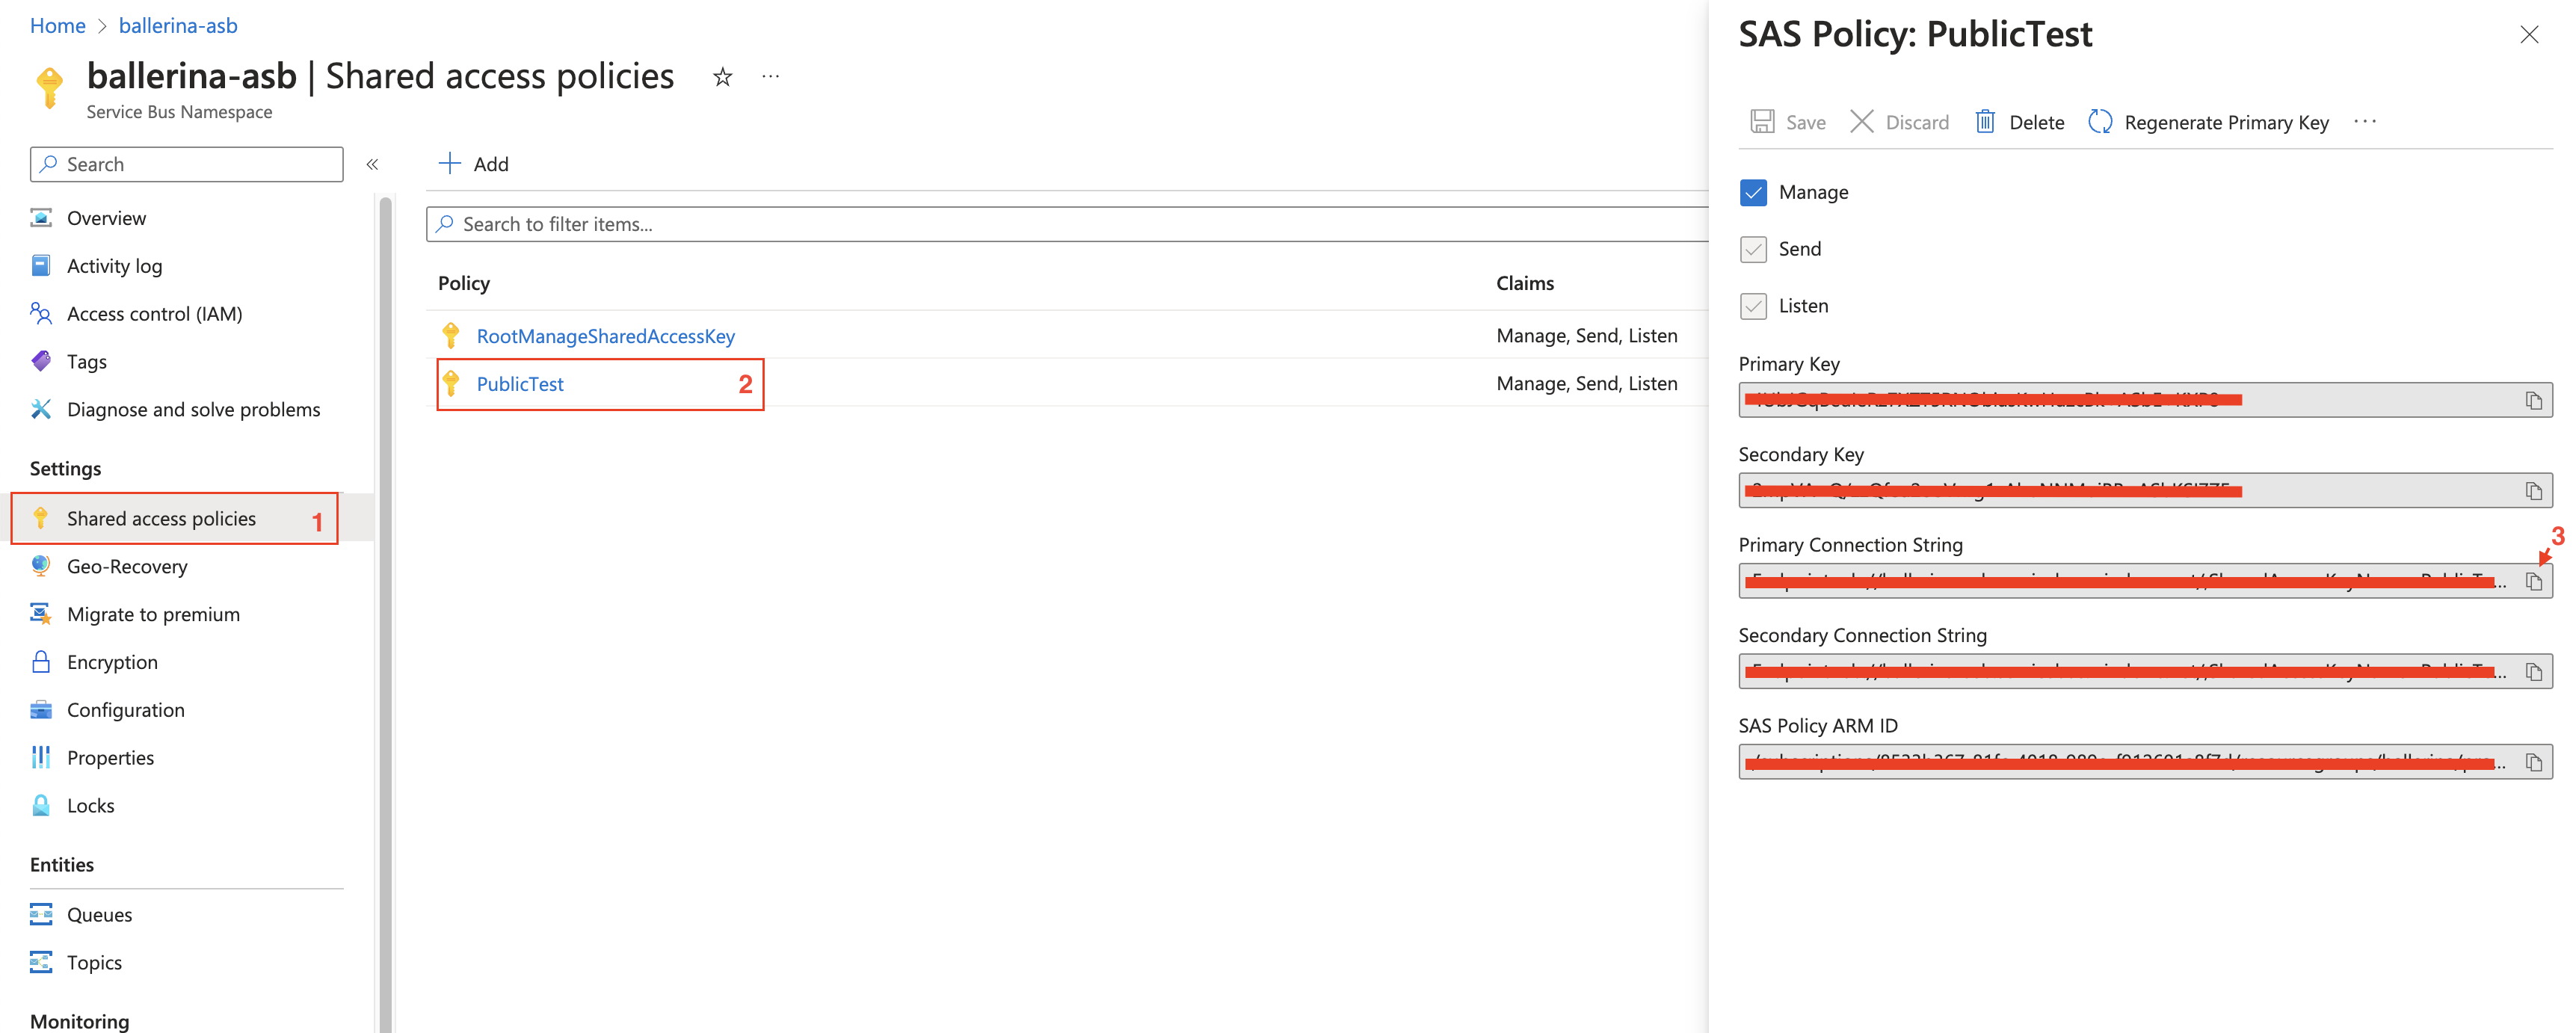
To send and receive messages from a Service Bus queue or topic, clients must use a token that is signed by a shared access key, which is part of a shared access policy. A shared access policy defines a set of permissions that can be assigned to one or more Service Bus entities (queues, topics, event hubs, or relays). A shared access policy can be assigned to more than one entity, and a single entity can have more than one shared access policy assigned to it.
To obtain a token following steps should be followed:
-
In the left navigation pane of the portal, select All services, select Integration from the list of categories, hover the mouse over Service Bus, and then select your namespace.
-
In the left navigation pane of the namespace page, select Shared access policies.
-
Click on the RootManageSharedAccessKey policy.
-
Copy the Primary Connection String value and save it in a secure location. This is the connection string that you use to authenticate with the Service Bus service.
To use the ASB connector in your Ballerina application, modify the .bal file as follows:
Import the ballerinax/asb module into the Ballerina project.
import ballerinax/asb;This can be done by providing a connection string.
    configurable string connectionString = ?;
asb:AdminClient asbAdmin = check new (connectionString);This can be done by providing a connection string with a queue or topic name.
    configurable string connectionString = ?;

    ASBServiceSenderConfig senderConfig = {
        connectionString: connectionString,
        entityType: QUEUE,
        topicOrQueueName: "myQueue"
    };
asb:MessageSender asbSender = check new (senderConfig);This can be done by providing a connection string with a queue name, topic name, or subscription path.
Here, the Receive mode is optional. (Default: PEEKLOCK)
    configurable string connectionString = ?;

    ASBServiceReceiverConfig receiverConfig = {
        connectionString: connectionString,
        entityConfig: {
            queueName: "myQueue"
        },
        receiveMode: PEEK_LOCK
    };
asb:MessageReceiver asbReceiver = check new (receiverConfig);Now you can use the remote operations available within the connector,
Create a queue in the Azure Service Bus
public function main() returns error? {
   asb:AdminClient asbAdmin = check new (connectionString);

   check asbAdmin->createQueue("myQueue");

   check asbAdmin->close();
}
Send a message to the Azure Service Bus
public function main() returns error? {
    asb:MessageSender asbSender = check new (senderConfig);

    string stringContent = "This is My Message Body";
    byte[] byteContent = stringContent.toBytes();
    int timeToLive = 60; // In seconds

    asb:ApplicationProperties applicationProperties = {
        properties: {a: "propertyValue1", b: "propertyValue2"}
    };

    asb:Message message = {
        body: byteContent,
        contentType: asb:TEXT,
        timeToLive: timeToLive,
        applicationProperties: applicationProperties
    };

    check asbSender->send(message);

    check asbSender->close();
}
Receive a message from the Azure Service Bus
public function main() returns error? {
    asb:MessageReceiver asbReceiver = check new (receiverConfig);

    int serverWaitTime = 60; // In seconds

    asb:Message|asb:Error? messageReceived = asbReceiver->receive(serverWaitTime);

    if (messageReceived is asb:Message) {
        log:printInfo("Reading Received Message : " + message received.toString());
    } else if (messageReceived is ()) {
        log:printError("No message in the queue.");
    } else {
        log:printError("Receiving message via Asb receiver connection failed.");
    }

    check asbReceiver->close();
}bal runThere are two sets of examples demonstrating the use of the Ballerina Azure Service Bus (ASB) Connector.
-
Management Related Examples: These examples cover operations related to managing the Service Bus, such as managing queues, topics, subscriptions, and rules.
-
Message Sending and Receiving Related Examples: This set includes examples for sending to and receiving messages from queues, topics, and subscriptions in the Service Bus.
The Issues and Projects tabs are disabled for this repository as this is part of the Ballerina library. To report bugs, request new features, start new discussions, view project boards, etc., visit the Ballerina library parent repository.
This repository only contains the source code for the package.
-
Download and install Java SE Development Kit (JDK) version 17. You can download it from either of the following sources:
Note: After installation, remember to set the
JAVA_HOMEenvironment variable to the directory where JDK was installed. -
Download and install Ballerina Swan Lake.
-
Download and install Docker.
Note: Ensure that the Docker daemon is running before executing any tests.
Execute the commands below to build from the source.
-
To build the package:
./gradlew clean build -
To run the tests:
./gradlew clean test -
To build the without the tests:
./gradlew clean build -x test -
To debug the package with a remote debugger:
./gradlew clean build -Pdebug=<port> -
To debug with the Ballerina language:
./gradlew clean build -PbalJavaDebug=<port> -
Publish the generated artifacts to the local Ballerina Central repository:
./gradlew clean build -PpublishToLocalCentral=true -
Publish the generated artifacts to the Ballerina Central repository:
./gradlew clean build -PpublishToCentral=true
As an open-source project, Ballerina welcomes contributions from the community.
For more information, go to the contribution guidelines.
All the contributors are encouraged to read the Ballerina Code of Conduct.
- For more information go to the ASB package.
- For example demonstrations of the usage, go to Ballerina By Examples.
- Chat live with us via our Discord server.
- Post all technical questions on Stack Overflow with the #ballerina tag.