
The goals / steps of this project are the following:
- Compute the camera calibration matrix and distortion coefficients given a set of chessboard images.
- Apply the distortion correction to the raw image.
- Use color transforms, gradients, etc., to create a thresholded binary image.
- Apply a perspective transform to rectify binary image ("birds-eye view").
- Detect lane pixels and fit to find lane boundary.
- Determine curvature of the lane and vehicle position with respect to center.
- Warp the detected lane boundaries back onto the original image.
- Output visual display of the lane boundaries and numerical estimation of lane curvature and vehicle position.
The first task is to calibrate the camera. Do so with
$ python camera_calibration.py
This uses the OpenCV tutorial modified for this project. It reads in each of the chessboard images, tries to find the best fit chessboard corners (working down from 9x6 to 3x3 because some in some of the images it is hard to detect certain corners), then tries to refine the corners to improve accuracy and draws them for inspection. After all images are read and corners detected, the camera calibration matrices are computed. The reprojection error is calculated, mean reprojection error with/without subpixel refinement: 0.157446473143611 | 0.11117617624420388.
Finally, the camera matrices are used to undistort the original images and the results are saved in ./camera_cal_undistorted/ for inspection.
There are 4 files that are useful here. The thresholding logic is in threshold.py. The lane detection code is in lane.py. test_threshold.py and test_lane.py are for seeing what effect a given combination of thresholds (colour transforms and gradients) has on the test images in ./test_images/.
The bulk the effort here was spent trying to find good combinations of colours and gradients that would find the lanes, while remaining invariant to shadows, variations in road colour, gradients formed by different colours of tarmac and other lighting conditions. To make this work better on the challenge videos, some difficult frames from the challenge videos were included in the ./test_images/ folder.
Firstly undistortion is applied to each of the test images.
Initially the same approach was taken as presented in lectures, compute the X and Y gradients using the Sobel operator, then determine the magnitude of the gradients and the orientation. For colour the HSV colourspace was selected and thresholds applied.
The process of changing thresholds in code was found to be very time consuming so OpenCV trackbars were applied to be able to vary the threshold limits and see the immediate effect of this.
As an example, try
$ python test_thresholds.py test_images/solidWhiteRight.jpg
From many hours spent trying out combinations of gradients, I found that the most effective gradient combination to detect lanes with low false positives (i.e. not detecting pixels that are not lanes) was to blur the grayscale (this is common) and then to morphologically close the magnitude image (to fill in the gaps) and then to open the image (to remove unconnected detections). The actual threshold and kernels were found through trial-and-error.
For the gradient directions, a similar idea was followed, except opening and then closing was found to work better. Gradients that lay between 75 and 150 degrees were found to correspond well to lanes.
One idea that I would pursue in future would be to try this detection in birds-eye view space.
For colour detections of white and yellow I found that the HSV colourspace wouldn't give me any good thresholds, but the LUV colourspace did. In particular I found that the L plane was good for discriminating white even in the presence of shadows and varying road colours, and that the U and V spaces together were good for discriminating yellow.
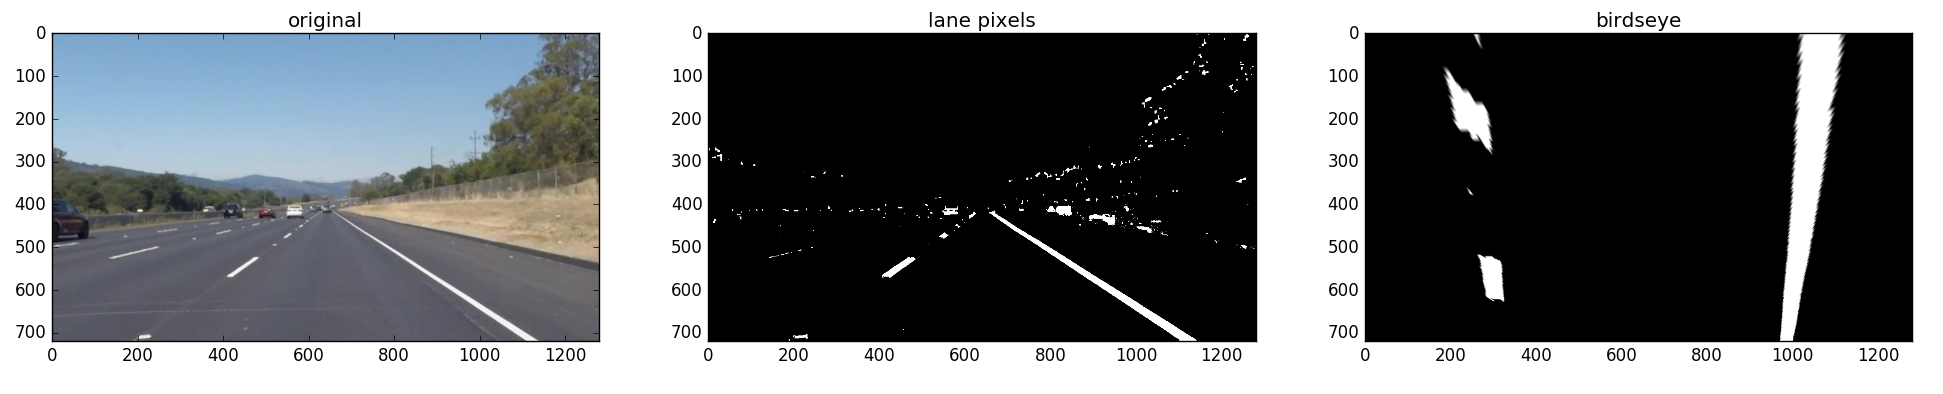
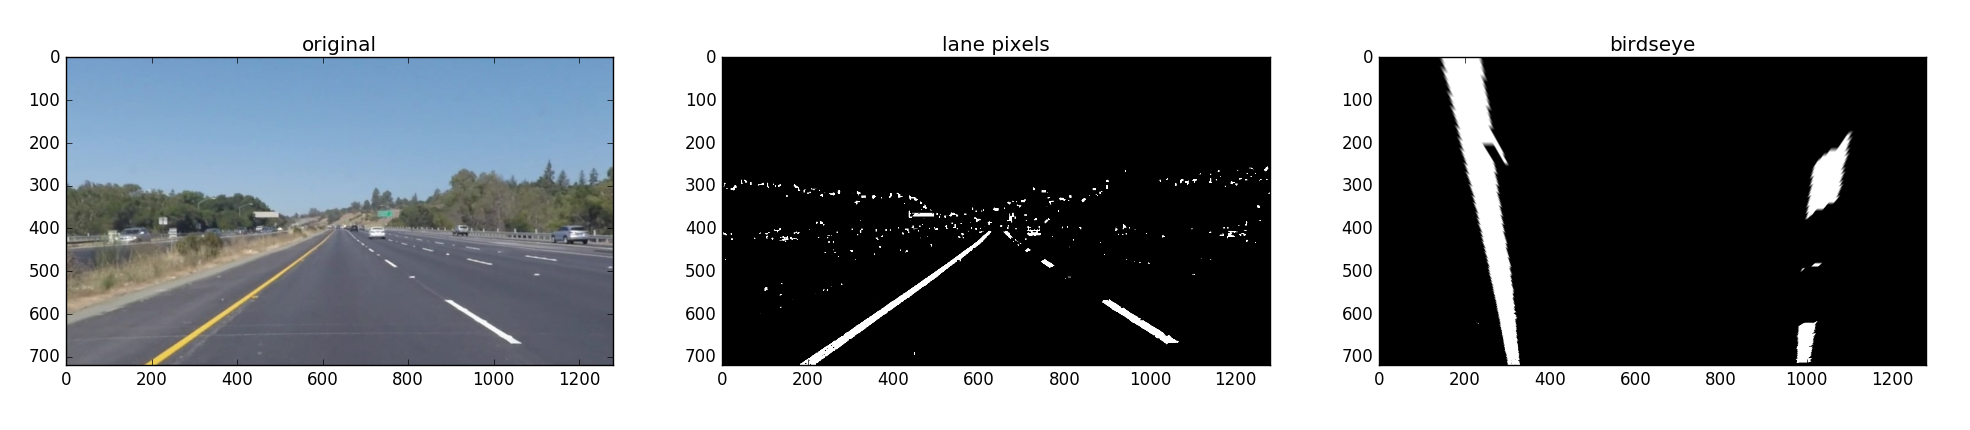
Examples of lane pixel detection
![]()
![]()
Once reasonable results were found for the binary image that represents lane pixels, we move onto the parts of the pipeline. The pipeline in implemented in lane.py in the class LaneDetector. The main logic is in the process() function where the following algorithm is applied:
- Undistort the image
- Find candidate lane pixels using the thresholds described above
- Warp to birds-eye view
- Find lanes in the birds-eye view (fit a curve, check curvature etc)
- Do a sanity check, use the detections if they are reasonable
- Warp back to original image and overlay detected lanes + some info
This was tested using
$ python opencv_lane.py project_video.mp4
Examples of warping to birdseye view
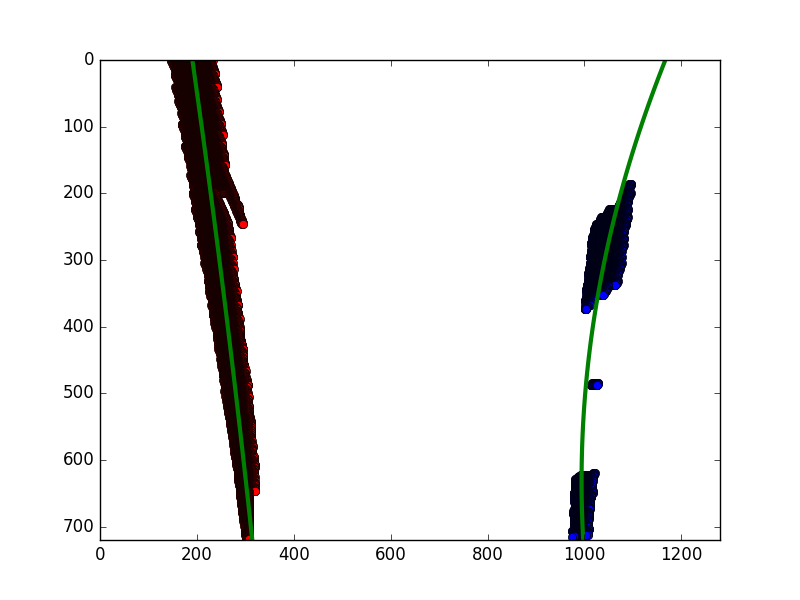
Examples of curve fitting to detected lane pixels in birdseye view space
Solid white right
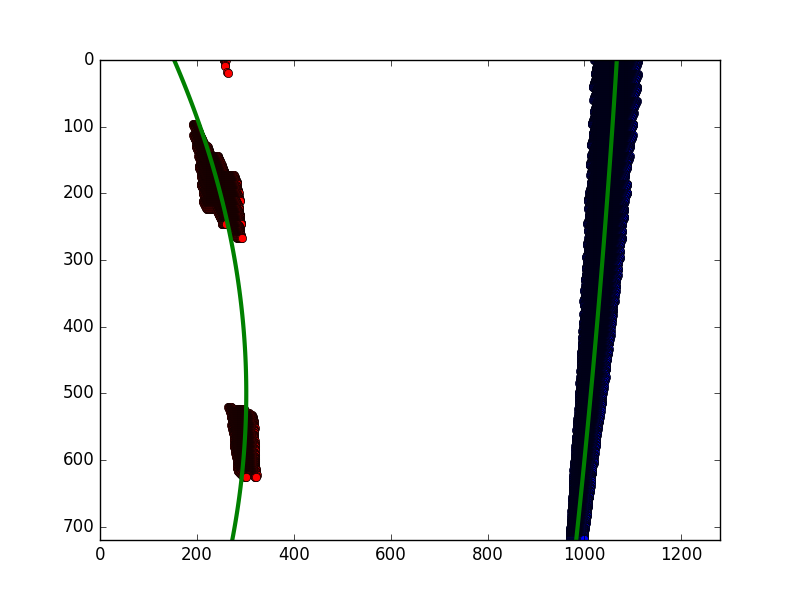 Solid yellow left
Once The pipeline was found to work reasonably well, it was applied to the project_video.mp4 file.
A new video showing the output is shown in project_video_output.mp4, and the results on the challenge video are also shown.
The algorithm starts with no assumptions about where the lane lines are, but it does assume that there will be 2 peaks in the birds-eye view histogram that will correspond to the starting points of lanes.
A sanity check is applied at every frame, and only if the sanity check passes do those results get used, and the next step starts by using the previous starting point for lane detections.
The pipeline will fail if the assumption of 2 peaks in the histogram is not true. It's also not completely invariant to shadows and illumination problems like low contrast. I experimented with histogram equalisation, AHA and CLAHE (Contrast limited Adaptive Histogram Equalisation), but found that it just made finding good thresholds for the colours more difficult.
Shadow removal is a difficult problem. I spent a long time trying out different approaches especially in colour space to get around this issue. I read a number of papers (see references.txt) and finally settled on LUV space to detect white and yellow. It's clear to me that this is still and area of active research and a real-time algorithm to remove shadows (detect and in-paint accurately) would be welcome.
Some (sometimes many) of the lane pixels that are detected are false positives (outliers). I experimented with RANSAC to remove these outliers, but I found that the algorithm was extremely slow. I didn't have time to optimise it so I dropped it, but this is something I would try again in future.
Another area that I would pursue is alternative approaches to detecting lane pixels. Semantic segmentation models trained on the CityScapes or Synthia datasets should yield better lane detections than the gradient and colour approach here. Perhaps they might complement each other, but this is something I plan to try out.