Custom Firmware Images
Load apps onto a Precursor by building a custom firmware image. Here's how.
- Install rust, or ensure rust is up to date.
- Clone the
xous-corerepo. - Run
cargo xtask app-image-xip <app1> <app2>...-
appNis a list of app names you'd like in the image -
shellchatis always included - Some apps require extra features (i.e.:
mtxchatrequires--feature tlsas well) - Precursor is designed to be a application specific software runner. Thus it only has capacity for about 2-3 simultaneously loaded apps.
-
- The custom firmware image is now located in
target/riscv32imac-unknown-xous-elf/release/xous.img
Load custom apps with usb_update.py.
- Install prerequisites:
pip3 install pyusb progressbar2 pycryptodome - Plug the Precursor device into your host (see host-specific instructions below for setup)
- From the
xous-corebase directory, runpython3 -m tools/usb_update.py -k. With no argument, it will search a default path for the kernel image. You can also specify the image to load by providing an argument to-k.
See TFM for lots more details.
- Enable user-mode access to Precursor. Add a file called
99-precursor-usb.rulesto /etc/udev/rules.d/ with the following content as a single line terminated by a carriage return:SUBSYSTEM=="usb", ATTRS{idVendor}=="1209", ATTRS{idProduct}=="5bf0", GROUP="plugdev", TAG+="uaccess" - Run
sudo udevadm control --reload-rules - If the device was plugged in, you'll have to unplug it and plug it back in again for the new rules to take effect.
The following script to install a udev rule has been tested to work on Rasbpian:
mkdir -p /home/pi/code
cd /home/pi/code
sudo apt update
sudo apt install python3-venv python3-wheel libusb-1.0-0
python3 -m venv venv
source venv/bin/activate
pip3 install pyusb progressbar2 pycryptodome
cat <<EOF | sudo tee /etc/udev/rules.d/50-precursor.rules
ATTR{idVendor}=="1209", ATTR{idProduct}=="5bf0", SYMLINK+="precursor%k", MODE="660", GROUP="plugdev"
EOF
If you log out and log back in again, you will need to activate the venv before running the updating script:
source venv/bin/activate  # use this to enter the venv
./usb_update.py ...
deactivate  # use this to leave the venv
- You will need to install python3 from the Windows App store if you don't already have it
- Run
pip3 install pyusb progressbar2 pycryptodomefrom a Powershell - use zadig to remap
Precursor pvt2's Windows driver tolibusb-win32 - Run
python3 .\usb_update.py [args]from a Powershell; elevated privs are not necessary after usingzadig.
Users have reported trouble navigating the Zadig UI. Here is a guide:
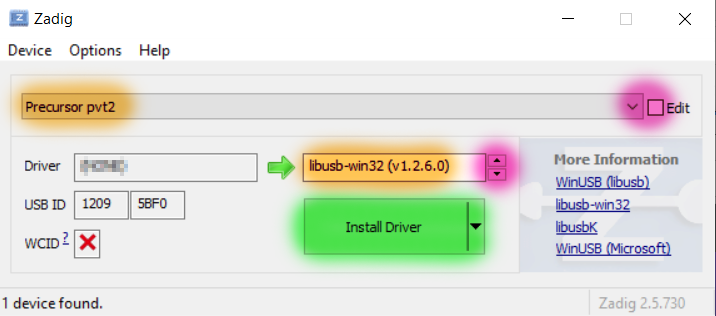
- Select "Precursor pvt2" from the large pull-down box. Click the "Edit" checkbox if the menu is blank or unselectable.
- Select the driver to be "libusb-win32", using the red highlighted arrows, as shown in the right text box. You can ignore the text in the left box.
- Click the "Install Driver" (or "Reinstall driver") button (highlighted in green) once these settings are made. This step can take several minutes.