Home
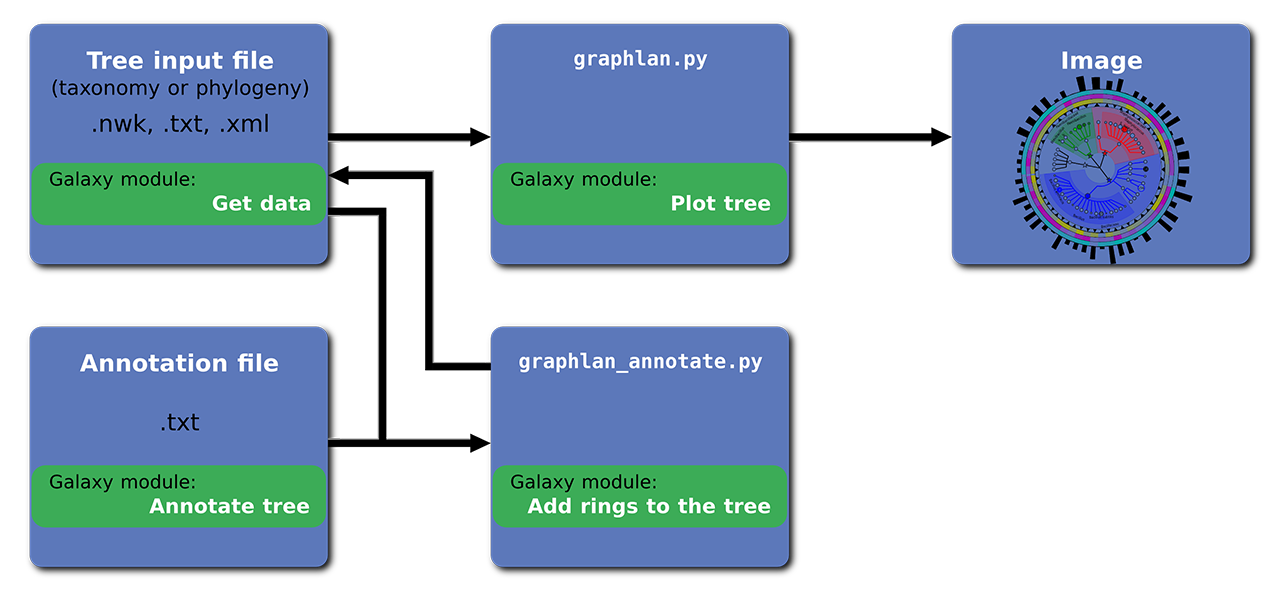
GraPhlAn is a software tool for producing high-quality circular representations of taxonomic and phylogenetic trees. It focuses on concise, integrative, informative, and publication-ready representations of phylogenetically- and taxonomically-driven investigation.
The following image report a brief overview of the GraPhlAn structure:
Please, follow this tutorial learn about how to use GraPhlAn.
GraPhlAn is available in GitHub (repository) and can be obtained using:
bash
conda install graphlan
In a Unix environment you just have to type:
bash
git clone git@github.com:biobakery/graphlan.git
This will download the GraPhlAn repository locally in the graphlan subfolder. You then have to put this subfolder into the system path so that you can use GraPhlAn from any location in your system:
bash
export PATH=`pwd`/GraPhlAn/:$PATH
Adding the above line into the bash configuration file will make the path addition permanent. For Windows or MacOS systems a similar procedure should be followed.
GraPhlAn has two main scripts:
- graphlan_annotate.py
- graphlan.py
The first one (graphlan_annotate.py) is used to tie the annotation file to the input tree.
bash
graphlan_annotate.py --annot annotation_file.txt input_file.txt new_input_file_name.xml
Annotations files can be tie to tree input files several times.
The second one (graphlan.py) is used to generate the output images in several different formats: png, pdf, ps, eps, svg. You can also set their resolution with --dpi (default value is 72) and their size with --size (default value is 7.0, expressed in inches).
bash
graphlan.py new_input_file_name.xml image_name.png --dpi 150 --size 7 graphlan.py new_input_file_name.xml image_name.svg --dpi 150 --size 7
This step-by-step tutorial is based on the guide (quick link) example that you can find inside the examples folder (quick link).
The guide folder contains the following files:
- guide.txt
- step0.sh
- annot_0.txt
- step1.sh
- annot_1.txt
- step2.sh
- annot_2.txt
- step3.sh
- annot_3.txt
- step4.sh
If you need more help you can have a look at each file .txt or .sh. We decided to include a comment (#comment) for each step line that specifies what you are going to do with the custom written below.
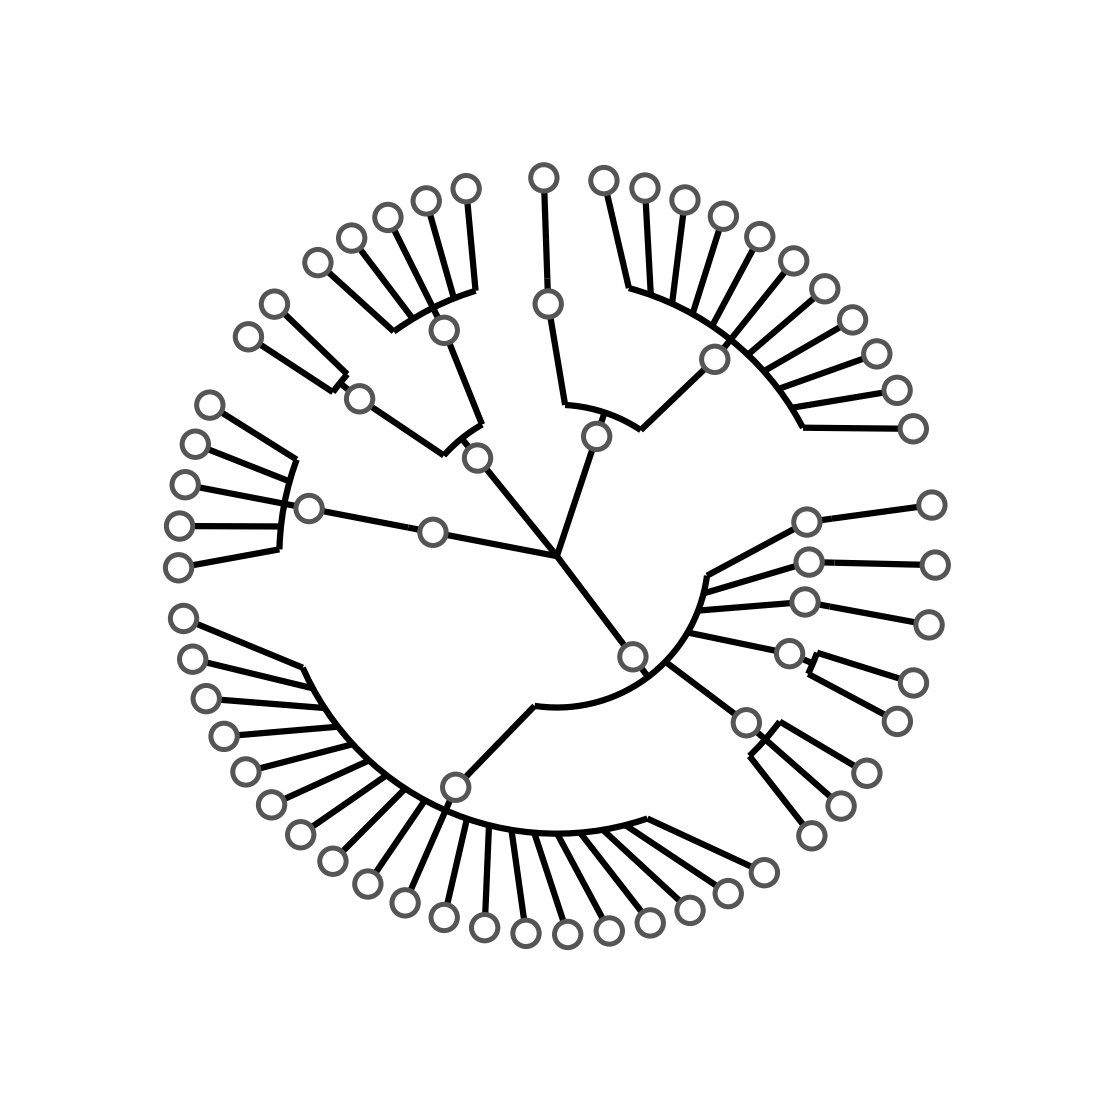
When you execute
bash
./step0.sh
You will get the following tree:

The step0.sh script executes the following commands:
bash
graphlan.py guide.txt step_0.png --dpi 300 --size 3.5 graphlan.py guide.txt step_0.svg --dpi 300 --size 3.5
This is a very basic output tree that GraPhlAn can provide. Using annotation file we can personalise the aspect of the tree.
When you execute
bash
./step1.sh
You will get the following tree:
The step1.sh script executes the following commands:
bash
graphlan_annotate.py --annot annot_0.txt guide.txt guide_1.xml graphlan.py guide_1.xml step_1.png --dpi 300 --size 3.5 graphlan.py guide_1.xml step_1.svg --dpi 300 --size 3.5
The first command tie the settings in the annot_0.txt to the guide.txt tree, generating a new tree: guide_1.xml. The latter commands simply generate two images: a .png and an .svg.
The annot_0.txt contains the following customisation:
text
clade_separation 0.5 branch_thickness 1.5 branch_bracket_depth 0.8 branch_bracket_width 0.25 clade_marker_size 40 clade_marker_edge_color #555555 clade_marker_edge_width 1.2
Where:
-
clade_separationspecify a fractional separation between clades which is proportional to the branch distance between subtrees. It option can be used to visually separate more clades that are reciprocally deep branching. Default is 0.0 -
branch_thicknessset the global thickness of the lines connecting taxa. Default is 0.75 -
branch_bracket_depthset the relative position of the branch bracket which is the radial segment from which the child taxa branches originate. Default is 0.25 -
branch_bracket_widthset the width of the branch bracket relative to the position of the most separated child roots. Default is 1.0 -
clade_marker_sizeset the size of the marker representing the root of the clade inside the tree. Default is 20.0 -
clade_marker_edge_colorset the color of the markers' border. Default is #000000 (i.e. black) -
clade_marker_edge_widthset the thickness of the border for clade markers. Default is 0.5
When you execute
bash
./step2.sh
You will get the following tree:
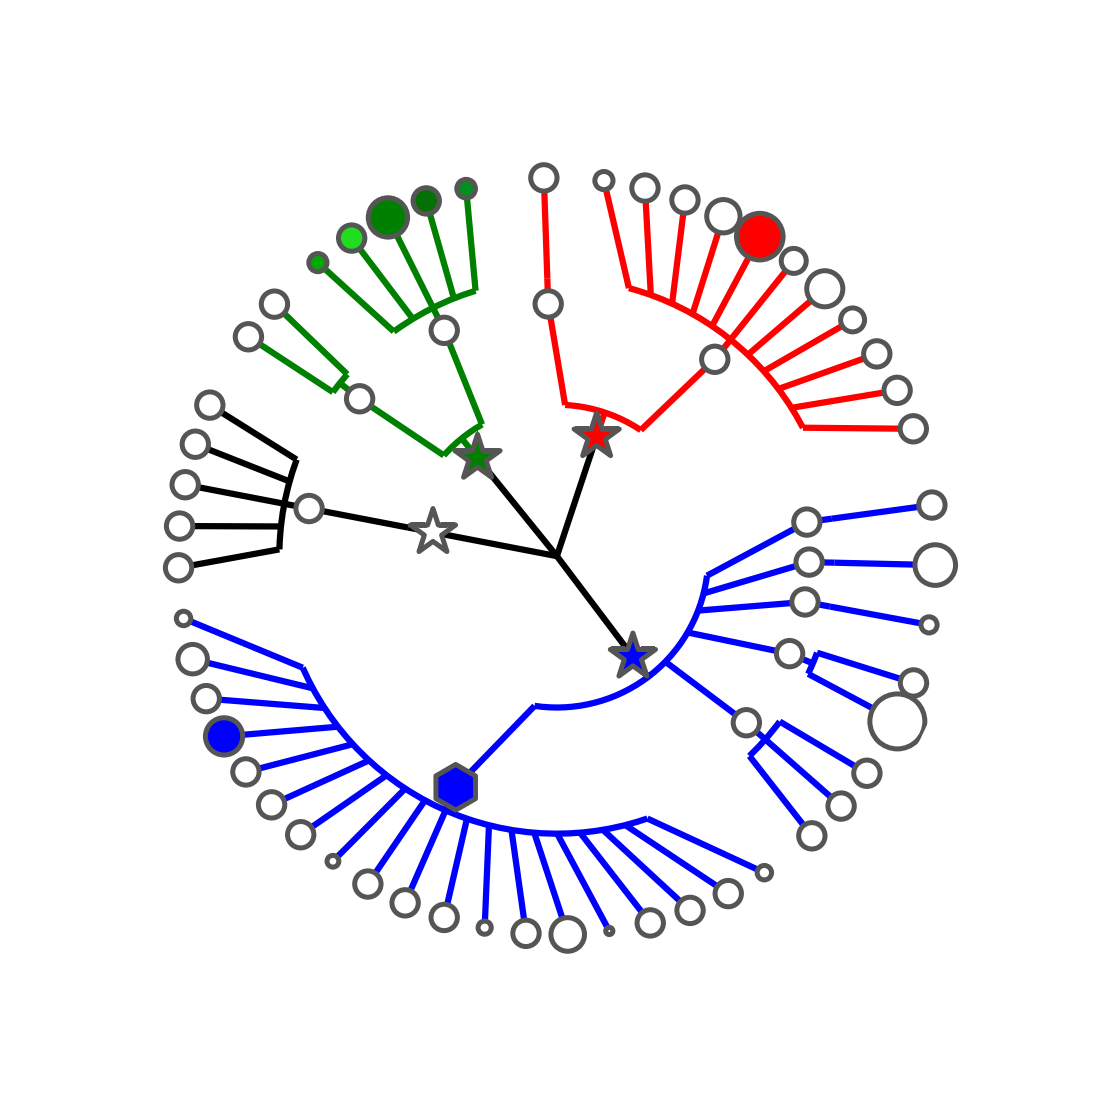
The step2.sh script executes the following commands:
bash
graphlan_annotate.py --annot annot_1.txt guide_1.xml guide_2.xml graphlan.py guide_2.xml step_2.png --dpi 300 --size 3.5 graphlan.py guide_2.xml step_2.svg --dpi 300 --size 3.5
The first command tie the annot_1.txt file to the tree generated at the previous step: guide_1.xml, saving the result in guide_2.xml. The latter two commands will generate the two output images.
The annot_1.txt contains the following customisation:
text
[..] Bacillus clade_marker_color b Bacillus clade_marker_size 120 Bacillus clade_marker_shape h [..]
These specifications applies to the rule "GRAPHICAL TREE OPTIONS", with the following syntax:
[clade_name{+|*|^}] graphical_tree_option graphical_tree_option_value
If the clade name is omitted the option is applied to ALL clades. The clade can be specified with the full label comprising all names from the root of the tree or with the last level only (if last level names are not unique, multiple matching clades will be affected by the command). Optionally, at the end of the clade name, one of the following character can be added: +, *, ^. Where * means that the specified clade and all its descendants are affected by the property; + means that the specified clade and all its terminal nodes are affected; and ^ means that all (an only) the terminal nodes of the specified clade are affected.
The graphical_tree_option used in the annot_1.txt are:
-
clade_marker_sizeis the size of the marker representing the root of the clade inside the tree. Default is 20.0 -
clade_marker_colorspecify the fill color of the marker representing the root of the clade inside the tree. Default is #FFFFFF (i.e. white) -
clade_marker_shapeprovides the shape of the clade marker. See the "MARKER SHAPES" table in thereadme.txtfile for more information. Default is 'o' (i.e. circle)
When you execute
bash
./step3.sh
You will get the following tree:
The step3.sh script executes the following commands:
bash
graphlan_annotate.py --annot annot_2.txt guide_2.xml guide_3.xml graphlan.py guide_3.xml step_3.png --dpi 300 --size 3.5 graphlan.py guide_3.xml step_3.svg --dpi 300 --size 3.5
The first command tie the settings in the annot_2.txt to the guide_2.xml tree, generating a new tree: guide_3.xml. The latter commands simply generate two images: a .png and an .svg.
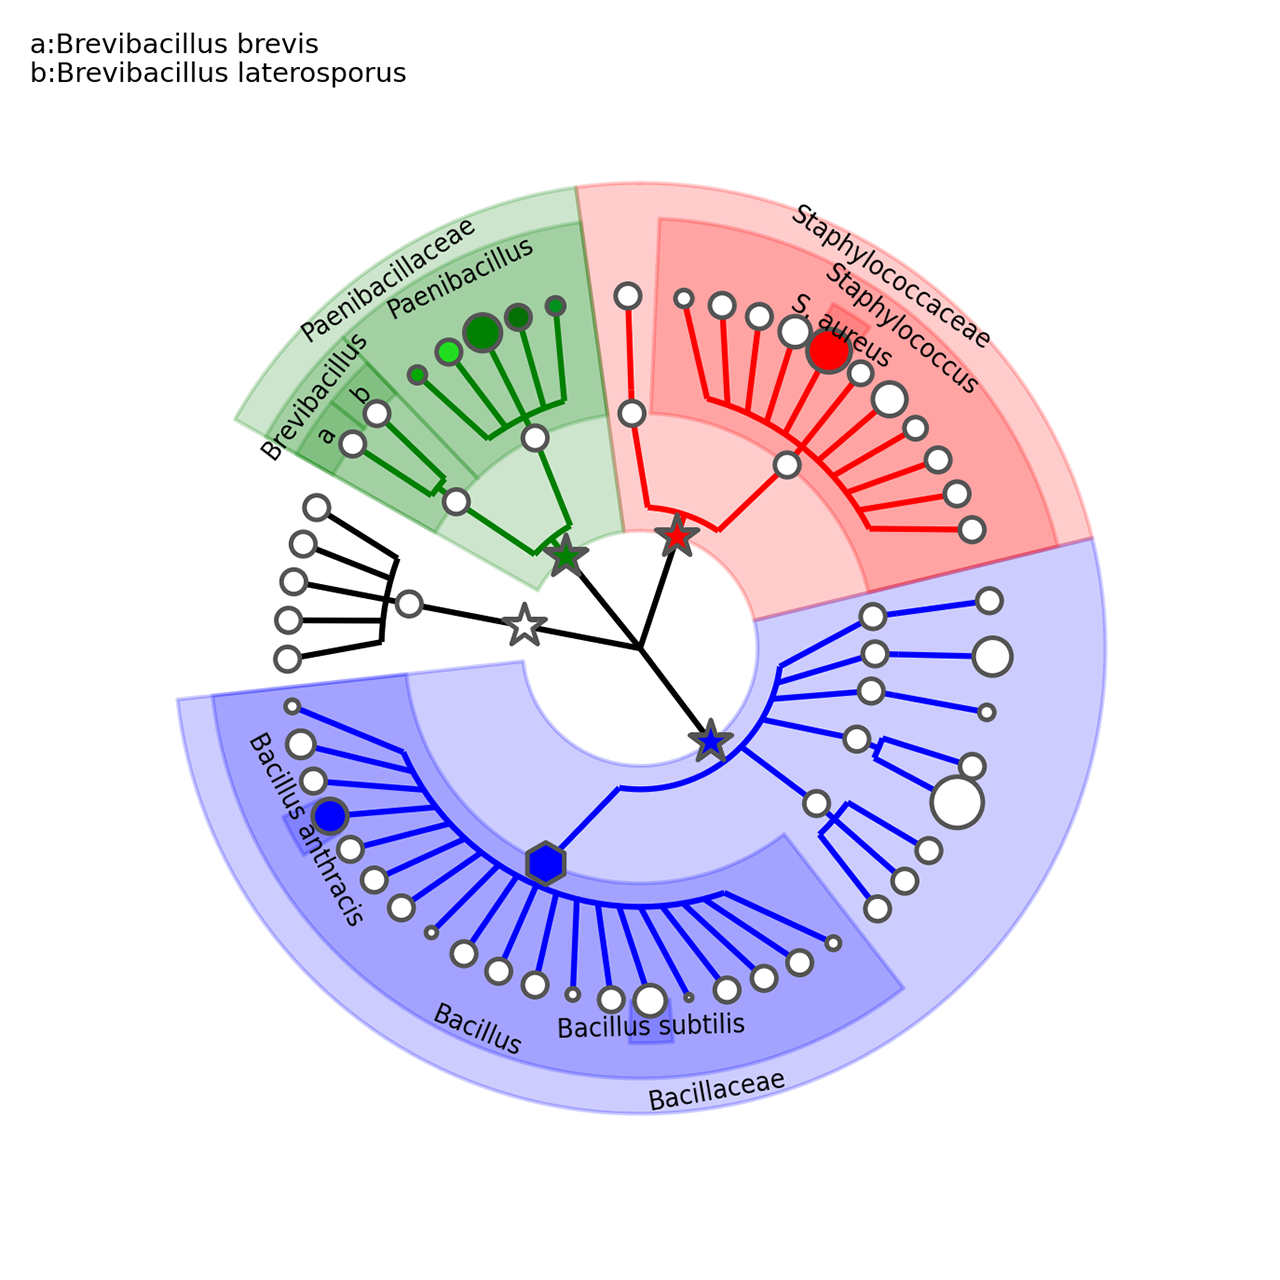
The annot_2.txt contains the following customisation:
text
Bacillus annotation Bacillus [..] Bacillus annotation_background_color b [..] Bbrevis annotation a:Brevibacillus brevis Bbrevis annotation_background_color g Blaterosporus annotation b:Brevibacillus laterosporus Blaterosporus annotation_background_color g [..]
These specifications applies to the rule "ANNOTATION OPTIONS", with the following syntax:
[clade_name] annotation_option graphical_tree_option_value
We call annotations the shadings highlighting clades and the corresponding subtree. Annotations can be colored, their alpha-channel can be globally regulated, and have a label associated with them.
Specifically, the annotation_option used in the annot_2.txt are:
-
annotationspecify the label to be associated and displayed for the annotation. This can assume several formats: -
- str (a string not containing ':') specify the string to be displayed entirely (an only) on the shading
- key:str where the (supposedly short) key will be displayed on the annotation shading, whereas the full key:string label will be reported as external legend
- *:str where a key will be generated automatically and used as the previous key:str case
- * the name of the clade (specifically the last taxonomic level only) will be used as the str in the first case above
- *:* represents the combination of the previous two cases above
-
-
annotation_background_colordefine the color of the annotation background. Default is grey
When you execute
bash
./step4.sh
You will get the following tree:
The step4.sh script executes the following commands:
bash
graphlan_annotate.py --annot annot_3.txt guide_3.xml guide_4.xml graphlan.py guide_4.xml step_4.png --dpi 300 --size 3.5 --pad 0.0 graphlan.py guide_4.xml step_4.svg --dpi 300 --size 3.5 --pad 0.0
The first command tie the settings in the annot_3.txt to the guide_3.xml tree, generating a new tree: guide_4.xml. The latter commands simply generate two images: a .png and an .svg.
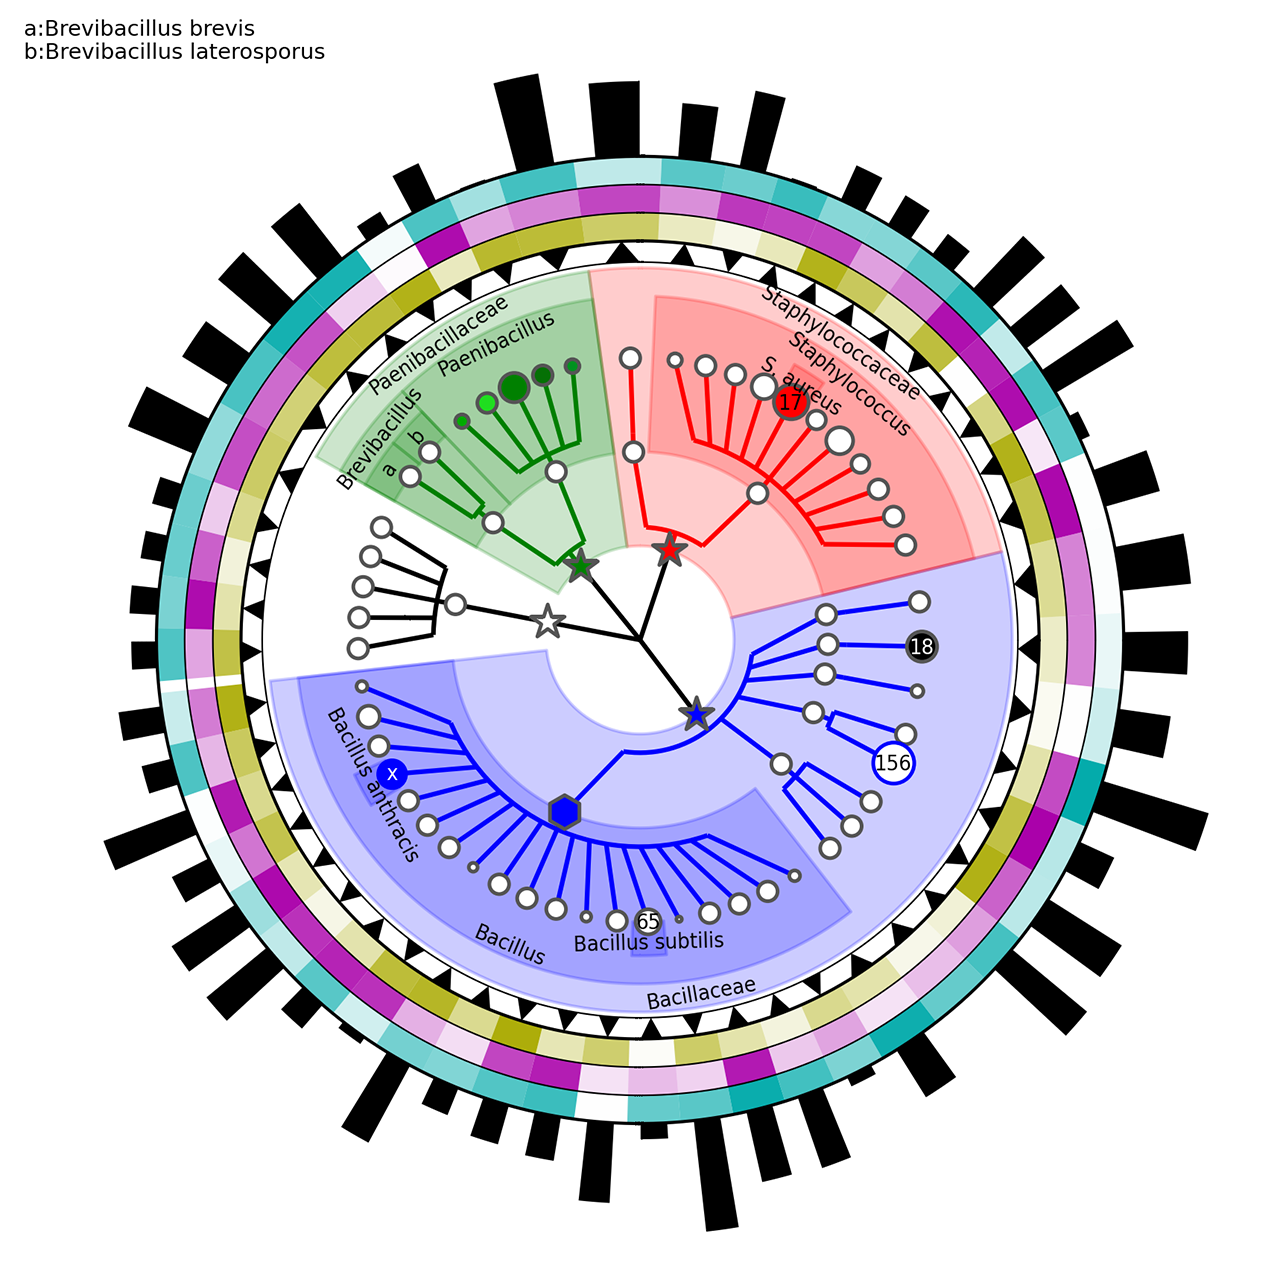
The annot_3.txt contains the following customisation:
text
ring_internal_separator_thickness 1 0.5 [..] ring_width 1 0.5 ring_height 1 0.75 [..] Bacillaceae.Anoxybacillus.Aflavithermus ring_shape 1 v [..] Bacillaceae.Anoxybacillus.Aflavithermus ring_alpha 2 0.423462136478 [..] Bacillaceae.Anoxybacillus.Aflavithermus ring_color 2 #AAAA00 [..] Bacillaceae.Anoxybacillus.Aflavithermus ring_height 5 2.48900854747 [..] Bacillaceae.Bacillus.Bsubtilis clade_marker_label 65 [..] Bacillaceae.Bacillus.Banthracis clade_marker_font_color w Bacillaceae.Bacillus.Banthracis clade_marker_edge_color b [..]
These specifications applies to the rule "RING OPTIONS".
We call rings the graphical elements external to the tree itself that can be seen as "circular heatmaps", "circular barplots", and actually more (like indicator elements). These "rings" are linked directly to the internal tree as each segment of the rings correspond to a tree leaf (and potentially to internal nodes as well). Multiple rings can be specified for the same image and each must have a progressive associated number (level "1" being the most internal ring).
The general syntax for rings is:
[clade_name] ring_option ring_level ring_option_value
If
clade_nameis not present or if it is * the ring option is applied to all the ring sectors in thering_level. Thering_levelis a integer number that must always be specified.
Here the ring_options use in the example above:
-
ring_colorindicates the color of the ring segment. Default is black -
ring_widthspecify the width of the ring segment a fraction of the total circular width available for the specific clade. Default is 1.0 -
ring_heightset the height of the circular segment. If not specify the same default height (0.1*size of the tree) is applied for all ring segment in the level, otherwise the height is equal to the biggest height value in the level. Default is the highest height for the rings in the same level, or 0.1 if no heights are specify -
ring_alphaset the transparency value. 0.0 means completely transparent (thus invisible), 1.0 means completely opaque (no transparencies). Default is 1.0 -
ring_shapespecify the shape of the ring. Default is R for rectangular which means that the whole available area is used. The alternatives are currently v or ^ which mean triangular shape (with opposite directions) that can be used as pointing arrow for highlighting specific clades. Default is R
Some additional ring options refer to non clade-specific aspects like the label of the ring itself or the graphical separation between rings. These options are specified without a clade name in the following tree-column format:
global_ring_option ring_level global_ring_option_value
-
ring_internal_separator_thicknessset the thickness of the circular line separating different ring levels. This is referred to the most internal of the two sides of each ring. Default is 0.0, which means absent
The lasts rows applies to the rule "GRAPHICAL TREE OPTIONS":
-
clade_marker_edge_colorspecify the color of the markers' border. Default is #000000 (i.e. black) -
clade_marker_labelspecify a label to insert in the specified clade -
clade_marker_font_colorspecify the font color of the clade marker label specified. Default is 'k', i.e. black
Here we want show other examples (present in the example folder of the repository) to show the flexibility and several customisation possibilities that GraPhlAn provides.
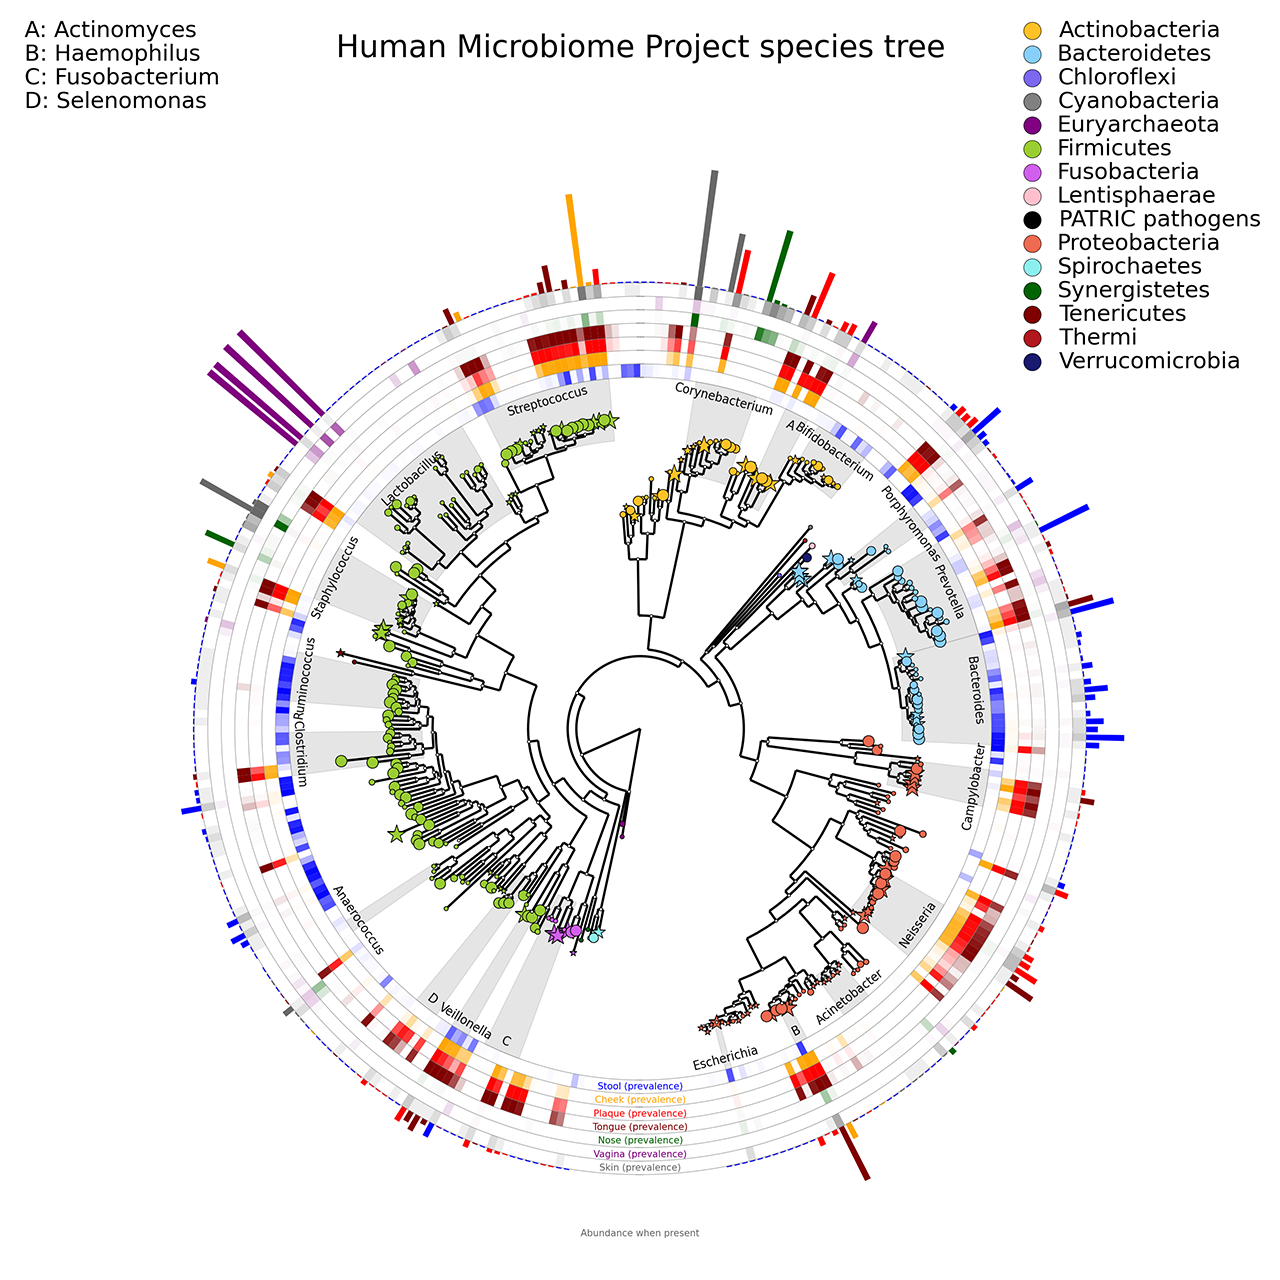
A phylogenetic tree of organisms abundant in the human microbiome, using circular heatmaps and barplots. The colors intensity corresponds to species prevalence in each body site; the bar heights on the outside of the circle are proportional to taxa abundance (reference).
The following image refers to the HMP_tree folder present in the example folder of the repository.
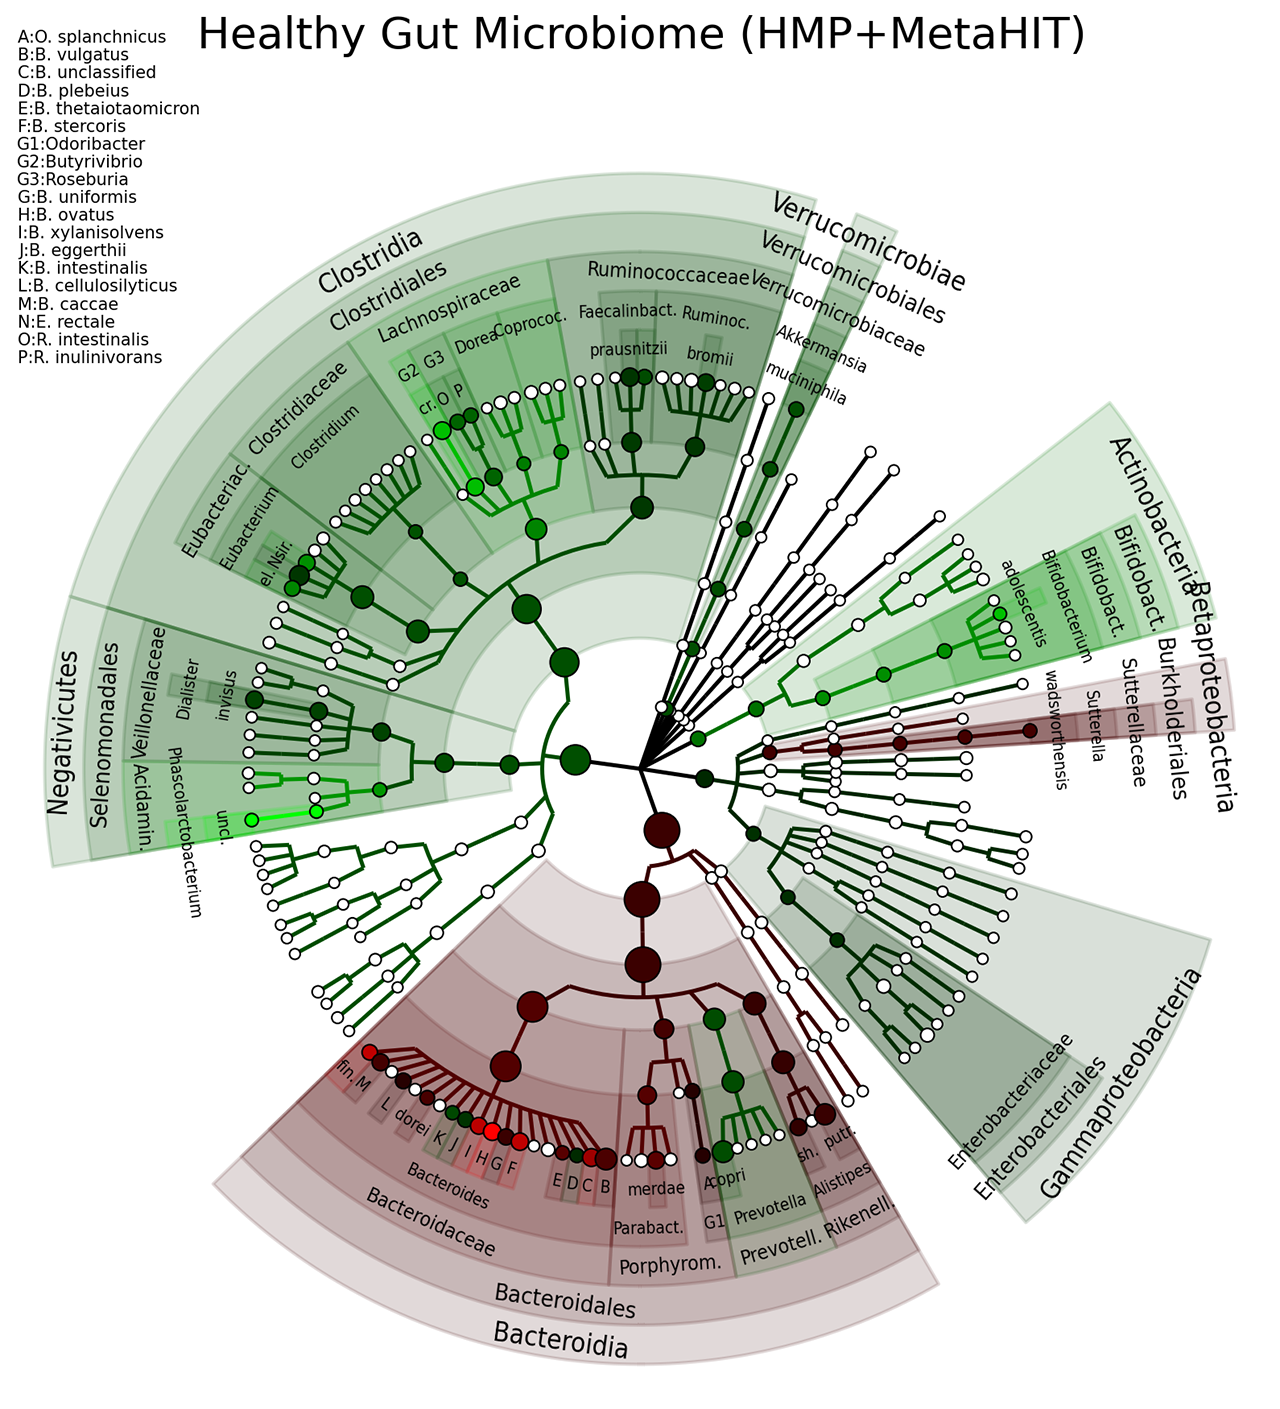
A taxonomic tree that compares the gut microbiome from the HMP and MetaHIT. In particular: the colours are directly related to the effect size of clades that are biomarkers; the nodes' size reflect their relative abundance (reference).
The following image refers to the gut_microbiome folder present in the example folder of the repository.
A high-resolution microbial tree of life with taxonomic annotations. Scale indicates normalized fraction of total branch length. Grey labels indicate the lowest common ancestor of genera with at least 10 genomes. External bar length represents the fraction of the 400 proteins contained in each genome. Red external triangles indicate genomes predicted by our method to be taxonomically mislabelled and confidently replaced; blue triangles indicate problematic labels that were refined but still did not fall within a fully consistent clade; green triangles indicate genomes whose incomplete taxonomic label we confidently refined; and black triangles indicate 566 genomes from IMG-GEBA that have been newly placed into the tree (reference).
The following image refers to the PhyloPhlAn folders present in the example folder of the repository.

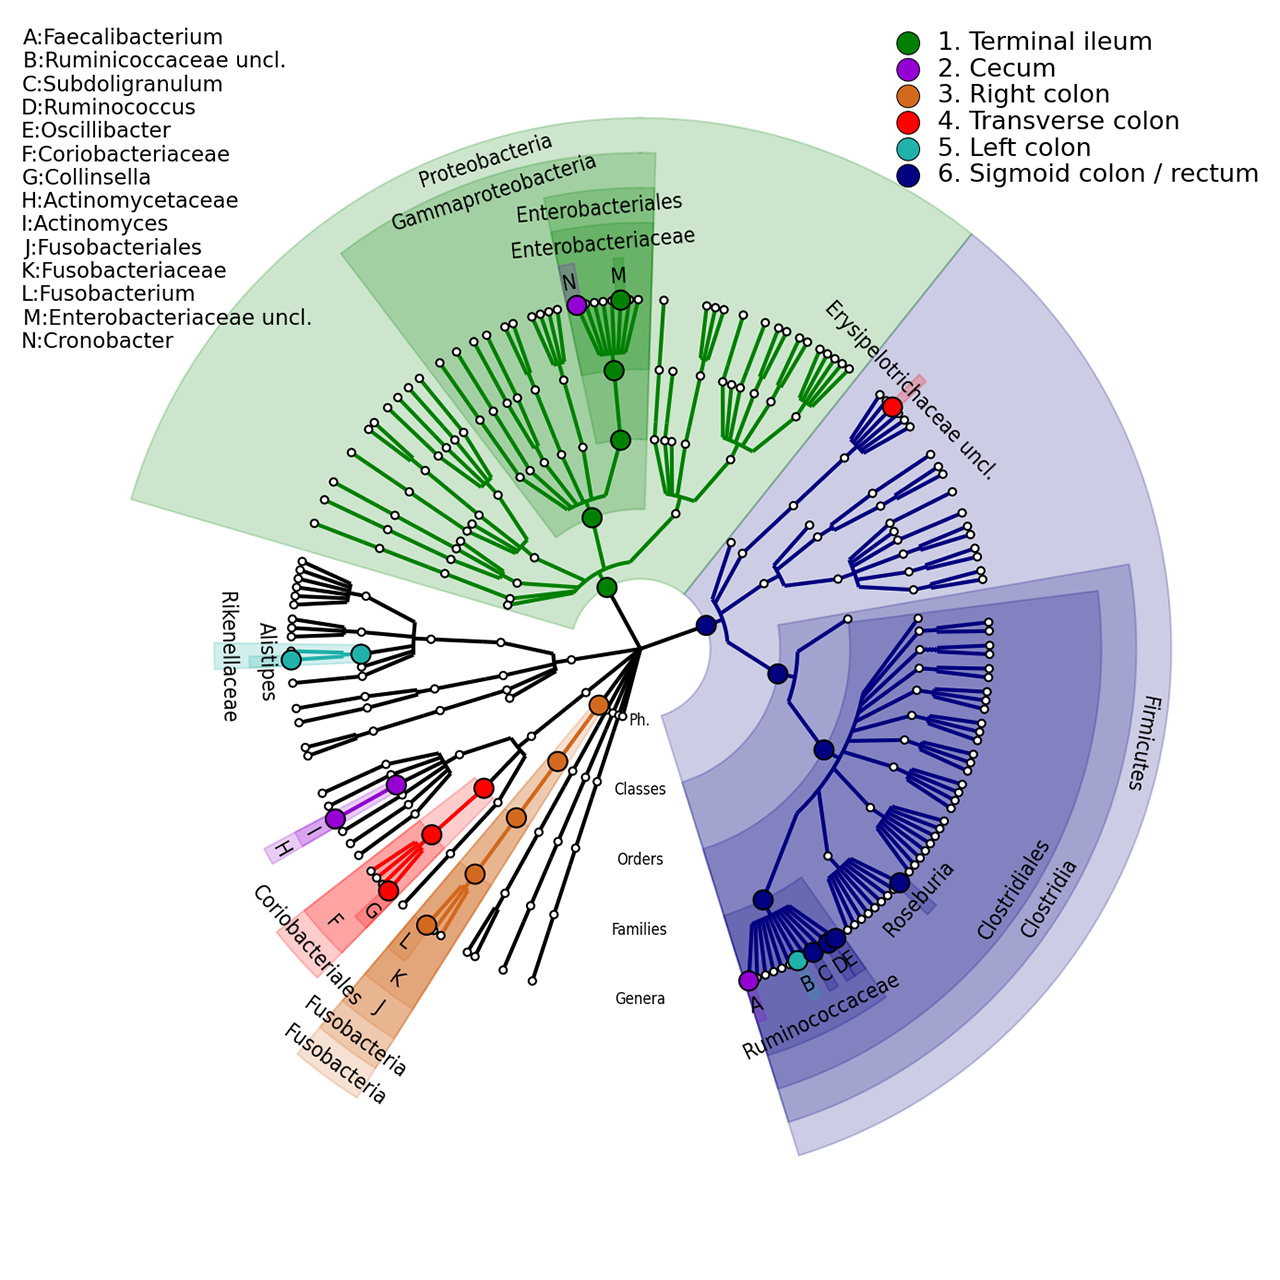
A taxonomic tree that shows the Inflammatory Bowel Disease biogeography. In particular are differentiated with different colours the following body-sites: terminal ileum, cecum, right colon, traverse colon, left colon and sigmoid colon/rectum (reference).
The following image refers to the IBD_biogeography folders present in the example folder of the repository.
For a more detailed list of the possible configurations that GraPhlAn provides, please have a look at the readme.txt file present in the repository.
We developed an automatic conversion script called export2graphlan.py, that allows for automatic conversion from LEfSe, MetaPhlAn2, and HUMAnN input and/or output file to GraPhlAn. The input file can be also given in the BIOM 2.0 format.
The aim of this conversion script is to support biologists, helping them by automatically write the tree and the annotation file for GraPhlAn. export2graphlan is present as sub-repository in GraPhlAn. Some examples that explain how to use it can be found here: export2graphlan tutorial.
We provide support for GraPhlAn users through the bioBakery help forum.