Connect AGW with Orchestrator
caprivm (jcaviede@nttdata.com)
This page explains all the steps required to connect AGW with Orchestrator. All steps that expose this section has been tested in a virtual environment with the following characteristics for AGW and Orchestrator.
| Feature | Value |
|---|---|
| AGW IP | 192.168.1.88 |
| AGW OS | Ubuntu 20.04 |
| Bootstrapper IP | 192.168.1.248 |
| Controller IP | 192.168.1.248 |
| Fluentd IP | 192.168.1.247 |
| NMS IP | 10.233.39.105 |
| Orchestrator Deployment | Kubernetes |
| Magma Tag | v1.6 |
The contents of the page are:
The Network Management System (NMS) can be used as UI to manage the AGW connection. This UI is the easy way to perform the connection between elements. Please consider the next:
- Assume that the Orchestrator
bootstrapperservice IP is192.168.1.248. - Assume that the Orchestrator
controllerservice IP is192.168.1.248. - Assume that the
fluentdservice IP is192.168.1.247. - Assume that the NMS service IP is
10.233.39.105. - Assume that the AGW IP is
192.168.1.88and the user of VM ismagma. - It is assumed that you have already deployed the orchestrator using Helm. Please see sections:
In this case, consider the next environment variables before continue the procedure:
export MAGMA_ROOT=~/magma_v1.6The next sections asumes that you have already deployed an Orchestrator and have the certificates needed for connection to AGW. The next commands can help you to verify these points.
# In the deployment machine:
cd $MAGMA_ROOT/orc8r/cloud/helm/orc8r/charts/secrets/.secrets/certs
ls -1
# admin_operator.key.pem
# admin_operator.pem
# admin_operator.pfx
# bootstrapper.key
# certifier.key
# certifier.pem
# controller.crt
# controller.csr
# controller.key
# rootCA.key
# rootCA.pem
# rootCA.srl
# vpn_ca.crt
# vpn_ca.key
In the next sections, the rootCA.pem certificate is neccesary. For this reason, later in this documentation is explained how to transfer the certificate to AGW VM.
Copy the rootCA.pem certificate from the orchestrator deployment in the AGW machine and put it in the /var/opt/magma/certs/ folder. Use the kubectl command to get the certificate:
kubectl get secret/orc8r-secrets-certs -n magma -o "jsonpath={.data.rootCA\.pem}" | base64 --decode
# -----BEGIN CERTIFICATE-----
# MIIDTTCCAjWgAwIBAgIUF/aIL9e3VgoUTtyleH2/AeS6YpAwDQYJKoZIhvcNAQEL
# BQAwNjELMAkGA1UEBhMCVVMxJzAlBgNVBAMMHnJvb3RjYS5tYWdtYS5zdmMuY2x1
# c3Rlci5sb2NhbDAeFw0yMTA4MTcyMTIyNTZaFw0zMTA4MTUyMTIyNTZaMDYxCzAJ
# BgNVBAYTAlVTMScwJQYDVQQDDB5yb290Y2EubWFnbWEuc3ZjLmNsdXN0ZXIubG9j
# YWwwggEiMA0GCSqGSIb3DQEBAQUAA4IBDwAwggEKAoIBAQDPDlEquQfdrDI1IBxp
# jyHFLvyxJdzu1cUFGFZXo3XZbHWOUG68fHis+YPBIQUGlrqAKT48SM3xwYK2+lzp
# soka7SKlNkJbZ9ngiBFS/md8VWupmBnkSjMG6SjF54kNFIauNBJdhbcqcCMXbI0Q
# rqFOVDbgIV3J2+YghmC/DaDJf4m+hRR5RpO9yqFVjb8469d8i7vhRksR49lw0iVb
# sUIPGieg+6+PJyf9+n7ZKJKTttYU3V/lrm3hLD7pYgoSyIO7AduuW8HEtSXJfIYQ
# qxQ6Bhjez77+Lar61oqXaM9uI4LcQ5r5fuUVMX0ZGPZpSI/sqBjPQXEs9WqOPikk
# chOlAgMBAAGjUzBRMB0GA1UdDgQWBBTU4qYYNP7NmdEJqy2psJHabKsMfzAfBgNV
# HSMEGDAWgBTU4qYYNP7NmdEJqy2psJHabKsMfzAPBgNVHRMBAf8EBTADAQH/MA0G
# CSqGSIb3DQEBCwUAA4IBAQAdA2W1+kYR/NxF7QHnVy9aIDocTspswHw5pP8wAPsw
# Ahs/Mue3vo2uW2nFmD4FdAmvU8ktPzuCTMvk5mLG4TOk1tuGmvhdloQEmBQrC7RP
# jOuK7aLxj8xfeB7aCDWLik1O3Z0e5s09hv7kHUi2Km19lU9Lw68BbSuj+Sae8bB6
# 1wgkWQ/dw+ttS8SDNtHJ7y1d6sdbQpR33KW1pRoKjLNqpd8pa6qwT44SKO9Z0Fti
# H83Snc1zrxb+hnt3g3Zegy32wmRtNNtglSfrgP6xUp7V7eI4IQ69If40kFpN2Fep
# uO1Khv54UwVgdzHpdwJ8OIaXg2bCM1vu5CQnCQLKw/Xe
# -----END CERTIFICATE-----
In AGW put the rootCA.pem in /var/opt/magma/certs/ folder:
ls -1 /var/opt/magma/certs/
# gateway.crt
# gateway.key
# gw_challenge.key
# rootCA.pem    <--- Certificate for auth to orc8r
NOTE: Also, you can transfer the
rootCA.pemcert usingsftporscp:sudo sftp ubuntu@<secrets_ip>:$MAGMA_ROOT/orc8r/cloud/helm/orc8r/charts/secrets/.secrets/certs/rootCA.pem .
Next, modify the /etc/hosts file in AGW machine for DNS resolution. Be sure to use the IPs assigned by the cluster for each service of interest. In this case, the services are specified in the beginning table:
sudo vi /etc/hosts
## Add the next lines
# 192.168.1.248 controller.magma.svc.cluster.local
# 192.168.1.248 bootstrapper-controller.magma.svc.cluster.local
# 192.168.1.247 fluentd.magma.svc.cluster.local
Make sure that you have connectivity to the orchestrator services:
ping -c 4 controller.magma.svc.cluster.local
ping -c 4 bootstrapper-controller.magma.svc.cluster.local
pinc -c 4 fluentd.magma.svc.cluster.localBy default, the control_proxy.yml file have a configuration that use wrong ports to talk with the orchestrator. It is necessary edit the ports as shown below:
sudo vi /etc/magma/control_proxy.ymlUse the next configuration if you deploy your orchestrator using Docker:
---
#
# Copyright (c) 2016-present, Facebook, Inc.
# All rights reserved.
#
# This source code is licensed under the BSD-style license found in the
# LICENSE file in the root directory of this source tree. An additional grant
# of patent rights can be found in the PATENTS file in the same directory.

# nghttpx config will be generated here and used
nghttpx_config_location: /var/tmp/nghttpx.conf

# Location for certs
rootca_cert: /var/opt/magma/certs/rootCA.pem
gateway_cert: /var/opt/magma/certs/gateway.crt
gateway_key: /var/opt/magma/certs/gateway.key

# Listening port of the proxy for local services. The port would be closed
# for the rest of the world.
local_port: 8443

# Cloud address for reaching out to the cloud.
cloud_address: controller.magma.svc.cluster.local
cloud_port: 8443

bootstrap_address: bootstrapper-controller.magma.svc.cluster.local
bootstrap_port: 8444

fluentd_address: fluentd.magma.svc.cluster.local
fluentd_port: 24224

# Option to use nghttpx for proxying. If disabled, the individual
# services would establish the TLS connections themselves.
proxy_cloud_connections: True

# Allows http_proxy usage if the environment variable is present
allow_http_proxy: True
Please see how the ports for controller.magma.svc.cluster.local, bootstrapper-controller.magma.svc.cluster.local and fluentd.magma.svc.cluster.local are 8443. 8444 and 24224 respectively.
If you try before to connect the AGW, the orchestrator saves the Hardware UUID and the Challenge Key in a local database that prevents a connection of an AGW with the same combination. For this reason, we suggest to generate a new key and then, perform the connection. In the AGW machine execute the next commands:
sudo snowflake --force-new-key
cd && show_gateway_info.py    # Verify the new key
# Example of output:
# Hardware ID
# -----------
# e828ecb7-64d4-4b7c-b163-11ff3f8abbb7
#
# Challenge key
# -------------
# MHYwEAYHKoZIzj0CAQYFK4EEACIDYgAERR/0pjjOI/3VVFUJmphurMHhlgxyVHxkJ9QDovgLC99lImKOvUHzKEqlNwsqxmCyWyuyZnNpf8lOaWNmoclbGcXFwh1EeTlIUZmvW1rqj8iPO17AQRgpHJYN5F30eaHa
#
# Notes
# -----
# - Hardware ID is this gateway's unique identifier
# - Challenge key is this gateway's long-term keypair used for
#   bootstrapping a secure connection to the cloud
Now delete old AGW certificates and restart services:
sudo rm /var/opt/magma/certs/gateway*
# Restart magma services
sudo service magma@* stop
sudo service magma@magmad restart
sudo service magma@* status
Verify that you have 200 response in HTTPv2 messages in control_proxy service:
sudo service magma@control_proxy statusWhen you start all AGW services, the AGW is able to connect with the orchestrator. For perform this task, there are two possible ways:
- Using the API that orchestrator provides.
- Using the NMS interface.
In this case, the second option is considered. First, access to the UI. You should see something like the next image:

Once in the NMS, go to the Administrative Tools option:
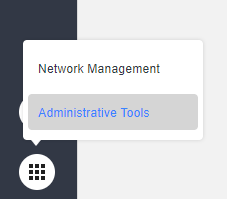
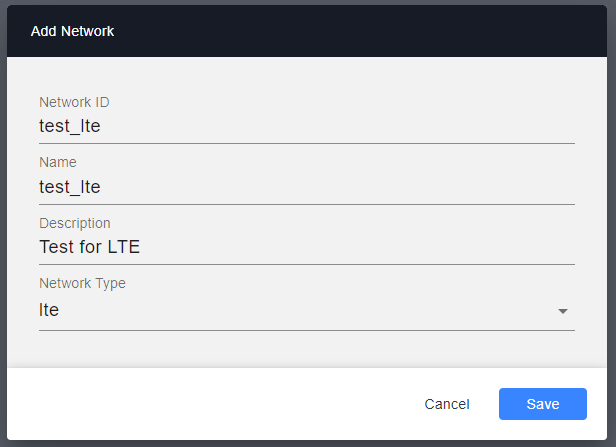
Next, go to the Networks tab and add a new network.
NOTE: You can have multiple AGWs on the same network.
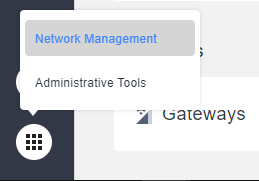
With the network created, you can go to the Network Management option and, next, go to the network that you created in the previous step. These steps are shown in the following figures:

In the emerged interface, go to the Equipment tab and select it. You should see all the AGW that you add to the current network. Also, you can see the health of each AGW, latency and another statistics.
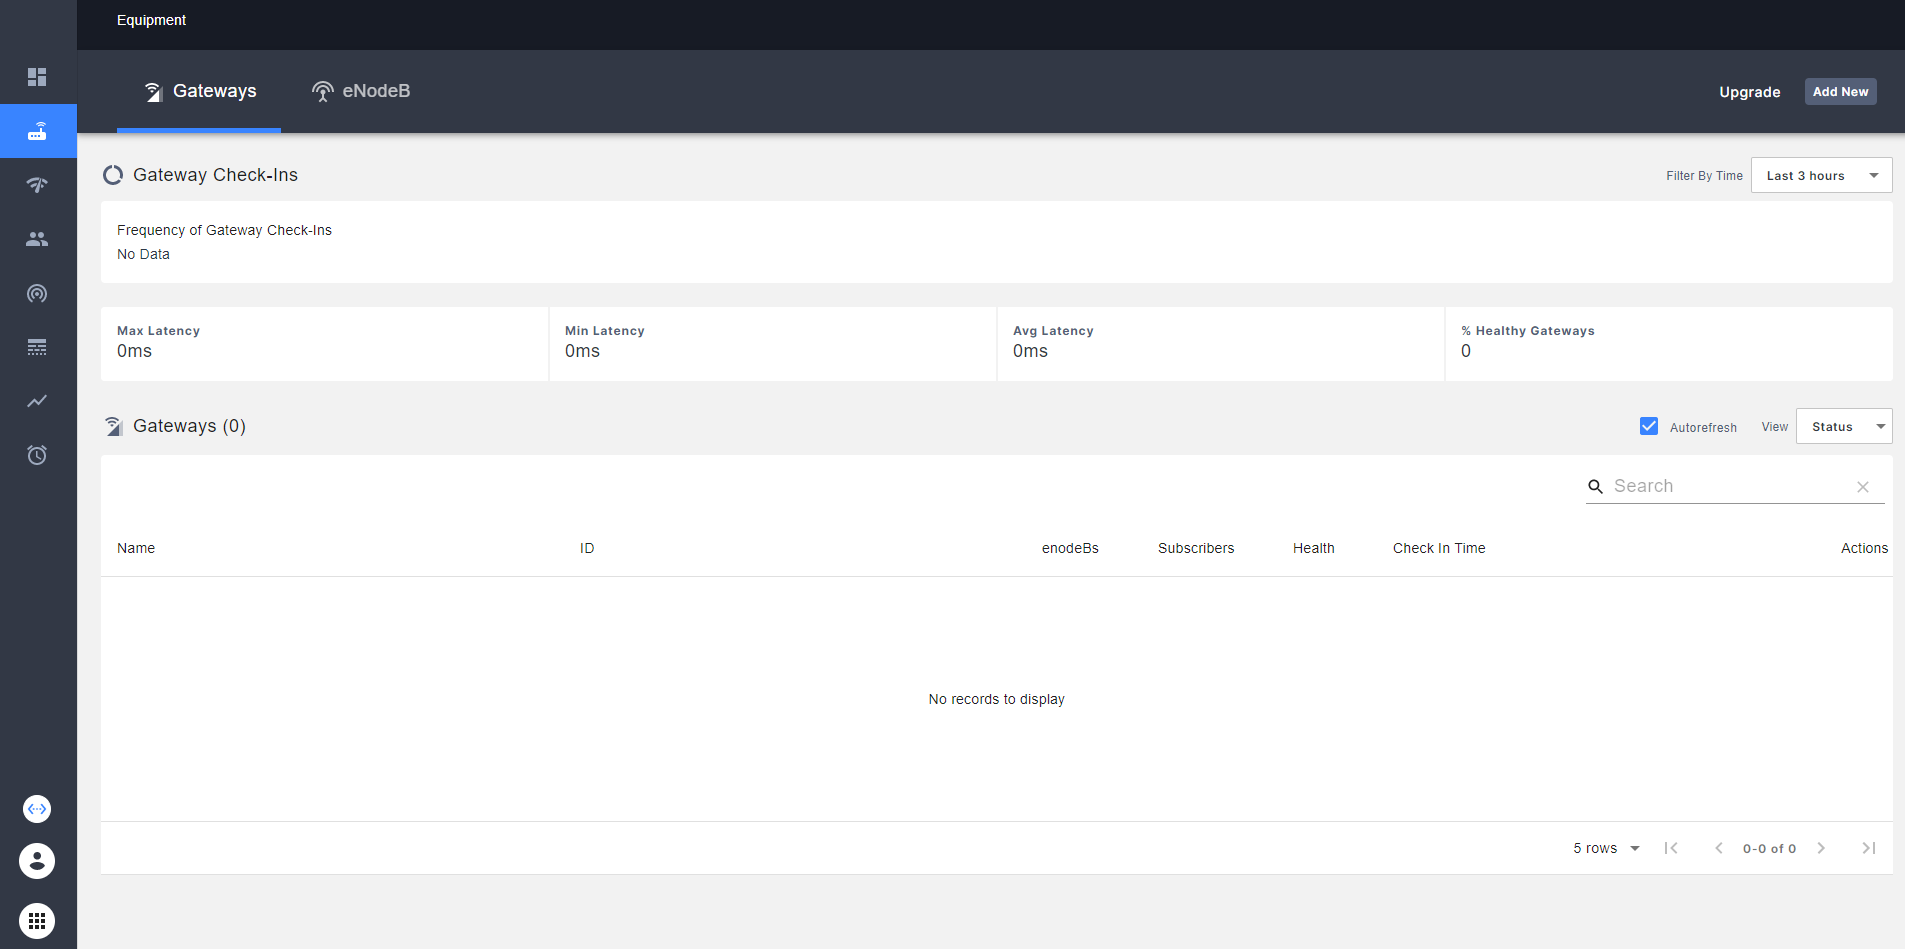
In the up-right part of the UI, select the Add New option for add a new AGW:
You should see a new interface where needed some AGW information.
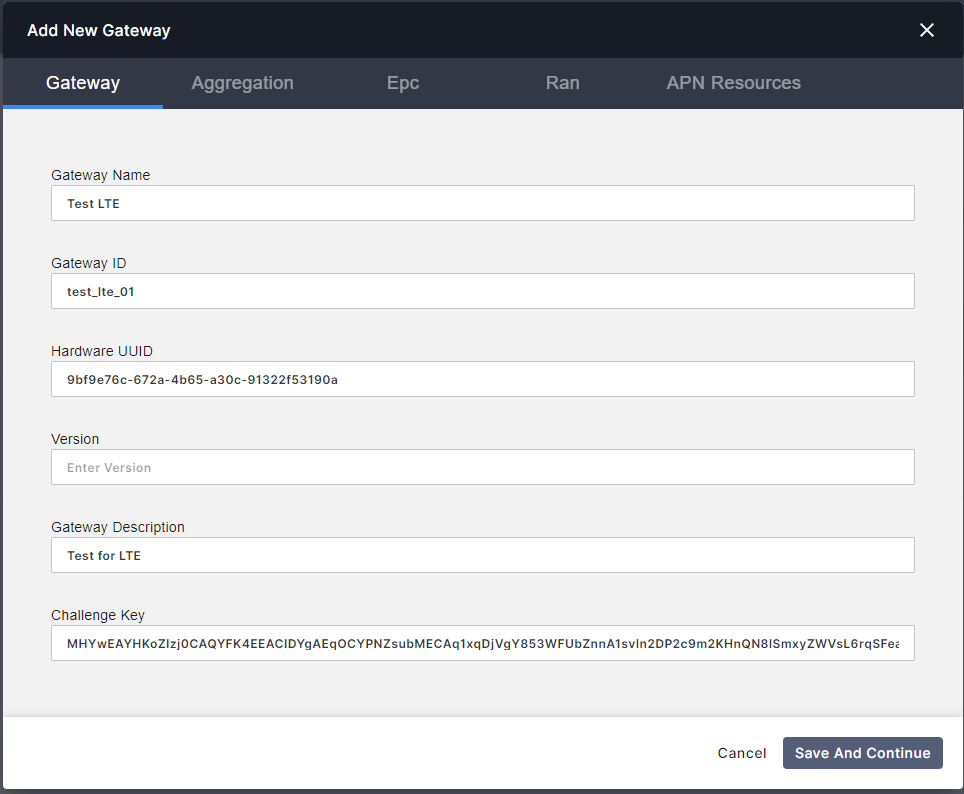
Please follow all info considering next:
- Gateway Name: Any. We suggest lte_everis
- Gateway ID: Must be unique. We suggest IDs like agw01, agw02, etc.
-
Hardware UUID: Go to AGW VM and run
show_gateway_info.py. An example of the output is showed below:
# In the AGW machine:
cd && show_gateway_info.py
# Hardware ID:
# ------------
# 9bf9e76c-672a-4b65-a30c-91322f53190a
#
# Challenge Key:
# -----------
# MHYwEAYHKoZIzj0CAQYFK4EEACIDYgAEqOCYPNZsubMECAq1xqDjVgY853WFUbZnnA1svln2DP2c9m2KHnQN8lSmxyZWVsL6rqSFeaqRLnn/bq8dbSBFUNPT505OtBgsQnevDsmWoFGfOQtaAe8ga+ZujJzGbPU+- Version: Leave it empty. The orchestrator must be recognize the version when the AGW Check In Successful.
- Gateway Description: Any.
For Aggregation tab leave it by default.
For EPC tab:
- Nat Enabled: True.
- IP Block: Depends on number of eNBs and users. Leave it by default if there are few.
- DNS Primary: We suggest leave empty. In any case, it is configurable after.
- DNS Secondary: We suggest leave empty. In any case, it is configurable after.
NOTE: If your AGW is connected to an operator's network, use the DNS primary/secondary that they suggest.
For RAN leave it all by default.
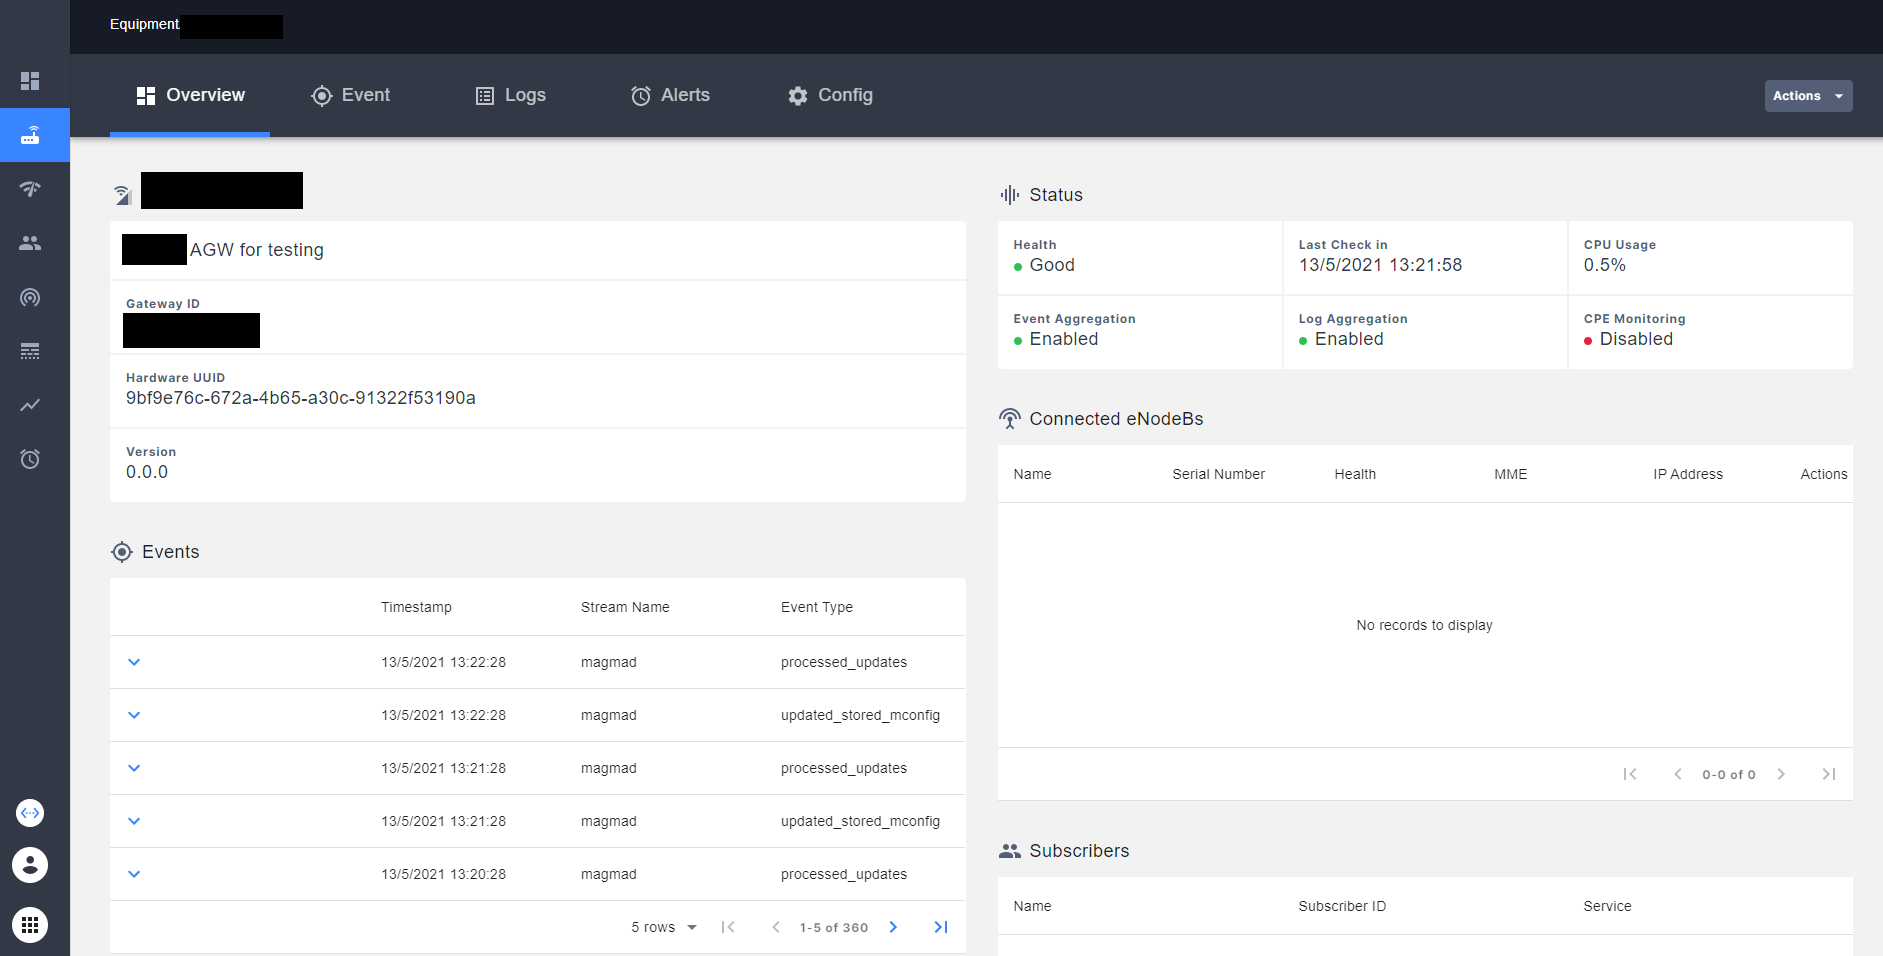
In Equipment tab you should see the AGW with a Good Health. You can see that, in NMS interface, this AGW has a good Health.
Finally, you can corrobore the connnection status between AGW and Orchestrator using sudo service magma@control_proxy status command. In the CLI, you should see a 200 response in logs of control_proxy service. Use the next commands:
sudo service magma@control_proxy status
# ● magma@control_proxy.service - Magma control_proxy service
#    Loaded: loaded (/etc/systemd/system/magma@control_proxy.service; disabled; vendor preset: enabled)
#    Active: active (running) since Mon 2021-05-10 21:38:37 UTC; 2 days ago
#   Process: 22550 ExecStartPre=/usr/bin/env python3 /usr/local/bin/generate_nghttpx_config.py (code=exited, status=0/SUCCESS)
#  Main PID: 22582 (nghttpx)
#     Tasks: 2 (limit: 4915)
#    Memory: 2.7M (limit: 300.0M)
#    CGroup: /system.slice/system-magma.slice/magma@control_proxy.service
#            ├─22582 nghttpx --conf /var/opt/magma/tmp/nghttpx.conf
#            └─22594 nghttpx --conf /var/opt/magma/tmp/nghttpx.conf

# May 13 16:31:09 magma-dev control_proxy[22582]: 2021-05-13T16:31:09.069Z [127.0.0.1 -> metricsd-controller.magma.test,8443] "POST /magma.orc8r.MetricsController/Collect HTTP/2" 200 5bytes 0.030s
# May 13 16:31:09 magma-dev control_proxy[22582]: 2021-05-13T16:31:09.069Z [127.0.0.1 -> metricsd-controller.magma.test,8443] "POST /magma.orc8r.MetricsController/Collect HTTP/2" 200 5bytes 0.038s
# May 13 16:31:09 magma-dev control_proxy[22582]: 2021-05-13T16:31:09.069Z [127.0.0.1 -> metricsd-controller.magma.test,8443] "POST /magma.orc8r.MetricsController/Collect HTTP/2" 200 5bytes 0.038s
# May 13 16:31:09 magma-dev control_proxy[22582]: 2021-05-13T16:31:09.069Z [127.0.0.1 -> metricsd-controller.magma.test,8443] "POST /magma.orc8r.MetricsController/Collect HTTP/2" 200 5bytes 0.042s
# May 13 16:31:09 magma-dev control_proxy[22582]: 2021-05-13T16:31:09.069Z [127.0.0.1 -> metricsd-controller.magma.test,8443] "POST /magma.orc8r.MetricsController/Collect HTTP/2" 200 5bytes 0.043s
# May 13 16:31:20 magma-dev control_proxy[22582]: 2021-05-13T16:31:20.479Z [127.0.0.1 -> streamer-controller.magma.test,8443] "POST /magma.orc8r.Streamer/GetUpdates HTTP/2" 200 2054bytes 0.022s
# May 13 16:31:33 magma-dev control_proxy[22582]: 2021-05-13T16:31:33.682Z [127.0.0.1 -> streamer-controller.magma.test,8443] "POST /magma.orc8r.Streamer/GetUpdates HTTP/2" 200 287bytes 0.019s
# May 13 16:31:41 magma-dev control_proxy[22582]: 2021-05-13T16:31:41.716Z [127.0.0.1 -> streamer-controller.magma.test,8443] "POST /magma.orc8r.Streamer/GetUpdates HTTP/2" 200 67bytes 0.013s
# May 13 16:31:41 magma-dev control_proxy[22582]: 2021-05-13T16:31:41.716Z [127.0.0.1 -> streamer-controller.magma.test,8443] "POST /magma.orc8r.Streamer/GetUpdates HTTP/2" 200 31bytes 0.012s
# May 13 16:31:41 magma-dev control_proxy[22582]: 2021-05-13T16:31:41.716Z [127.0.0.1 -> streamer-controller.magma.test,8443] "POST /magma.orc8r.Streamer/GetUpdates HTTP/2" 200 7bytes 0.010sThis section is dedicated to reporting the known issues behind connecting the AGW to the orchestrator on Kubernetes.
A 400 error may occur in the control_proxy service even after adding the rootCA.pem certificate, modifying the /etc/hosts file, and restarting the services. This bug is known and is due to the gateway.crt and gateway.key files being out of date. To solve the problem consider the following steps:
# Delete the gateway.* certs
sudo rm /var/opt/magma/certs/gateway.*
# Restart the magma services
sudo service magma@* stop
sudo service magma@magmad restart
After this validate the status of the control_proxy service:
sudo service magma@control_proxy status