The goal of this guide is to quickly bootstrap R Shiny on an Amazon AWS EC2 instance. We will also walk through a recommended workflow using Github for rapid development on a local machine and the EC2 server instance.

This is an opiniated guide created for the following software versions:
Ubuntu: 14.04 LTS
R: 3.1.2
shiny-server: 1.3.0.403
For other software versions, please make sure to check the version numbers used in the installations (e.g. see Install Shiny Server section on installing different versions of shiny-server).
- Launch EC2
- Register Key Pair
- Create and enable swap file
- Install R
- Install R Packages
- Install Shiny Server
- Install Git
- Workflow Overview
- Problematic Packages
- Examples
- Resources
-
Click on
Compute > EC2(near the top left of the screen) and click theLaunch Instancebutton in theCreate Instancesection of the page. -
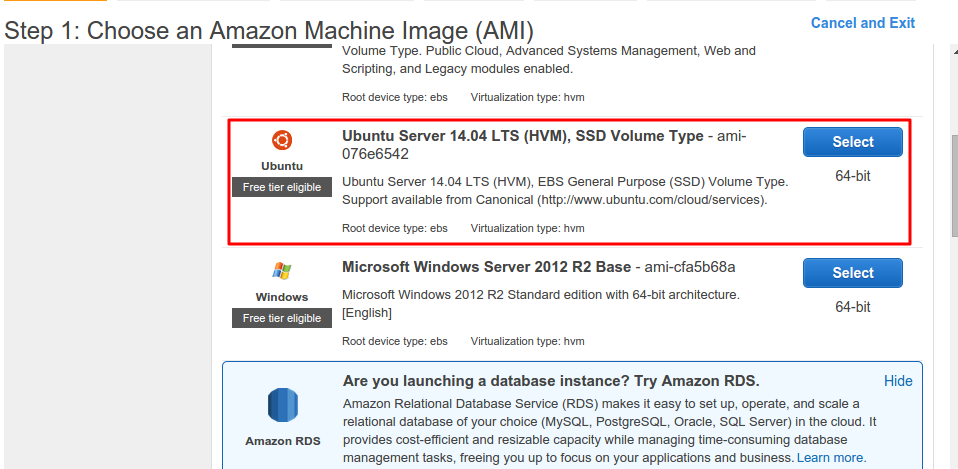
We are now in the AMI (Amazon Machine Image) interface. Select
Ubuntu Server 14.04 LTS. -
We will choose the default
t2.microinstance. Accept all the default settings for the next few steps:- Click
Next: Configure Instance Details - Click
Next: Add Storage - Click
Next: Tag Instance - Click
Next Configure Security Group
- Click
-
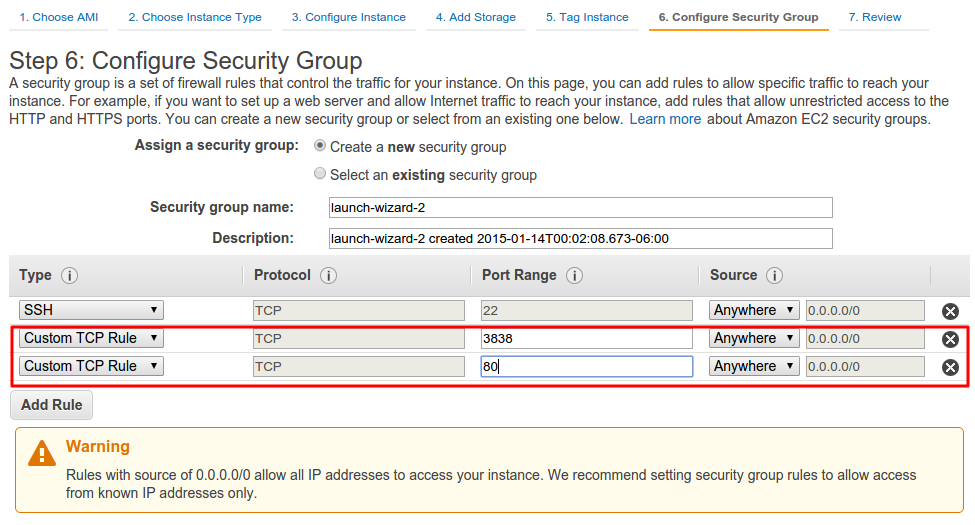
When we arrive to
Configure Security Group, we will need to add a few more security groups to open our EC2 instance to the world when we later build applications with Shiny. -
Add the following rules using the
Add Rulebuttons. This registers and opens the ports3838and80that Shiny will use later. By default, Shiny will listen on the3838port, but keeping the default HTTP listening port80open is always a useful option (In the Install Shiny Server section, we go through changing theshiny-serverconfigurations to listen on the default80port, which removes the need to specify a port number in your URL). -
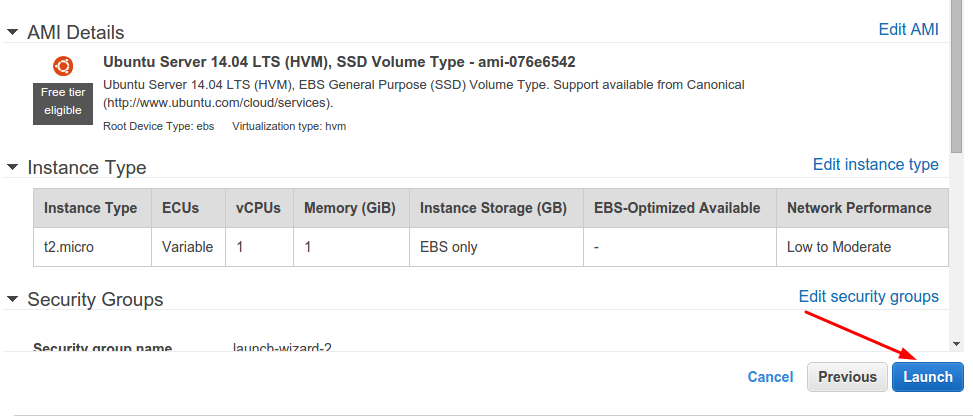
We are ready to launch our EC2 instance now.
-
Click on the
Review and Launchbutton, andLaunchyour instance!
-
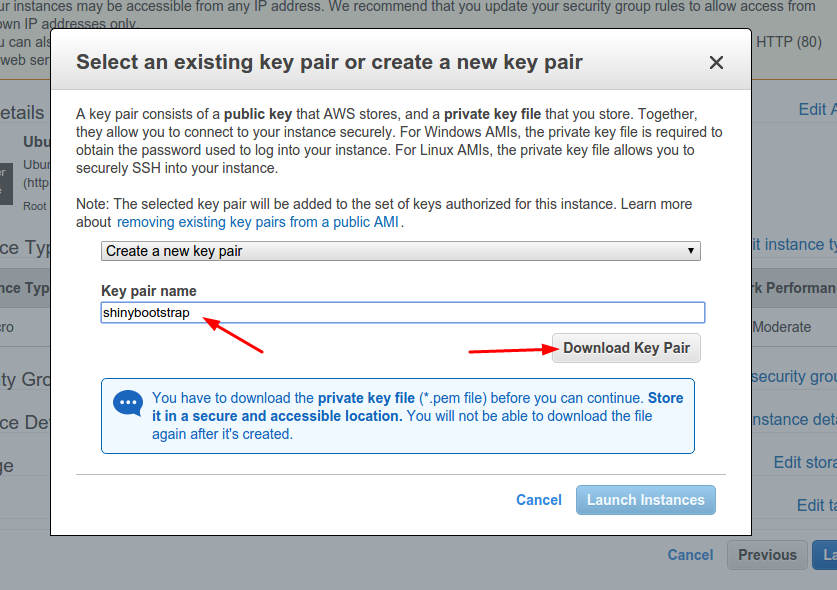
With our EC2 instance set up, we need to register the key provided to us from Amazon with our local machine.
-
Amazon will prompty you to create a new key pair. For this guide, we shall name the keypair
shinybootstrap. -
Download the
shinybootstrap.pemkey pair. We recommend that you place yourshinybootstrap.pemkey pair in a safe folder. Ekuns has provided a great reuseable and general tip on setting up and managingsshconnections in general.-
Copy the
shinybootstrap.pemkey into the~/.sshfolder -
Create and edit the file using a text editor in
~/.ssh/config(config is the filename)Host * ServerAliveInterval 240 Host aws-shiny HostName public_dns_name User ubuntu IdentityFile ~/.ssh/aws-shiny.pem ForwardX11 yes ForwardX11Trusted yes -
where
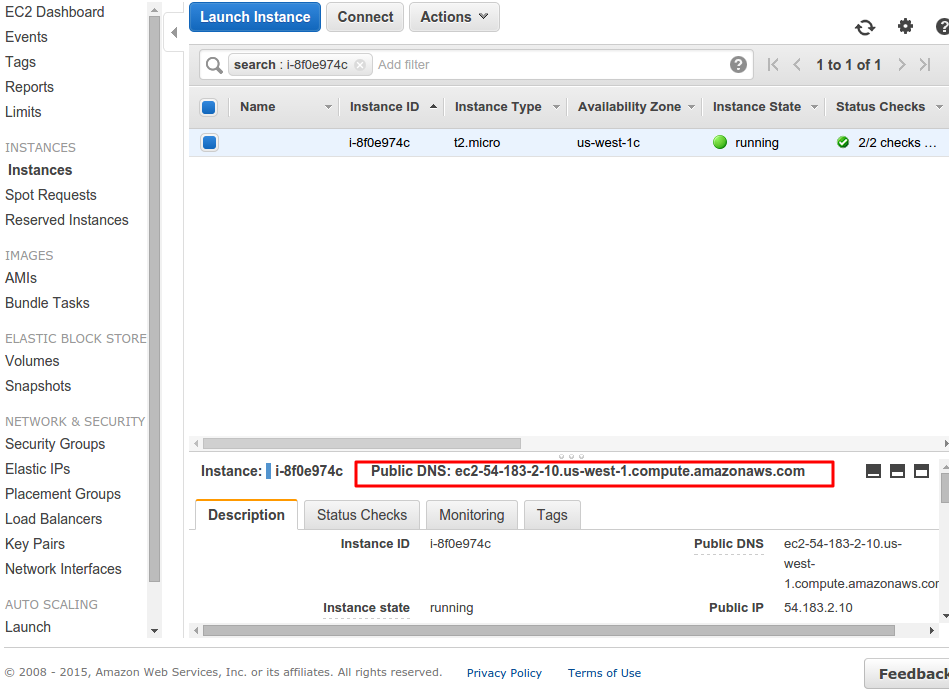
aws-shinyis the alias hostname you are providing andpublic_dns_nameis the name of your EC2 instance e.g.ec2-54-183-2-10.us-west-1.compute.amazonaws.comor the public IP itself54.183.2.10 -
Restart your terminal and you can now access your ubuntu EC2 server using:
ssh aws-shiny -
NOTE: The public DNS name and public IP may not be static/permanent, e.g. their values can change when
shiny-serverrestarts. For a full permanent solution to creating abash_alias, you would need to create an Elastic IP (but we will defer that for the readers to the Amazon guide if readers wish to research the details).
-
-
This step is necessary when running on a T2.mirco EC2 instance. You won't be able to install certain R packages (e.g.
dplyr,tidyr) without the additional allocated memory from the swap -
First we need to create and enable the swap file:
sudo fallocate -l 1G /swapfile
sudo chmod 600 /swapfile
sudo mkswap /swapfile
sudo swapon /swapfile
-
Next, we need to make sure that the swap file is enabled even after rebooting the system
-
Edit the `fstab``file with root privileges in your text editor:
sudo nano /etc/fstab
-
At the bottom of the file, you need to add a line that will tell the operating system to automatically use the file you created:
/swapfile none swap sw 0 0 -
Save and close the file when you are finished.
-
Phew! The tough parts are over, we can now move onto installing R in our EC2 instance!
-
First, create a superuser root password by entering a password in the EC2 command line.
sudo password root
su
-
Update your barebones EC2 virtual machine and install R:
sudo apt-get update
sudo apt-get install r-base-dev
sudo apt-get install libcurl4-openssl-dev
-
R is now successfuly installed!
-
Base R is argubly boring, so let's get started with installing a few important packages,
shinybeing an obviously shiny option. (while installing these packages, make sure you are insumode and I highly recommend installing them from the0-CloudCRAN repository) -
From your EC2 command line:
R       # enter the R console

install.packages("shiny")
install.packages("ggplot2")
q()         # quit R
-
A few other packages are highly recommended but you might encounter issues installing certain packages due to memory limitations available on the EC2 instance or missing libraries in our EC2 instance. For more details, please refer to the Problematic Packages section for a brief outline.
-
Other than that, you can come back anytime in the future to install R-packages by logging in with
suand installing R packages via the command line.
-
shinyrequires a server to run. The next step is to setupshiny-serverin our EC2 instance. -
Run the following commands in EC2:
sudo apt-get install gdebi-core
wget http://download3.rstudio.org/ubuntu-12.04/x86_64/shiny-server-1.3.0.403-amd64.deb
sudo gdebi shiny-server-1.3.0.403-amd64.deb
-
NOTE: You can install a different version of
shiny-serverin the above command prompt by adjusting theshiny-server-version_numberin thewgetandgdebicommands above. You can check for the latest versions of RStudio shiny-server on the official site. -
OPTIONAL: Change the listening port from
3838to default80-
shiny-serverby default runs applications on the URL and port:http://domain:3838/. We can take the time to make an easy change to theshiny-serverconfigfile to listen to the default port at80. This will allow our future apps to be accessed without specifying a port number by simply going tohttp://domain/ -
Execute the following commands in your EC2 instance:
cd /etc/shiny-server/ sudo nano shiny-server.conf -
At this point, you can use a text editor (unfortunately we can only use CLI and non-GUI text editors) to change the line
listen 3838;tolisten 80; -
Makes sure to save the changes and you can now access your shiny instances without specifying the
3838port number!
-
-
And we're done!
-
gitis probably one of the greatest creations and tools that you can use in your life, so it's good to include it in our EC2 instance. -
Installing
gitis as simple as typing:sudo apt-get install git
-
gitis very critical in our Shiny EC2 workflow. If you are not familiar with usinggit, here are some great resources to get on speed:
-
A big part of the EC2 R Shiny workflow is to develop with RStudio on your local machines and use Github as a repository station for transferring data between your local machine and EC2 instance. Make sure that you are familiar with the basic
gitcommands:pull,push,clone. It's going to be a big part of the development cycle. -
The following diagram outlines the overall workflow of the EC2 R Shiny workflow:
-
Workflow Summary:
- Develop on your local machine with RStudio.
- Whenever you are ready to show your work to the world, you would
git pushyour changes to your Github repository. - Initiate your EC2 instance with the same codebase on Github by using
git cloneinto/srv/shiny-server/(this is the folder whereshiny-serverserves your application). - If there are changes to be made to your app, repeat steps 1 and 2 to
git pushupdates to Github from your local machine, and then perform agit pullin your EC2 instance to update your application in EC2.
-
Since our EC2 instance is completely barebones, installing various packages might be problematic due to a lack of libraries that EC2 comes with.
-
My recommendation is to do searches on Stackoverflow and Google using keywords such as
EC2,package-name,installation,R. -
You could run into issues with missing Python libraries and version requirements for R and various packages, but most of them can be solved by searching on Stackoverflow and Google.
-
Stackoverflow + Goole are most definitely the best teachers and guides out there for resolving problematic packages. My job here is to just inform on some of the issues you may encounter :)
Here are some project examples of Shiny EC2 instances that I have built and their respective Github codebase.
- State Crime Rates (EC2 | Github)
- Labor Force Statistics (EC2 | Github)
- Box Office Mojo (EC2 | Github)
- Power to Choose (EC2 | Github)
This guide would not be possible without the works and guides provided by previous people. I'm listing some additional resources that are helpful for the general audience. Please contact me if there are any issues/corrections with this guide. Thank you!
-
Shiny AWS EC2 Guides:
-
Digital Ocean Guides
-
Other resources: