NOTE: the MIT license of this repo means all individual resources made by myself, the content of the tutorial and the example codes is licensed under MIT. All third-party opensource projects, upstream source codes and patches to other opensource projects will/should follow their own LICENSE.
PIC (usually pronounced as "pick") is a family of microcontrollers made by Microchip Technology, derived from the PIC1650 originally developed by General Instrument's Microelectronics Division. The name PIC initially referred to Peripheral Interface Controller, and is currently expanded as Programmable Intelligent Computer. The first parts of the family were available in 1976; by 2013 the company had shipped more than twelve billion individual parts, used in a wide variety of embedded systems.
PIC micro chips are designed with a Harvard architecture, and are offered in various device families. The baseline and mid-range families use 8-bit wide data memory, and the high-end families use 16-bit data memory. The latest series, PIC32MZ is a 32-bit MIPS-based microcontroller. Instruction words are in sizes of 12-bit (PIC10 and PIC12), 14-bit (PIC16) and 24-bit (PIC24 and dsPIC). The binary representations of the machine instructions vary by family and are shown in PIC instruction listings.
For more info, please refer to: https://en.wikipedia.org/wiki/PIC_microcontrollers.
MicroChip does not provide a 'free,full-feature' compiler for 8-bit PIC, even not provide a 'close-source, full-feature' compiler. the offcial MPLABX IDE use XC8 compiler, and with a free license, you won't get the best optimizations (up to and include O2 level), that means you have to buy a pro license for better code optimizations or use opensource toolchain.
Anyway, here is tutorial about opensource toolchain of 8-bit PIC (pic12/16/18 series), if you wish to get a feel of PIC MCU.
Thanks for opensource community, we have completely open source toolchain (but without debugging support) for PIC 8-bit MCU .
- a PIC12/PIC16/PIC18 dev board
- If you need to buy new one, I recommend to check the lists(from sdcc/gcbasic/jal/pk2cmd-minus) that the opensource toolchain can supported.
- 'Curiosity nano PIC board' from Microchip have an nEDBG debuger on board, it can be programmed with 'pymcuprog'.
- In this tutorial, I will use PIC16F877, PIC16F690 (HVP), PIC16F1823(1825) and PIC18F45K20 as example, also use curiosity nano DM164150 with PIC18F57Q43 to demo 'pymcuprog'
- PICKIT 2 or 3 as programmer
- Prefer PICKIT2 or clones for reliablity and price. with 'pk2cmd-minus', nearly all 8-bit PIC MCU can be supported by PICKIT2 or 3. Please check the list to verify your PIC part is supported or not
- Arduino uno or nano as programmer
- You don't have to buy a PICKIT if your MCU supported by a-p-prog, please check the device list of 'a-p-prog' project.
- Compilers:
- gputils/SDCC for C
- GCBasic for basic
- JALV2 for jal
- SDK: integrated with compilers
- Programming tool:
- pk2cmd-minus with PICKIT2 or 3, recommended
- pymcuprog with nEDBG
- a-p-prog with Arduino (only work with some LVP parts)
- Debugger: NO opensource software solution
NOTE: PIC part of SDCC is un-maintained now, and maybe lack of new model support. It's not the best choice of OpenSource PIC toolchain.
Most Linux distributions shipped SDCC in their repositories. You can install it by yum or apt.
If you really want to build it yourself, at least you need make/bison/flex/libtool/g++/boost development package/zlib development package/etc. installed, and the building process is really simple:
./configure --prefix=<where you want to install SDCC>
make
make install
If the prefix does not set to standard dir (such as '/usr' or '/usr/local'), you need add the <prefix>/bin dir to PATH env.
Greate Cow BASIC is a robust and fully functional compiler and assembler for Microchip PIC or Atmel AVR 8-bit microcontroller. It seems have active development and better support than SDCC PIC part, and also support more PIC MCU model than SDCC by default.
GCBASIC can be downloaded from https://sourceforge.net/projects/gcbasic/files/GCBasic%20-%20Linux%20Distribution/
The 'GCB@Syn.rar' password is 'GCB', as mentioned in FAQ:
Why is the rar File for Linux encrypted?
There are software portals that do nothing other than catalog and provide free software for download. That's not really a big deal, but they are often out of date and offer ancient versions. In addition, they earn advertising revenue that does not benefit the project. Btw. the password is GCB
To build gcbasic, you need to have freebasic installed. Build and install gcbasic as
cd GreatCowBASIC
# If you use gcbasic-0.99.01, a patch is needed.
cat gcbasic-0.99.01-build-fix.patch|patch -p1
cd sources/linuxbuild
./install.sh build
sudo ./install.sh install
A patch is needed to build gcbasic-0.99.01 successfully, and the patch 'gcbasic-0.99.01-build-fix.patch' provided in this repo. If you use the latest version of gcbasic, please omit this patch step.
After installation, you should have gcbasic command on your PATH.
By the way, the source file suffix of gcbasic is 'gcb', it can not be detect automatically as basic source file by editors. for vim, you can add
autocmd BufNewFile,BufRead *.gcb set syntax=basic
to ~/.vimrc.
JALV2 is a high level language designed to hide the general nuisance of programming a MicroChip PIC processor, The language is loosely based on Pascal. JALV2 and jallib is under active development.
the source code of JALV2 compiler can be downloaded from https://github.com/jallib/jalv2compiler.
building process is very simple:
git clone https://github.com/jallib/jalv2compiler.git
cd jalv2compiler

# fix permission issues
chmod +x src/jal/build.sh
chmod +x src/make_64

# avoid treat warnings as errors for some new gcc version.
sed -i 's/-Werror//g' src/Makefile.inc

# build
cd src
./make_64

# install
sudo install ../bin/jalv2-x86-64 /usr/bin/jalv2
For 32bit linux, you need use make_32 instead of make_64.
After building successfully, the JALV2 compiler bin/jalv2-x86-64 will be generated, It's only the compiler, you still need the 'jallib' (include a lot of device include files) installed.
By the way, there are some pre-generated documents in documentation/external dir, include 'An Introduction & Guide to JALV2'(jalv2.pdf), 'JALv2 Compiler Options'(jalv2opt.pdf), 'JALv2 PRAGMAs'(jalv2pragma.pdf), you can take them as reference to learn JALV2. And there is also a tutorial of JALV2 from official site.
Jallib can be downloaded from https://github.com/jallib/jallib. But due to the building process, I suggest you download the release archive from jal official site, the release archive also contains all source codes, but flatten the library files, sample files into one dir:
wget http://www.justanotherlanguage.org/sites/default/files/ftp_server/builds/release/jallib-1.7.0.zip
sudo mkdir /opt/jallib
sudo unzip jallib-1.7.0.zip -d /opt/jallib
The release archive (even the git repo) contains prebuilt binaries, delete all of them and use the compiler built from source above:
sudo rm /opt/jallib/compiler/*.exe
sudo rm /opt/jallib/compiler/jalv2-osx
sudo rm /opt/jallib/compiler/jalv2-i686
sudo rm /opt/jallib/compiler/jalv2-x86-64
sudo rm -r /opt/jallib/compiler/other_versions
Now, the jalv2 compiler installed at /usr/bin/jalv2 and jallib installed at /opt/jallib.
PicPas is multi-platform Pascal cross-compiler and IDE for Microchip 8 bits PIC microcontrollers, written in Lazarus, which generates executable code for Baseline and Mid-range PIC microcontrollers. But There is not yet support for Enhanced Mid-range, or the PIC18 High-preformance families of PIC.
Please refer to:
https://github.com/t-edson/PicPas
The essential headers with pre-defined registers and libs already shipped with SDCC. Generally it divided into two sets: 'pic14' and 'pic16'.
It's a little bit confusing about the 'pic14' and 'pic16' name. Actually, 'pic14' means '14bit instruction set' and 'pic16' means '16bit instruction set'. thus PIC12 and PIC16 series MCU should use 'pic14' sdk set and PIC18 series should use 'pic16' sdk set.
Here is example code to blink led connect to RC0 of PIC16F1823 breakout board. Usually to blink a led with all sort of MCUs should follow below steps:
- Setup config bits correctly, such as freq and watchdog timer, etc.
- Config specific pin as digital output.
- Toggle the pin and delay some time in a loop.
// blink.c
// blink the led connect to RC0 of PIC16F1823

#include <pic14regs.h>

#define LED PORTCbits.RC0

// disable watchdog timer
unsigned int __at (_CONFIG1) __configword = _WDTE_OFF;

// not accurate, just delay some time
void delay(unsigned int count)
{
  unsigned int i;
  for (i = 0; i < count; i++)
    __asm nop __endasm;
}

void main(void)
{
  // portc as digital
  ANSELC = 0;

  // portc as output
  TRISC = 0;
  // or just set rc0 as output
  // TRISC0 = 0;

  // led on
  LED = 1;

  while (1) {
    // toggle led
    LED = ~LED;
    // delay a while
    delay(3000);
  }
}
Build it as:
sdcc --use-non-free -mpic14 -p16f1823 blink.c
Because some PIC header files have a special Microchip license, the arg '--use-non-free' is essential to build PIC codes.
the 'pic14regs.h' header have some macros defined to find the correct header should used with pic model specified by '-p' arg, it can be replaced by '#include <pic14/pic16f1823.h>'.
There are some warning messages when building blink demo code, looks like:
blink.asm:93:Message[1304] Page selection not needed for this device. No code generated.
blink.asm:150:Message[1304] Page selection not needed for this device. No code generated.
blink.asm:152:Message[1304] Page selection not needed for this device. No code generated.
message: Using default linker script "/usr/share/gputils/lkr/16f1823_g.lkr".
warning: Relocation symbol "_cinit" [0x0000] has no section. (pass 0)
warning: Relocation symbol "_cinit" [0x0004] has no section. (pass 0)
warning: Relocation symbol "_cinit" [0x0018] has no section. (pass 0)
warning: Relocation symbol "_cinit" [0x001C] has no section. (pass 0)
warning: Relocation symbol "_cinit" [0x0000] has no section. (pass 0)
warning: Relocation symbol "_cinit" [0x0004] has no section. (pass 0)
warning: Relocation symbol "_cinit" [0x0018] has no section. (pass 0)
warning: Relocation symbol "_cinit" [0x001C] has no section. (pass 0)
These msgs are generated by 'gputils' and can be ignored.
After build successfully, a 'blink.hex' file will be generated in currect dir.
By the way, it's not neccesary to look into the codes seriously at this time. every PIC model has it's own register set, although most of them are identical and most of the codes can be re-used, but the code you write for a model more likely is not compatible with other models, it always require some major or minor changes to work.
Below is a gcbasic example to blink led:
' CJMCU PIC16F690:
' onboard LED connect to PortA.2

' CJMCU PIC16F1823:
' onboard LED connect to PortC.0

' Curiosity Nano DM164150 with PIC18F57Q43:
' onboard LED connect to PortF.3

' DM164130-4 - PICKIT 44-PIN DEMO BOARD (PIC18F45K20)
' onboard LED connect to PortD.7

' ----- Configuration
#CHIP 16f690
'#CHIP 16f1823
'#CHIP 18f45k20
'#CHIP 18f57q43

Do Forever
    ' Lighten LED for 100ms

    ' for CJMCU PIC16F690
    PulseOut PortA.2, 100 ms

    ' for CJMCU PIC16F1823
    'PulseOut PortC.0, 100 ms

    ' for Curiosity Nano DM164150
    'PulseOut PortF.3, 100 ms

    ' for DM164130-4 - PICKIT 44-PIN DEMO BOARD (PIC18F45K20)
    'PulseOut PortD.7, 100 ms

    'Then wait 900 milliseconds after LED goes off:
    Wait 900 ms

Loop
Build it as:
makehex.sh blink.gcb
A 'blink.hex' will be generated in currect dir.
Actually, Jallib is the 'SDK' of JALV2, it contains a lot of pre-defined device files and we already installed it before.
Below is a JALV2 example for PIC16F1823 to blink led connect to pin A.2, it's modified from '16f1823_blink_intosc.jal' in 'jallib/sample` dir:
include 16f1823                     -- target PICmicro
--
-- This program uses the internal oscillator at 4 MHz.
pragma target clock    4_000_000       -- oscillator frequency
--
pragma target OSC      INTOSC_NOCLKOUT           -- internal oscillator
pragma target PLLEN    DISABLED                  -- PLL off
pragma target CLKOUTEN DISABLED                  -- no clock output
pragma target WDT      DISABLED                  -- watchdog
pragma target BROWNOUT DISABLED                  -- no brownout reset
pragma target FCMEN    DISABLED                  -- no clock monitoring
pragma target IESO     DISABLED                  -- no int/ext osc switching
pragma target LVP      ENABLED                   -- low voltage programming
pragma target MCLR     EXTERNAL                  -- external reset
--
-- The configuration bit settings above are only a selection, sufficient
-- for this program. Other programs may need more or different settings.
--
OSCCON_SCS = 0                      -- select primary oscillator
OSCCON_IRCF = 0b1101                -- 4 MHz
OSCCON_SPLLEN = FALSE               -- software PLL off
--
enable_digital_io()                 -- make all pins digital I/O
--
-- A low current (2 mA) led with 2.2K series resistor is recommended
-- since the chosen pin may not be able to drive an ordinary 20mA led.
--
alias  led       is pin_A2          -- alias for pin with LED
--
pin_A2_direction = OUTPUT
--
forever loop
   led = ON
   _usec_delay(100_000)
   led = OFF
   _usec_delay(400_000)
end loop
Build it as:
jalv2 blink.jal -s /opt/jallib/lib
The output looks like:
jal jalv2compiler-jalv25r6
generating p-code
11995 tokens, 112596 chars; 2404 lines; 3 files
generating PIC code pass 1
generating PIC code pass 2
7 branches checked, 0 errors
27 data accesses checked, 0 errors
6 skips checked, 0 errors
writing result
Code area: 67 of 2048 used (words)
Data area: 4 of 128 used
Software stack available: 91 bytes
Hardware stack depth 0 of 16
0 errors, 0 warnings
A 'blink.hex' will be generated in currect dir.
PICKIT2 with pk2cmd-minus can support programming almost all 8-bit PIC MCU
pk2cmd is the official open-source program tool work with PICKIT2, updates by Miklós Márton to add support for PICkit3, the support for SPI-type MSB1st -family PICs is based on work by bequest333.
'pk2cmd minus' developed by kair has support for 1203 parts, supports nearly all 8-bit PIC microcontrollers.
For more info, please refer to http://kair.us/projects/pickitminus/.
I make a fork to improve the installation process and other minor changes:
git clone https://github.com/cjacker/pk2cmd-minus
cd pk2cmd-minus
make
sudo make install
Then you should have 'pk2cmd' and 'pk2-device-file-editor' in your PATH, other resources will be installed to proper dir automatically.
To run 'pk2-device-file-editor', you should have mono and mono-basic installed.
If you want to build it from the upstream source code:
mkdir build && cd build
wget http://kair.us/projects/pickitminus/PK2CMD_SourceV1_23_04.zip
wget https://raw.githubusercontent.com/cjacker/opensource-toolchain-pic/main/pk2_devicefile_osfile_paths.patch
wget https://raw.githubusercontent.com/cjacker/opensource-toolchain-pic/main/60-pickit.rules

unzip PK2CMD_SourceV1_23_04.zip

# apply global database file path patch
cat pk2_devicefile_osfile_paths.patch | patch -p1 -d PK2CMD_SourceV1_23_04

cd PK2CMD_SourceV1_23_04/pk2cmd/pk2cmd
make linux
cd ../../../

# install cmd
sudo install -m0755 PK2CMD_SourceV1_23_04/pk2cmd/pk2cmd/pk2cmd /usr/bin

sudo mkdir -p /usr/share/pk2

# install device database
sudo install -m0644 PK2CMD_SourceV1_23_04/pk2cmd/pk2cmd/PK2DeviceFile.dat /usr/share/pk2/

# install adapter firmware
sudo cp PK2CMD_SourceV1_23_04/pk2cmd/release/*.hex /usr/share/pk2/

# install udev rule to avoid using sudo
sudo install -m0644 60-pickit.rules /etc/udev/rules.d/
If you want to edit the 'PK2DeviceFile.dat' to add new devices, you can use device file editor created by dougy83.
The PICKIT2 6pin header's pin out as:
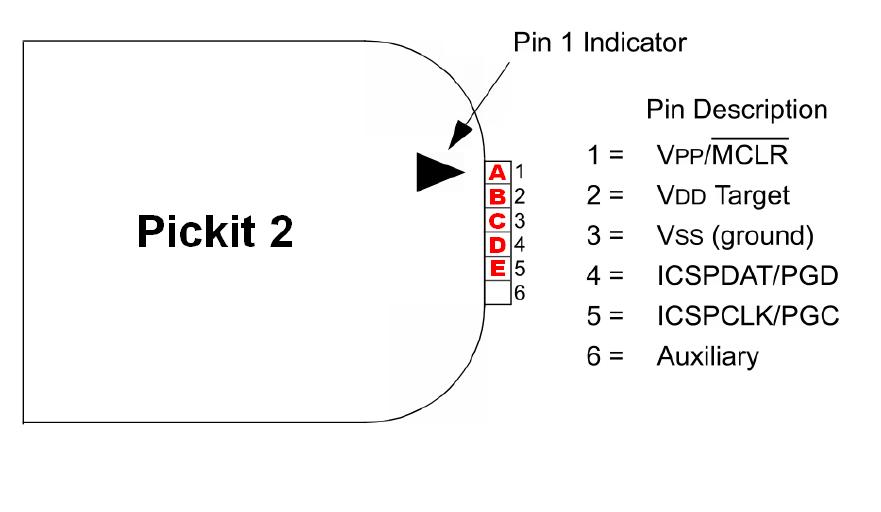
Refer to part's datasheet to connect pins respectively, usually the 6th pin is not used.
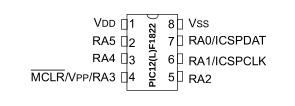
For example, the PIC16F1823 pinout is:
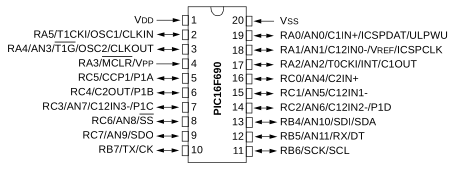
and the PIC16F690 pinout is:
To update PICKIT2 firmware:
$ pk2cmd -D/usr/share/pk2/PK2V023200.hex
Downloading OS...
Verifying new OS...
Resetting PICkit 2...
OS Update Successful.

Operation Succeeded
NOTE there is no 'whitespace' between '-D' and '/usr/share/pk2/PK2V023200.hex', and this firmware is for PICKIT2, you need to find corresponding firmware for PICKIT3 in '/usr/share/pk2' dir.
To detect target device:
$ pk2cmd -P
Auto-Detect: Found part PIC16F690.

Operation Succeeded
To erase target device:
$ pk2cmd -P PIC16F690 -X -E
Erasing Device...

Operation Succeeded
Note that the device name from the auto-detection is now placed after the -P argument, -X tells the PICKit2 to "Use VPP first Program Entry Method", you may omit it. -E tells pk2cmd to erase the connected PIC.
To program target device:
$ pk2cmd -PPIC16F690 -M -F blink.hex -R -T
PICkit Program Report
21-6-2022, 11:39:46
Device Type: PIC16F690

Program Succeeded.

Operation Succeeded
-M tells pk2cmd to actually program the PIC. -F tells pk2cmd which file to use. The -M argument can actually also be either -MP, -ME, -MI or -MC to program only Program memory, EEPROM, ID memory or Configuration memory respectively but for most cases you will program the entire PIC using -M.
To verify:
$ pk2cmd -P PIC16F690 -Y -F blink.hex
PICkit 2 Verify Report
21-6-2022, 11:40:58
Device Type: PIC16F690

Verify Succeeded.

Operation Succeeded
The argument -Y tells pk2cmd to verify the PIC's memory with the HEX file given by -F. Again the -Y argument can address different areas just as the -M argument by setting either -YP, -YE, -YI or -YC to verify a specific region only.
To release MCLR:
$ pk2cmd -P PIC16F690 -R
By default, PICKIT2 doesn't supply power to target device, you can turn on the 'VDD' as:
To power on target device
$ pk2cmd -P PIC16F690 -T

Operation Succeeded
To power off
$ pk2cmd -P PIC16F690

Operation Succeeded
Please try to run pk2cmd directly for more help infomation.
a-p-prog is a 8-bit PIC programmer built around AVR/Arduino platform, if you have a Arduino UNO or NANO, then you can use it as 8bit PIC programmer.
It support a lot of 8-bit LVP PIC models and very easy to build.
Here I make a fork to improve the usablity and add PIC16F1823 support, you can download and built it yourself:
git clone https://github.com/cjacker/a-p-prog.git
cd /a-p-prog/sw
make -f Makefile.linux
sudo make install PREFIX=/usr -f Makefile.linux
pp3 programmer and the device database will be installed.
Then prepare a UNO or NANO and upload the 'pp' sketch to it, you need to have 'arduino-cli' installed:
cd fw/pp
make upload TARGET=uno -f Makefile.linux
For Arduino NANO, change 'TARGET=uno' to 'TARGET=nano'.
If you do not have 'arduino-cli' installed, you can use arduino IDE to open the 'pp.ino' and upload it.
Before wire it up to the target PIC development board to program, you need to make sure:
-
Check the datasheet to identify which pin is the 'ICSPDAT', 'ICSPCLK' and 'MCLR' pin.
- ISCPDAT (data) also called 'PGD' pin
- ICSPCLK (clock) also called 'PGC' pin
- MCLR is the RESET pin
-
Check the datasheet to find out Whether the target MCU is 5v voltage tolerance or not.
- If the target is NOT 5v tolerance, you should NOT wire up the VCC line to Arduino, and should supply power seperately to the target board.
- You also need to use 1K resistors between Arduino and PIC target board.
Since PIC16F1823 is 5v voltage tolerance, we can use the 5v pin of Arduino to supply power directly.
Wire it up as:
+--------------+      +--------------+       +----------------+
|              |      |    Arduino   |       |   PIC16F1823   |
|              |      |        (5V)  +-------+ (VCC)          |
|              |      |              |       |                |
|              |      |        (GND) +-------+ (GND)    (RC0) +-------(Resistor)---+
|              | USB  |              |       |                |                    |
|      PC      +------+        (A3)  +-------+ (MCLR)         |                    |
|              |      |              |       |                |                  (LED)
|              |      |        (A1)  +-------+ (PGD)          |                    |
|              |      |              |       |          (GND) +--------------------+
|              |      |        (A0)  +-------+ (PGC)          |
|              |      |              |       |                |
+--------------+      +--------------+       +----------------+
And program it:
pp3 -c /dev/ttyUSB0 -t 16f1823 blink.hex
The output looks like:
PP programmer, version 0.99
Sleeping for 2000 ms while arduino bootloader expires
Device ID: 2720
Programming FLASH (4096 B in 128 pages)
Programming config
Verifying FLASH (4096 B in 128 pages)
Verifying config
After programming successfully, the LED should blink.
These years, MicroChip officially provide some Curiosity Nano boards of PIC or AVR, it has an onboard nEDBG debugger integrated and can be used as programmer and debugger with MPLABX directly.
With such a board, you do NOT need to buy a PICKIT, it can be programmed with 'pymcuprog' directly.
I have a DM164150 CNANO baord with PIC18F57Q43(by the way, it can be supported with pk2cmdminus and PICKIT2), and it can not supported by SDCC (device headers is not include in SDCC), thus I use the gcbasic to build a blink demo for it (refer to above gcbasic section for example code).
After 'blink.hex' generated, 'pymcuprog' from MicroChip can be used to program it.
The installation of pymcuprog is very simple:
pip install pymcuprog
After pymcuprog installed, connect Curiosity Nano PIC board to PC via USB cable and run:
pymcuprog ping
The output looks like:
Connecting to anything possible
Connected to nEDBG CMSIS-DAP from Microchip (serial number MCHP3290041800001449)
Debugger firmware version 1.22.73
Debugger hardware revision 0
Device mounted: 'pic18f57q43'
No device specified.  Using on-board target (pic18f57q43)
Unable to start session: Unable to setup stack using the given packpath: 'None'
Note the last line Unable to start session: Unable to setup stack using the given packpath: 'None', you have to install MPLABX IDE and find the corresponding pack of your MCU from it. for 'pic18f57q43', the pack located at /opt/microchip/mplabx/v6.00/packs/Microchip/PIC18F-Q_DFP/1.13.211/scripts/pic18f57q43.
Re-run with this packpath:
pymcuprog ping -p /opt/microchip/mplabx/v6.00/packs/Microchip/PIC18F-Q_DFP/1.13.211/scripts/pic18f57q43
the output looks like:
Connecting to anything possible
Connected to nEDBG CMSIS-DAP from Microchip (serial number MCHP3290041800001449)
Debugger firmware version 1.22.73
Debugger hardware revision 0
Device mounted: 'pic18f57q43'
No device specified.  Using on-board target (pic18f57q43)
Pinging device...
Ping response: 74C0
Done.
Program it:
pymcuprog write -p /opt/microchip/mplabx/v6.00/packs/Microchip/PIC18F-Q_DFP/1.13.211/scripts/pic18f57q43 -f blink.hex
The output as:
Connecting to anything possible
Connected to nEDBG CMSIS-DAP from Microchip (serial number MCHP3290041800001449)
Debugger firmware version 1.22.73
Debugger hardware revision 0
Device mounted: 'pic18f57q43'
No device specified.  Using on-board target (pic18f57q43)
Pinging device...
Ping response: 74C0
Writing from hex file...
Writing flash...
Writing flash...
Writing flash...
Writing config_words...
Done.
There are a lot of opensource (both hardware and software) program solutions for PIC, list some of them here for your reference:
- http://hyvatti.fi/~jaakko/pic/picprog.html
- http://usbpicprog.org/
- https://github.com/rweather/ardpicprog
There isn't opensource debug software exist for PIC. you can use 'mdb' - the official pic debugger program of Microchip shipped with MPLABX IDE from command line, it's not opensource, please find out the usage by yourself.
And you can also have a try of picsim and picsimlab with very limited hardware support.