Using M5Stack ESP32 Ethernet Unit with POE M5Unit PoESP32
In this guide I'll walk you through the required steps to use a M5Stack ESP32 Ethernet Unit with POE (M5Unit-PoESP32) between a PowerMax/PowerMaster and Home Assisant.
The M5Stack PoESP32 Unit is an ESP32 Ethernet Unit that supports PoE (Power Over Ethernet). This module adopts an ESP32 as a built-in MAC and IP101G as a physical layer transceiver.
The unit has default firmware with ESP-AT that we will replace with ESPHome.
I'm not responsible for bricked devices, dead alarms or short circuits.
- You are choosing to make these modifications, please don't point the finger at me for messing up your device.
- Your Visonic Warranty will (possibly) be void if you tamper with any part of your device / software.
- More reliable than Wifi in unreliable locations
- It is supported by ESPHome
- Has a Serial UART onboard (for the RS232 panel connection)
- Only needs 1 external cable and is Powered over Ethernet (PoE)
- Provides an elegant and simple install, it fits neatly inside the alarm housing.
- It is fairly low cost but certainly not the cheapest option (~30 GBP)
- Requires additional equipment PoE power/switch. Unless you already have them!
- M5Stack ESP32 Ethernet Unit with PoE (M5Unit-PoESP32). Available from thepihut.com or other vendors
- M5Stack Grove2Dupont Conversion Cable. Available from thepihut.com or other vendors.
- A PoE switch or a PoE injector that supports 802.3AF. Available from amazon.co.uk
- USB to TTL/Serial Adapter. Many different models available, I tried several DSD Tech models but only had success after using this one amazon.co.uk
- Male to Female jumper wires. Many different oens available eg. amazon.co.uk
On Windows:
-
Install python. At the end of the install don't forget to tick
Add Python to the PATH - Install esphome
pip install -U esphome
On Mac:
brew install python
python3 -m pip install --upgrade pip
pip3 install -U esphome- Download visonic.yaml and secrest.yaml here
- Unzip the file
You only need to retain the following:
network_port: 10077              # The port that you connect the Visonic Integration to
panel_baud_rate: 9600            # The baud rate of the serial port on the alarm panel. As per the wiki
device_password: "123456789" # This is the password for the ESPHome API, please change it. You need this when you setup ESPHome in Home Assistantsubstitutions:
plug_name: "visonic"
esphome:
name: ${plug_name}
friendly_name: ${plug_name}
esp32:
board: m5stack-core-esp32
external_components:
- source: github://oxan/esphome-stream-server
# Enable logging
logger:
# Disable logging
logger:
level: DEBUG
baud_rate: 0 # disables logging to the serial UART (as we are using it for other things)
# Enable Home Assistant API
api:
password: !secret device_password
ota:
password: !secret device_password
uart:
id: uart_bus_visonic
baud_rate: !secret panel_baud_rate
tx_pin: 17
rx_pin: 16
stop_bits: 1
data_bits: 8
parity: NONE
debug:
direction: BOTH
dummy_receiver: false
stream_server:
id: my_stream
uart_id: uart_bus_visonic
port: !secret network_port
ethernet:
type: IP101
mdc_pin: GPIO23
mdio_pin: GPIO18
clk_mode: GPIO0_IN
power_pin: GPIO5
phy_addr: 1This is where things get a little bit tricky, unless you are an Octopus. You may also want to read the guidance here
- Disassemble the M5Unit-PoESP32
- Connect the pins on the M5Unit-PoESP32 to the USB serial adaptor (with the USB disconnected).

- Use your thumb to apply side pressure to the plug that goes into the poesp32 to ensure they make contact
- Use a finger to hold the fly lead on G0
- Use the rest of your fingers and spare hand to plug in the USB device
- Use your spare hand to run the esphome commands:
python -m esphome visonic.yaml run - Select/confirm the
COMport, ESPHome will then attempt to connect to the device - If you have done it correctly you should see
TXandRXflash and ESPHome should be logging out lots of positive messages - On completion, plug the M5Unit-PoESP32device into a network port with
POE, check it appears on the network.
- Connect the Grove2Dupont cable (Groove to female) to the POESP32 device
- Attach a network cable and place the M5Stack POESP32 device into the spare slot on the wall mount bracket, it is slightly too tigher but will just about fit
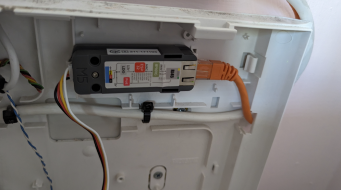
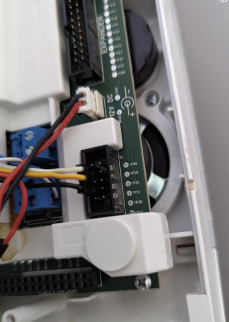
- Connect the white, yellow and black Grove2Dupont connectors to the 3 pins on the alarm. Tuck the red cable out of the way (not needed)
- You should end up with something like
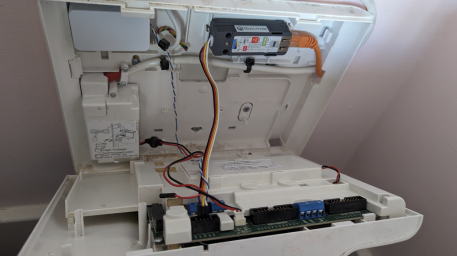
- Place the alarm back on the wall.
Note: If you have an issue with the Tamper Alarm that won't go away, remove the power supply to the Alarm along with the battery connection and then re-attach the device to the wall ensure you hold the bottom of the alarm while you screw it back in to ensure it doesn't come back.
- Navigate to Home Assistant and check that your new device has been detected by ESPHome.
- Install the custom integration "Visonic"
- Add the visonic integration and use Ethernet as the connection type:
- Use the IP address "network_ip" that you put in your secrets.yaml
- Use the port "network_port" that you put in your secrets.yaml
- This should create the alarm panel