This guide takes you through the process of deploying the NSX Application Platform. Depending on the infrastructure where you'll run NSX Application Platform we decided to have a vAPP with all VMs inside for vCenter and a second solution for vCLoud Director (vCD) deployment.
This release is for evaluation only, but later we may add some features to make it production ready.
Overview
Prerequsites
Setup NAPP vAPP in vCenter
- Install vAPP with CSI Provisioner
- Install vAPP with NFS Provisioner
- Start vAPP
- Watch the Setup Process
Setup NAPP APP in vCLoud Director aka OneCloud
Setting Up 3-worker node cluster for NSX Application Platform Advanced
Troubleshooting

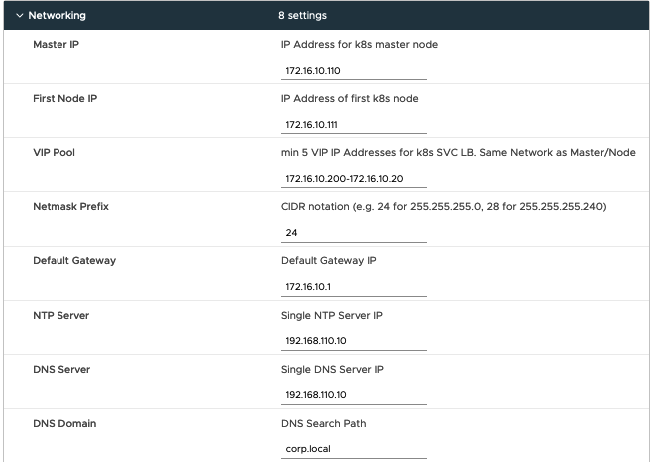
The vAPP will deploy the Blue boxes on the right side and they can be in the same network like DNS and NSX Manager, but they can also be in a different Network like in the picture above. The PodNetwork must have at least one /24 Network for each VM (master and node). So in our case we could also use as PodNet 172.25.0.0/23 because we have one Master and one Node. The Load Balancer IPs (VIP Pool) must be within the same subnet where master and node are connected.
Following prerequisites are needed
-
NSX Manager 3.2
-
DNS Server
Access to NSX Application Platform requires an exposed service from the kubernetes cluster. IP will be chosen from the Load Balancer Pool and a DNS Entry must exist BEFORE the deployment because NSX will ask the DNS Server which IP should be used for the Service.
In the picture above we create a LoadBalancer Pool with the IP addresses from 172.16.10.200-172.16.20.205. If we create a DNS entry like “napp.corp.local” we must point to one of the defined Addresses. (napp.corp.local=172.16.10.202). While the setupprocess NSX Manager will ask the DNS Server what IP Address is used for “napp.corp.local” and will create the Service IP in the K8S Cluster.
Worst Case Workaround: If there is no chance to create an DNS entry on the DNS Server for the NSX Application Platform, you must connect to the NSX Manager CLI via root and create an Host entry in the /etc/hosts.
-
68 Gigabyte RAM (4G Master Node / 64G Worker Node)
-
1 Terabyte Disk Drive
vSphere DRS must be enabled in the Cluster where you want to deply NAPP even if you have only one host in the cluster. Otherwhise you get the following deployment Error
- NAPP_VAPP can be deployed in a VLAN based DVPG or NSX VLAN/Overlay Segment. Default Gateway, DNS must work and internet connection must be possible.
NAPP needs inside Kubernetes a volume that support volume expansion. This feature allows to easily resize an existing volume by editing the PersistentVolumeClaim (PVC) object. There are some volumes available that supports volume expansion but unfortunately not the Local Storage. So, I decided to make two Version. One with the CSI Provisioner and another one with NFS Provisioner.
CSI Provisioner !!!RECOMENDED!!! The CSI Provisioner (high level) use the Storage that is attached to your vCenter and creates on demand virtual disk for Kubernetes. This is highly recommended (also in the NAPP Installation Documentation), but you need a user with the rights in vCenter to create virtual Disks.
NFS Provisioner If you are not able to access the vCenter with the needed permissions, a workaround is to use the NFS Provisioner. In this case the NFS Server is running on the first Kubernetes Node and all request to the Storage will be handled by the Kubernetes Node in addition to all the other Workloads. This impact the performance and the stability and should be only used for testing in small environments.
After you decided which Version to use, you can downlad the vAPP OVA.
Download vAPP OVA from releases If you would like to install only one Worker Node you only need to download the vAPP.ova. If you would like to install 3 Worker Nodes you need to download in addition also the node_app.ova.
Before we can install the vAPP we need to create a Storage Policy and tag the Storage in vCenter that should be used for the NAPP vAPP. Optional you can also create a new User in vCenter with only rights to manage the Storage (e.g. Storage Admin). The right settings for the Storage Admin can be found here -> https://docs.vmware.com/en/VMware-vSphere-Container-Storage-Plug-in/2.0/vmware-vsphere-csp-getting-started/GUID-0AB6E692-AA47-4B6A-8CEA-38B754E16567.html
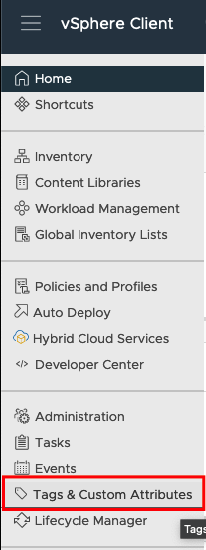
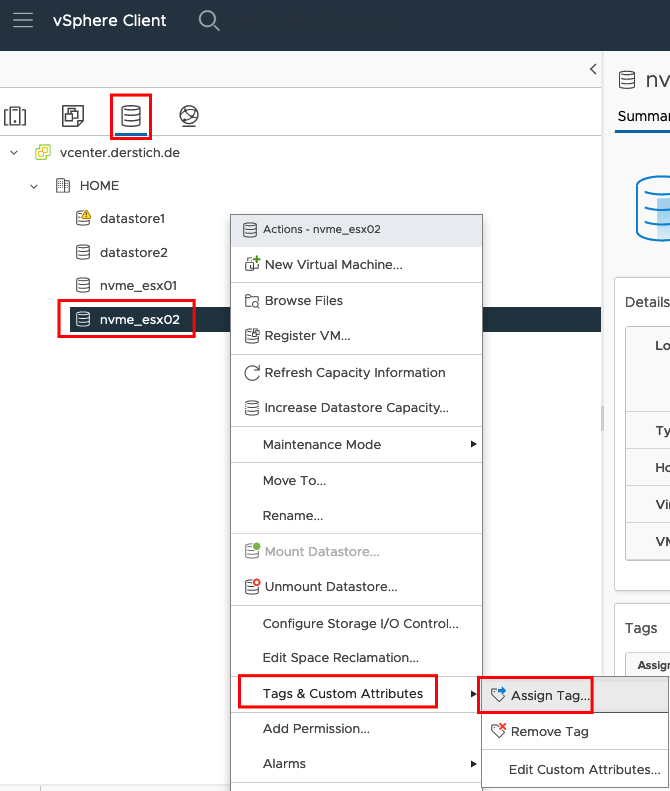
Login to vCenter and go to "Tags & Custom Attributes"
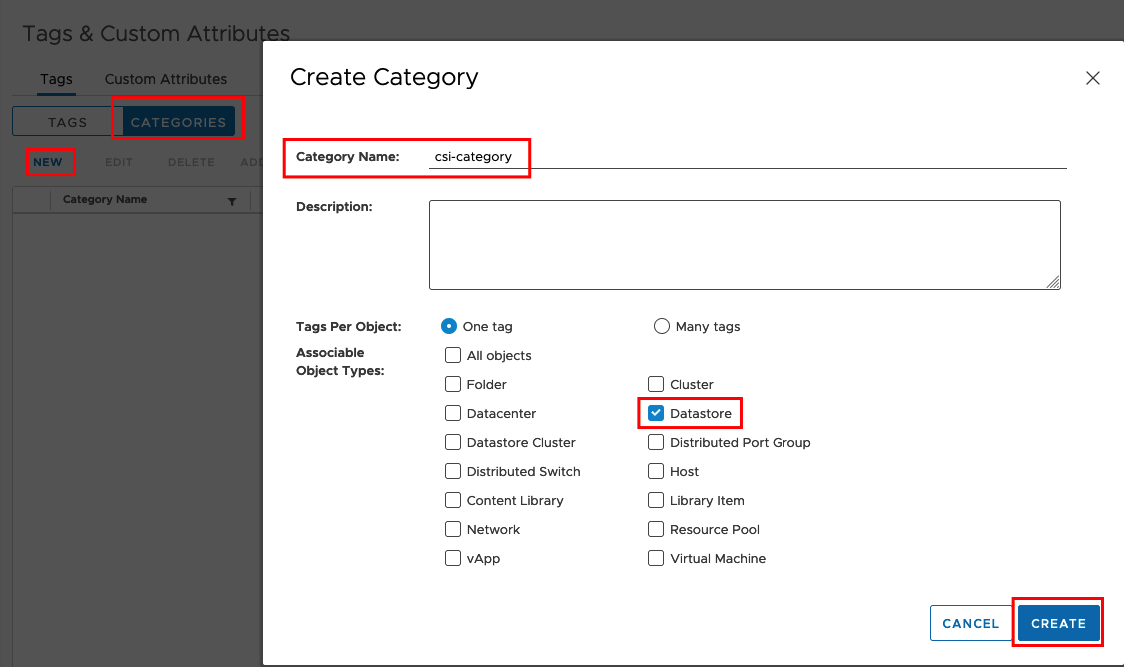
Create a new Category and select only Datastore
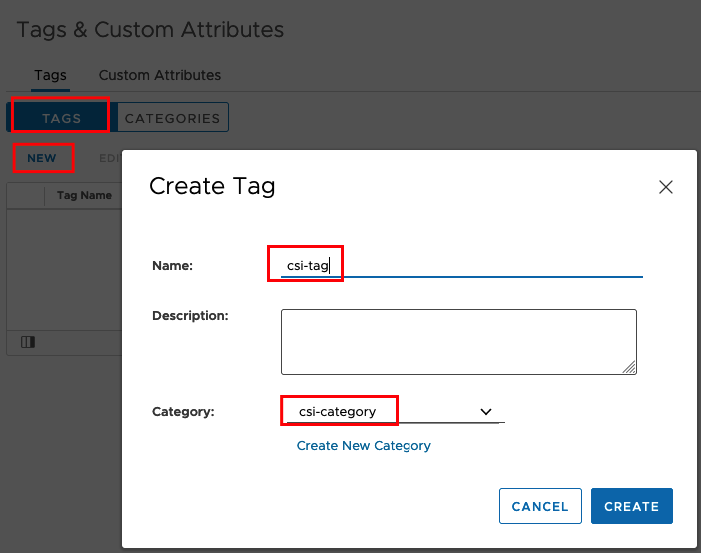
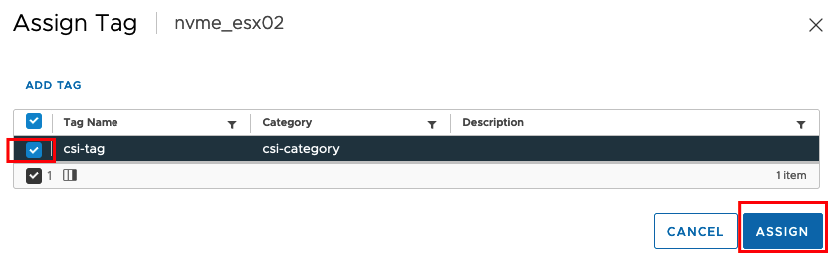
And now create a TAG and mapp the Tag to the new created category
Next we will apply the Tag to all volumes that can be used. Can be either one or many.
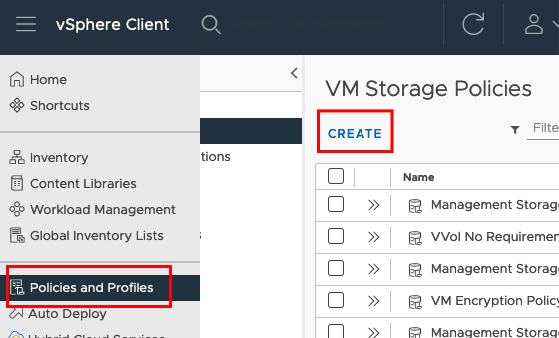
In the last Step we will create the Storage Policy under "Policies and Profiles"
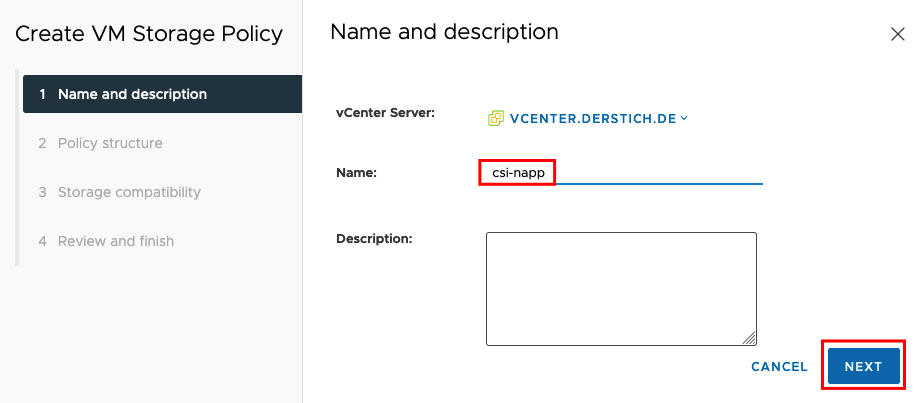
Insert a Name. This will be used later in our OVA Template to map the CSI Driver to the right storage
We will use the Tags that are created before, so we use "Enable tag based placement rules".
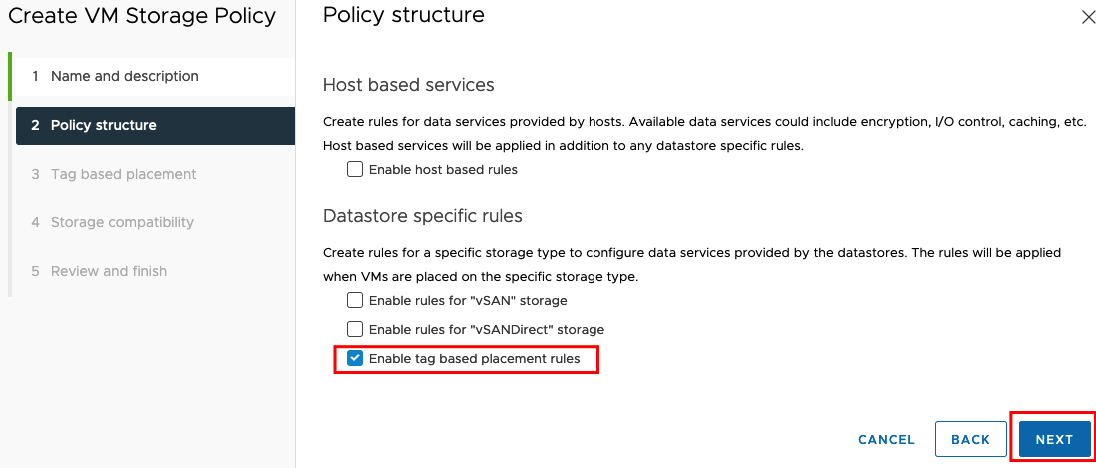
We need to specify the Category and the Tag
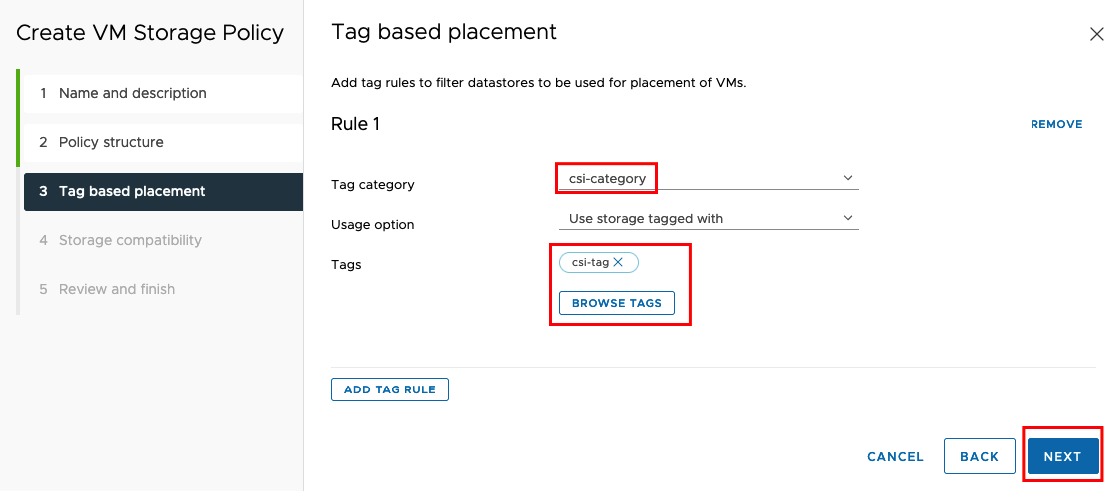
You should see now all Stoarge Devices that you have tagged before

Finish the creation and go forward to install the NAPP vAPP
Like with all other vAPPS you need to select the Template, Folder, Compute Resource, Storage and the belonging Network. Customize Template is the important part. Change the settings to your environment. Please check the picture above if you need to understand which IP is used where.
Next we define the Password for the NAPP Appliance, a DNS Entry from the IP Addres Range defined for the Load Balancer VIPs and the Information how to reach the NSX Manager. In Addition you can decide if <ou would like to install only one Worker Node (Evaluation) or 3 Worker Nodes (Advanced) and if you would like to download all container images upfront or not. We recognized some issues if the internet connection is not performant enough and in this case you should preload the images. Lcal Cache is for testing porpuses and should not be used.
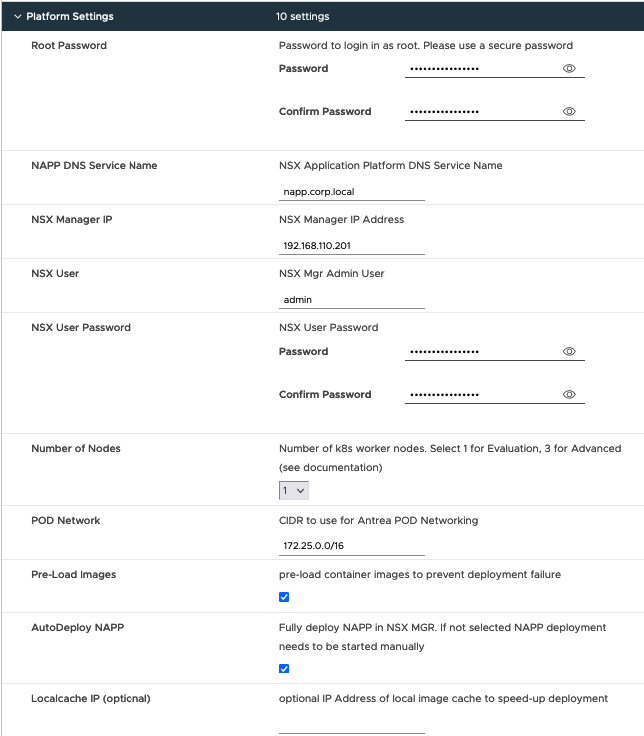
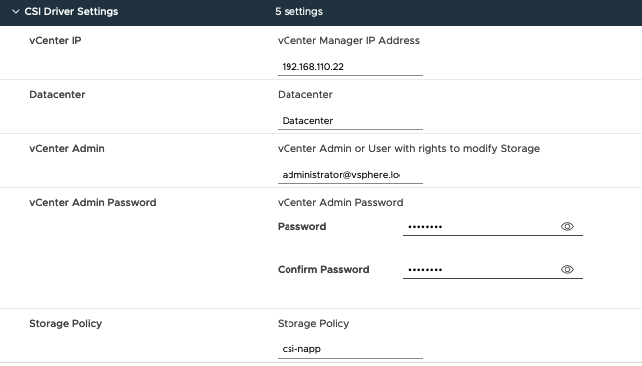
In the last Step we will define the CSI Driver Settings. You need to define the vCenter IP, and the Datacenter where you install the NAPP vAPP. Unfortunattely (as of now) the Datacenter Name must be without blanks. Otherwise the script will fail. The easiest way is to use the vCenter Admininstrator, but you can also create a special user with only rights to modify storage. The Storage Policy Name must match the name you used above while you create the Policy.
now you can jump to - Start vAPP
Like with all other vAPPS you need to select the Template, Folder, Compute Resource, Storage and the belonging Network. Customize Template is the important part. Change the settings to your environment. Please check the picture above if you need to understand which IP is used where.

We recognized some Issues while deploying if the Internet Connection is slow. So you can decide to load alle Images upfront to the Node - the checkbox is enabled by default. Be aware it could take a couple of hours before you see something happen in NSX. You can also choose to start the NSX Application deployment fully automated.
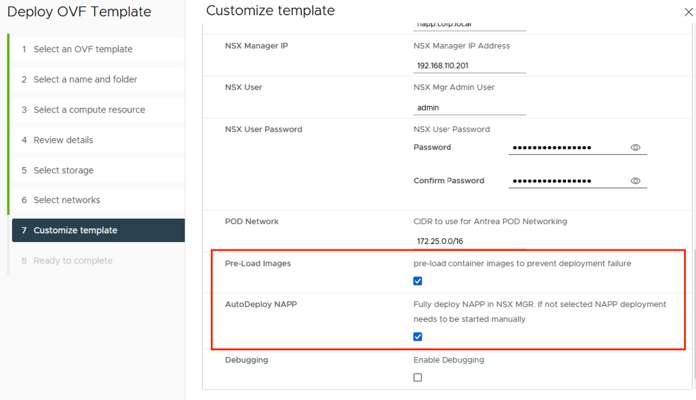
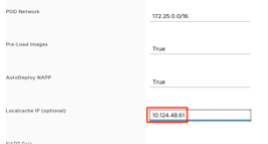
In adittion we improved the deployment time with a local cache option. We loaded all Files on a Server in the OneCloud and if you insert an IP in the new Field Localcache IP the Nodes will try to download there the images first before they try to download from the public Harbor registry.
Just start the overall vapp – both VMs will do their own setup steps in parallel. Depending on speed of your internet connection this can take some hours!
All steps will be printed on the console from the Master and the Node and you can check the process there. The Logfiles will be stored in /var/log/photon-customization.log You can also SSH into the Master or the Node using root/the password you created while deployment and check if Kubernetes is up and running.
(watch) kubectl get pods -A
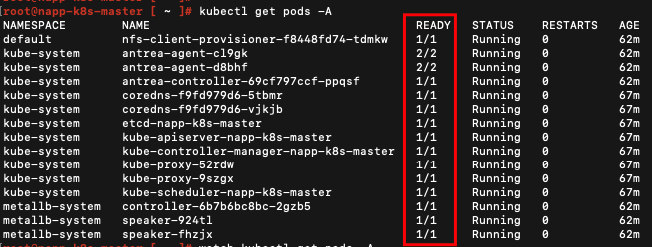
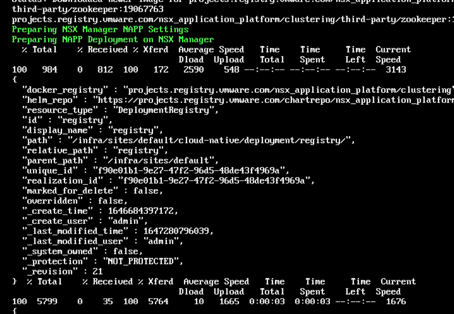
You should see after some Minutes all machines in Ready state. When all Images are downloaded the next steps can be seen in NSX Manager and also with the kubectl command. If all Images for the Base Installation are downloaded (Last Image is zookeeper), the script will automatically push the .kube/config to NSX Manager and make all settings that are needed to proceed.
If the Installation will not start after 2 minutes you can start the Installation also manually. If everything works as expected, the certmanager will be installed
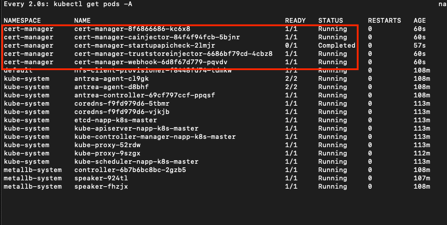
Followed by Project Contour

And than the NSXi Platform will be installed in some steps
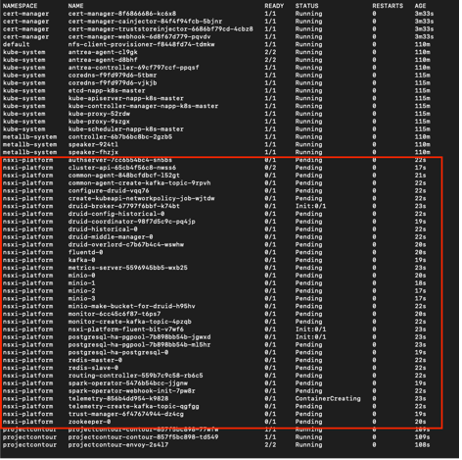

If the Installation fails, it is most likely that the Metrics Postgresql Cluster does not come up.
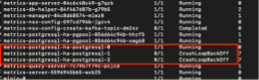
You should press the Retry Buttun in NSX Manager and if it is still not working retry it 2 or 3 times.

If this does not help you should check if you can deploy the vAPP in a more performant environment. If the Environment is nested it will also fail and you should proceed with the Single VMs vAPP for vCLOUD Director.
As vCloud Director seems to have some issues with the vAPP we created single node ova images for master and node VMs To deploy in vCloud director download and import NAPP_Appliance_master_app.ova and NAPP_Appliance_node_app.ova each as separate vAPP.
Both need to be deployed with identical options except the “role”. This must be set “master” for master VM and “node” for node VM. After deployment move the VMs into your exisiting vAPP (the one already running NSX Manager). In network settings choose fitting network and IP Mode DHCP. After moving VMs into your existing vAPP you can delete the two newly created VAPPS. Then just start both VMs (startup order doesn’t matter)
To setup a 3-worker node cluster refer to the documentations above, but choose "cluster size = 3" when deploying master node.
When deploying the vAPP to vCenter the first worker node will be setup automatically, then use the NAPP-Appliance_xxx_node_app.ova images to add two additional node VMs.
When deploying single master/node OVAs to vCloudDirector start with master (and enter IP of first node vm), then continue with 3 node VMs (ensure to select correct node numer and IP for each node)
-
Each worker node needs an IP address within the same subnet as the master node / vip range.
-
Each worker node must be set up using the same root password as the master node.
-
When deploying additional worker nodes specify the correct node number for each node (first node = 1, second node = 2, third node= 3)
-
You can deploy and start master & worker node vms in any order
-
During first startup master VM will wait for worker VMs to get ready - setup will finish automatically after all worker nodes are up and running
If initial deployment of VAPP failes with error message in VM console you need to re-deploy the vapp. Re-starting vapp during setup process or after failes setup process will result in inconsistent state. This might be fixed in future release.
Initial setup was successful when file “/root/ran_customization” exists. Then rebooting of appliance is safe.
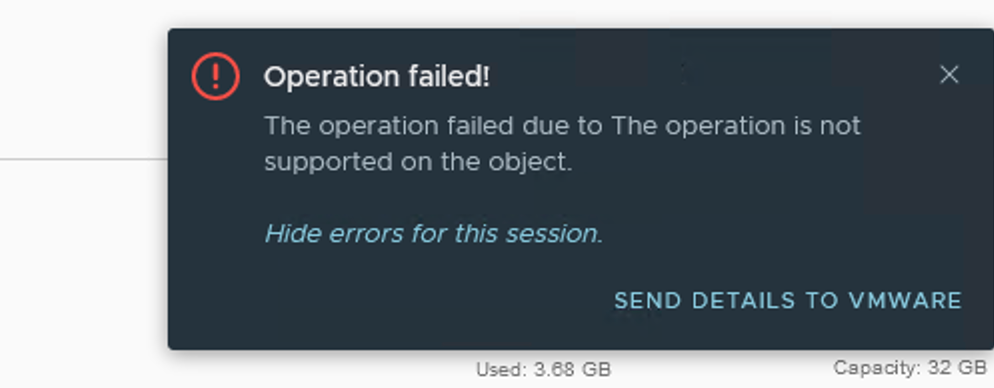
If the Setup will fail in the first phase (Cert Manager installation) you may see this error Message in the NSX Manager.

In this case a retry will not fix the Problem and you will run in other Problems while installing contour.

The only option to fix this, is to cancel the Installation in NSX Manager run the Cleanup (if needed) and install NAPP via the NSX Manager UI again. If it does not work and it will fail again you need to try it again to a different Time of the Day. It seems that the Problem comes from our shared Storage in OneCloud and if to many people accessing the Storage the latency becomes to high and the Certmanager will not comes up in the right time. This means that all other Container will not get the needed Certs and will fail also.
If your DNS Entry for the NAPP Appliance cannot be find you will get an error message like this and you need to correct the DNS entry.

If the IP Address for the DNS Entry is not included in the list of VIP Addresses you provided to Metallb Loadbalancer you will get the following Errormessage and you should correct the DNS Entry to an address in the IP Space of the VIP Addresses.

You can check it also on the CLI with the command: kubectl get svc -n projectcontour You will see the EXTERNAL-IP is in pending

Normally you can delete the NSX Application Platfrom via the NSX Manager. In some cases and especially if something went wrong in the beginning it could be that the deletion process will not clean up the Kubernetes Cluster and you will not be able to redeploy NAPP if the Namespaces “cert-manager”, nsxi-platform” and “projectcountour” exist. First you should try to delete the namespaces with the command: kubectl delete namespaces cert-manager nsxi-platform projectcontour If this fails and namespace stucks in state “Terminating” you should check the cluster APIService kubectl get APIService You may find there entries for projectcontour or nsxi-platform that should be deleted.
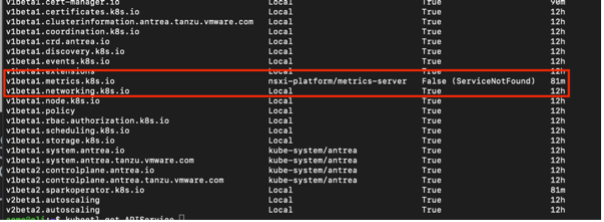
kubectl delete APIService v1beta1.metrics.k8s.io v1alpha1.projectcontour.io
Image creation scripts based on Reference for building PhotonOS Virtual Appliance (OVA) using Packer
Based on William Lams Packer PhotonOS Appliance (https://github.com/lamw/photonos-appliance)
- MacOS or Linux Desktop
- vCenter Server
- VMware OVFTool
- Packer
- PowerShell
- PowerCli
- xmlstarlet
packerbuilds the OVA on a remote ESXi host via thevsphere-isobuilder.
photon-builder.json vCenter Server settings where build VM will be created
photon-version.json PhotonOS ISO Image / Source and VM Settings
photon.json packer main config file
photon-dev.json identical to photon.json but additionally deploys newly created OVA appliance(s) to a vCenter Server
NAPP specific modifications are done in files/setup.sh
./build.sh
If you wish to automatically deploy the PhotonOS appliance after successfully building the OVA run ./build.sh dev instead.