03. Publishing your Windows Container images into a Docker Registry
When deploying a Docker container into production environments (including Windows Containers and Linux containers), you need to deploy it by pulling its related Docker image ("docker pull") from a Docker Registry, in the first place. After that, you'll be able to deploy it to multiple environments like a regular Docker Host (VM), Azure Container Instances(ACI), Kubernetes, Azure App Service for Containers, etc.
But the common denominator that you need to use is a Docker Registry. When you are creating a custom application which will be running as a container, you also need to know how to create its related custom Docker image and how to publish that image into a Docker Registry.
This walkthrough assumes a basic understanding of Docker. You can learn about Docker by reading the Docker Overview.
This post describes how to create a custom eShopModernizedMVC Windows Container image (Docker image for Windows Containers) in your local development PC with Visual Studio and 'Docker for Windows' installed and then how to publish it into a Docker Registry.
A Docker Registry is a public or private store, running on a public cloud or on-premises, which contains Docker container images, either for Linux or Windows. An example od a Docker Registry is 'Docker Hub' and 'Azure Container Registry'. Both are public registries and both allow private repositories of images.
A few examples of a Docker registry and its related taxonomy is shown below.

Publishing your custom Docker images in a Docker Registry requires a 2-step process:
- Create your custom Docker image (Windows Container image, in this case)
- Publish/Push your custom Docker image into a Docker Registry (i.e. Docker Hub or Azure Container Registry)
You can also do the same action but in an automated way from your CI or build pipelines like in Azure DevOps or Jenkins.
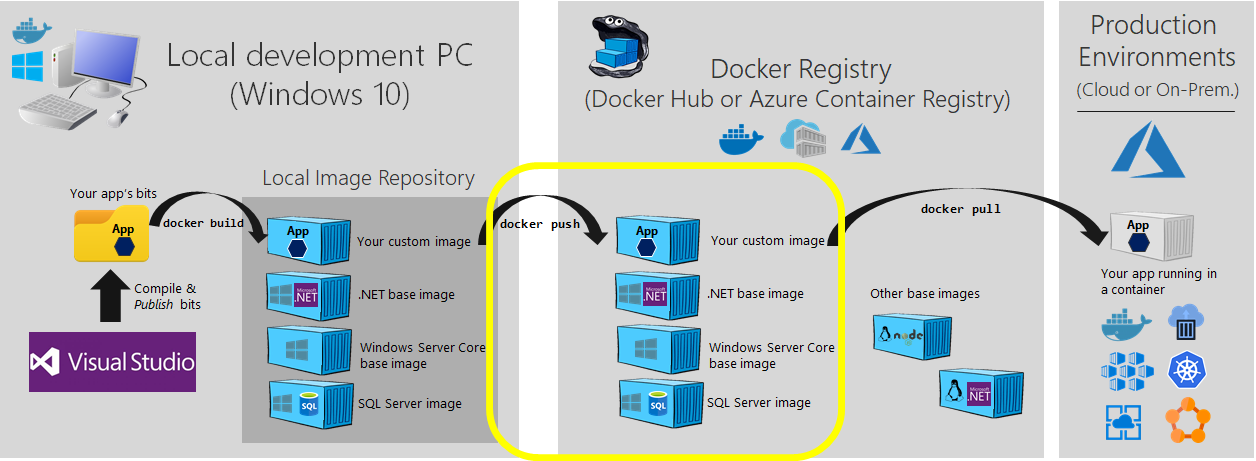
As explained in the previous post titled "How to containerize the .NET Framework web apps with Windows Containers and Docker", the following image shows you the environment in your local development PC when creating and running your containers locally.

However, when you need to deploy your image as a container into production environments, you first need to publish/push your images into a Docker Registry (i.e. Docker Hub or Azure Container Registry) as in the following evolved figure.

This particular scenario focuses just on the area highlighted in yellow, meaning the steps on how you can create your custom Docker image and have it ready in your local development PC.

Option 1.A (Straightforward): Use a single script to build All your apps and create All the related Windows Container images
As a convenient tool, we have created a single .CMD script that builds all the applications' bits and publish its files into a specific local tree of folders: deploy\wcf\ deploy\mvc deploy\webforms
After the applications' files to be deployed are generated/published in those folders, the script builds/creates the Docker Windows Container image per each application.
Make sure you have the path to MSBuild.exe (C:\Program Files (x86)\MSBuild\14.0\Bin) as part of your Path environment variable by checking/adding it like in the following screenshot:

In a Developer Command Prompt for VS 2022 (or 2017 or 2019) CMD window, move to your eShopModernizing root folder, then run the Build.cmd script as the following execution:

The execution should finish like the following:

With that, the script would have built the bits and the Docker images. You can check them out by typing docker images in the command-line:

(*) Note that the image's tags might vary depending on the base images you are targeting and the specific tags you use in the docker-compose.yml file. You can change that on every dockerfile per project targeting one or another base image tag, then you can specify the tag you prefer for your custom images at the docker-compose.yml file. In this case we were targeting the 4.7.1-windowsservercore-ltsc2016 tag for base images (ASP.NET and WCF images), therefore, our custom images have a similar tag, for clarity on the base imaged being used.
You can now directly jump to the section "Scenario 2: Publish/Push your Windows Container image into a Docker Registry (i.e. Docker Hub) using the Docker CLI" in order to publish/push the images into the Docker Registry.
Option 1.B (Optional and manual steps per app and Windows Container images): Build/Publish your app's files with Visual Studio and create your Windows Container image with Docker CLI (docker-compose build or docker build)
1.B.1. Confirm/change the name and tag of your custom image to create
Open the docker-compose.yml file within the eShopModernizedMVC solution folder and check the name of your custom image to be created. For instance, in the following .YML code it is named as eshop/modernizedmvc:4.7.1-windowsservercore-1709, where eshop has to coincide with the name of the repo or organization at the Docker Registry (such as Docker Hub), eshop/modernizedmvc is the full name of the image (without tag), and :4.7.1-windowsservercore-1709 is a tag which can specify any characteristic of the image, like version, etc.
Common tags are: latest, dev, etc.
version: '3'
services:
  eshop.modernized.mvc:
    image: eshop/modernizedmvc:4.7.1-windowsservercore-1709
    build:
      context: .\src\eShopModernizedMVC
      dockerfile: Dockerfile
    depends_on:
      - sql.data

  sql.data:
    image: microsoft/mssql-server-windows-developer
In our case, we're specifying the version of the ASP.NET base image microsoft/aspnet:4.7.1-windowsservercore-1709 we're using at the dockerfile (such as the dockerfile within the eShopModernizedMVC project) because certain deployment environments might only support specific versions of Windows Server Core (1709 vs. older), so you can discriminate or select the right image.
1.B.2. Compile your .NET application bits and publish it in a local folder
In order to create a Windows Container image you first need to generate your .NET application's bits plus web/HTML files by compiling it and publishing in a local folder. In order to do so in Visual Studio, right click on the eShopModernized project and hit on the Publish menu option as shown below.

Then, make sure that the selected profile is of type "FolderProfile" and very importantly, make sure that the target location is set to "obj\docker\publish" as that is the path where docker-compose build will look for the compiled app's bits.
Once those settings are confirmed, hit on the Publish button. Once it finished, you can check the files to be deployed (copied within the Docker image) with the File Explorer, such as the following screenshot.

NOTE ON DOCKER MULTI-STAGE BUILDS: In the near future when Docker Multi-Stage builds are supported in Windows Containers you won't need to first compile and publish the app's bits in a folder because with Docker Multi-Stage build when running docker-compose build/up it will also compile the .NET bits in a previous stage by using a .NET SDK/Build image and then it will generate the final app's image, all in a single docker-compose build execution. No need to compile/publish from Visual Studio. Docker Multi-Stage builds are already supported for Linux containers as of April 2018.
1.B.3. Create the Windows Container image with "docker-compose build"
Now, with all the bits and web app files ready to be published placed on the "obj\docker\publish" folder, you can create the Docker image with the following steps.
Open a PoewrShell or Command-Prompt window and go to the root folder of eShopModernizedMVC where the docker-compose files for that solution are placed.
Then, just run the command docker-compose build, so it created your custom Windows Container image and registers it into your local Docker Repository in your PC, like in the following execution.

Confirm that you have it locally registered by running 'docker images' and checking that the image appears in the list with the specific tag that you had.

Scenario 2: Publish/Push your Windows Container image into a Docker Registry (i.e. Docker Hub) using the Docker CLI
As mentioned, when you need to deploy your image as a container into production environments, you first need to publish/push your images into a Docker Registry (i.e. Docker Hub or Azure Container Registry).
This is precisely the scenario highlighted in yellow in the following figure.
The steps to publish an image into a Docker Registry are the following:
-
Open a PowerShell or CMD window
-
Login into your selected Docker Registry, such as Docker Hub or Azure Container Registry. In this case, we're using Docker Hub, so we're authenticating against Docker Hub with the
docker logincommand, such as in the following screenshot.

If you want to authenticate against Azure Container Registry, you need to use the Azure CLI command az acr login. For further instructions on how to do it with Azure Container Registry, check it out here.
- Push your image to the Docker Registry with
docker push [name-of-image]but before doing that, make sure that the prefix, such as "eshop" already exists as a user or as an organization in the Docker Registry, in the first place.
Example: docker push eshop/modernizedmvc:4.7.1-windowsservercore-1709

You can go ahead and push the rest of the images (WebForms image or WCF image) you might have created into your local repository, in a similar way.
- Check in the Docker Registry UI (in this case, Docker Hub portal) that the image was correctly uploaded. You can also check that our public eShopModernizedMVC images are published here:
https://hub.docker.com/r/eshop/modernizedmvc/tags/

With that, the image is ready to be deployed in any deployment environment such as:
- Azure Web App for Containers
- Azure Container Instances
- Azure VM with Windows Server 2016 with Windows Containers support
- Azure Container Service (Kubernetes)
Check out the rest of the Wiki posts in order to actually deploy the application containers into any of those deployment environments.
The previous manual steps are good enough when learning Docker and Windows Containers or for a local developer scenario. But in real projects, we encourage you to automate the application build, Docker image build, image publish to a Docker registry and even the deployment to final deployment environments such as the ones mentioned in Azure.
Basically, using an automated CI/CD approach, the developer shouldn't manually publish/push a Docker image from his/her PC but just push the code to the initial code repo, such as a Git repo (GitHub, Azure DevOps, etc.). Azure DevOps supports this process as described in the documentation.
It is the automated build pipeline (in this case Azure DevOps) that builds the Docker image and pushes it into the Docker Registry. Doing so, you can track exactly what version of the code was compiled and used to build any specific Docker image and get all the benefits of CI/CD and DevOps in general. Learn more