06. Deploying your Windows Containers based app into Azure VMs (Including CI CD)
Deploying to a Docker host on a Windows Server 2016 VM in Azure allows you to have quick dev/test/staging environments where you can run your applications in a common place for testers or business users validating the app. VMs can also be valid for IaaS production environments.
This walkthrough shows you the multiple alternatives you can have when deploying Windows Containers to Azure VMs based on Windows Server 2016 or later.
Virtual Machines for Windows containers are simply VMs based on Windows Server 2016, Windows 10, or later versions, both with Docker engine setup. Usually, you will use Windows Server2016 in the Azure VMs. Azure currently provides a VM named “Windows Server 2016 with Containers” which allows you to try the new Windows Server Container feature with both Windows Server Core and Windows Nano Server Container OS Images installed and ready to use with Docker.
There are several scenarios. The following diagrams show you each of them to be detailed in this page.
SCENARIO A:

SCENARIO B:

SCENARIO C:

- A Microsoft Azure subscription. If you don't have one, sign up for a free trial here.
- Dev machine with Windows 10, Docker for Windows and Visual Studio 2017
Although Windows Containers can be deployed into on-premises Windows Server 2016 VMs, however, when deploying into Azure you get a much easier way to get started with ready-to-use Windows Server Container VMs, a common place in the Internet accessible for testers plus automatic scalability of VMs through Azure scale-sets.
As mentioned, before starting the walkthrough, you will need an Azure subscription account. If you don’t already have one, sign up for a free 30-day trial here.
First of all, log in to the Azure management portal. Then, click on the “+ New” menu option and then search for “Windows Server 2016 Datacenter - with Containers” and select that VM type, as shown in the image below.

On the Windows Server 2016 Datacenter – with Containers panel, make sure that Resource Manager is selected in the Select a Deployment Model drop-down menu. Then, click on the “Create” button, as specified in the next image.

Then, you will see a panel with the VM settings that you need to select or write as shown in the following screenshot.

On the Create Virtual Machine panel and within the Basics tab, provide a name for the server, a username for the VM’s administrator account in the User field, type and confirm a password for the account, and finally in the Resource Group field, make sure that Create new is checked, and type a name for the new Resource Group.
Change the Datacenter Location using the drop-down menu, if needed. Finally, hit OK.
In the Choose a size panel set a size for the new VM and hit Select.

In the Settings panel, under Storage, set Use Managed Disks to Yes. You will also need to create a new Virtual Network (or select an existing one), as in the next image.

Then, click on OK at the bottom of the Settings panel and finally hit the OK button of the Summary panel to deploy the VM. The deployment will take a few minutes.
Once the VM is deployed, you can enter into its configuration panel in Azure portal. Follow the following steps once you are in the VM configuration panel.
-
In the Virtual Machine panel, click Connect to open an RDP session to the VM.
-
Save the RDP file to your PC and open it by double-clicking on it.
-
Click Connect in the Remote Desktop Connection dialog box, as shown in the next image.

-
In the Remote Desktop Connection dialog, check Don’t ask me again for connections to this computer. Then click Connect.
-
Enter the admin username and password for the VM in the Windows Security dialog box and click OK, as shown in the next image.

-
If prompted again, in the Remote Desktop Connection dialog, check Don’t ask me again for connections to this computer. Then click Yes.
-
At this point you should be able to see the desktop of the VM and work with it remotely.
This Windows Server 2016 VM is basically a Windows Container Host with Docker Engine running to manage the Windows Containers. Open a PowerShell console in the Windows Server 2016 by typing “Windows PowerShell” on the start menu. Type “docker images” to see the already available pre-installed Windows Containers images in the VM. You can see you will have the Windows Server Core and the Windows Nano Server images. You could have downloaded/pulled from Docker Hub, but having them pre-installed in the “Windows Server 2016 Datacenter - with Containers” Azure VM will save you significant time.

You can deploy containers to Docker hosts in multiple ways. Some ways are better suited for development environments and other ways fit better under production environments.
Scenario A: Deploying containers to an Azure VM from a development machine (PC) through Docker engine
In this case, you would have an Azure VM based on Windows Server 2016 but you would deploy to it from a development machine with “Docker for Windows” or “Docker for Mac” by using the regular “docker-compose build”, “docker-compose up” and “docker run” commands, but redirected to the VM as Docker Host in the cloud instead of deploying locally into the local development machine with Docker.
The difference in this case, compared to the “Production environment”, is that you are building the Docker images and creating them in the local image repository at the VM right before deploying the containers into the same VM. You are not using any Docker/Container registry in between.
This is the Scenario A introduced right at the beginning of the page:

By default, the Docker Server will only listen on a Named Pipe connection, which cannot be accessed remotely. However, you can add additional listeners very easily.
Perform the following steps in the server (VM) you deployed in Azure:
-
Edit C:\ProgramData\docker\config\daemon.json. If it does not exist, just create the text file.
-
Add or modify the hosts settings and append tcp://0.0.0.0:2375 (un-secured port), like in the following JSON snippet.
ONLY UNSECURED PORT plus internal npipe
{ "hosts": ["tcp://0.0.0.0:2375","npipe://"] } -
Save the file and restart the Docker Service with the command “Restart-Service Docker” from the PowerShell in the server VM.
This configuration will listen for all IP addresses on the specified 2375 ports (Warning, this is unsecured). However, for real production environments you could also set only specific client IP addresses, for security reasons.
Create the certificates in the server (Optional but recommended for secured production environments)
If you want to connect securely from the client development machine, you will need to create the needed certificates files CA (Certificate Authority, Server-Cert and Server-private-key, client cert and client-private-key).
If you're creating the certs with an IP address, you may want to consider an static IP for you VM, or even better, use a DNS name to avoid having to recreate certs when the IP address changes.
Generate the certificates, keys and CA with this script:
In the Docker host VM (Windows Server 2016) create the following folder:
`mkdir c:\DockerCerts`
Then, copy the following PowerShell Script into the folder (credits for artisticcheese) https://github.com/dotnet-architecture/eShopModernizing/blob/master/VM/DockerCerts-Generation/CreateDockerCerts.ps1
And run it, like in the following screenshot generating the certificate files:

Copy the server certificates plus the rooCA certificate into the folder C:\ProgramData\docker\certs.d

Copy the client certificates plus the rooCA certificate into the user folder C:\Users\YOUR-USER.docker either at the server for testing and also at the client docker machine to connect from, as in the image:

In the Docker host server, you should update and have a C:\ProgramData\docker\config\daemon.json in the server like the following:
`{
    "tlsverify":  true,
    "hosts":  [
                  "tcp://0.0.0.0:2376",
                  "npipe://"
              ],
    "tlscert":  "C:\\ProgramData\\docker\\certs.d\\serverCert.cer",
    "tlskey":  "C:\\ProgramData\\docker\\certs.d\\privateKey.cer",
    "tlscacert":  "C:\\ProgramData\\docker\\certs.d\\rootCA.cer"
}`
Now, restart the docker service with the ”Restart-Service Docker” command from the command prompt.
At this point, remote clients should be able to connect remotely to the Docker server if using the required certificates.
Test it out with the following Docker command, either from the server console and also from any remote docker machine from where you want to connect. This command should list the images at the Docker host, connecting securely based on the certificates.
`docker --tlsverify --tlscacert=$env:USERPROFILE\.docker\rootca.cer --tlscert=$env:USERPROFILE\.docker\clientPublicKey.cer --tlskey=$env:USERPROFILE\.docker\clientPrivateKey.cer -H=tcp://your-docker-host-name-server-vm.westus.cloudapp.azure.com:2376 images`
For more information on configuring the Docker Server on Windows check this blog post:
- Generating Certificates without using openSSL in plain PowerShell https://artisticcheese.wordpress.com/2017/06/10/using-pure-powershell-to-generate-tls-certificates-for-docker-daemon-running-on-windows/
Additional resources
-
Configuring Docker Engine on Windows Server 2016 https://docs.microsoft.com/en-us/virtualization/windowscontainers/manage-docker/configure-docker-daemon
-
Container Host Deployment - Windows Server https://docs.microsoft.com/en-us/virtualization/windowscontainers/deploy-containers/deploy-containers-on-server
-
Considerations for running Docker for Windows Server 2016 with Hyper-V VMs https://blog.docker.com/2016/10/considerations-running-docker-windows-server-2016-hyper-v-vms/
A network security group (NSG) contains a list of security rules that allow or deny network traffic to resources connected to Azure Virtual Networks (VNet). You’ll need to create a rule to allow traffic for remote management of your Windows Docker Host. Make port docker's TLS ports 2375 and 2376 available by creating an NSG rule allowing inbound traffic. Note that for secure connections you only need to allow 2376. The portal should show an NSG configuration for your VM like the following:

In addition, you need to open the port used by Docker in the Windows Firewall, either by manually creating a rule of by running this PowerShell command:
`PS C:\> netsh advfirewall firewall add rule name="Docker Engine Remote Management" dir=in action=allow protocol=TCP localport=2375-2376`
Or alternatively, using with this other PowerShell command:
`PS C:\> New-NetFirewallRule -DisplayName 'Docker Engine Remote Management' -Profile @('Domain', 'Public', 'Private') -Direction Inbound -Action Allow -Protocol TCP -LocalPort 2375-2376`
Note that if you also open the 2375 port you’ll be opening a door to anyone, so you might want to open just the secure port and use the certificates for a secure connection.
IMPORTANT: You will need to create a similar NSG rule for the HTTP ports that your application uses. In this case, the eShopModernizingMVC app uses the 5114 port.
You don’t need to use the Docker client CLI on the same host as the Docker server, the Docker CLI also runs over a network (TCP) connection.
By using this method, you will connect to the Docker host (Windows Containers VM you just set up) from a development machine that has to have Docker Client installed. Usually, you will install “Docker for Windows” or “Docker for Mac” in the development machines, so that you have Docker Client installed. Then, you can use Docker CLI.
If you want to connect securely to your VM in Azure, as mentioned before, you need to copy the client certificates plus the rootCA certificate into the user folder C:\Users\YOUR-USER.docker at the client docker machine to connect from, as in the screenshot (previously shown, too, but in this case you'll do it in a remote client PC):
e.g. c:\users\YOUR-USER.docker in your you local machine. For example, you can ctrl-c, ctrl-v the files from an RDP session in the server.
You can specify a remote Docker Server when using the Docker Client in two ways:
A. Use the -H or --host command line parameter
B. Set the DOCKER_HOST environment variable
For example, using the method B to connect to a remote Docker Server at IP Address 13.91.40.155 on the default 23751 port, run the following commands.
`PS C:\> docker --host tcp://13.91.44.143:2375 info
or
PS C:\> $ENV:DOCKER_HOST = 'tcp://13.91.44.143:2375'
PS C:\> docker info`
For instance, the following commands are run from a Windows 10 dev machine which is configured to remotely access the Windows Server VM in Azure we created previously.

If your VM is set up with a DNS name in Azure, you could also run the same commands against the DNS name in Azure of your VM, like this command.
`PS C:\> $ENV:DOCKER_HOST = 'tcp://your-server.westus.cloudapp.azure.com:2375'
 PS C:\> docker info
`
At this point, you could run any “docker-compose” or “docker run” command from your development machine and those commands will be executed against the remote Azure VM.
In this case, you can specify the certificates when connecting, like in the following example where you are obtaining the remote docker host "info", or you could do a docker-compose up, etc.
PS C:> docker --tlsverify --tlscacert=$env:USERPROFILE.docker\rootca.cer --tlscert=$env:USERPROFILE.docker\clientPublicKey.cer --tlskey=$env:USERPROFILE.docker\clientPrivateKey.cer -H=tcp://your-server.westus.cloudapp.azure.com:2376 info
Right click the project in VS 2017 and select publish and Folder. Make sure you select/type the path obj\Docker\publish (case sensitive), and finally click on Publish.

Navigate to the published folder src\eShopModernizedMVC\obj\Docker\publish and make sure the application bits and the Dockerfile are in that folder.
Build the Docker images and deploy the images and containers to the remote Windows Server VM in Azure
Now, open a command line window (either PowerShell or CMD) and go to the root folder of the application where you see the docker-compose.yml files, like with:
`cd yourPath\eShopModernizedMVCSolution`
Then, build the custom Docker image and run the application container into the remote Docker Host (Windows Server VM in Azure) with the docker-compose up command, like the following.
`\> Docker-compose up`
SECURED OPTION: In case you are using certificates for the secured communication from a client machine, you can run commands like the following:
`cd YOUR_PATH\eShopModernizing\VM\eShopModernizedMVC`

`docker-compose -H tcp://yourserver.westus.cloudapp.azure.com:2376 --tlscacert=$env:USERPROFILE\.docker\rootca.cer --tlscert=$env:USERPROFILE\.docker\clientPublicKey.cer --tlskey=$env:USERPROFILE\.docker\clientPrivateKey.cer -f .\docker-compose.nobuild.yml -f .\docker-compose.override.yml up`
You will see a similar output to the following image.

Note that the first time you run “docker-compose up” it will take quite a few minutes as it will need to download the SQL Server image, from Docker Hub, into the remote Azure VM. This is only needed the first time.
If you didn’t change the $ENV:DOCKER_HOST environment variable in your console window, then the deployment will be performed in your local development machine (i.e. Windows 10) where you have installed Docker for Windows. But if you changed that environment variable, then the Docker commands are sent to the remote Windows Server 2016 VM in Azure. At this point, the .NET application and SQL Server are both running as Windows Containers in the remote VM, as you can check by typing “docker ps” to see the containers and by typing “docker images” to see the registered images in the remote VM, as shown in the following screenshots.


Finally, and provided that you have the Azure NSG rules and the Windows Server Firewall rules allowing the traffic through the TCP port used by the application (in this case the port 5114), you could test the MVC application from any machine in the Internet, like in image X-XX which uses the URL http://yourserver.westus.cloudapp.azure.com:5114/ but the public IP could also be used like with http://your_VM_IP:5114/

To go back and use a local Docker Server over named pipes in your local development machine, use a command like the following:
PS C:\> docker --host npipe:////./pipe/docker_engine
Additional resources
- Remote Management of a Windows Docker Host https://docs.microsoft.com/en-us/virtualization/windowscontainers/management/manage_remotehost
When deploying to production/staging environments, you would normally deploy the application’s containers from a Continuous Deployment pipeline based on products like VSTS (Visual Studio Team Services) or Jenkins.
However, for simplicity’s sake or for testing and researching reasons, you could also deploy the application directly into the Azure VM itself by using the Docker CLI commands like “docker-compose up”.
In any of those cases, you will first need to push/submit your custom Docker images to a Docker Registry like Docker Hub or Azure Container Registry. Then, from the VM in production you will pull those images from the Docker Registry, register them into the local Docker repository at the VM and then deploy the Windows Containers.
This is the diagram for this scenario:

If you followed the previous steps, you would probably have the docker images created and registered locally. You can check that out by typing “docker images” in your local CMD or PowerShell Window (Make sure it is a new window without the Docker environment variable pointing to the remote VM).
If you don’t have the Docker images already built, you can build them with the following commands.
`\> cd yourPath\eShopModernizedMVCSolution
 \> docker-compose build
`
You should see an output similar to the following image.

And you should see that image registered locally (dev machine) by typing “docker images”.

For this step, you need to have either a Docker Hub account or an Azure Container Registry (ACR) created. In this case, we’re going to upload the image to Docker Hub which is a public Docker Registry. Follow the next steps:
-
Login to the Docker Hub. From a Powershell execute ”docker login -u dockerUser -p yourPassword” like in the next image.

-
Publish the image in Docker Hub by executing “
docker push eshop/modernizedmvc” like in the next image.

- If you login at the Docker Hub web site, you should see your image registered like in the following image.

If you didn't do it in the previous section (SCENARIO A), you need to do it now.
A network security group (NSG) contains a list of security rules that allow or deny network traffic to resources connected to Azure Virtual Networks (VNet). You’ll need to create a rule to allow traffic for remote management of your Windows Docker Host.
Make the HTTP ports used by the applications (like in this case port 5114) available by creating an NSG rule allowing inbound traffic.
In addition, you need to open the port used by Docker in the Windows Firewall, either by manually creating a rule of by running this PowerShell command:
`PS C:\> netsh advfirewall firewall add rule name="HTTP eShop ports" dir=in action=allow protocol=TCP localport=5000-5500`
Once you have the image at any accessible Docker Registry it is only a matter of pulling the images into the VM and running the container. Follow the next steps.
-
Use the same Windows Server 2016 that you created in Azure in previous sections.
-
Check the local images and if you have the app image, delete it with “docker rmi image-ID” so you make sure it will pull the image from the remote Docker Hub
-
At the VM, copy the files docker-compose.nobuild.yml, docker-compose.override.yml and .env into a folder (i.e. C:/eShopModernizedMVCDeployment).
-
Edit the .env and set the VM IP or VM DNS name VM in the ESHOP_EXTERNAL_DNS_NAME_OR_IP variable, like in the following text.
#.env file ESHOP_EXTERNAL_DNS_NAME_OR_IP=yourserver.westus.cloudapp.azure.com -
Install docker-compose tool in the VM. By default, the current Windows Server with Window Containers does not have the docker-compose tool. In order to install it, follow the instructions from Docker, here, which is basically running the following PowerShell command with Admin rights.
\> Invoke-WebRequest "https://github.com/docker/compose/releases/download/1.16.1/docker-compose-Windows-x86_64.exe" -UseBasicParsing -OutFile $Env:ProgramFiles\docker\docker-compose.exe
A good way to install it with no issues with Windows Defender afterwards is by installing it with Chocolatey, just install it - e.g. on a administrative command line with: From CMD admin rights:
`@powershell -NoProfile -ExecutionPolicy Bypass -Command "iex ((New-Object System.Net.WebClient).DownloadString('https://chocolatey.org/install.ps1'))" && SET "PATH=%PATH%;%ALLUSERSPROFILE%\chocolatey\bin"`
Now that chocolatey is installed, the only thing that´s left is to fire up an administrative PowerShell and do:
`\> choco install docker-compose`
-
Run the application by deploying the containers: Finally, within the folder you created for the app’s files, run the docker-compose command at the VM PowerShell or CMD.
docker-compose -f .\docker-compose.nobuild.yml -f .\docker-compose.override.yml up
You should see a similar execution to the following image.

- The first time the images will be downloaded from the registry, so this step can take some minutes if the SQL Server image is still not registered locally in the VM.
- Finally, open the browser and write http://{ip or DNS name of the VM}:5114 and the app should open, like in the following screenshot.

The whole process is the same for the MVC application and for the WebForms application, so here only the MVC CI and CD definitions are explained.
DevOps scenario:

For the CI we have a Build with 4 steps. The first two are standard in majority of builds, a restore for the Nuget packages and a build of the .Net project.
The third step is 'Build the image' using the docker-compose tool. We only need to pass the docker-compose files as parameters. In the 'Docker Compose File' variable we add our main docker-compose file (in this case 'eShopModernizedMVCSolution/docker-compose.yml'), and in the 'Additional Docker Compose Files' field we add the rest of docker-compose files (in this case only the 'eShopModernizedMVCSolution/docker-compose.override.yml'). If you need any extra tags for the image add them in this step. The 'Action' is 'Build service images'.

After this step, we have already the image build. Now we have to push this image to our repository. We have to set the correct connection as endpoint in the 'Docker Registry Connection', and as in the previous section fill the docker compose parameters with the correct files. As 'Action' in this case is 'Push service images'. Again, if you want to push the image with an specific tag, remember to put it in the 'Additional Image Tags'.

Once the step is finished, we have the new image stored in the connected repository.
We have a pipeline where we want to get the new image and deploy it in the VM. This new image has been build and pushed in our container repository in the Build process.

Our Artifact will be the source code in the repository:

The Release pipeline will do four actions: remove old containers, remove old images, deploy new images and run the containers.
The first step is to ensure that there are no containers running in the VM. To do so we add one Docker action task

As we can see in the 'Command' field, we simply do a docker rm -f command with the name of the containers. In the 'Docker Host Connection' we must set the connection to our VM.
We use the same task as in the previous step, a Docker command task, but here to remove the images. We have as 'Action' 'Run a Docker command' and as a 'Command' we have rmi -f eshop/modernizedmvc

Exactly as the previous task, but for the SQL image. This step is not needed if you are not using SQL database in container format.

Once removed the images we pull the new one

Again, this step is only needed if you want a container with SQL.

This step is the command docker-compose -f docker-compose.nobuild.yml -f docker-compose.override.yml up. We are creating the containers and running them. Note that we are using the docker-compose.nobuild.yml file. This file is the same as the original docker-compose.yml that we use for building the images but without the option 'Build', because we only want to run an already existing image (stored already in a repository), not build a new one.
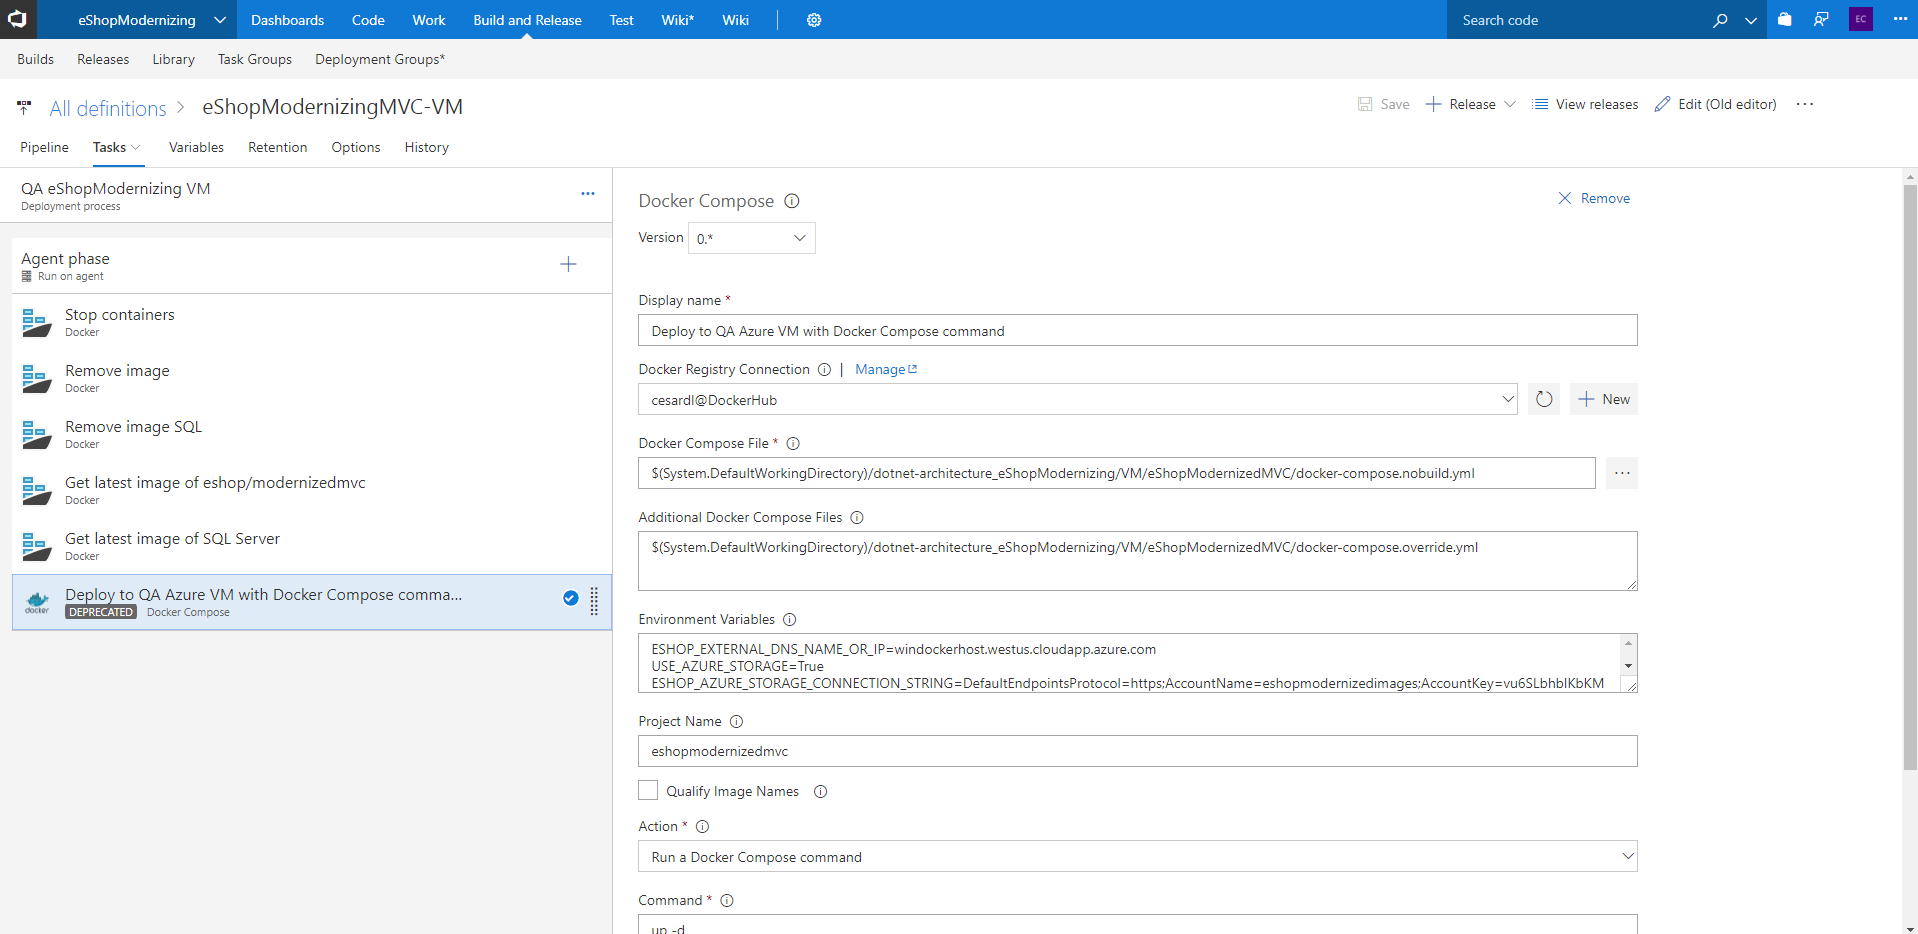
Regarding the environmet variables, we can override them in the 'Environment Variables' option of the task. What you put there will override the values of the .yml files. This way we avoid having variables configured directly in the yml files, that are stored in the repository. In the 'Environment Variables' we store values that change or cannot be in the repository (basically the private data). We have stored the next variables:
ESHOP_EXTERNAL_DNS_NAME_OR_IP=xxxxx.westus.cloudapp.azure.com
USE_AZURE_STORAGE=True
ESHOP_AZURE_STORAGE_CONNECTION_STRING=DefaultEndpointsProtocol=https;AccountName=eshopmodernizedimages;AccountKey=xxxx==;EndpointSuffix=core.windows.net
APP_INSIGHTS_INSTRUMENTATION_KEY=xxxxxxxx-yyyy-zzzz-962b-9bbf9f4f7f92
USE_AZURE_ACTIVE_DIRECTORY=True
AZURE_ACTIVE_DIRECTORY_CLIENT_ID=xxxxxxxx-yyyy-zzzz-a275-8bff314a4cbb
AZURE_ACTIVE_DIRECTORY_TENANT=eshoponcontainers.onmicrosoft.com