Windows setup
This page covers the setup of your Windows development computer.
CONTENT
- Install Docker Desktop
- Configure Docker Desktop
- Configure local networking
- Build and deploy eShopOnContainers
- Explore the application
-
Optional - Use Visual Studio
- Server side (Microservices and web applications) - Workloads
- Mobile (Xamarin apps for iOS, Android and Windows UWP) - Workloads
- Stop Docker background tasks on project open
- Open eShopOnContainers solution in Visual Studio
- Build and run the application with F5 or Ctrl+F5
- Issue with "Visual Studio Tools for Docker" and network proxies/firewalls
- Optional - Use Visual Studio Code
- Explore the code
- Additional resources
You can install Docker Desktop following :
Install Docker Desktop Of Windows

NOTE You can ensure your system meets the System-requirements
The initial Docker for Desktop configuration is not suitable to run eShopOnContainers because the app uses a total of 25 Linux containers.
Even though the microservices are rather light, the application also runs SQL Server, Redis, MongoDb, RabbitMQ and Seq as separate containers. The SQL Server container has four databases (for different microservices) and takes an important amount of memory.
So it's important to have enough memory RAM and CPU to Docker.
IMPORTANT: If you have installed Docker Desktop on a system that supports WSL 2, then WSL 2 will be enabled by default. It automatically uses the required CPU and memory resources while building and running containers. For more details refer : Docker Desktop WSL 2 backend
This step is optional but recommended, as Docker sometimes needs to access the shared drives when building, depending on the build actions.
This is not really necessary when building from the CLI, but it's mandatory when building from Visual Studio to access the code to build.
The drive you'll need to share depends on where you place your source code. For e.g :

IMPORTANT: If you are using Docker Desktop WSL 2 backend, then this step is optional.
IMPORTANT: Ports 5100 to 5205 must be open in the local Firewall, so authentication to the STS (Security Token Service container, based on IdentityServer) can be done through the 10.0.75.1 IP, which should be available and already setup by Docker. These ports are also needed for client remote apps like Xamarin app or SPA app in a remote browser.
You can manually create a rule in your local firewall in your development machine or you can just run the add-firewall-rules-for-sts-auth-thru-docker.ps1 script available in the solution's deploy\windows\ folder.

NOTE: If you get the error Unable to obtain configuration from: http://10.0.75.1:5105/.well-known/openid-configuration you might need to allow the program vpnkit for connections to and from any computer through all ports.
If you are working within a corporate VPN you might need to run this power shell command every time you power up your machine, to allow access from the DockerNAT network:
Get-NetConnectionProfile | Where-Object { $_.InterfaceAlias -match "(DockerNAT)" } | ForEach-Object { Set-NetConnectionProfile -InterfaceIndex $_.InterfaceIndex -NetworkCategory Private }Or just run the set-dockernat-networkategory-to-private.ps1 script available in the solution's deploy/windows folder.
Docker Desktop 2.2.0.0 doesn't use
DokerNATso the above solution will not work.According to issue 5538 in the Docker Desktop for Windows repo this was by-design.
While it gets solved or a workaround devised, it's recommended that you use the
WebSPAclient.
At this point you should be able to run eShopOnContainers from the command line. To do that, you should:
Go to a directory to clone the repo, something like C:\Users\<username>\source will be fine.
2. Clone eShopOnContainer's GitHub repo
git clone https://github.com/dotnet-architecture/eShopOnContainers.gitNote: Remember that the active development is done in dev branch. To test the latest code, use this branch instead of master.
cd eShopOnContainers\src
docker-compose build
While building the docker images, you should see something like the following image, and the process should take between 10 and 30 minutes to complete, depending on the system speed.

The first time you run this command it'll take some more additional time as it needs to pull/download the dotnet/core/aspnet and SDK images, so it'll take its time.
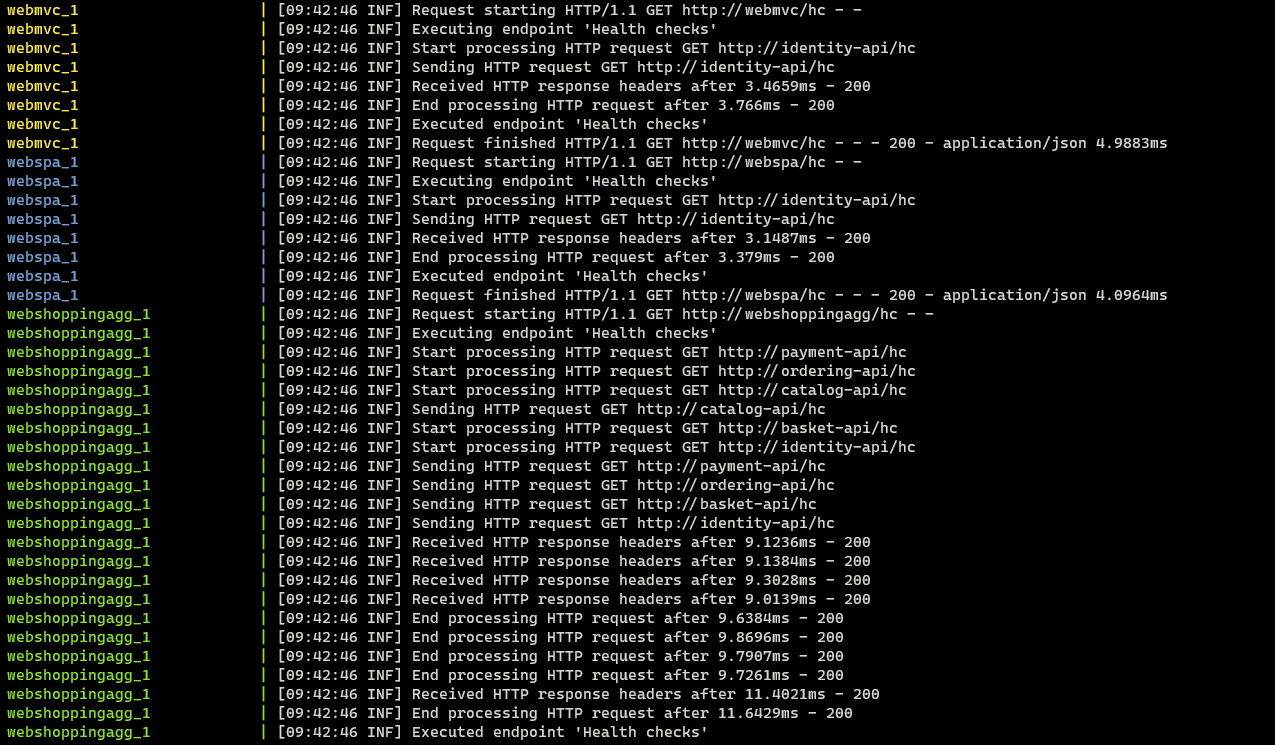
docker-compose upYou should view something like this in the first seconds:

After a few more seconds you should see something like this:
At this point you should be able to navigate to http://host.docker.internal:5107/ and see the WebStatus microservice:

When all microservices are up (green checks) you should be able to navigate to http://host.docker.internal:5100/ and see the Home Page of eShopOnContainers:

You should also be able to navigate to http://host.docker.internal:5104/ and see the Home Page of eShopOnContainers on the SPA application:

You can now explore the application or continue with the optional Visual Studio setup.
If you want to explore the code and debug the application to see it working, you have to install Visual Studio.
You have to install VS 2022 and you can install the latest release from https://visualstudio.microsoft.com/vs/.
Make sure you have the latest .NET 6 SDK from https://dotnet.microsoft.com/download/dotnet/6.0 installed.
Upon running the installer, select the following workloads depending on the apps you intend to test or work with:
- ASP.NET and Web development
- Azure development (Optional) - It is optional but recommended in case you want to deploy to Docker hosts in Azure or use any other infrastructure in Azure.

If you also want to test/work with the eShopOnContainer model app based on Xamarin, you need to install the following additional workloads:
- Mobile development with .NET (Xamarin)
- Universal Windows Platform development
- .NET desktop development (Optional) - This is not required, but just in case you also want to make tests consuming the microservices from WPF or WinForms desktop apps

IMPORTANT: As mentioned above, make sure you are NOT installing Google's Android emulator with Intel HAXM hypervisor or you will run on an incompatibility and Hyper-V won't work in your machine, therefore, Docker for Windows won't work when trying to run the Linux host or any host with Hyper-V.
Make sure that you DO NOT select the highlighted options below with red arrows:

VS runs some docker related tasks when opening a project with Docker support, to avoid these tasks from executing and slowing down your system, you might want to configure this options:

-
If testing/working only with the server-side applications and services, open the solution: eShopOnContainers-ServicesAndWebApps.sln (Recommended for most cases testing the containers and web apps)
-
If testing/working either with the server-side applications and services plus the Xamarin mobile apps, open the solution: eShopOnContainers.sln
Below you can see the full eShopOnContainers-ServicesAndWebApps.sln solution (server side) opened in Visual Studio 2022:

Note how VS 2022 loads the docker-compose.yml files in a special node-tree so it uses that configuration to deploy/debug all the containers configured, at the same time into your Docker host.
IMPORTANT: If the "docker-compose" project is not your "by default startup project", right click on the "docker-compose" node and select the "Set as Startup Project" menu option, as shown below:

In Visual Studio before hitting F5, set the run configuration from the default 'Debug' to 'Release' for WebSpa as shown below:

In case you find issues with WebSPA project while browsing the app using http://<url>:5104/ after hitting F5 to debug in Visual Studio, then follow the below instructions:
- At location
eShopOnContainers\src\Web\WebSPA, update the Dockerfile in WebSPA project(src/Web/WebSPA/Dockerfile), insert the below piece of code betweenWORKDIR /app( Line 5) andEXPOSE 80(Line 6)
  RUN apt-get update
  RUN apt-get -y install curl gnupg
  RUN curl -sL https://deb.nodesource.com/setup_12.x | bash -
  RUN apt-get -y install nodejs
  RUN npm install
  RUN npm -v
- In
docker-compose.override.ymlfile at locationeShopOnContainers\src, under webspa.environment update the value ofASPNETCORE_ENVIRONMENTtoDevelopmentas illustrated below:
webspa:
  environment:
    - ASPNETCORE_ENVIRONMENT=Development
    - ASPNETCORE_URLS=http://0.0.0.0:80
    - IdentityUrl=http://${ESHOP_EXTERNAL_DNS_NAME_OR_IP}:5105
At this point, after waiting sometime for the NuGet packages to be properly restored, you should be able to build the whole solution or even directly deploy/debug it into Docker by simple hitting F5 or pressing the debug "Play" button that now should be labeled as "Docker":

VS 2022 should compile the .NET projects, then create the Docker images and finally deploy the containers in the Docker host (your by default Linux VM in Docker for Windows). Note that the first time you hit F5 it'll take more time, a few minutes at least, because in addition to compile your bits, it needs to pull/download the base images (SQL for Linux Docker Image, Redis Image, ASPNET image, etc.) and register them in the local image repo of your PC. The next time you hit F5 it'll be much faster.
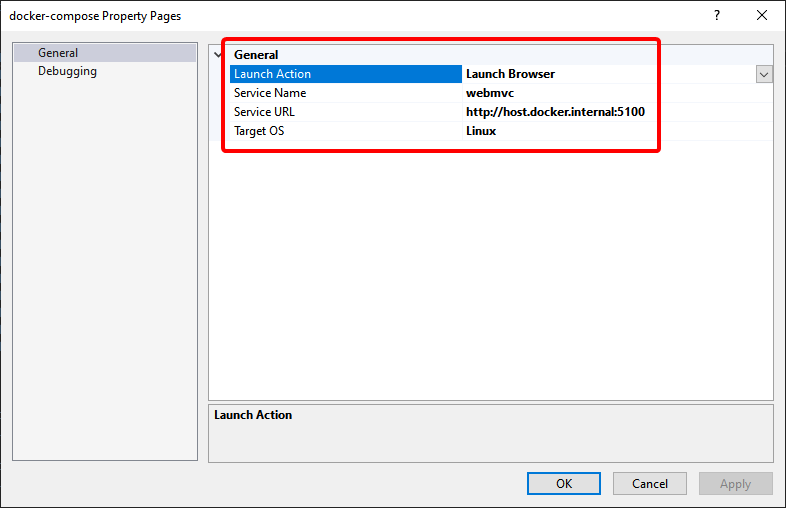
Finally, because the docker-compose configuration project is configured to open the MVC application, it should open your by default browser and show the MVC application with data coming from the microservices/containers:
NOTE: Depending on your system configuration, starting up all containers and applying database migrations might take some time. If you get a 503 error (service unavailable) in the browser, just give it some more time and refresh, after little while you should get to see the home page.

Here's how the docker-compose configuration project is configured to open the MVC application:
Finally, you can check out how the multiple containers are running in your Docker host by running the command "docker ps" like below:

You can see the 8 containers are running and what ports are being exposed, etc.
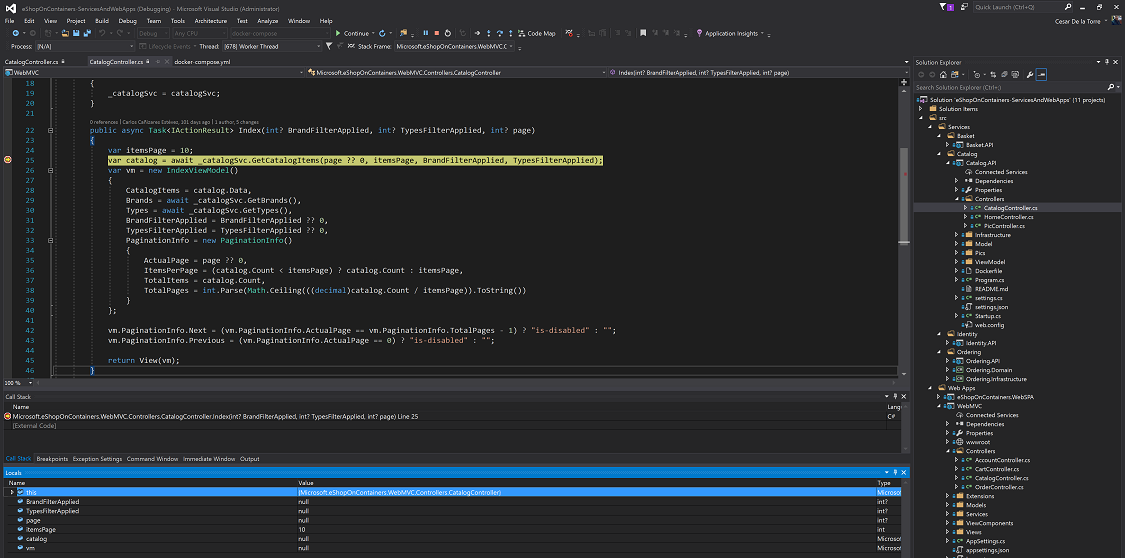
Something very compelling and productive in VS 2022 is the capability to debug several breakpoints across the multiple containers/projects. For instance, you could set a breakpoint in a controller within the MVC web app plus a second breakpoint in a second controller within the Catalog Web API microservice, then refresh the browser if you were still running the app or F5 again, and VS will be stopping within your microservices running in Docker as shown below! :)
Breakpoint at the MVC app running as Docker container in the Docker host:
Press F5 again...
Breakpoint at the Catalog microservice running as Docker container in the Docker host:

And that's it! Super simple! Visual Studio is handling all the complexities under the covers and you can directly do F5 and debug a multi-container application!
After installing 2022 with docker support, if you cannot debug properly and you are trying from a corporate network behind a proxy, consider the following issue and workarounds, until this issue is fixed in Visual Studio:
After installing VS code from Visual Studio Code you can edit particular file or "open" the whole solution folder like in the following screenshots:
Opening the Solution's folder

Editing a .yml file

It is also recommended to install the C# extension and the Docker extension for VS Code:

You should be now ready to begin learning by exploring the code and debugging eShopOnContainers.
-
[eShopOnContainers issue] Can't display login page on MVC app
https://github.com/dotnet-architecture/eShopOnContainers/issues/295#issuecomment-327973650 -
[docs.microsoft.com issue] Configuring Windows vEthernet Adapter Networks to Properly Support Docker Container Volumes
https://github.com/dotnet/docs/issues/11528#issuecomment-486662817 -
[eShopOnContainers PR] Add Power Shell script to set network category to private for DockerNAT
https://github.com/dotnet-architecture/eShopOnContainers/pull/1019 -
Troubleshoot Visual Studio development with Docker (Networking)
https://docs.microsoft.com/en-us/visualstudio/containers/troubleshooting-docker-errors?view=vs-2019#errors-specific-to-networking-when-debugging-your-application -
[eShopOnContainers issue] Projects won't load in Visual Studio
https://github.com/dotnet-architecture/eShopOnContainers/issues/1013#issuecomment-488664792