Building a Polargraph from a vitamin kit

If you've bought a Polargraph vitamin kit, then assembly is up to you.
- Polarshield, with LCD and stepper drivers
- Stepper motors
- Drive sprockets
- Motor brackets
- Gondola kit
- Servo motor (for pen lift)
- Arduino MEGA 2560 compatible microcontroller (I also sell these, surprise)
- Cables
- 9v / 12v 1500mA power supply
- A case
- Put the Polarshield onto an Arduino MEGA 2560 compatible microcontroller
- Compile and upload the firmware onto the arduino (http://www.polargraph.co.uk/setup/polargraphsd-updating-firmware/)
- Build the motor brackets, and wire the motors up to the Polarshield
- Build the gondola
The motors that are in the kit are bipolar steppers with four wires. The four wires power two separate motor drive coils, so there are two pairs of wires, one pair for each coil.
- Red and blue
- Black and green
To use the shield with the motors mounted the traditional way (shafts pointing towards the wall), then the sequence to wire the motors is (left-to-right):
- Blue
- Red
- Green
- Black

Both motors are wired identically. The firmware inverts the direction control pin of one of the motors so that they turn in opposite directions.
You can't damage anything by wiring these up in the wrong order, the worst that will happen is that it'll go the wrong way.
Always remember to cut the power before you unplug the motors. The motor drivers are sensitive to the kind of current spikes that occur when you suddenly remove the motor.
The Polarshield has the same connectors on it as the PolargraphSD.

These are neat, here's the data sheet about them. In principle you can just shove a bare end into each circular aperture. A tiny screwdriver in the rectangular slot opens up the spring cage inside, so in practice, I open them first because stranded wire isn't always stiff enough to get a good connection through force alone.


If you'd want screw terminals or something like that, there are some 3.5mm pitch holes that can accept a larger connector, hidden away under the stepper drivers. I usually need to shave a bit of plastic off the housing to make it fit, and the soldering on the inside is a bit tight, but do-able.
There's these little boards that I use to terminate the motor wires.

A case for the electronics is not necessary at all, but it makes it a little neater. The board itself is somewhat ESD-sensitive, so can behave slightly erratically if it is getting handled a lot (the touch screen often stops responding). It's non-permanent.
You can download and laser cut (or print, I guess) the case that the PolargraphSD comes in.
The PDF file is here: https://github.com/euphy/polargraph_models/blob/master/casev2/flat2/polargraph_case_parts_basic_v2.2.pdf. It is designed to be cut from 3mm thick acrylic (or MDF), and held together with six M3 12mm bolts, and nuts and washers.
There's some pictures to help with assembly in this flickr album:

https://www.flickr.com/photos/euphy/albums/72157662946794342
The Polarshield is pre-set to use 8x microstepping, and the standard motors in the kit have 200 steps per revolution. The settings for your controller app should be:
- mm per rev – set it to 95 (why? This is the length of string dealt out by one revolution of the motor)
- Steps per rev – set it to 200. If you have a Polargraph kit from before July 2014, it'll probably be 400 (why? This is the number of whole steps that the motor is capable of making)
- Step multiplier – set it to 8 (why? This is the default microstepping value for the polarshield – this sets the internal resolution that the machine uses while moving)
http://www.polargraph.co.uk/setup/polargraphsd-controller-application/
Irritation warning
The controller doesn't like having steps per rev changed while it's running. Doesn't break it or anything, just spoils all your existing measurements, so you're best off closing it, then opening default.properties.txt and editing it manually - look for the line starting machine.motors.stepsPerRev.
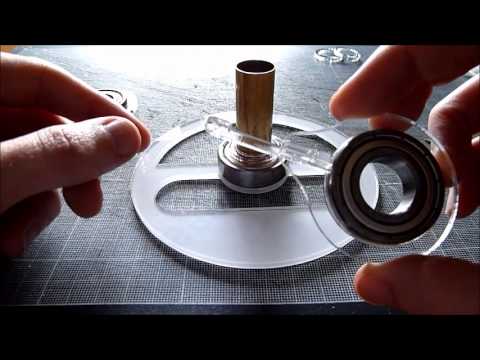
##Assembling Gondola
There's a video about this here.