Animation Definitions
Animation definitions are stored in the mods/[mod-name]/animations/ folder.
Animations definitions can be layed out in two different ways:
- The fast way for developing and prototyping
- The packed way to save (lots) of memory when playing, also reduces loading times!
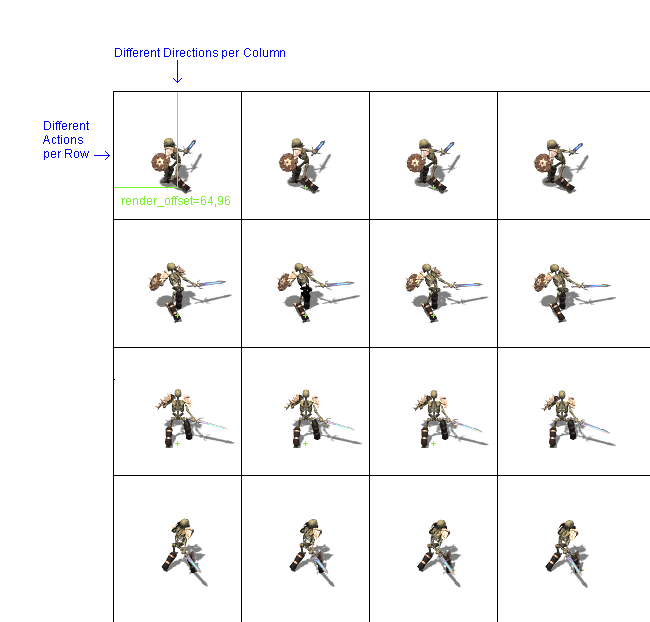
The first and fast way to define the animations is to setup the frames in a grid like fashion:
image=images/enemies/skeleton.png

render_size=128,128
render_offset=64,96

[stance]
position=0
frames=4
duration=4
type=back_forth

[run]
position=4
frames=8
duration=3
type=looped

...
(Note: The image below is incorrect. Rows represent each of the 8 possible directions. Columns represent frames of animation.)
Comments begin with a # symbol. These should be on a line by themselves.
image refers to an image containing different frames to craft an animation from it. All the frames for an animation are packed into one image. An animation definition file should only have one image entry. The path of this file is assumed to be mods/[mod-name]/images/...
render_size determines the size of each cell in the grid by giving width and height.
render_offset determines the position of the virtual ground point given as an offset of x and y.
New sections start with brackets.
Generally the sections describe animations, which are mounted vertically. The first frame is defined by the position, and the number of frames is given by frames.
position describes the starting frame for an action. The first frame is 0.
frames describes the number of frames. The ending column will be position + frames - 1. The -1 is explained by the start at 0. So the run section from above starts at the fourth column (0,1,2,3 indexes are before the run section) and the last frame is in the 11 column (4+8-1).
duration defines how long each frame is displayed in either milliseconds (ms) or seconds (s). Examples: 400ms, 2s
type can have different values describing how to compose the images to an animation, possible values are:
play_once
looped
back_forth
play_once plays the animation starting in the left frame specified by position and stops after the last frame in the row position + frames -1 has been reached. The number of ticks for such an animation is frames times duration The run section from above has a duration of 3x8=24 ticks, so nearly a second.
looped has the same order as play_once but starts playing again once the animation is complete.
back_forth is first playing the same way as play_once and then it is playing the same animation exactly backwards, so the duration of a back_forth animation is exactly twice as many ticks as in a play_once animation.
Let's say I have 8 directions, 24 total frames of animation, and each frame is 128x128 pixel size. The montage command I use is something like this:
montage -background "transparent" -geometry 128x128 -tile 24x8 *.png output.png
Images and animations eat up lots of RAM while playing the flar game. The images on the harddrive are compressed with the png file format, so they are rather small. But when playing the game, the images are held uncompressed in the RAM. Each pixel in an image eats up 4 bytes of RAM. Even the transparent pixels! And in the grid structure packing as above there are lots of transparent pixels. The first game made with the flare engine called flare-game needs more than 90 percent of its used RAM to hold the images!
Why bother about RAM usage?
- Loading times in the game are reduced a lot when only using small amounts of RAM.
- As long as you have enough RAM, you're fine. However not everyone who wants to play your game has lots of RAM, so if you make sure your game uses as little RAM as possible you have a larger audience for your game!
The main idea of this section is to remove as many transparent pixels as possible. This is done by spritepacking. The images are not layed out in a grid structure, but they will be moved as close together as possible, so they do not overlap yet.
As different images have different widthes and heights, this will not result in just a smaller grid, but in a fairly random fashion:

The game engine draws the single images by copying rectangles out of the image onto screen. That's why we need to care for rectangles and not for the actual shape of the image.
When playing the game, we have the uncompressed image in the RAM. So to reduce the RAM usage, we will need to reduce the number of pixels the images has. To reduce the number of pixels we need to find a size, which is small, but still can keep all the images. The images must not overlap into the rectangle of other images. If there was overlapping, we would see these overlaps in the game during an animation.
image=images/enemies/skeleton.png

[stance]
frames=4
duration=4
type=back_forth
frame=0,0,6548,57,53,57,28,50
frame=0,1,2333,67,87,61,32,54
frame=0,2,2015,68,81,60,24,55
frame=0,3,1536,0,47,69,17,54
frame=0,4,2462,0,56,67,18,50
frame=0,5,1331,69,87,59,48,48
frame=0,6,154,73,83,55,51,46
frame=0,7,7607,0,43,51,24,47
frame=1,0,6494,57,54,57,28,50
frame=1,1,2990,66,86,62,31,54
frame=1,2,2096,68,80,60,23,55
frame=1,3,1932,0,46,68,17,53
frame=1,4,2895,0,56,66,19,50
frame=1,5,869,70,88,58,49,47

...
The format has also an image and sections and inside the sections there are also frames, durations and type attributes. They work the same as explained above.
What is missing? render_size and render_offset is missing, because we don't have a grid any more. position inside a section is also gone.
New to this format are the frame specifiers. This entry specifies which image is found inside which rectangle and the now individual render offset. The number have this meaning:
index, direction, x, y, width, height, render offset(x), render offset(y)
The index describes the position in the former rows. It ranges from 0 up to frames (excluded).
direction describes the row of the former grid.
x, y, width, height describes where to find the rectangle for this animation frame. x,y is the starting point in the image from the upper left corner and width, height describe the size of the rectangle.
The render offset is now individual for each animation frame and that's why it is specified for each frame as well.
There is a tool, which can transform the development version to the shipping version full automatic.
It is found at https://github.com/stefanbeller/RectangleBinPack