APIVault is an API Gateway similar to Kong but is much simpler.
Of course APIVault does "sub-milliseconds" like Kong as APIVault is written in Go!
Supports MySQL, PostgreSQL and Microsoft SQL Server.
There is no need to modify your microservice application to use APIVault
Authentication
POST /api/auth
{
  "email": "youremail",
  "password": "yourpassword"
}
Then you will get a reply with JSON Web Token in "access_token" field. Use this in your Authorization header (with "Bearer ").
Of course the hashes stored in your DB must be in BCrypt in order for this to work, although we will make the hash algorithm to be easily configurable in the near future.
You can also configure any custom user table and a custom column name for your user login.
For example: in some setups the users table maybe called "customers" - you can customise that. Also login maybe stored in username column or email column
See the example configuration below.
Registration
POST /api/auth/register
{
  "email": "email@domain.com",
  "password": "thepassword"
}
Detailed information HERE
In a nutshell:
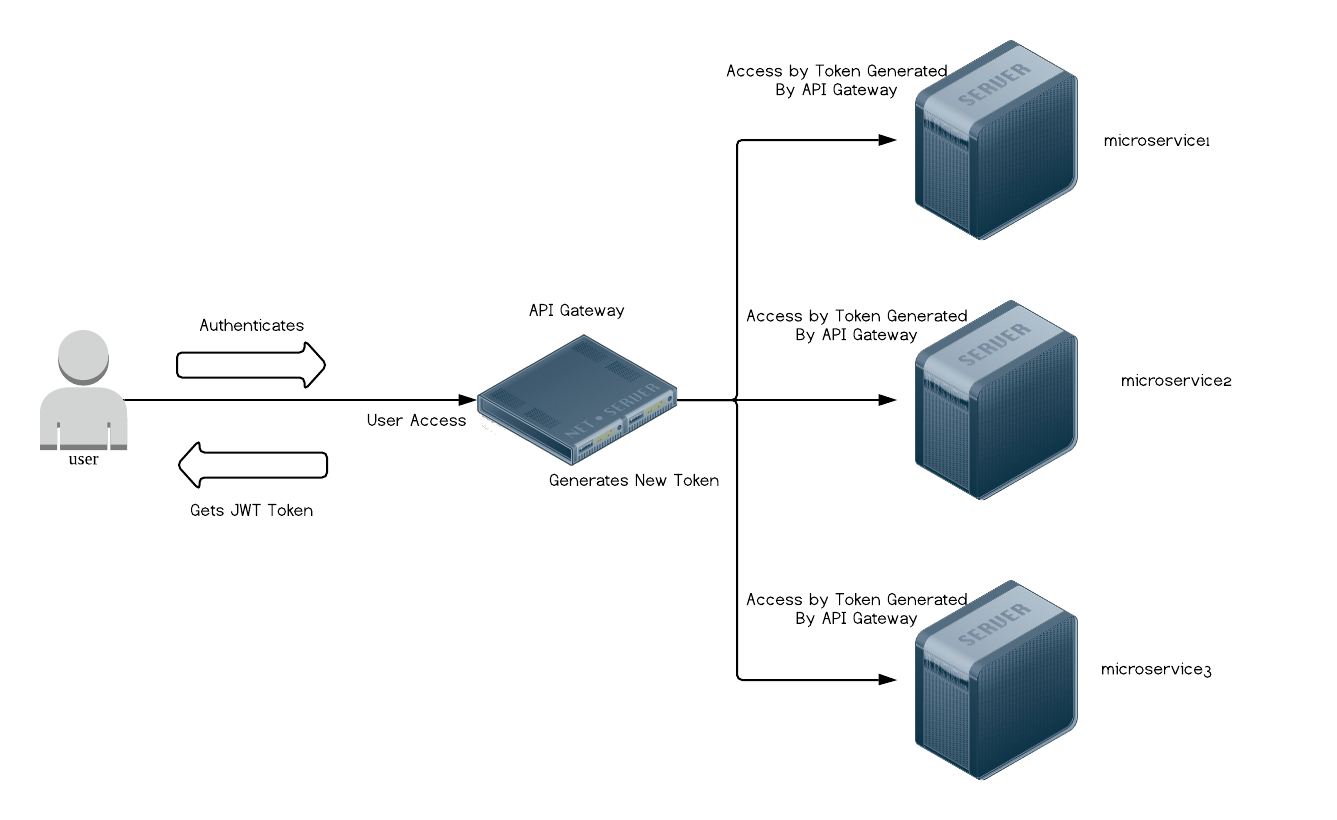
Note: The backend microservice endpoint needs to accept Authorization header which contains the token.
Example: Bearer exampletoken
The backend microservice do not need to setup any authentication - this is done by APIVault.
As long your passwords are hashed with BCrypt and the secret configured (as shown in microservices.yml below) is correct, everything will work nicely.
- Download the binaries (according to the version you need) - from the right side of this page.
- ungzip and untar the file and upload the
APIVaultbinary to your server - Copy apivault.yml.example and microservices.yaml.example to the same folder as your
APIVaultbinary - Edit apivault.yml, include your database credentials, jwt secret for APIVault - this is needed for JWT Token.
- Edit microservices.yml which contains your hostname which is used to run APIVault, and the real backend server http://url_backendapi (need http:// or https://) in url_endpoint and your microservice's JWT secrets. (NOTE: This is different than the one in apivault.yml, to have the same value as your microservice's JWT secret)
- Run APIVault!
./APIVault
There are two steps: You need to configure APIVault and Microservice-specific configuration
Copy apivault.yml.example as apivault.yml at the same directory as your APIVault binary
Sample configuration:
---
# if you want to use socket, set this to true
# socket will be /tmp/apivault.sock
unixsocket: false
port: 8080 # where APIVault will bind port to
db:
  adapter: mysql         # database adapter can be "mysql", "postgres" or "mssql"
  host: localhost        # your database host
  port: 3306             # change this to your database port, 5432 for postgresql and 1433 for mssql
  name: api-gateway      # your database name
  user: devel            # your database user
  password: yourpassword # your database password
# API Gateway JWT Secret (not microservice!)
jwt:
  secret: abc123
  ttl: 72
# Database user username/email and password column mapping
# set what is your table name, login column (example: "email" or "username")
table:
  name: users
  column:
    login: email
# For unprotected endpoints which is public, example: OTP/SMS endpoints which is unprotected
# This adds another layer of verification for legitimate clients and prevent OTP DoS attacks
# The header is `X-Authenticity:` which has a HMAC hex value that verifies the client.
# You will also need `X-Date: ` which is the timestamp where the backend will compute the HMAC hex value
# See the example ruby script in examples/ folder
# This is optional and disabled by default
verification:
  shared_key: your_shared_key_keep_it_safe
Microservice:
Copy microservices.yml.example to microservices.yml at the same directory as your APIVault binary.
server:
  - name: apivault_main_host
    source_host: api.apivault.domain1.com
    secret: your-microservice-generated-secret-keep-this-secure!
    mapping:
      - target_url: http://internal.customers.backendprotectedapi.microservice1.domain.com
        source_endpoint: /api/v1/customers
        destination_endpoint: /customers
      - target_url: http://internal.accounts.backendprotectedapi.microservice1.domain.com
        source_endpoint: /api/v1/accounts
        destination_endpoint: /accounts
      - target_url: http://internal.orders.backendprotectedapi.microservice1.domain.com
        source_endpoint: /api/v1/orders
        destination_endpoint: /orders
      - target_url: http://internal.otp.domain.com
        source_endpoint: /request/otp
        destination_endpoint: /api/auth/otp
        protect: true # this will force client to pass "X-Authenticity: " and "X-Date: " header, else reject, useful for unauthenticated endpoints. eg. OTP request endpoints
  - name: apivault_dev_host
    source_host: api.dev.apivault.domain1.com
    secret: your-microservice-generated-secret-keep-this-secure!
    mapping:
      - target_url: http://internal.orders.backendprotectedapi.microservice2.domain.com
        source_endpoint: /api/v1/orders
        destination_endpoint: /orders
Protect mode is designed to protect unauthenticated endpoints (endpoints that do not use JWT Token to allow clients) and it is a simple mitigation strategy.
Protect mode is not designed for Web Applications (like NextJS) in mind but more for mobile devices. We are looking into how we can improve this to provide support for Web Applications as well.
We took the problem with OTP/SMS request API endpoints which is unauthenticated and thus without any form of protection, anyone could DoS attack that endpoint and trigger SMS send-outs and drain all the SMS credits for the provider. This seemed a valid use-case, however, there might other use-cases we have not looked at.