Welcome to Redwood! If you haven't yet, check out the Redwood README to get a little background on why we created Redwood and the problems it's meant to solve. Redwood brings several existing technologies together for the first time into what we think is the future of database-backed single page applications.
In this tutorial we're going to build a blog engine. In reality a blog is probably not the ideal candidate for a Redwood app: blog articles can be stored in a CMS and statically generated to HTML files and served as flat files from a CDN. But as most developers are familiar with a blog and it uses all of the features we want to demonstrate, we decided to build one anyway.
Want to watch this tutorial instead? Start here:
This tutorial assumes you are already familiar with a few core concepts:
You could work through this tutorial without knowing anything about these technologies but you may find yourself getting lost in terminology that we don't stop and take the time to explain. It also helps knowing where the line is between what is built into React and what additional features Redwood brings to the table.
During installation, RedwoodJS checks if your system meets version requirements for Node and Yarn:
- node: ">=12"
- yarn: ">=1.15"
👉 Heads Up: If your system versions do not meet both requirements, the installation bootstrap will result in an ERROR. To check, please run the following from your terminal command line:
node --version
yarn --version
Please do upgrade accordingly. Then proceed to the RedwoodJS installation when you're ready!
Installing Node and Yarn
There are many ways to install and manage both Node.js and Yarn. If you're installing for the first time, we recommend the following:
Yarn
- We recommend following the instructions via Yarnpkg.com.
Node.js
- For Linux and Mac users,
nvmis a great tool for managing multiple versions of Node on one system. It takes a bit more effort to set up and learn, however, in which case getting the latest installation from Nodejs.org works just fine.
- For Mac users, if you already have Homebrew installed, you can use it to install
nvmas well. Otherwise, follow the installation instructions fromnvm.- For Linux users, you can follow the installation instructions from
nvm.- We recommend Windows users visit Nodejs.org for installation.
If you're confused about which of the two current Node versions to use, we recommend using the most recent "even" LTS, which is currently v14.
We'll use yarn (yarn is a requirement) to create the basic structure of our app:
yarn create redwood-app ./redwoodblog
You'll have a new directory redwoodblog containing several directories and files. Change to that directory and let's create the database, and then start the development server:
cd redwoodblog
yarn redwood dev
A browser should automatically open to http://localhost:8910 and you will see the Redwood welcome page:

Remembering the port number is as easy as counting: 8-9-10!
Now that we have the skeleton of our Redwood app in place, it's a good idea to save the current state of the app as your first commit...just in case.
git init
git add .
git commit -m 'First commit'
Let's take a look at the files and directories that were created for us (config files have been excluded for now):
├── api
│   ├── db
│   │   ├── schema.prisma
│   │   └── seeds.js
│   └── src
│       ├── functions
│       │   └── graphql.js
│       ├── graphql
│       ├── lib
│       │   └── db.js
│       └── services
└── web
    ├── public
    │   ├── README.md
    │   ├── favicon.png
    │   └── robots.txt
    └── src
        ├── Routes.js
        ├── components
        ├── index.css
        ├── index.html
        ├── index.js
        ├── layouts
        └── pages
            ├── FatalErrorPage
            │   └── FatalErrorPage.js
            └── NotFoundPage
                └── NotFoundPage.js
At the top level we have two directories, api and web. Redwood separates the backend (api) and frontend (web) concerns into their own paths in the codebase. (Yarn refers to these as "workspaces". In Redwood, we refer to them as "sides.") When you add packages going forward you'll need to specify which workspace they should go in. For example (don't run these commands, we're just looking at the syntax):
yarn workspace web add marked
yarn workspace api add better-fs
Within api there are two directories:
-
dbcontains the plumbing for the database:schema.prismacontains the database schema (tables and columns)seeds.jsis used to populate your database with any data that needs to exist for your app to run at all (maybe an admin user or site configuration).
After we add our first database table there will also be a SQLite database file named
dev.dband a directory calledmigrationscreated for us.migrationscontains the files that act as snapshots of the database schema changing over time. -
srccontains all other backend code.api/srccontains four more directories:functionswill contain any lambda functions your app needs in addition to thegraphql.jsfile auto-generated by Redwood. This file is required to use the GraphQL API.graphqlcontains your GraphQL schema written in a Schema Definition Language (the files will end in.sdl.js).libcontains one file,db.js, which instantiates the Prisma database client. You are free to send additional options, if necessary. You can use this directory for other code related to the API side that doesn't fit infunctionsorservices.servicescontains business logic related to your data. When you're querying or mutating data for GraphQL, that code ends up here, but in a format that's reusable in other places in your application.
That's it for the backend.
srccontains several subdirectories:componentscontain your traditional React components as well as Redwood Cells (more about those soon).layoutscontain HTML/components that wrap your content and are shared across Pages.pagescontain components and are optionally wrapped inside Layouts and are the "landing page" for a given URL (a URL like/articles/hello-worldwill map to one page and/contact-uswill map to another). There are two pages included in a new app:NotFoundPage.jswill be served when no other route is found (seeRoutes.jsbelow).FatalErrorPage.jswill be rendered when there is an uncaught error that can't be recovered from and would otherwise cause our application to really blow up (normally rendering a blank page).
index.cssis a generic place to put your CSS, but there are many options.index.htmlis the standard React starting point for our app.index.jsthe bootstraping code to get our Redwood app up and running.Routes.jsthe route definitions for our app which map a URL to a Page.
publiccontains assets not used by React components (they will be copied over unmodified to the final app's root directory):favicon.pngis the icon that goes in a browser tab when your page is open (apps start with the RedwoodJS logo).robots.txtcan be used to control what web indexers are allowed to do.README.mdexplains how, and when, to use thepublicfolder for static assets. It also covers best practices for importing assets within components via Webpack. You can also read this README.md file on GitHub.
Let's give our users something to look at besides the Redwood welcome page. We'll use the redwood command line tool to create a page for us:
yarn redwood generate page home /
The command above does three things:
- Creates
web/src/pages/HomePage/HomePage.js. Redwood takes the name you specified as the first argument, capitalizes it, and appends "Page" to construct your new page component. - Creates a test file to go along with this new page component at
web/src/pages/HomePage/HomePage.test.jswith a single, passing test. You do write tests for your components, don't you?? - Creates a Storybook file for this component at
web/src/pages/HomePage/HomePage.stories.js. Storybook is a wonderful tool for efficiently developing and organizing UI components. If you'd like to learn more, see this Redwood Forum topic to start using it in your development process. - Adds a
<Route>inweb/src/Routes.jsthat maps the path/to the new HomePage page.
Automatic import of pages in Routes file
If you look in Routes you'll notice that we're referencing a component,
HomePage, that isn't imported anywhere. Redwood automatically imports all pages in the Routes file since we're going to need to reference them all anyway. It saves a potentially hugeimportdeclaration from cluttering up the routes file.
In fact this page is already live (your browser automatically reloaded):

It's not pretty, but it's a start! Open the page in your editor, change some text and save. Your browser should reload with your new text.
Open up web/src/Routes.js and take a look at the route that was created:
<Route path="/" page={HomePage} name="home" />Try changing the route to something like:
<Route path="/hello" page={HomePage} name="home" />As soon as you add your first route, you'll never see the initial Redwood splash screen again. From now on, when no route can be found that matches the requested URL, Redwood will render the NotFoundPage. Change your URL to http://localhost:8910/hello and you should see the homepage again.
Change the route path back to / before continuing!
Let's create an "About" page for our blog so everyone knows about the geniuses behind this achievement. We'll create another page using redwood:
yarn redwood generate page about
Notice that we didn't specify a route path this time. If you leave it off the redwood generate page command, Redwood will create a Route and give it a path that is the same as the page name you specified prepended with a slash. In this case it will be /about.
Code-splitting each page
As you add more pages to your app, you may start to worry that more and more code has to be downloaded by the client on any initial page load. Fear not! Redwood will automatically code-split on each Page, which means that initial page loads can be blazingly fast, and you can create as many Pages as you want without having to worry about impacting overall webpack bundle size. If, however, you do want specific Pages to be included in the main bundle, you can override the default behavior.
http://localhost:8910/about should show our new page. But no one's going to find it by manually changing the URL so let's add a link from our homepage to the About page and vice versa. We'll start creating a simple header and nav bar at the same time on the HomePage:
// web/src/pages/HomePage/HomePage.js

import { Link, routes } from '@redwoodjs/router'

const HomePage = () => {
  return (
    <>
      <header>
        <h1>Redwood Blog</h1>
        <nav>
          <ul>
            <li>
              <Link to={routes.about()}>About</Link>
            </li>
          </ul>
        </nav>
      </header>
      <main>Home</main>
    </>
  )
}

export default HomePage
Let's point out a few things here:
-
Redwood loves Function Components. We'll make extensive use of React Hooks as we go and these are only enabled in function components. You're free to use class components, but we recommend avoiding them unless you need their special capabilities.
-
Redwood's
<Link>tag, in its most basic usage, takes a singletoattribute. Thattoattribute calls a named route function in order to generate the correct URL. The function has the same name as thenameattribute on the<Route>:<Route path="/about" page={AboutPage} name="about" />If you don't like the name that
redwood generateused for your route, feel free to change it inRoutes.js! Named routes are awesome because if you ever change the path associated with a route, you need only change it inRoutes.jsand every link using a named route function will still point to the correct place. You can also pass a string to thetoattribute, but you'll lose out on all the Redwood goodness that named routes provide.
Once we get to the About page we don't have any way to get back so let's add a link there as well:
// web/src/pages/AboutPage/AboutPage.js

import { Link, routes } from '@redwoodjs/router'

const AboutPage = () => {
  return (
    <>
      <header>
        <h1>Redwood Blog</h1>
        <nav>
          <ul>
            <li>
              <Link to={routes.about()}>About</Link>
            </li>
          </ul>
        </nav>
      </header>
      <main>
        <p>
          This site was created to demonstrate my mastery of Redwood: Look on my
          works, ye mighty, and despair!
        </p>
        <Link to={routes.home()}>Return home</Link>
      </main>
    </>
  )
}

export default AboutPage
Great! Try that out in the browser and verify you can get back and forth.
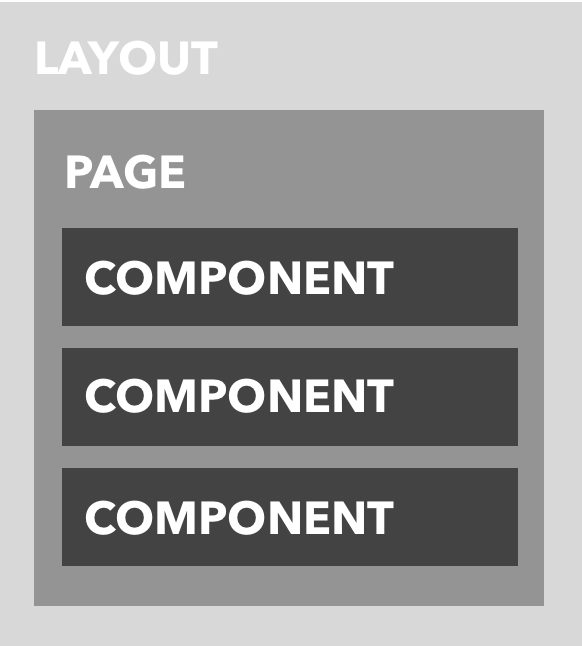
As a world-class developer you probably saw that copy-and-pasted <header> and gasped in disgust. We feel you. That's why Redwood has a little something called Layouts.
One way to solve the <header> dilemma would be to create a <Header> component and include it in both HomePage and AboutPage. That works, but is there a better solution? Ideally there should only be one reference to the <header> anywhere in our code.
When you look at these two pages what do they really care about? They have some content they want to display. They really shouldn't have to care what comes before (like a <header>) or after (like a <footer>). That's exactly what layouts do: they wrap your pages in a component that then renders the page as its child:
Let's create a layout to hold that <header>:
yarn redwood g layout blog
generateshorthandFrom now on we'll use the shorter
galias instead ofgenerate
That created web/src/layouts/BlogLayout/BlogLayout.js and an associated test file. We're calling this the "blog" layout because we may have other layouts at some point in the future (an "admin" layout, perhaps?).
Cut the <header> from both HomePage and AboutPage and paste it in the layout instead. Let's take out the duplicated <main> tag as well:
// web/src/layouts/BlogLayout/BlogLayout.js

import { Link, routes } from '@redwoodjs/router'

const BlogLayout = ({ children }) => {
  return (
    <>
      <header>
        <h1>Redwood Blog</h1>
        <nav>
          <ul>
            <li>
              <Link to={routes.about()}>About</Link>
            </li>
          </ul>
        </nav>
      </header>
      <main>{children}</main>
    </>
  )
}

export default BlogLayout
children is where the magic will happen. Any page content given to the layout will be rendered here. Back to HomePage and AboutPage, we add a <BlogLayout> wrapper and now they're back to focusing on the content they care about (we can remove the import for Link and routes from HomePage since those are in the Layout instead):
// web/src/pages/HomePage/HomePage.js

import BlogLayout from 'src/layouts/BlogLayout'

const HomePage = () => {
  return <BlogLayout>Home</BlogLayout>
}

export default HomePage
// web/src/pages/AboutPage/AboutPage.js

import { Link, routes } from '@redwoodjs/router'
import BlogLayout from 'src/layouts/BlogLayout'

const AboutPage = () => {
  return (
    <BlogLayout>
      <p>
        This site was created to demonstrate my mastery of Redwood: Look on my
        works, ye mighty, and despair!
      </p>
      <Link to={routes.home()}>Return home</Link>
    </BlogLayout>
  )
}

export default AboutPage
The
srcaliasNotice that the import statement uses
src/layouts/BlogLayoutand not../src/layouts/BlogLayoutor./src/layouts/BlogLayout. Being able to use justsrcis a convenience feature provided by Redwood:srcis an alias to thesrcpath in the current workspace. So if you're working inwebthensrcpoints toweb/srcand inapiit points toapi/src.
Back to the browser and you should see...nothing different. But that's good, it means our layout is working.
Why are things named the way they are?
You may have noticed some duplication in Redwood's file names. Pages live in a directory called
/pagesand also containPagein their name. Same with Layouts. What's the deal?When you have dozens of files open in your editor it's easy to get lost, especially when you have several files with names that are similar or even the same (they happen to be in different directories). We've found that the extra duplication in the names of files is worth the productivity benefit when scanning through your open tabs.
If you're using the React Developer Tools plugin this also helps disambiguate when browsing through your component stack:

One more <Link>, let's have the title/logo link back to the homepage as per usual:
// web/src/layouts/BlogLayout/BlogLayout.js

import { Link, routes } from '@redwoodjs/router'

const BlogLayout = ({ children }) => {
  return (
    <>
      <header>
        <h1>
          <Link to={routes.home()}>Redwood Blog</Link>
        </h1>
        <nav>
          <ul>
            <li>
              <Link to={routes.about()}>About</Link>
            </li>
          </ul>
        </nav>
      </header>
      <main>{children}</main>
    </>
  )
}

export default BlogLayout
And then we can remove the extra "Return to Home" link (and Link/routes import) that we had on the About page:
// web/src/pages/AboutPage/AboutPage.js

import BlogLayout from 'src/layouts/BlogLayout'

const AboutPage = () => {
  return (
    <BlogLayout>
      <p>
        This site was created to demonstrate my mastery of Redwood: Look on my
        works, ye mighty, and despair!
      </p>
    </BlogLayout>
  )
}

export default AboutPagePart 2 of the video tutorial picks up here:
These two pages are great and all but where are the actual blog posts in this blog? Let's work on those next.
For the purposes of our tutorial we're going to get our blog posts from a database. Because relational databases are still the workhorses of many complex (and not-so-complex) web applications, we've made SQL access a first-class citizen. For Redwood apps, it all starts with the schema.
We need to decide what data we'll need for a blog post. We'll expand on this at some point, but at a minimum we'll want to start with:
idthe unique identifier for this blog post (all of our database tables will have one of these)titlebodythe actual content of the blog postcreatedAta timestamp of when this record was created
We use Prisma Client JS to talk to the database. Prisma has another library called Migrate that lets us update the database's schema in a predictable way and snapshot each of those changes. Each change is called a migration and Migrate will create one when we make changes to our schema.
First let's define the data structure for a post in the database. Open up api/db/schema.prisma and add the definition of our Post table (remove any "sample" models that are present in the file). Once you're done the entire schema file should look like:
// api/db/schema.prisma

datasource DS {
  provider = "sqlite"
  url      = env("DATABASE_URL")
}

generator client {
  provider      = "prisma-client-js"
  binaryTargets = "native"
}

model Post {
  id        Int      @id @default(autoincrement())
  title     String
  body      String
  createdAt DateTime @default(now())
}
This says that we want a table called Post and it should have:
- An
idcolumn of typeInt, we let Prisma know this is the column it should use as the@id(for it to create relationships to other tables) and that the@defaultvalue should be Prisma's specialautoincrement()method letting it know that the DB should set it automatically when new records are created - A
titlefield that will contain aString - A
bodyfield that will contain aString - A
createdAtfield that will be aDateTimeand will@defaulttonow()when we create a new record (so we don't have to set the time manually in our app)
Integer vs. String IDs
For the tutorial we're keeping things simple and using an integer for our ID column. Some apps may want to use a CUID or a UUID which Prisma supports. In that case you would use
Stringfor the datatype instead ofIntand usecuid()oruuid()instead ofautoincrement():
id String @id @default(cuid())Integers also make for nicer URLs like https://redwoodblog.com/posts/123 instead of https://redwoodblog.com/posts/eebb026c-b661-42fe-93bf-f1a373421a13.
Take a look at the official Prisma documentation for more on ID fields.
That was simple. Now we'll want to snapshot this as a migration:
yarn redwood db save "create posts"
You've named the migration "create posts", and this is for your own benefit—Redwood doesn't care about the migration's name, it's just a reference for future developers.
After the command completes you'll see a new subdirectory created under api/db/migrations that has a timestamp and the name you gave the migration. It will contain a couple files inside (a snapshot of what the schema looked like at that point in time in schema.prisma and the directives that Prisma Migrate will use to make the change to the database in steps.json).
We apply the migration with another command:
yarn rw db up
redwoodShorthandFrom now on we'll use the shorter
rwalias instead of the fullredwoodname.
This will apply the migration (which runs the commands against the database to create the changes we need) which results in creating a new table called Post with the fields we defined above.
We haven't decided on the look and feel of our site yet, but wouldn't it be amazing if we could play around with posts without having to build a bunch of pages that we'll probably throw away once the design team gets back to us? Lucky for us, "Amazing" is Redwood's middle name! It has no last name.
Let's generate everything we need to perform all the CRUD (Create, Retrieve, Update, Delete) actions on posts so we can not only verify that we've got the right fields in the database, but let us get some sample posts in there so we can start laying out our pages and see real content. Redwood has a generator for just the occasion:
yarn rw g scaffold post
Let's point the browser to http://localhost:8910/posts and see what we have:
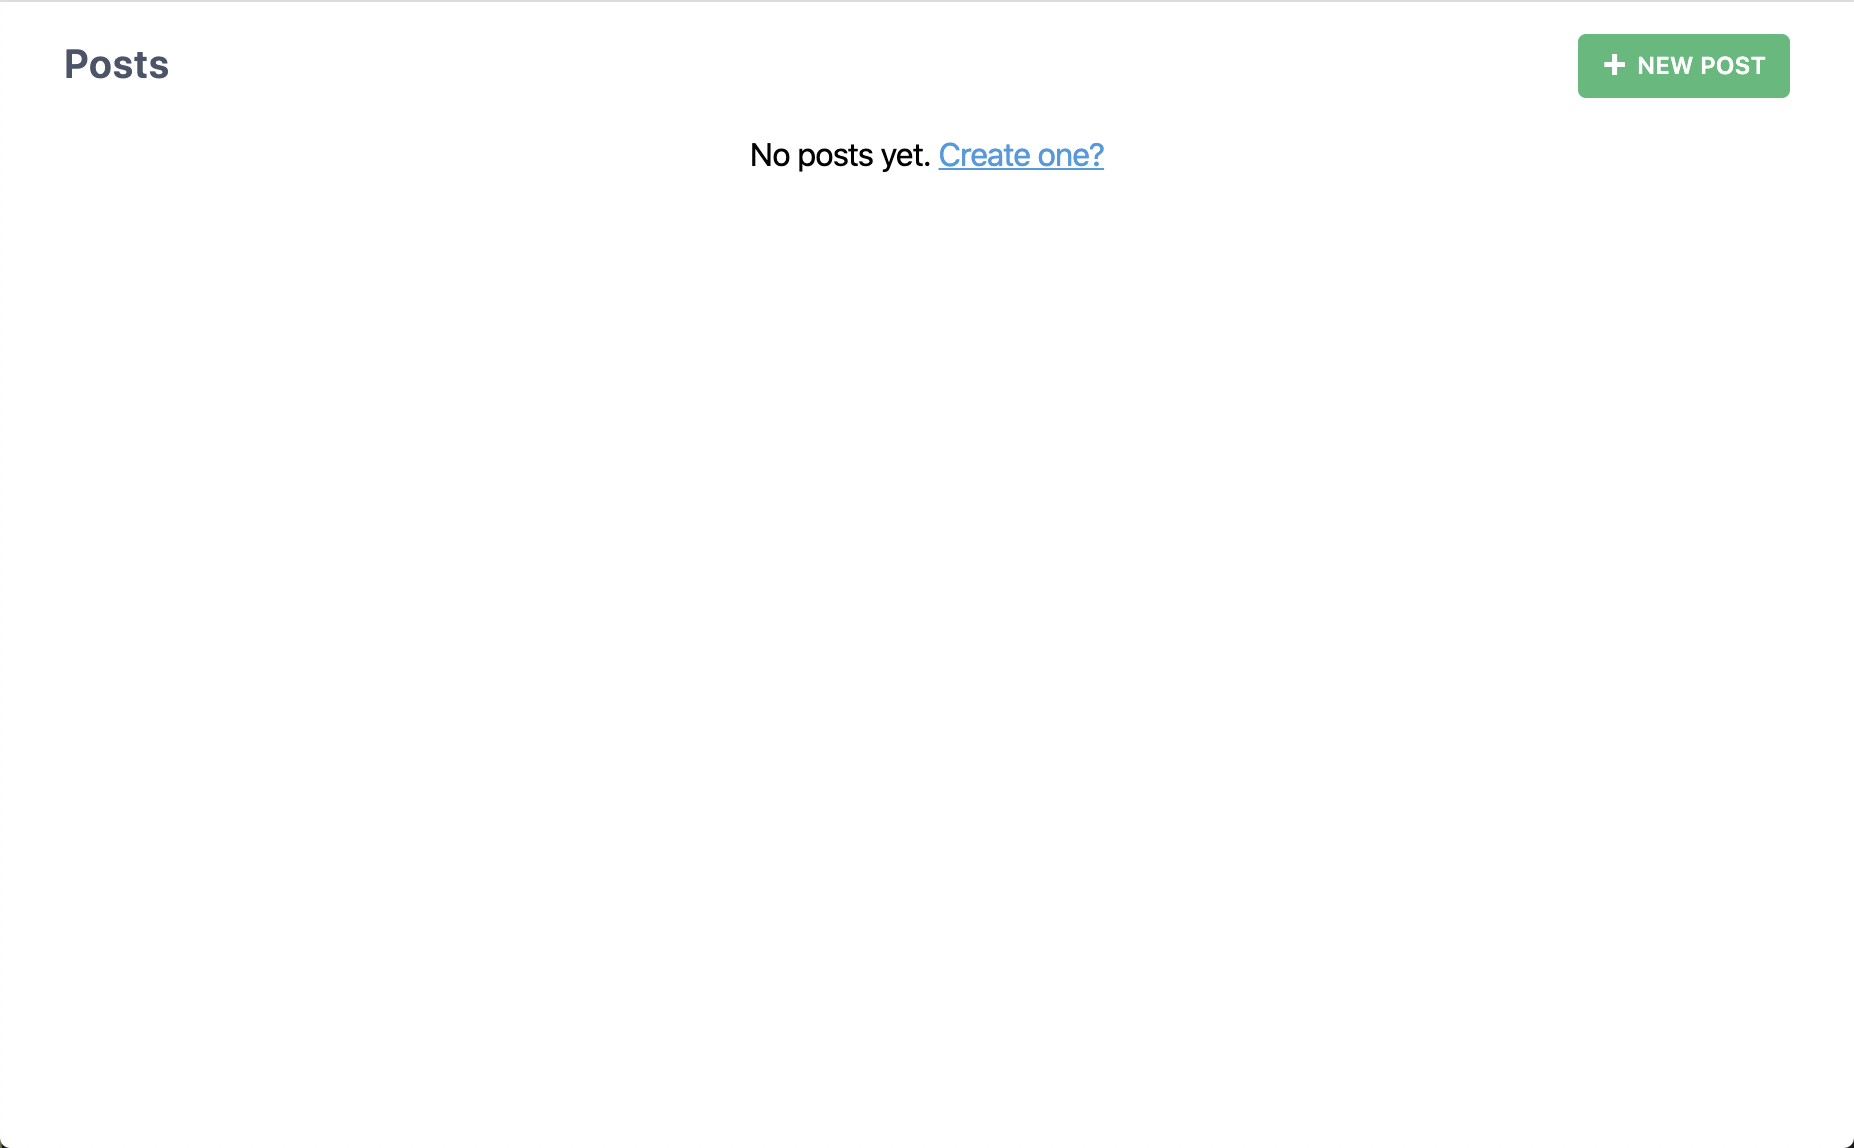
Well that's barely more than we got when we generated a page. What happens if we click that "New Post" button?
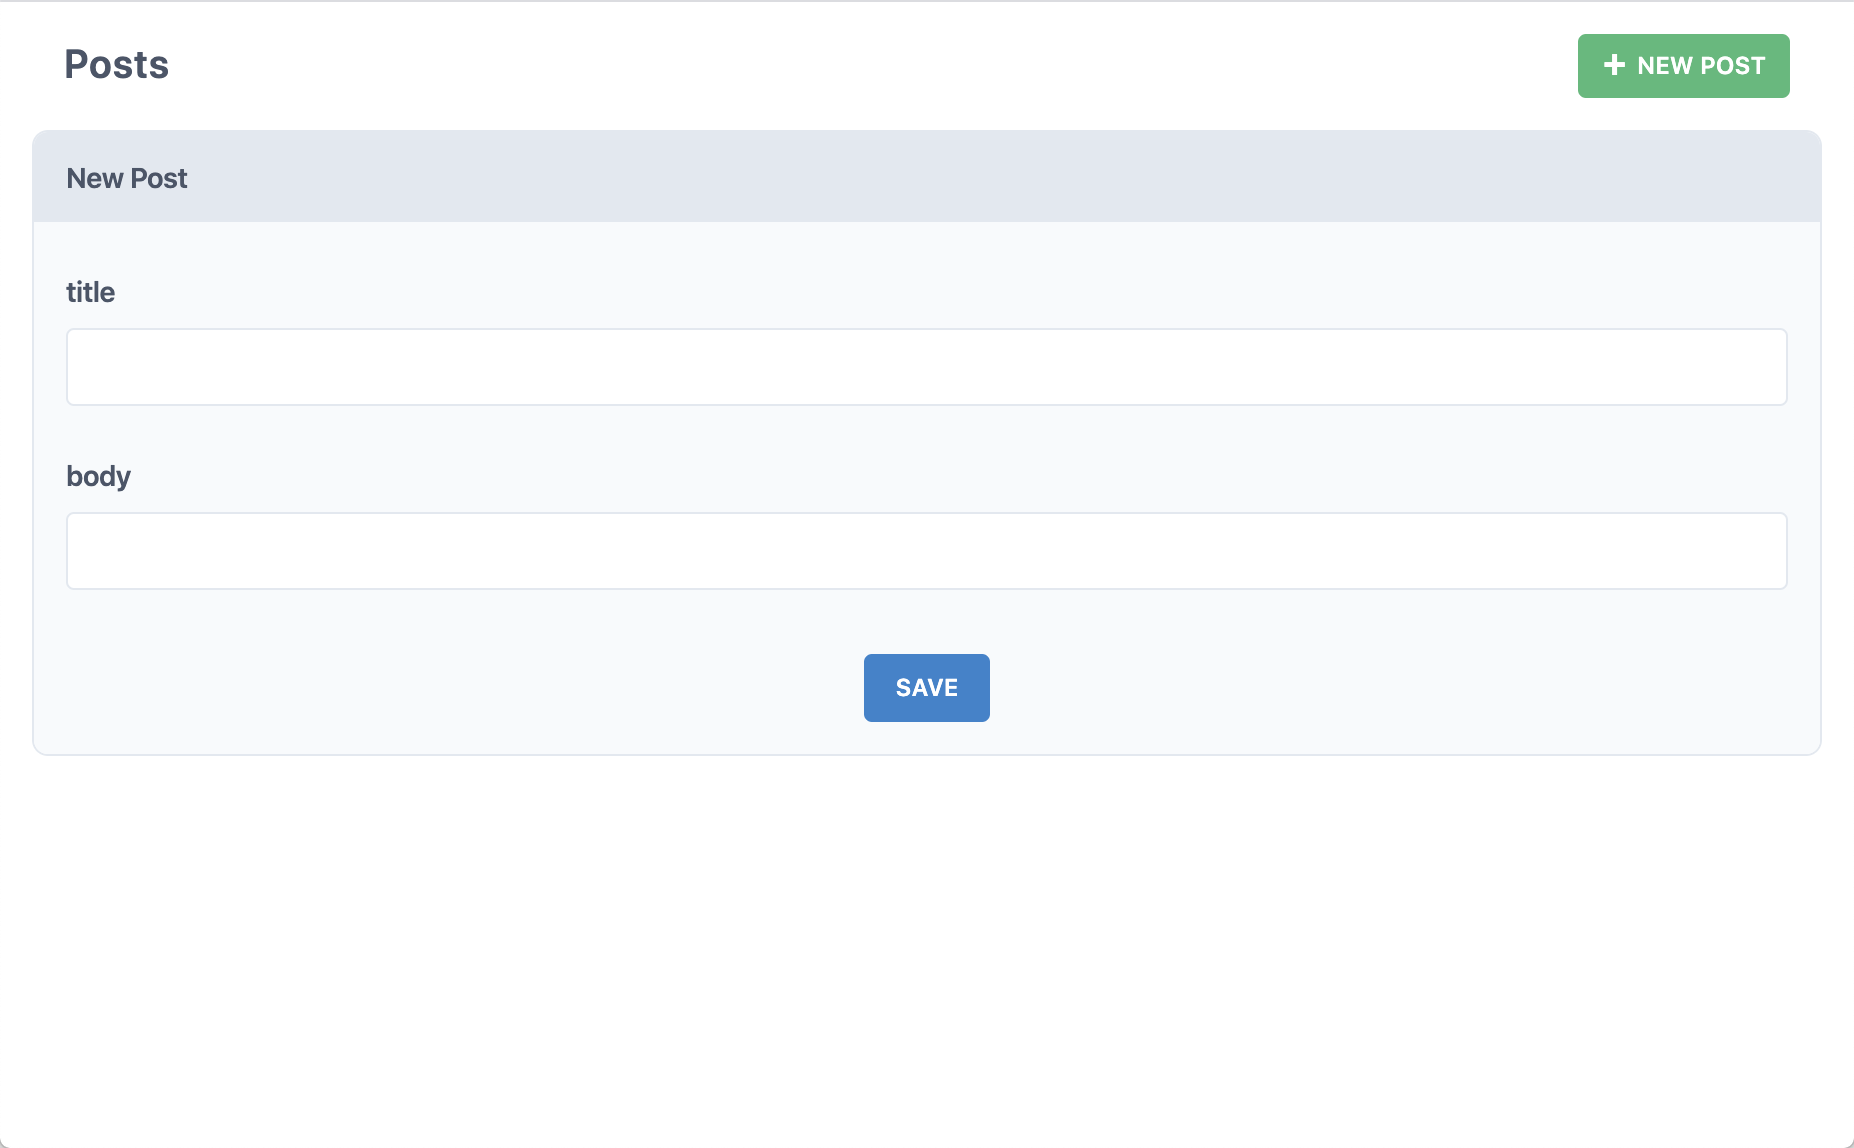
Okay, now we're getting somewhere. Fill in the title and body and click "Save".

Did we just create a post in the database? And then show that post here on this page? Yes, yes we did. Try creating another:
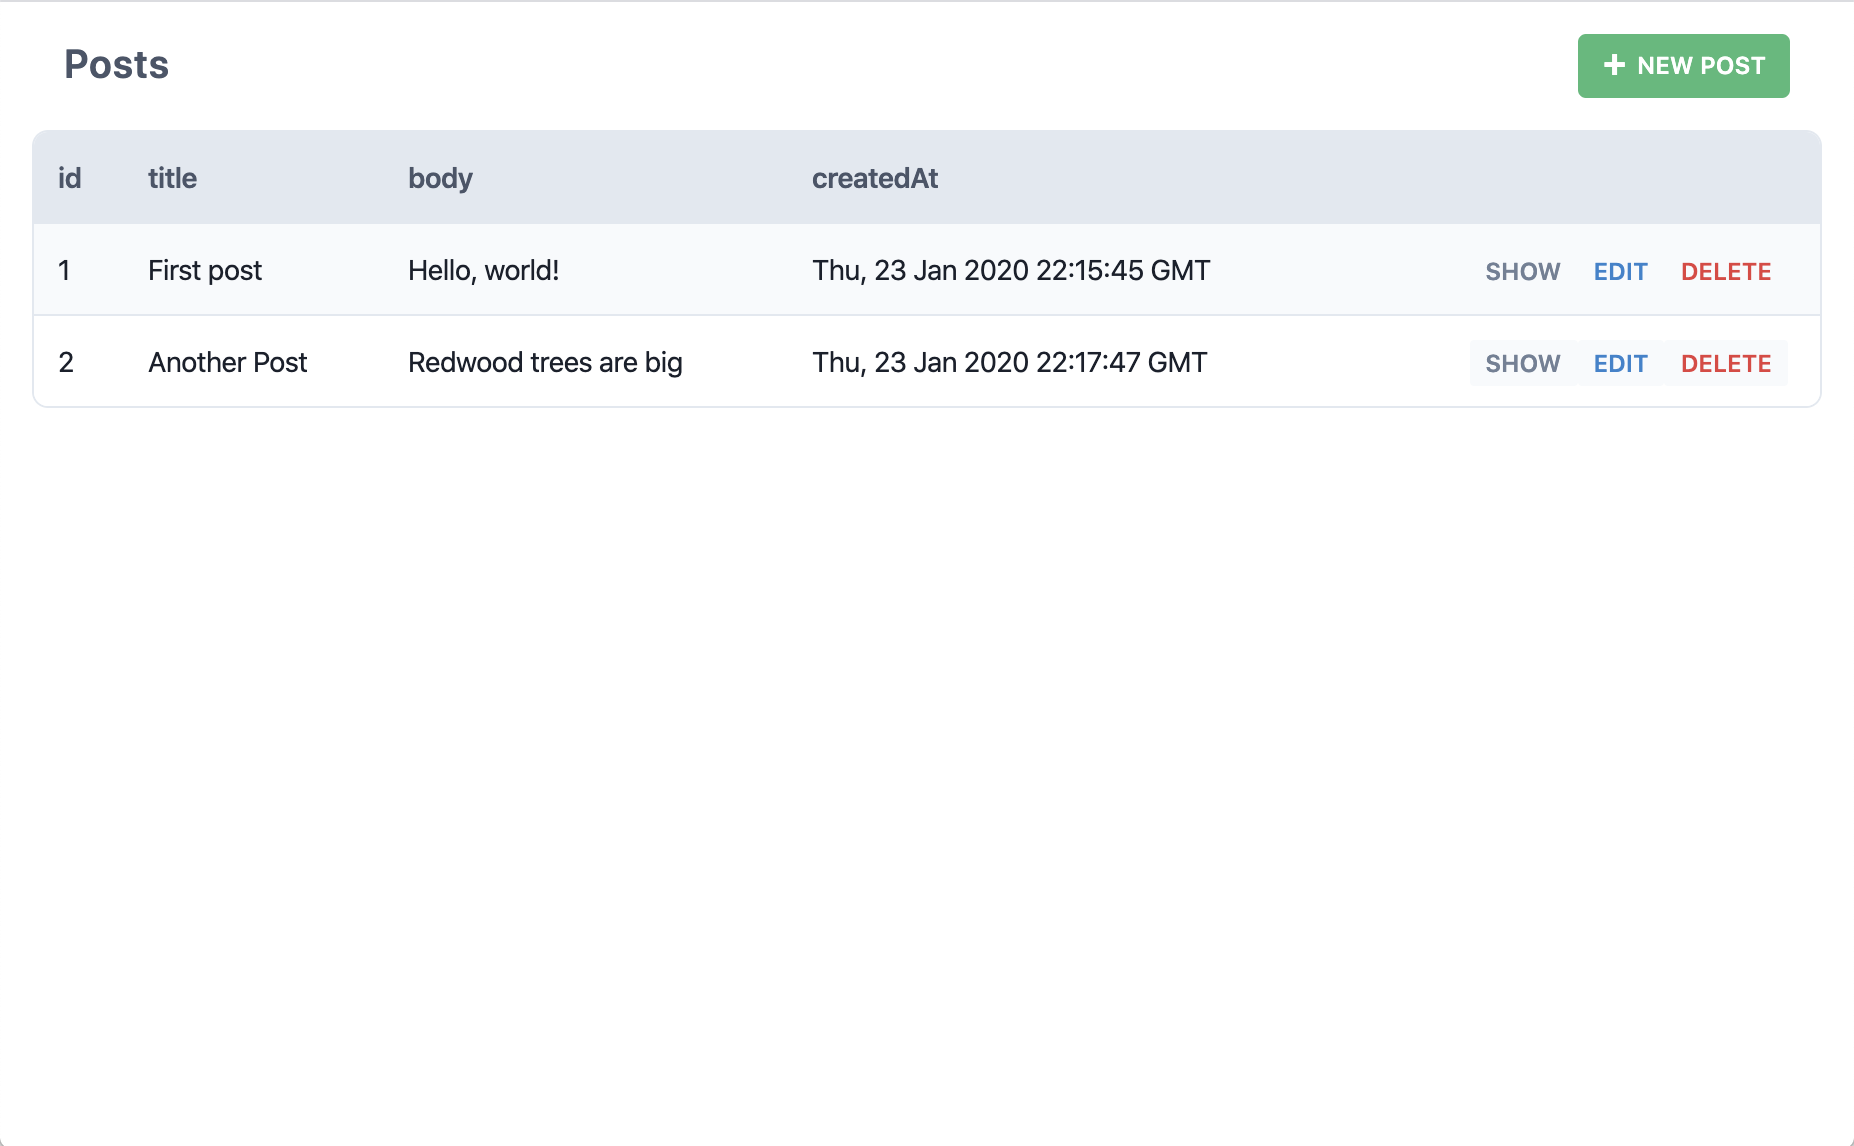
But what if we click "Edit" on one of those posts?
Okay but what if we click "Delete"?
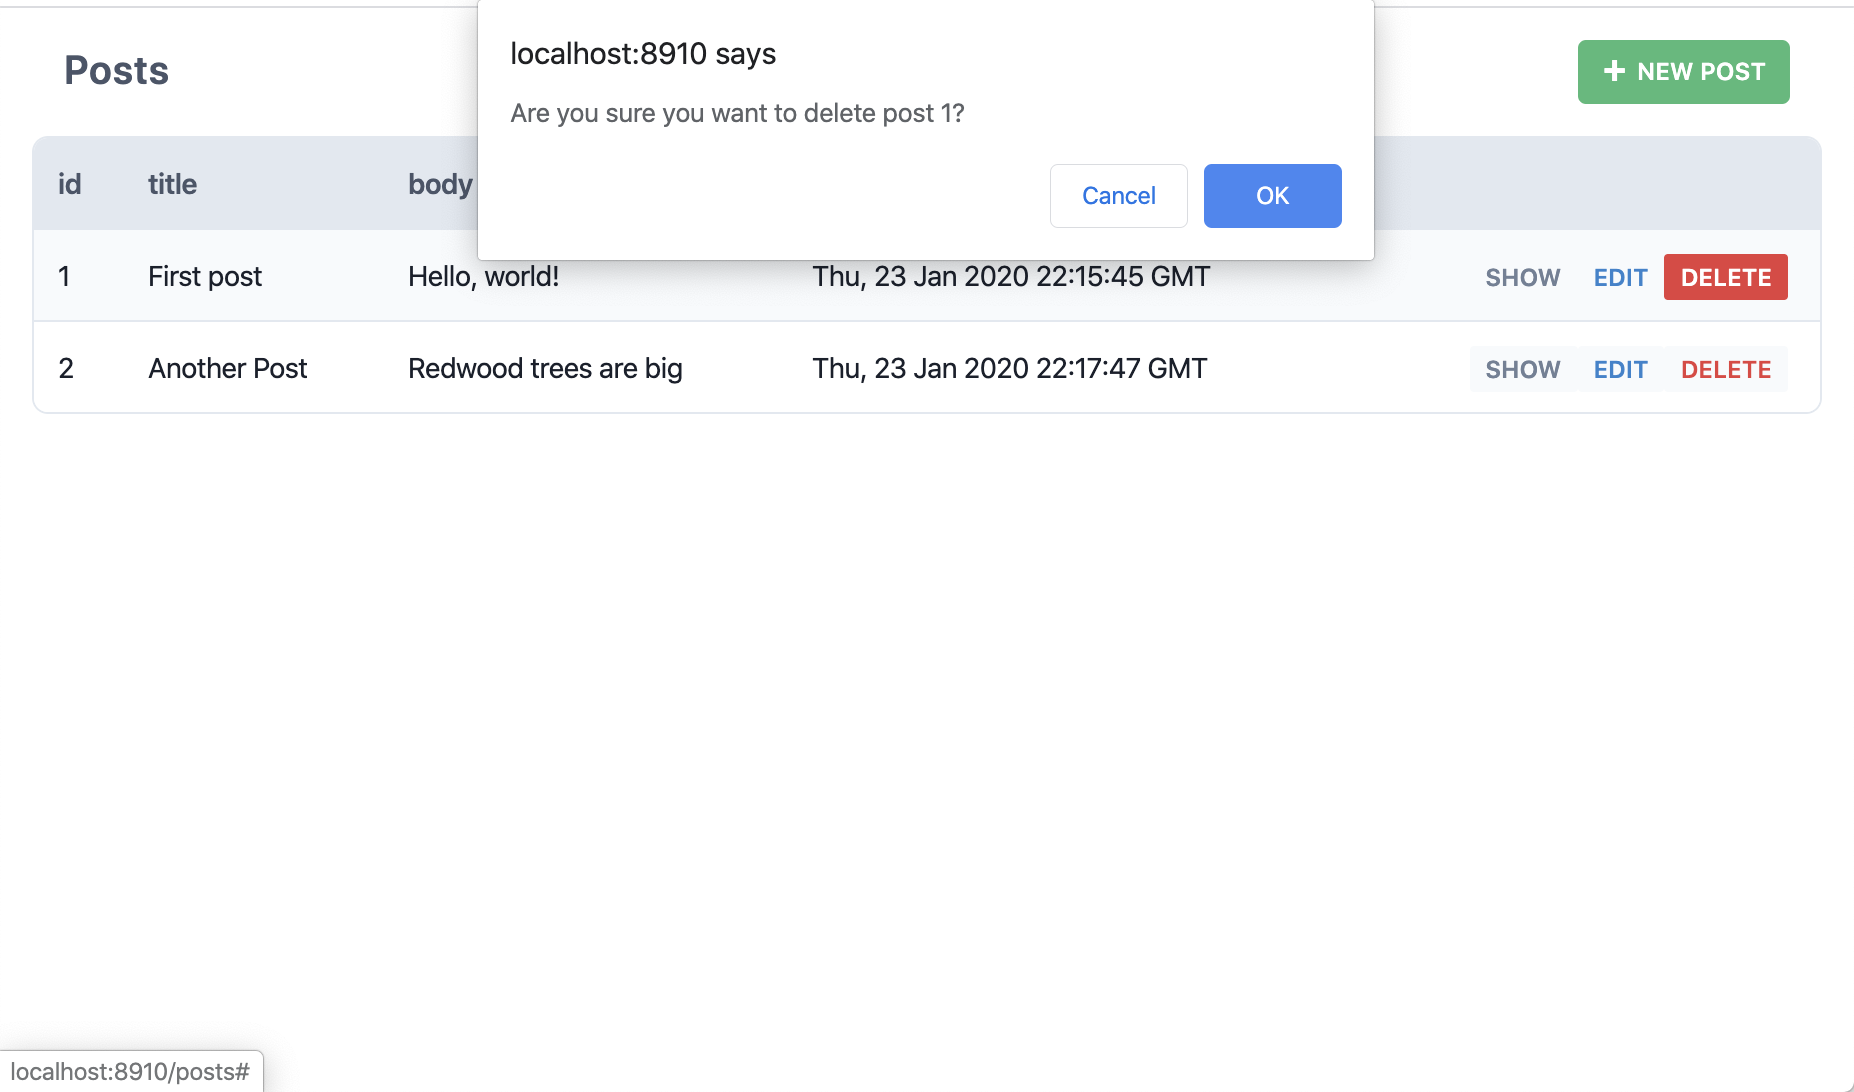
So, Redwood just created all the pages, components and services necessary to perform all CRUD actions on our posts table. No need to open a database GUI or login through a terminal window and write SQL from scratch. Redwood calls these scaffolds. Pretty neat, right?
Here's what happened when we ran that yarn rw g scaffold post command:
- Added an SDL file to define several GraphQL queries and mutations in
api/src/graphql/posts.sdl.js - Added a services file in
api/src/services/posts/posts.jsthat makes the Prisma Client JS calls to get data in and out of the database - Created several pages in
web/src/pages:EditPostPagefor editing a postNewPostPagefor creating a new postPostPagefor showing the detail of a postPostsPagefor listing all the posts
- Created routes for those pages in
web/src/Routes.js - Created three cells in
web/src/components:EditPostCellgets the post to edit in the databasePostCellgets the post to displayPostsCellgets all the posts
- Created four components also in
web/src/components:NewPostdisplays the form for creating a new postPostdisplays a single postPostFormthe actual form used by both the New and Edit componentsPostsdisplays the table of all posts
Generator Naming Conventions
You'll notice that some of the generated parts have plural names and some have singular. This convention is borrowed from Ruby on Rails which uses a more "human" naming convention: if you're dealing with multiple of something (like the list of all posts) it will be plural. If you're only dealing with a single something (like creating a new post) it will be singular. It sounds natural when speaking, too: "show me a list of all the posts" versus "I'm going to create a new post."
As far as the generators are concerned:
- Services filenames are always plural.
- The methods in the services will be singular or plural depending on if they are expected to return multiple posts or a single post (
postsvs.createPost).- SDL filenames are plural.
- Pages that come with the scaffolds are plural or singular depending on whether they deal with many or one post. When using the
pagegenerator it will stick with whatever name you give the command.- Layouts use the name you give them on the command line.
- Components and cells, like pages, will be plural or singular depending on context when created by the scaffold generator, otherwise they'll use the given name on the command line.
Also note that it's the database table name part that's singular or plural, not the whole word. So it's
PostsCell, notPostCells.You don't have to follow this convention once you start creating your own parts but we recommend doing so. The Ruby on Rails community has come to love this nomenclature even though many people complained about it when first exposed to it. Give it five minutes.
We can start replacing these pages one by one as we get designs, or maybe move them to the admin section of our site and build our own display pages from scratch. The public facing site won't let viewers create, edit or delete posts. What can they do?
- View a list of posts (without links to edit/delete)
- View a single post
Since we'll probably want a way to create and edit posts going forward let's keep the scaffolded pages as they are and create new ones for these two items.
We already have HomePage so we won't need to create that. We want to display a list of posts to the user so we'll need to add that logic. We need to get the content from the database and we don't want the user to just see a blank screen in the meantime (depending on network conditions, server location, etc), so we'll want to show some kind of loading message or animation. And if there's an error retrieving the data we should handle that as well. And what about when we open source this blog engine and someone puts it live without any content in the database? It'd be nice if there was some kind of blank slate message.
Oh boy, our first page with data and we already have to worry about loading states, errors, and blank slates...or do we?
These features are common in most web apps. We wanted to see if there was something we could do to make developers' lives easier when it comes to adding them to a typical component. We think we've come up with something to help. We call them Cells. Cells provide a simpler and more declarative approach to data fetching. (Read the full documentation about Cells.)
When you create a cell you export several specially named constants and then Redwood takes it from there. A typical cell may look something like:
export const QUERY = gql`
  query {
    posts {
      id
      title
      body
      createdAt
    }
  }
`

export const Loading = () => <div>Loading...</div>

export const Empty = () => <div>No posts yet!</div>

export const Failure = ({ error }) => (
  <div>Error loading posts: {error.message}</div>
)

export const Success = ({ posts }) => {
  return posts.map((post) => (
    <article>
      <h2>{post.title}</h2>
      <div>{post.body}</div>
    </article>
  ))
}
When React renders this component, Redwood will perform the QUERY and display the Loading component until a response is received.
Once the query returns, it will display one of three states:
- If there was an error, the
Failurecomponent - If the data return is empty (
nullor empty array), theEmptycomponent - Otherwise, the
Successcomponent
There are also some lifecycle helpers like beforeQuery (for massaging any props before being given to the QUERY) and afterQuery (for massaging the data returned from GraphQL but before being sent to the Success component).
The minimum you need for a cell are the QUERY and Success exports. If you don't export an Empty component, empty results will be sent to your Success component. If you don't provide a Failure component, you'll get error output sent to the console.
A guideline for when to use cells is if your component needs some data from the database or other service that may be delayed in responding. Let Redwood worry about juggling what is displayed when and you can focus on the happy path of the final, rendered component populated with data.
The homepage displaying a list of posts is a perfect candidate for our first cell. Naturally, there is a Redwood generator for them:
yarn rw g cell BlogPosts
This command will result in a new file at /web/src/components/BlogPostsCell/BlogPostsCell.js (and a test file) with some boilerplate to get you started:
// web/src/components/BlogPostsCell/BlogPostsCell.js

export const QUERY = gql`
  query BlogPostsQuery {
    blogPosts {
      id
    }
  }
`

export const Loading = () => <div>Loading...</div>

export const Empty = () => <div>Empty</div>

export const Failure = ({ error }) => <div>Error: {error.message}</div>

export const Success = ({ blogPosts }) => {
  return JSON.stringify(blogPosts)
}
Indicating Multiplicity to the Cell Generator
When generating a cell you can use any case you'd like and Redwood will do the right thing when it comes to naming. These will all create the same filename (
web/src/components/BlogPostsCell/BlogPostsCell.js):yarn rw g cell blog_posts yarn rw g cell blog-posts yarn rw g cell blogPosts yarn rw g cell BlogPostsYou will need some kind of indication that you're using more than one word: either snake_case (
blog_posts), kebab-case (blog-posts), camelCase (blogPosts) or PascalCase (BlogPosts).Calling
yarn redwood g cell blogposts(without any indication that we're using two words) will generate a file atweb/src/components/BlogpostsCell/BlogpostsCell.js.
To get you off and running as quickly as possible the generator assumes you've got a root GraphQL query named the same thing as your cell and gives you the minimum query needed to get something out of the database. In this case the query is called blogPosts:
// web/src/components/BlogPostsCell/BlogPostsCell.js

export const QUERY = gql`
  query BlogPostsQuery {
    blogPosts {
      id
    }
  }
`

export const Loading = () => <div>Loading...</div>

export const Empty = () => <div>Empty</div>

export const Failure = ({ error }) => <div>Error: {error.message}</div>

export const Success = ({ posts }) => {
  return JSON.stringify(posts)
}
However, this is not a valid query name for our existing Posts SDL (src/graphql/posts.sdl.js) and Service (src/services/posts/posts.js). (To see where these files come from, go back to the Creating a Post Editor section in the Getting Dynamic part.)
We'll have to rename that to just posts in both the query name and in the prop name in Success:
// web/src/components/BlogPostsCell/BlogPostsCell.js

export const QUERY = gql`
  query BlogPostsQuery {
    posts {
      id
    }
  }
`

export const Loading = () => <div>Loading...</div>

export const Empty = () => <div>Empty</div>

export const Failure = ({ error }) => <div>Error: {error.message}</div>

export const Success = ({ posts }) => {
  return JSON.stringify(posts)
}
Let's plug this cell into our HomePage and see what happens:
// web/src/pages/HomePage/HomePage.js

import BlogLayout from 'src/layouts/BlogLayout'
import BlogPostsCell from 'src/components/BlogPostsCell'

const HomePage = () => {
  return (
    <BlogLayout>
      <BlogPostsCell />
    </BlogLayout>
  )
}

export default HomePage
The browser should actually show an array with a number or two (assuming you created a blog post with our scaffolding from earlier). Neat!

In the
Successcomponent, where didpostscome from?Notice in the
QUERYthat the query we're making isposts. Whatever the name of this query is, that's the name of the prop that will be available inSuccesswith your data. You can alias the name of the variable containing the result of the GraphQL query, and that will be the name of the prop:export const QUERY = gql` query BlogPostsQuery { postIds: posts { id } } `Now
postIdswill be available inSuccessinstead ofposts
In addition to the id that was added to the query by the generator, let's get the title, body, and createdAt too:
// web/src/components/BlogPostsCell/BlogPostsCell.js

export const QUERY = gql`
  query BlogPostsQuery {
    posts {
      id
      title
      body
      createdAt
    }
  }
`
The page should now show a dump of all the data you created for any blog posts you scaffolded:

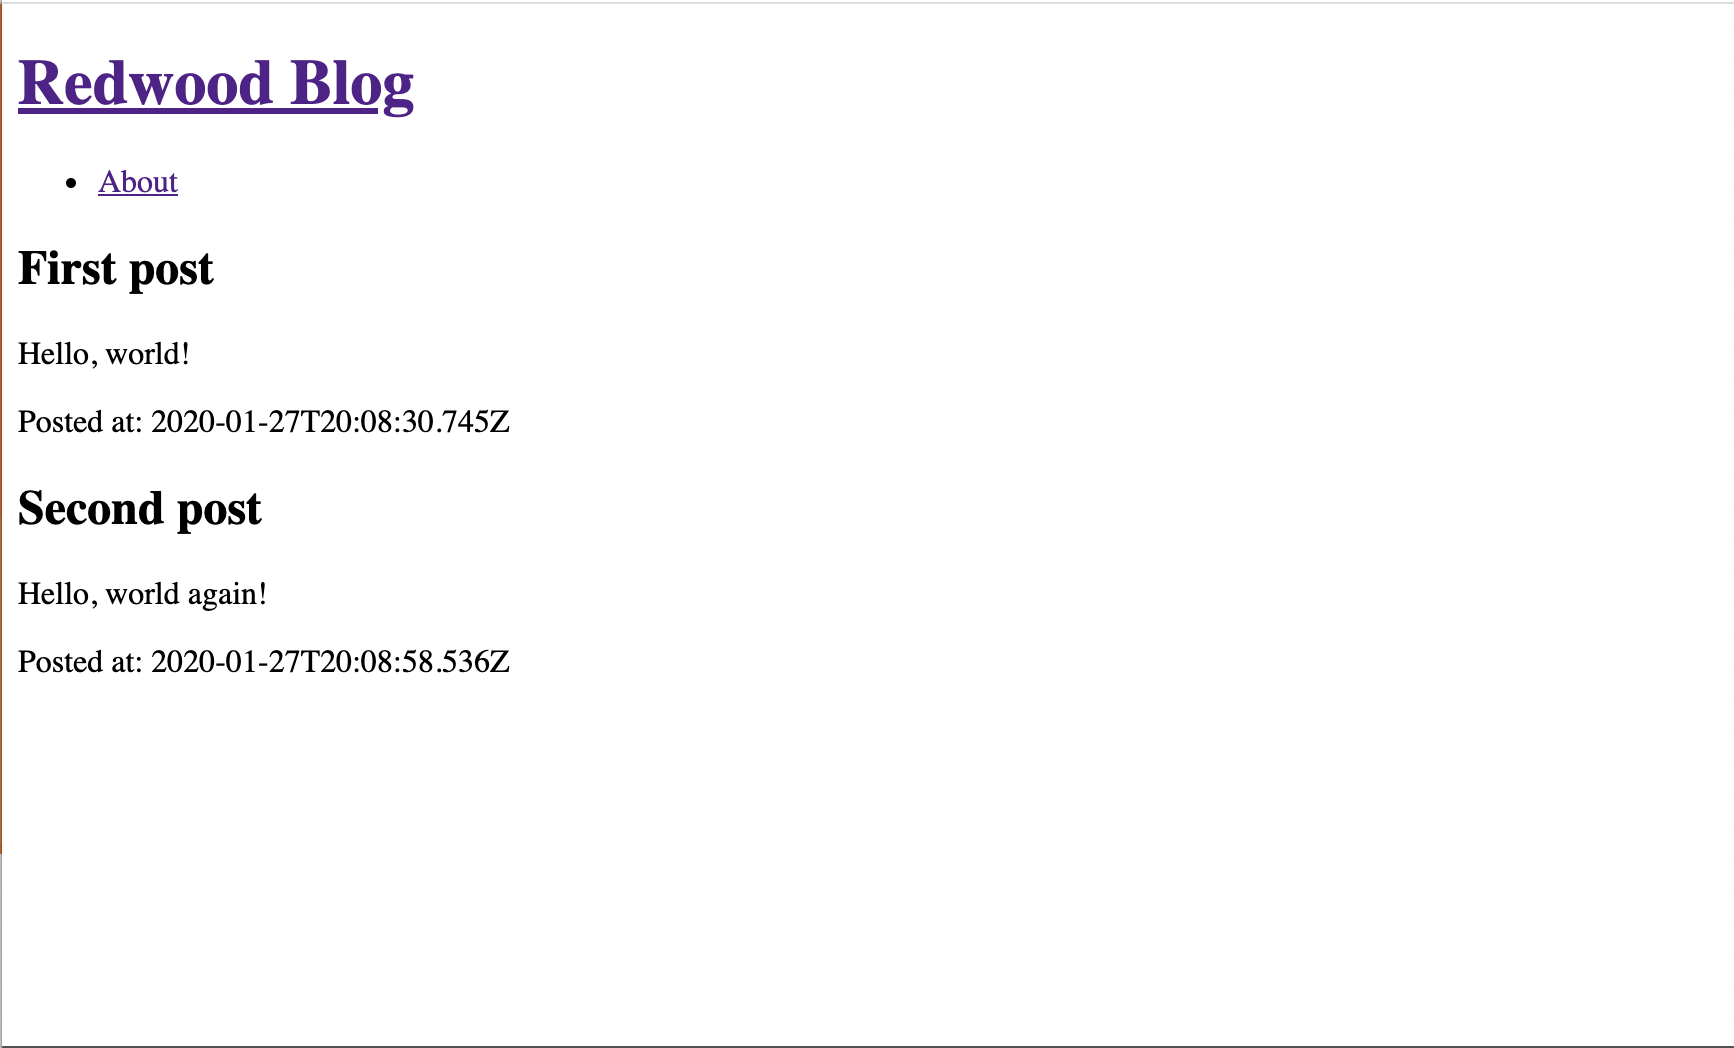
Now we're in the realm of good ol' React components, so just build out the Success component to display the blog post in a nicer format:
// web/src/components/BlogPostsCell/BlogPostsCell.js

export const Success = ({ posts }) => {
  return posts.map((post) => (
    <article key={post.id}>
      <header>
        <h2>{post.title}</h2>
      </header>
      <p>{post.body}</p>
      <div>Posted at: {post.createdAt}</div>
    </article>
  ))
}
And just like that we have a blog! It may be the most basic, ugly blog that ever graced the internet, but it's something! (Don't worry, we've got more features to add.)
To sum up, what did we actually do to get this far?
- Generate the homepage
- Generate the blog layout
- Define the database schema
- Run migrations to update the database and create a table
- Scaffold a CRUD interface to the database table
- Create a cell to load the data and take care of loading/empty/failure/success states
- Add the cell to the page
This will become a standard lifecycle of new features as you build a Redwood app.
So far, other than a little HTML, we haven't had to do much by hand. And we especially didn't have to write a bunch of plumbing just to move data from one place to another. It makes web development a little more enjoyable, don't you think?
Redwood likes GraphQL. We think it's the API of the future. Our GraphQL implementation is built with Apollo. Here's how a typical GraphQL query works its way through your app:

The front-end uses Apollo Client to create a GraphQL payload sent to Apollo Server running in a serverless AWS Lambda function in the cloud.
The *.sdl.js files in api/src/graphql define the GraphQL Object, Query and Mutation types and thus the interface of your API.
Normally you would write a resolver map that contains all your resolvers and tells Apollo how to map them to your SDL. But putting business logic directly in the resolver map would result in a very big file and horrible reusability, so you'd be well advised to extract all the logic out into a library of functions, import them, and call them from the resolver map, remembering to pass all the arguments through. Ugh, that's a lot of effort and boilerplate, and still doesn't result in very good reusabilty.
Redwood has a better way! Remember the api/src/services directory? Redwood will automatically import and map resolvers from the corresponding services file onto your SDL. At the same time, it allows you to write those resolvers in a way that makes them easy to call as regular functions from other resolvers or services. That's a lot of awesomeness to contemplate, so let's show an example.
Consider the following SDL javascript snippet:
// api/src/graphql/posts.sdl.js

export const schema = gql`
  type Post {
    id: Int!
    title: String!
    body: String!
    createdAt: DateTime!
  }

  type Query {
    posts: [Post!]!
    post(id: Int!): Post!
  }

  input CreatePostInput {
    title: String!
    body: String!
  }

  input UpdatePostInput {
    title: String
    body: String
  }

  type Mutation {
    createPost(input: CreatePostInput!): Post!
    updatePost(id: Int!, input: UpdatePostInput!): Post!
    deletePost(id: Int!): Post!
  }
`
In this example, Redwood will look in api/src/services/posts/posts.js for the following five resolvers:
posts()post({id})createPost({input})updatePost({id, input})deletePost({id})
To implement these, simply export them from the services file. They will usually get your data from a database, but they can do anything you want, as long as they return the proper types that Apollo expects based on what you defined in posts.sdl.js.
// api/src/services/posts/posts.js
import { db } from 'src/lib/db'

export const posts = () => {
  return db.post.findMany()
}

export const post = ({ id }) => {
  return db.post.findOne({
    where: { id },
  })
}

export const createPost = ({ input }) => {
  return db.post.create({
    data: input,
  })
}

export const updatePost = ({ id, input }) => {
  return db.post.update({
    data: input,
    where: { id },
  })
}

export const deletePost = ({ id }) => {
  return db.post.delete({
    where: { id },
  })
}
Apollo assumes these functions return promises, which
db(an instance ofPrismaClient) does. Apollo waits for them to resolve before responding with your query results, so you don't need to worry aboutasync/awaitor mess with callbacks yourself.
You may be wondering why we call these implementation files "services". While this example blog doesn't get complex enough to show it off, services are intended to be an abstraction above single database tables. For example, a more complex app may have a "billing" service that uses both a transactions table and a subscriptions table. Some of the functionality of this service may be exposed via GraphQL, but only as much as you like.
You don't have to make each function in your service available via GraphQL—leave it out of your Query and Mutation types and it won't exist as far as GraphQL is concerned. But you could still use it yourself—services are just Javascript functions so you can use them anywhere you'd like:
- From another service
- In a custom lambda function
- From a completely separate, custom API
By dividing your app into well-defined services and providing an API for those services (both for internal use and for GraphQL), you will naturally start to enforce separation of concerns and (in all likelihood) increase the maintainability of your codebase.
Back to our data flow: Apollo has called the resolver which, in our case, retrieved data from the database. Apollo digs into the object and returns only the key/values that were asked for in the GraphQL query. It then packages up the response in a GraphQL payload and returns it to the browser.
If you're using a Redwood cell then this data will be available to you in your Success component ready to be looped through and/or displayed like any other React component.
Now that we have our homepage listing all the posts, let's build the "detail" page—a canonical URL that displays a single post. First we'll generate the page and route:
yarn rw g page BlogPost
Note that we can't call this page simply
Postbecause our scaffold already created a page with that name.
Now let's link the title of the post on the homepage to the detail page (and include the import for Link and routes):
// web/src/components/BlogPostsCell/BlogPostsCell.js

import { Link, routes } from '@redwoodjs/router'

// QUERY, Loading, Empty and Failure definitions...

export const Success = ({ posts }) => {
  return posts.map((post) => (
    <article key={post.id}>
      <header>
        <h2>
          <Link to={routes.blogPost()}>{post.title}</Link>
        </h2>
      </header>
      <p>{post.body}</p>
      <div>Posted at: {post.createdAt}</div>
    </article>
  ))
}
If you click the link on the title of the blog post you should see the boilerplate text on BlogPostPage. But what we really need is to specify which post we want to view on this page. It would be nice to be able to specify the ID of the post in the URL with something like /blog-post/1. Let's tell the <Route> to expect another part of the URL, and when it does, give that part a name that we can reference later:
// web/src/Routes.js

<Route path="/blog-post/{id}" page={BlogPostPage} name="blogPost" />
Notice the {id}. Redwood calls these route parameters. They say "whatever value is in this position in the path, let me reference it by the name inside the curly braces."
Cool, cool, cool. Now we need to construct a link that has the ID of a post in it:
// web/src/components/BlogPostsCell/BlogPostsCell.js

<Link to={routes.blogPost({ id: post.id })}>{post.title}</Link>
For routes with route parameters, the named route function expects an object where you specify a value for each parameter. If you click on the link now, it will indeed take you to /blog-post/1 (or /blog-post/2, etc, depending on the ID of the post).
Ok, so the ID is in the URL. What do we need next in order to display a specific post? It sounds like we'll be doing some data retrieval from the database, which means we want a cell:
yarn rw g cell BlogPost
And then we'll use that cell in BlogPostPage (and while we're at it let's surround the page with the BlogLayout):
// web/src/pages/BlogPostPage/BlogPostPage.js

import BlogLayout from 'src/layouts/BlogLayout'
import BlogPostCell from 'src/components/BlogPostCell'

const BlogPostPage = () => {
  return (
    <BlogLayout>
      <BlogPostCell />
    </BlogLayout>
  )
}

export default BlogPostPage
Now over to the cell, we need access to that {id} route param so we can look up the ID of the post in the database. Let's update the query to accept a variable (and again change the query name from blogPost to just post)
// web/src/components/BlogPostCell/BlogPostCell.js

export const QUERY = gql`
  query BlogPostQuery($id: Int!) {
    post(id: $id) {
      id
      title
      body
      createdAt
    }
  }
`

export const Loading = () => <div>Loading...</div>

export const Empty = () => <div>Empty</div>

export const Failure = ({ error }) => <div>Error: {error.message}</div>

export const Success = ({ post }) => {
  return JSON.stringify(post)
}
Okay, we're getting closer. Still, where will that $id come from? Redwood has another trick up its sleeve. Whenever you put a route param in a route, that param is automatically made available to the page that route renders. Which means we can update BlogPostPage to look like this:
// web/src/pages/BlogPostPage/BlogPostPage.js

const BlogPostPage = ({ id }) => {
  return (
    <BlogLayout>
      <BlogPostCell id={id} />
    </BlogLayout>
  )
}
id already exists since we named our route param {id}. Thanks Redwood! But how does that id end up as the $id GraphQL parameter? If you've learned anything about Redwood by now, you should know it's going to take care of that for you! By default, any props you give to a cell will automatically be turned into variables and given to the query. "Say what!" you're saying. It's true!
We can prove it! Try going to the detail page for a post in the browser and—uh oh. Hmm:

By the way, this error message you're seeing is thanks to the
Failuresection of our Cell!
If you take a look in the web inspector console you can see the actual error coming from GraphQL:
[GraphQL error]: Message: Variable "$id" got invalid value "1";
  Expected type Int. Int cannot represent non-integer value: "1",
  Location: [object Object], Path: undefined
It turns out that route params are extracted as strings from the URL, but GraphQL wants an integer for the ID. We could use parseInt() to convert it to a number before passing it into BlogPostCell, but honestly, we can do better than that!
What if you could request the conversion right in the route's path? Well, guess what: you can! Introducing route param types. It's as easy as adding :Int to our existing route param:
// web/src/Routes.js

<Route path="/blog-post/{id:Int}" page={BlogPostPage} name="blogPost" />
Voilà! Not only will this convert the id param to a number before passing it to your Page, it will prevent the route from matching unless the id path segment consists entirely of digits. If any non-digits are found, the router will keep trying other routes, eventually showing the NotFoundPage if no routes match.
What if I want to pass some other prop to the cell that I don't need in the query, but do need in the Success/Loader/etc. components?
All of the props you give to the cell will be automatically available as props in the render components. Only the ones that match the GraphQL variables list will be given to the query. You get the best of both worlds! In our post display above, if you wanted to display some random number along with the post (for some contrived, tutorial-like reason), just pass that prop:
<BlogPostCell id={id} rand={Math.random()} />And get it, along with the query result (and even the original
idif you want) in the component:export const Success = ({ post, id, rand }) => { //... }Thanks again, Redwood!
Now let's display the actual post instead of just dumping the query result. This seems like the perfect place for a good old fashioned component since we're displaying a post on both the home page and this detail page, and it's (currently) the same exact output. Let's Redwood-up a component (I just invented that phrase):
yarn rw g component BlogPost
Which creates web/src/components/BlogPost/BlogPost.js (and test!) as a super simple React component:
// web/src/components/BlogPost/BlogPost.js

const BlogPost = () => {
  return (
    <div>
      <h2>{'BlogPost'}</h2>
      <p>{'Find me in ./web/src/components/BlogPost/BlogPost.js'}</p>
    </div>
  )
}

export default BlogPost
You may notice we don't have any explicit
importstatements forReactitself. We (the Redwood dev team) got tired of constantly importing it over and over again in every file so we automatically import it for you!
Let's take the post display code out of BlogPostsCell and put it here instead, taking the post in as a prop:
// web/src/components/BlogPost/BlogPost.js

import { Link, routes } from '@redwoodjs/router'

const BlogPost = ({ post }) => {
  return (
    <article>
      <header>
        <h2>
          <Link to={routes.blogPost({ id: post.id })}>{post.title}</Link>
        </h2>
      </header>
      <div>{post.body}</div>
    </article>
  )
}

export default BlogPost
And update BlogPostsCell and BlogPostCell to use this new component instead:
// web/src/components/BlogPostsCell/BlogPostsCell.js

import BlogPost from 'src/components/BlogPost'

// Loading, Empty, Failure...

export const Success = ({ posts }) => {
  return posts.map((post) => <BlogPost key={post.id} post={post} />)
}
// web/src/components/BlogPostCell/BlogPostCell.js

import BlogPost from 'src/components/BlogPost'

// Loading, Empty, Failure...

export const Success = ({ post }) => {
  return <BlogPost post={post} />
}
And there we go! We should be able to move back and forth between the homepage and the detail page.
If you like what you've been seeing from the router, you can dive deeper into the Redwood Router guide.
Let's summarize:
- We created a new page to show a single post (the "detail" page).
- We added a route to handle the
idof the post and turn it into a route param. - We created a cell to fetch and display the post.
- Redwood made the world a better place by making that
idavailable to us at several key junctions in our code and even turning it into a number automatically. - We turned the actual post display into a standard React component and used it in both the homepage and new detail page.
Wait, don't close your browser! You had to know this was coming eventually, didn't you? And you've probably realized by now we wouldn't even have this section in the tutorial unless Redwood had figured out a way to make forms less soul-sucking than usual. In fact Redwood might even make you love building forms. Well, love is a strong word. Like building forms. Tolerate building them?
Part 3 of the video tutorial picks up here:
We already have a form or two in our app; remember our posts scaffold? And those work pretty well! How hard can it be? (Hopefully you haven't sneaked a peek at that code—what's coming next will be much more impressive if you haven't.)
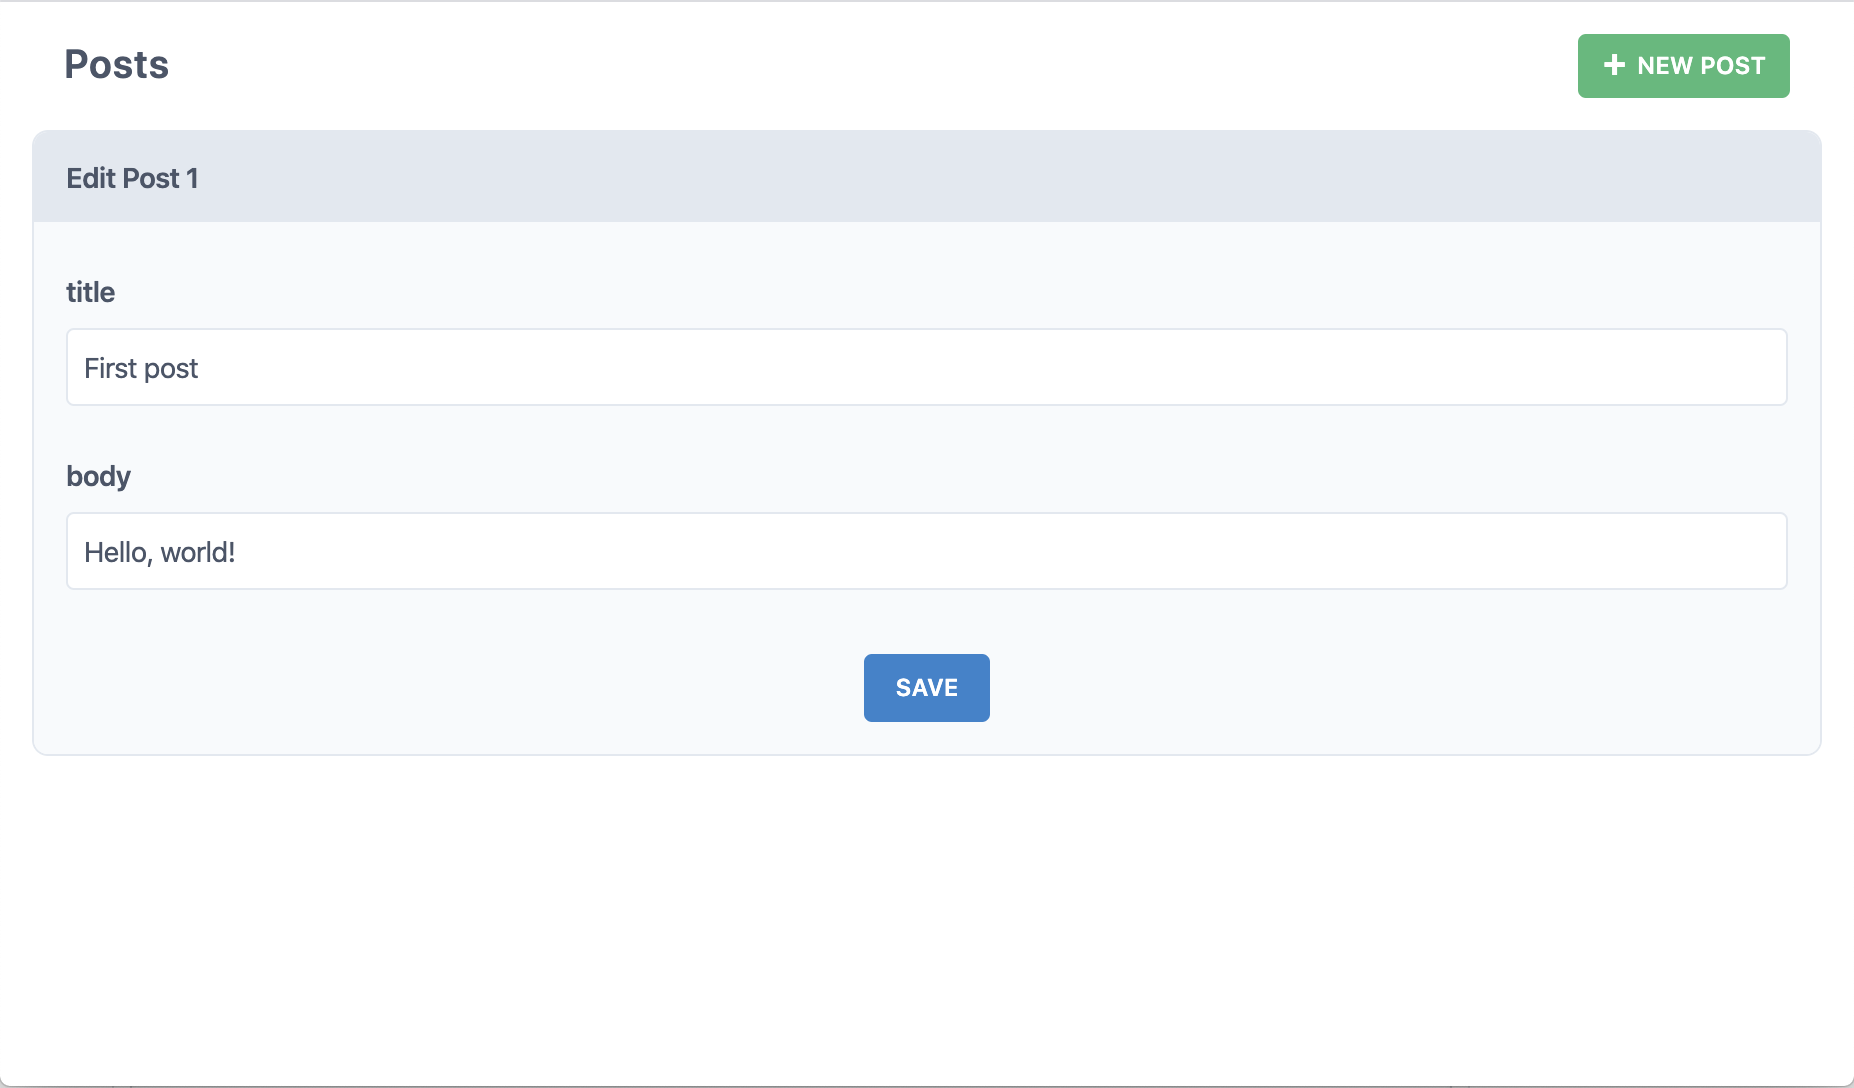
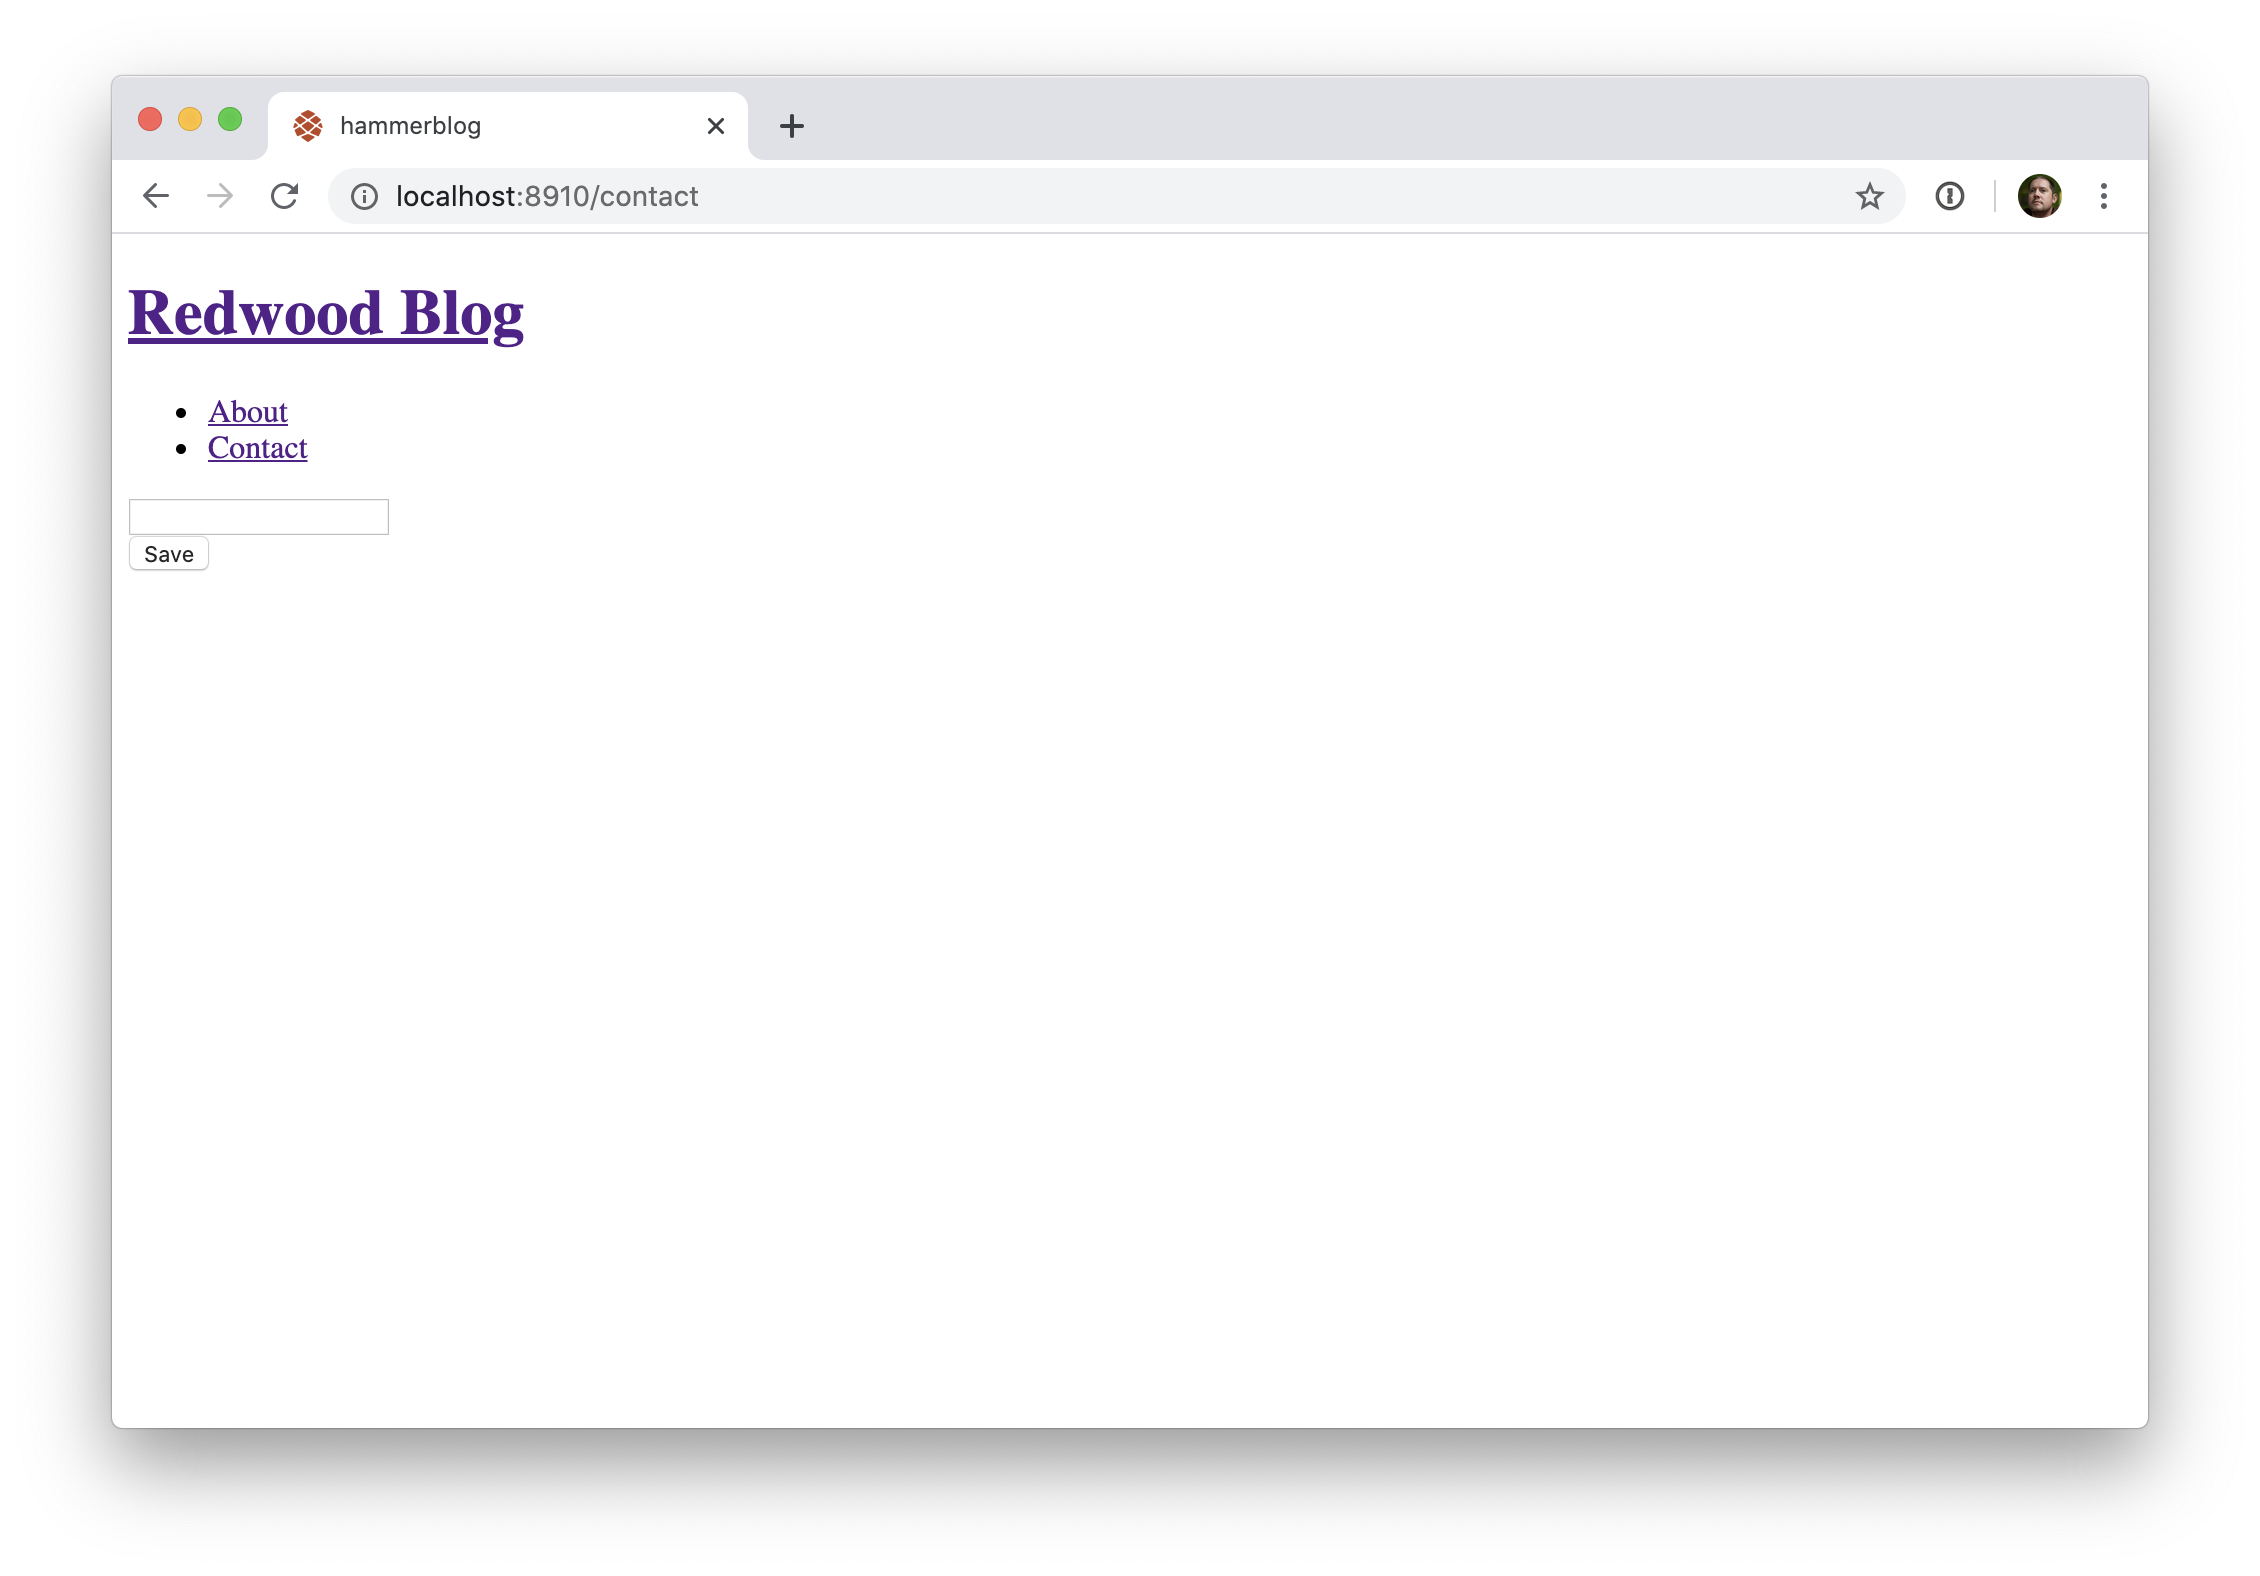
Let's build the simplest form that still makes sense for our blog, a "contact us" form.
yarn rw g page contact
We can put a link to Contact in our layout's header:
// web/src/layouts/BlogLayout/BlogLayout.js

import { Link, routes } from '@redwoodjs/router'

const BlogLayout = ({ children }) => {
  return (
    <>
      <header>
        <h1>
          <Link to={routes.home()}>Redwood Blog</Link>
        </h1>
        <nav>
          <ul>
            <li>
              <Link to={routes.about()}>About</Link>
            </li>
            <li>
              <Link to={routes.contact()}>Contact</Link>
            </li>
          </ul>
        </nav>
      </header>
      <main>{children}</main>
    </>
  )
}

export default BlogLayout
And then use the BlogLayout in the ContactPage:
// web/src/pages/ContactPage/ContactPage.js

import BlogLayout from 'src/layouts/BlogLayout'

const ContactPage = () => {
  return <BlogLayout></BlogLayout>
}

export default ContactPage
Double check that everything looks good and then let's get to the good stuff.
Forms in React are infamously annoying to work with. There are Controlled Components and Uncontrolled Components and third party libraries and many more workarounds to try and make forms in React as simple as they were originally intended to be in the HTML spec: an <input> field with a name attribute that gets submitted somewhere when you click a button.
We think Redwood is a step or two in the right direction by not only freeing you from writing controlled component plumbing, but also dealing with validation and errors automatically. Let's see how it works.
Before we start, let's add a couple of CSS classes to make the default form layout a little cleaner and save us from having to write a bunch of style attributes that will clutter up the examples and make them harder to follow. For now we'll just put these in the root index.css file in web/src:
/* web/src/index.css */

button, input, label, textarea {
  display: block;
  outline: none;
}

label {
  margin-top: 1rem;
}

.error {
  color: red;
}

input.error, textarea.error {
  border: 1px solid red;
}
For now we won't be talking to the database in our Contact form so we won't create a cell. Let's create the form right on the page. Redwood forms start with the...wait for it...<Form> tag:
// web/src/pages/ContactPage/ContactPage.js

import { Form } from '@redwoodjs/forms'
import BlogLayout from 'src/layouts/BlogLayout'

const ContactPage = () => {
  return (
    <BlogLayout>
      <Form></Form>
    </BlogLayout>
  )
}

export default ContactPage
Well that was anticlimactic. You can't even see it in the browser. Let's add a form field so we can at least see something. Redwood ships with several inputs and a plain text input box is <TextField>. We'll also give the field a name attribute so that once there are multiple inputs on this page we'll know which contains which data:
// web/src/pages/ContactPage/ContactPage.js

import { Form, TextField } from '@redwoodjs/forms'
import BlogLayout from 'src/layouts/BlogLayout'

const ContactPage = () => {
  return (
    <BlogLayout>
      <Form>
        <TextField name="input" />
      </Form>
    </BlogLayout>
  )
}

export default ContactPage

Something is showing! Still, pretty boring. How about adding a submit button?
// web/src/pages/ContactPage/ContactPage.js

import { Form, TextField, Submit } from '@redwoodjs/forms'
import BlogLayout from 'src/layouts/BlogLayout'

const ContactPage = () => {
  return (
    <BlogLayout>
      <Form>
        <TextField name="input" />
        <Submit>Save</Submit>
      </Form>
    </BlogLayout>
  )
}

export default ContactPage
We have what might actually be considered a real, bonafide form here. Try typing something in and clicking "Save". Nothing blew up on the page but we have no indication that the form submitted or what happened to the data (although you may have noticed an error in the Web Inspector). Next we'll get the data in our fields.
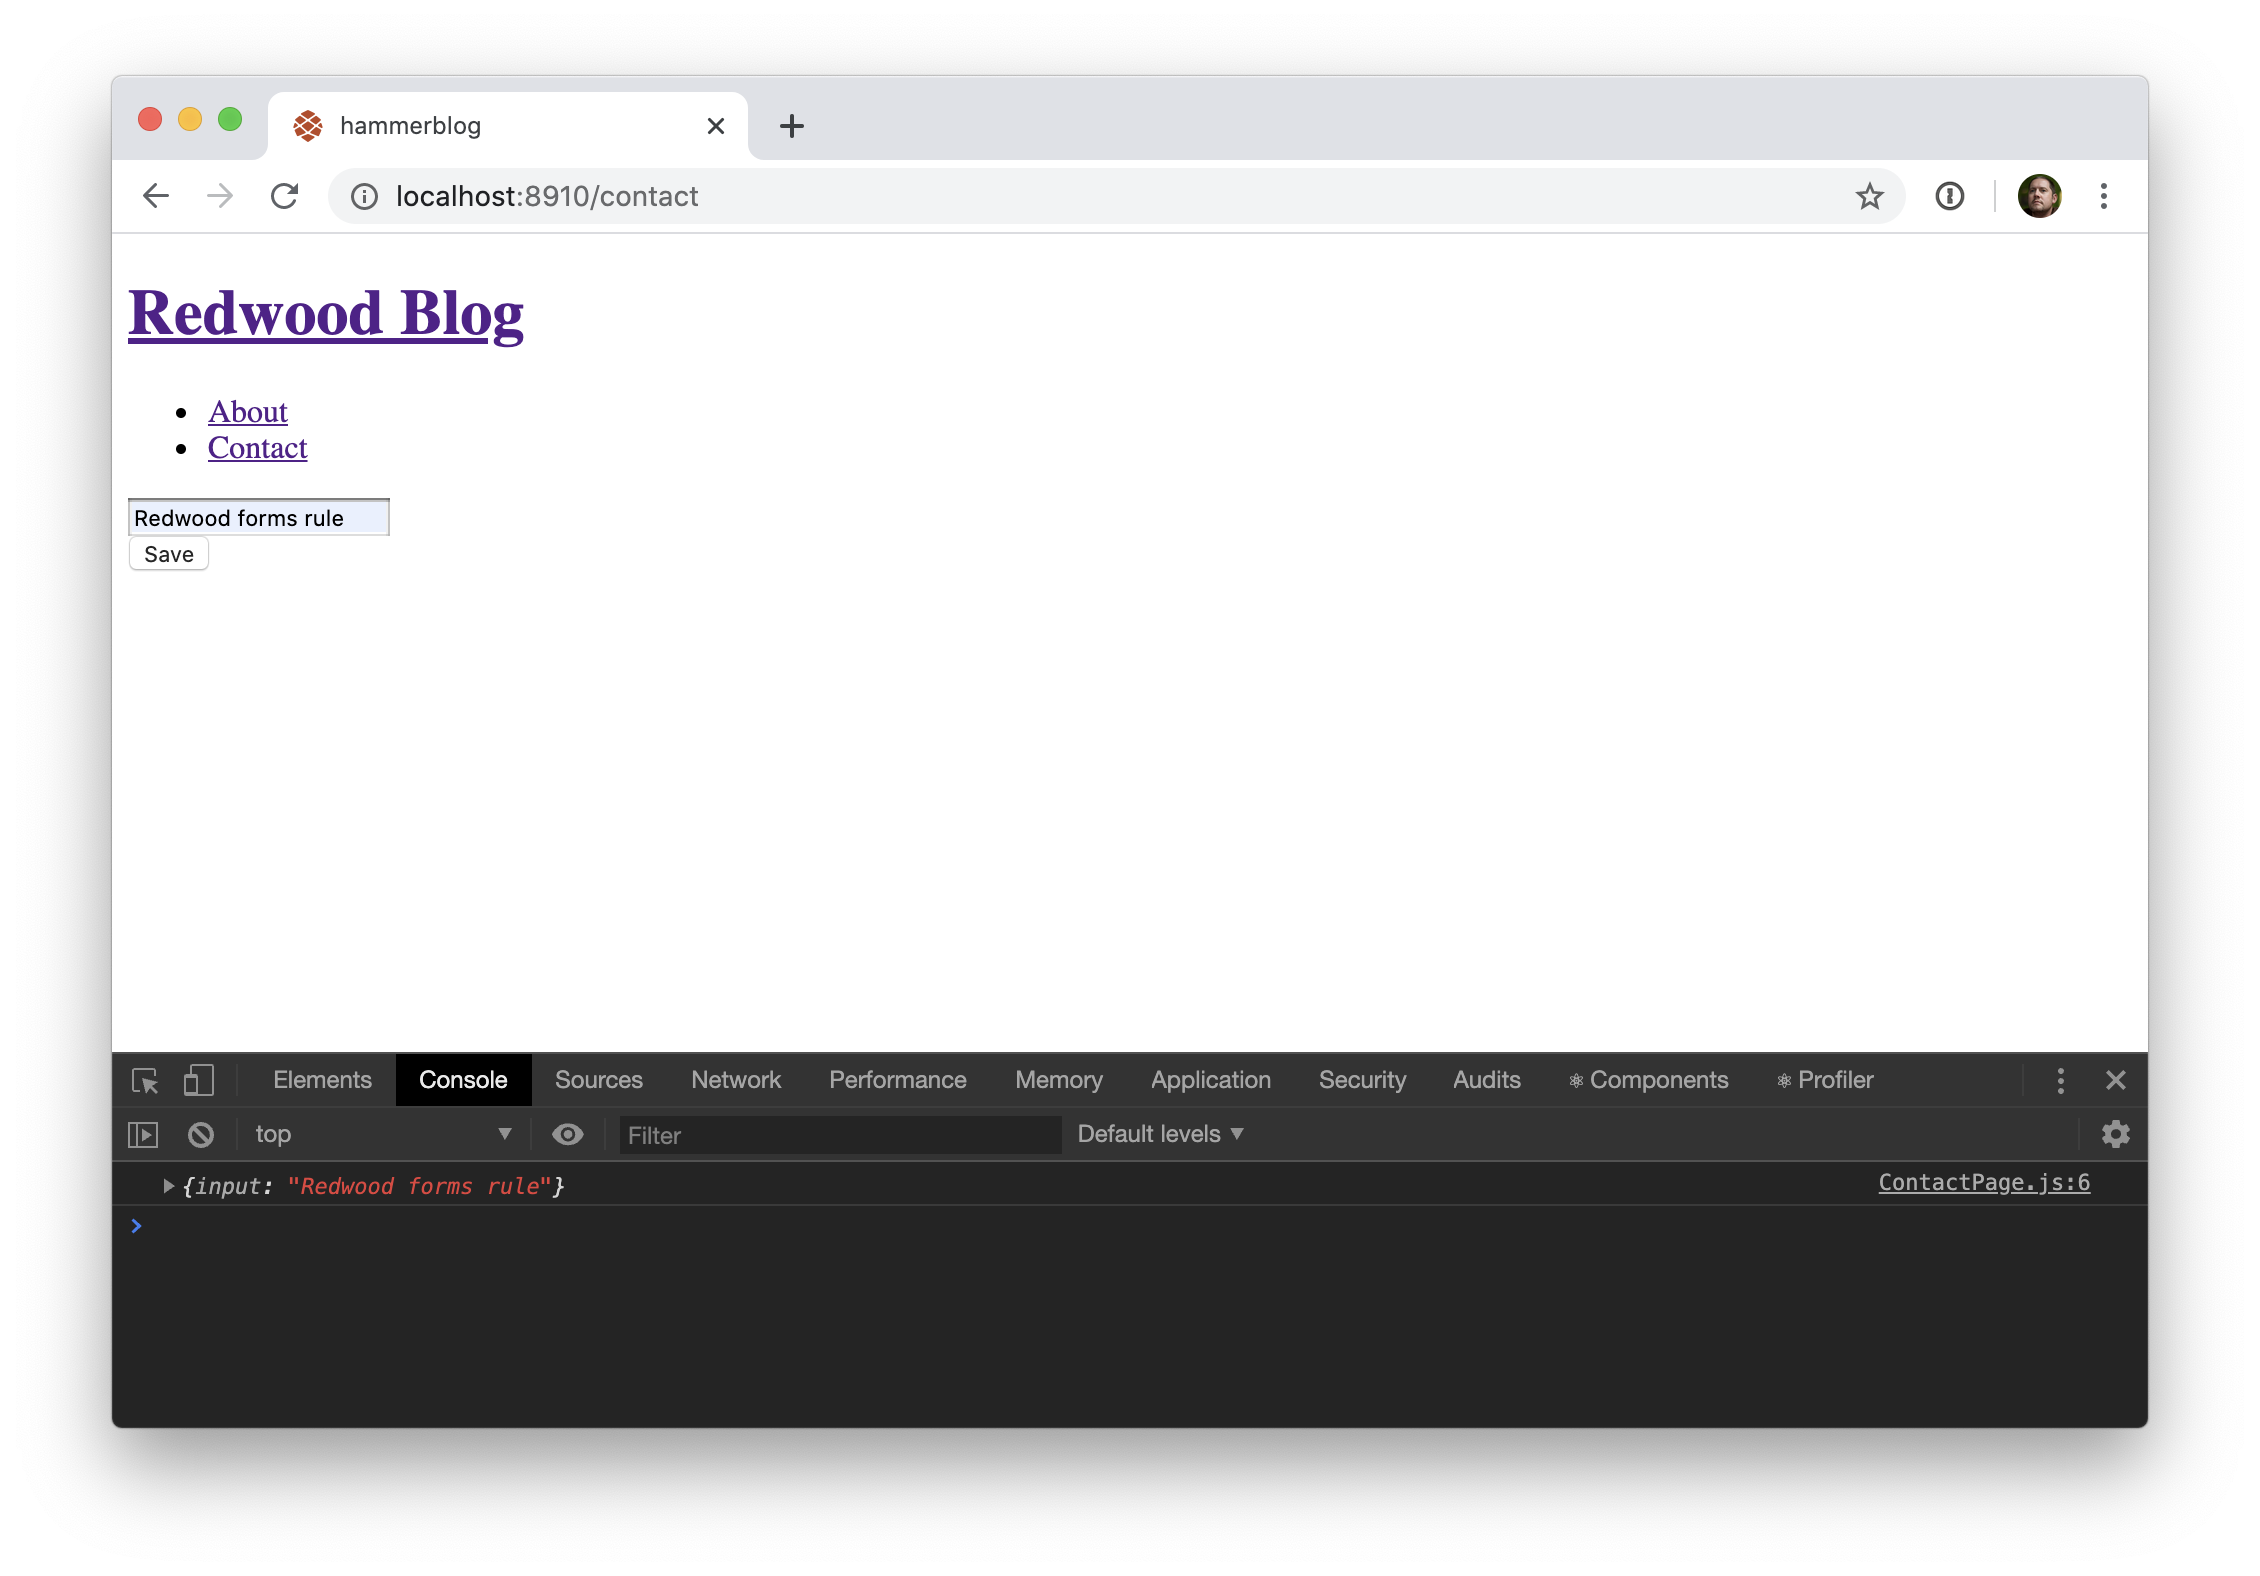
Similar to a plain HTML form we'll give <Form> an onSubmit handler. That handler will be called with a single argument—an object containing all of the submitted form fields:
// web/src/pages/ContactPage/ContactPage.js

const ContactPage = () => {
  const onSubmit = (data) => {
    console.log(data)
  }

  return (
    <BlogLayout>
      <Form onSubmit={onSubmit}>
        <TextField name="input" />
        <Submit>Save</Submit>
      </Form>
    </BlogLayout>
  )
}
Now try filling in some data and submitting:
Great! Let's turn this into a more useful form by adding a couple fields. We'll rename the existing one to "name" and add "email" and "message":
// web/src/pages/ContactPage/ContactPage.js

import { Form, TextField, TextAreaField, Submit } from '@redwoodjs/forms'
import BlogLayout from 'src/layouts/BlogLayout'

const ContactPage = () => {
  const onSubmit = (data) => {
    console.log(data)
  }

  return (
    <BlogLayout>
      <Form onSubmit={onSubmit}>
        <TextField name="name" />
        <TextField name="email" />
        <TextAreaField name="message" />
        <Submit>Save</Submit>
      </Form>
    </BlogLayout>
  )
}

export default ContactPage
See the new <TextAreaField> component here which generates an HTML <textarea> but that contains Redwood's form goodness:
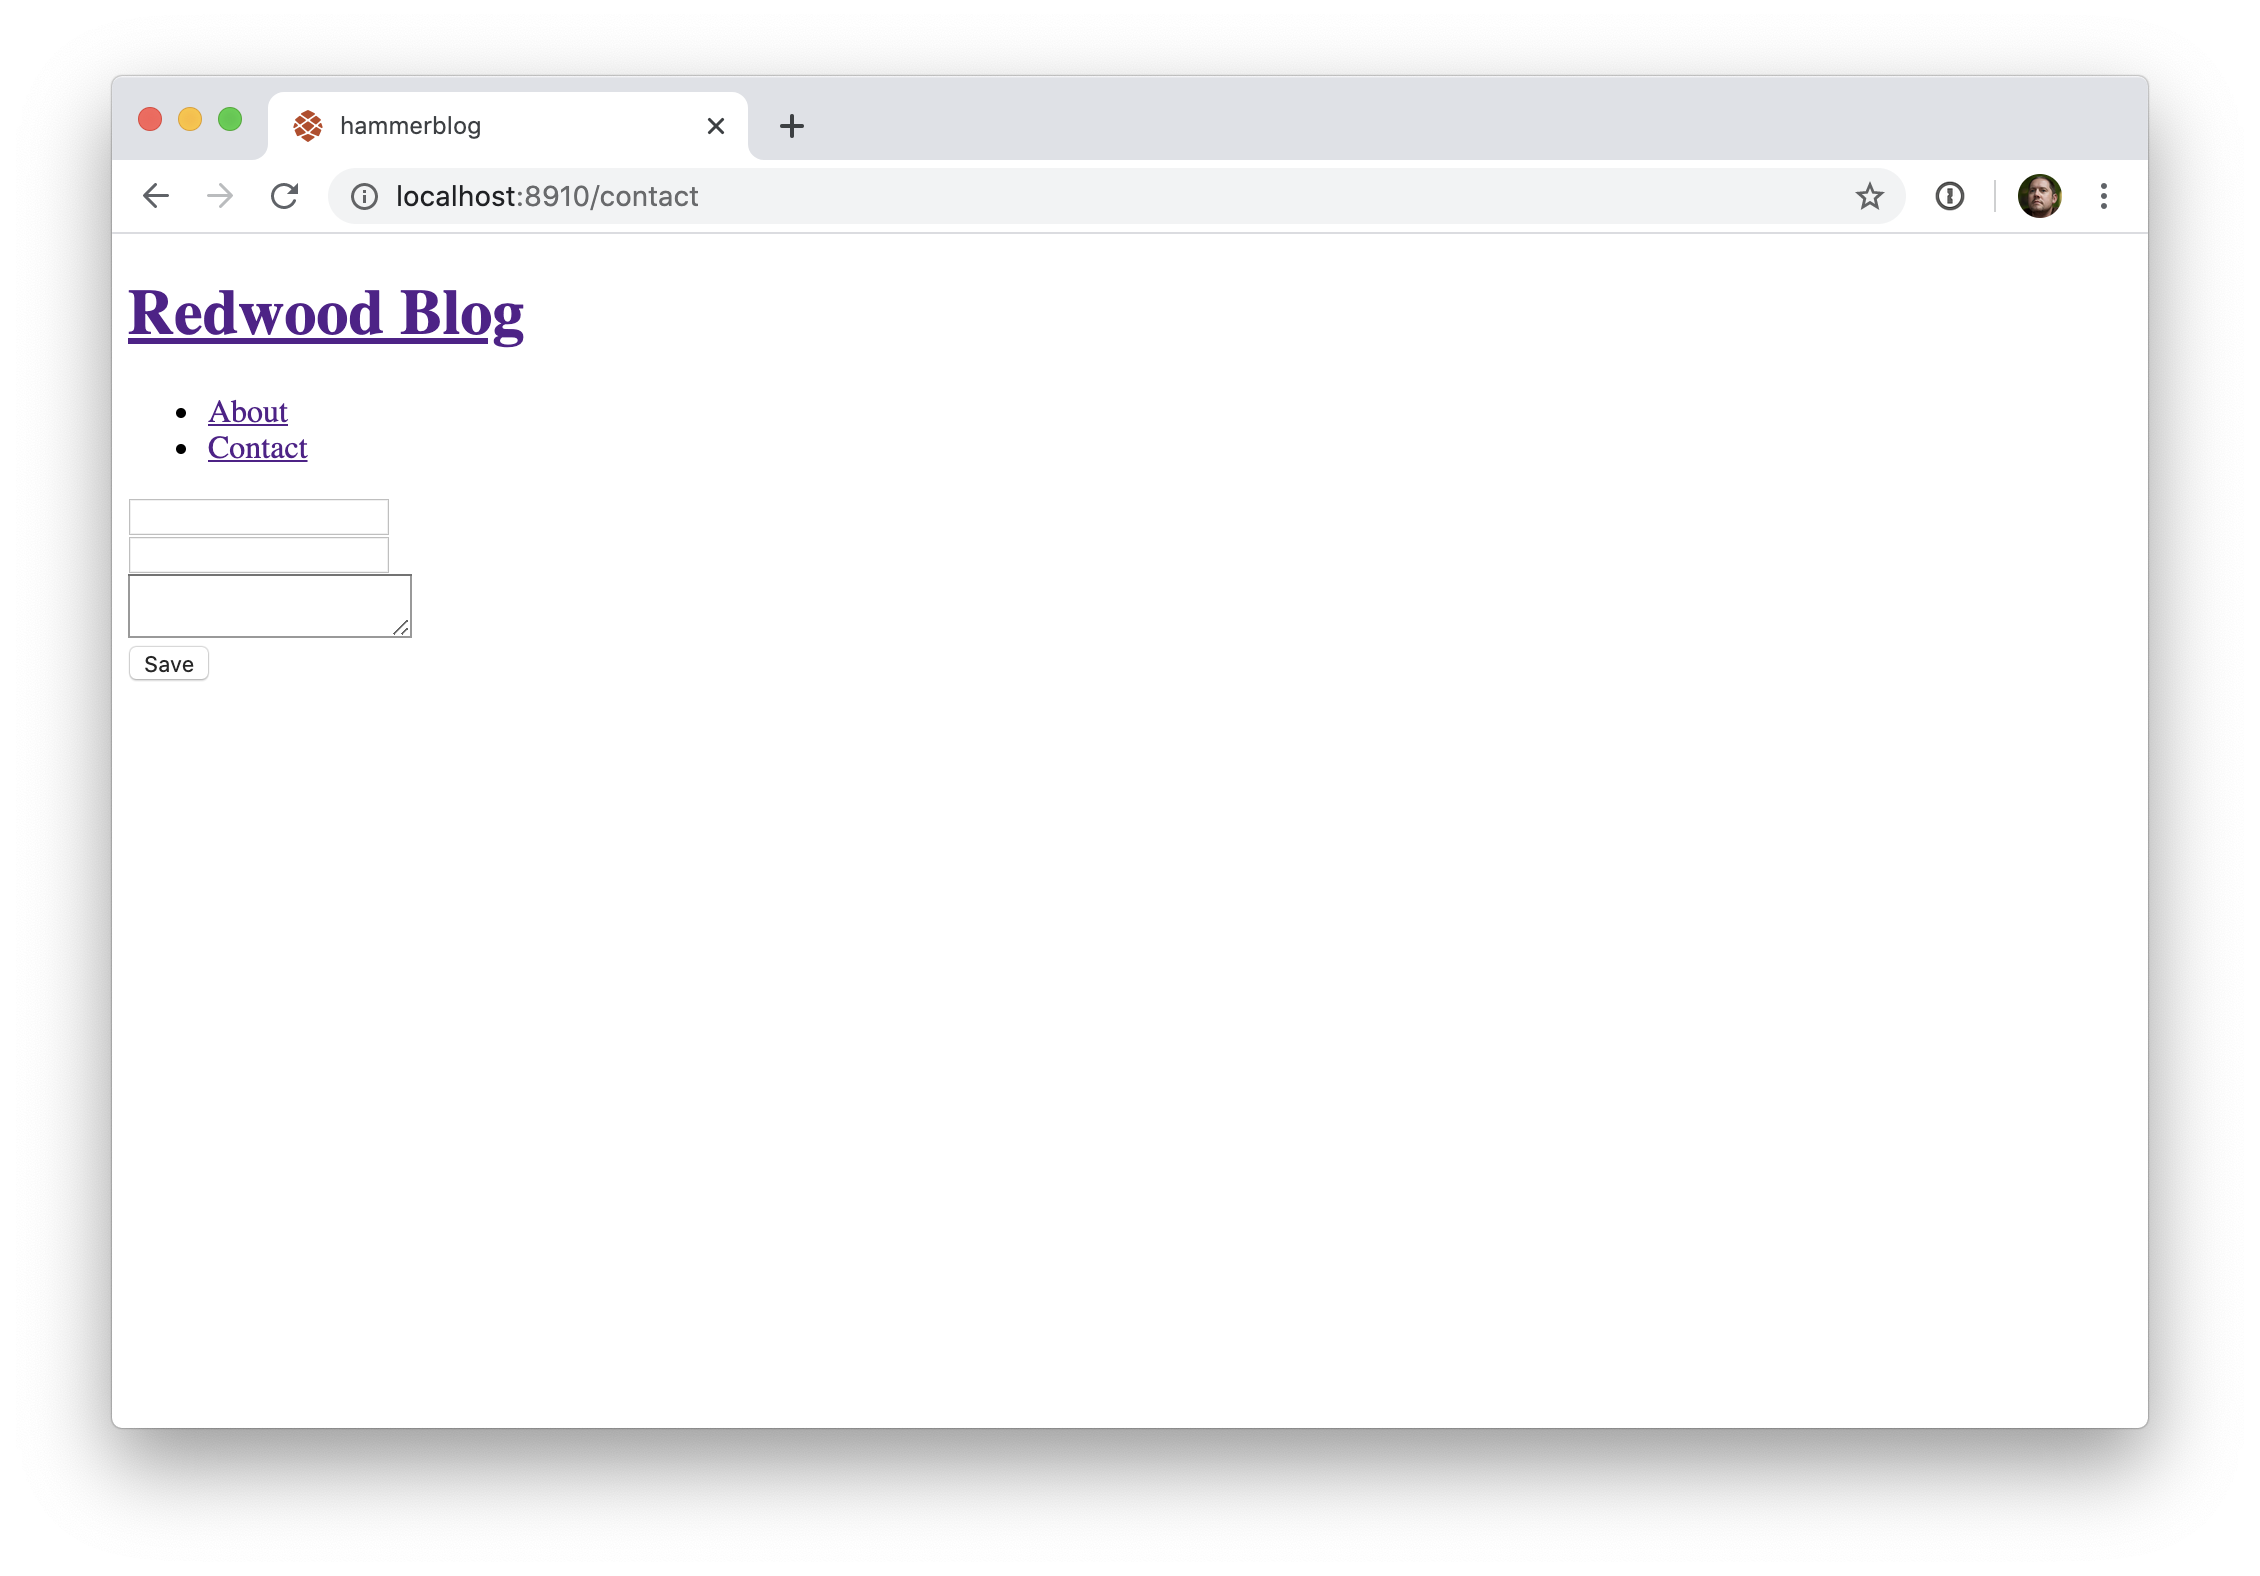
Let's add some labels:
// web/src/pages/ContactPage/ContactPage.js

return (
  <BlogLayout>
    <Form onSubmit={onSubmit}>
      <label htmlFor="name">Name</label>
      <TextField name="name" />

      <label htmlFor="email">Email</label>
      <TextField name="email" />

      <label htmlFor="message">Message</label>
      <TextAreaField name="message" />

      <Submit>Save</Submit>
    </Form>
  </BlogLayout>
)
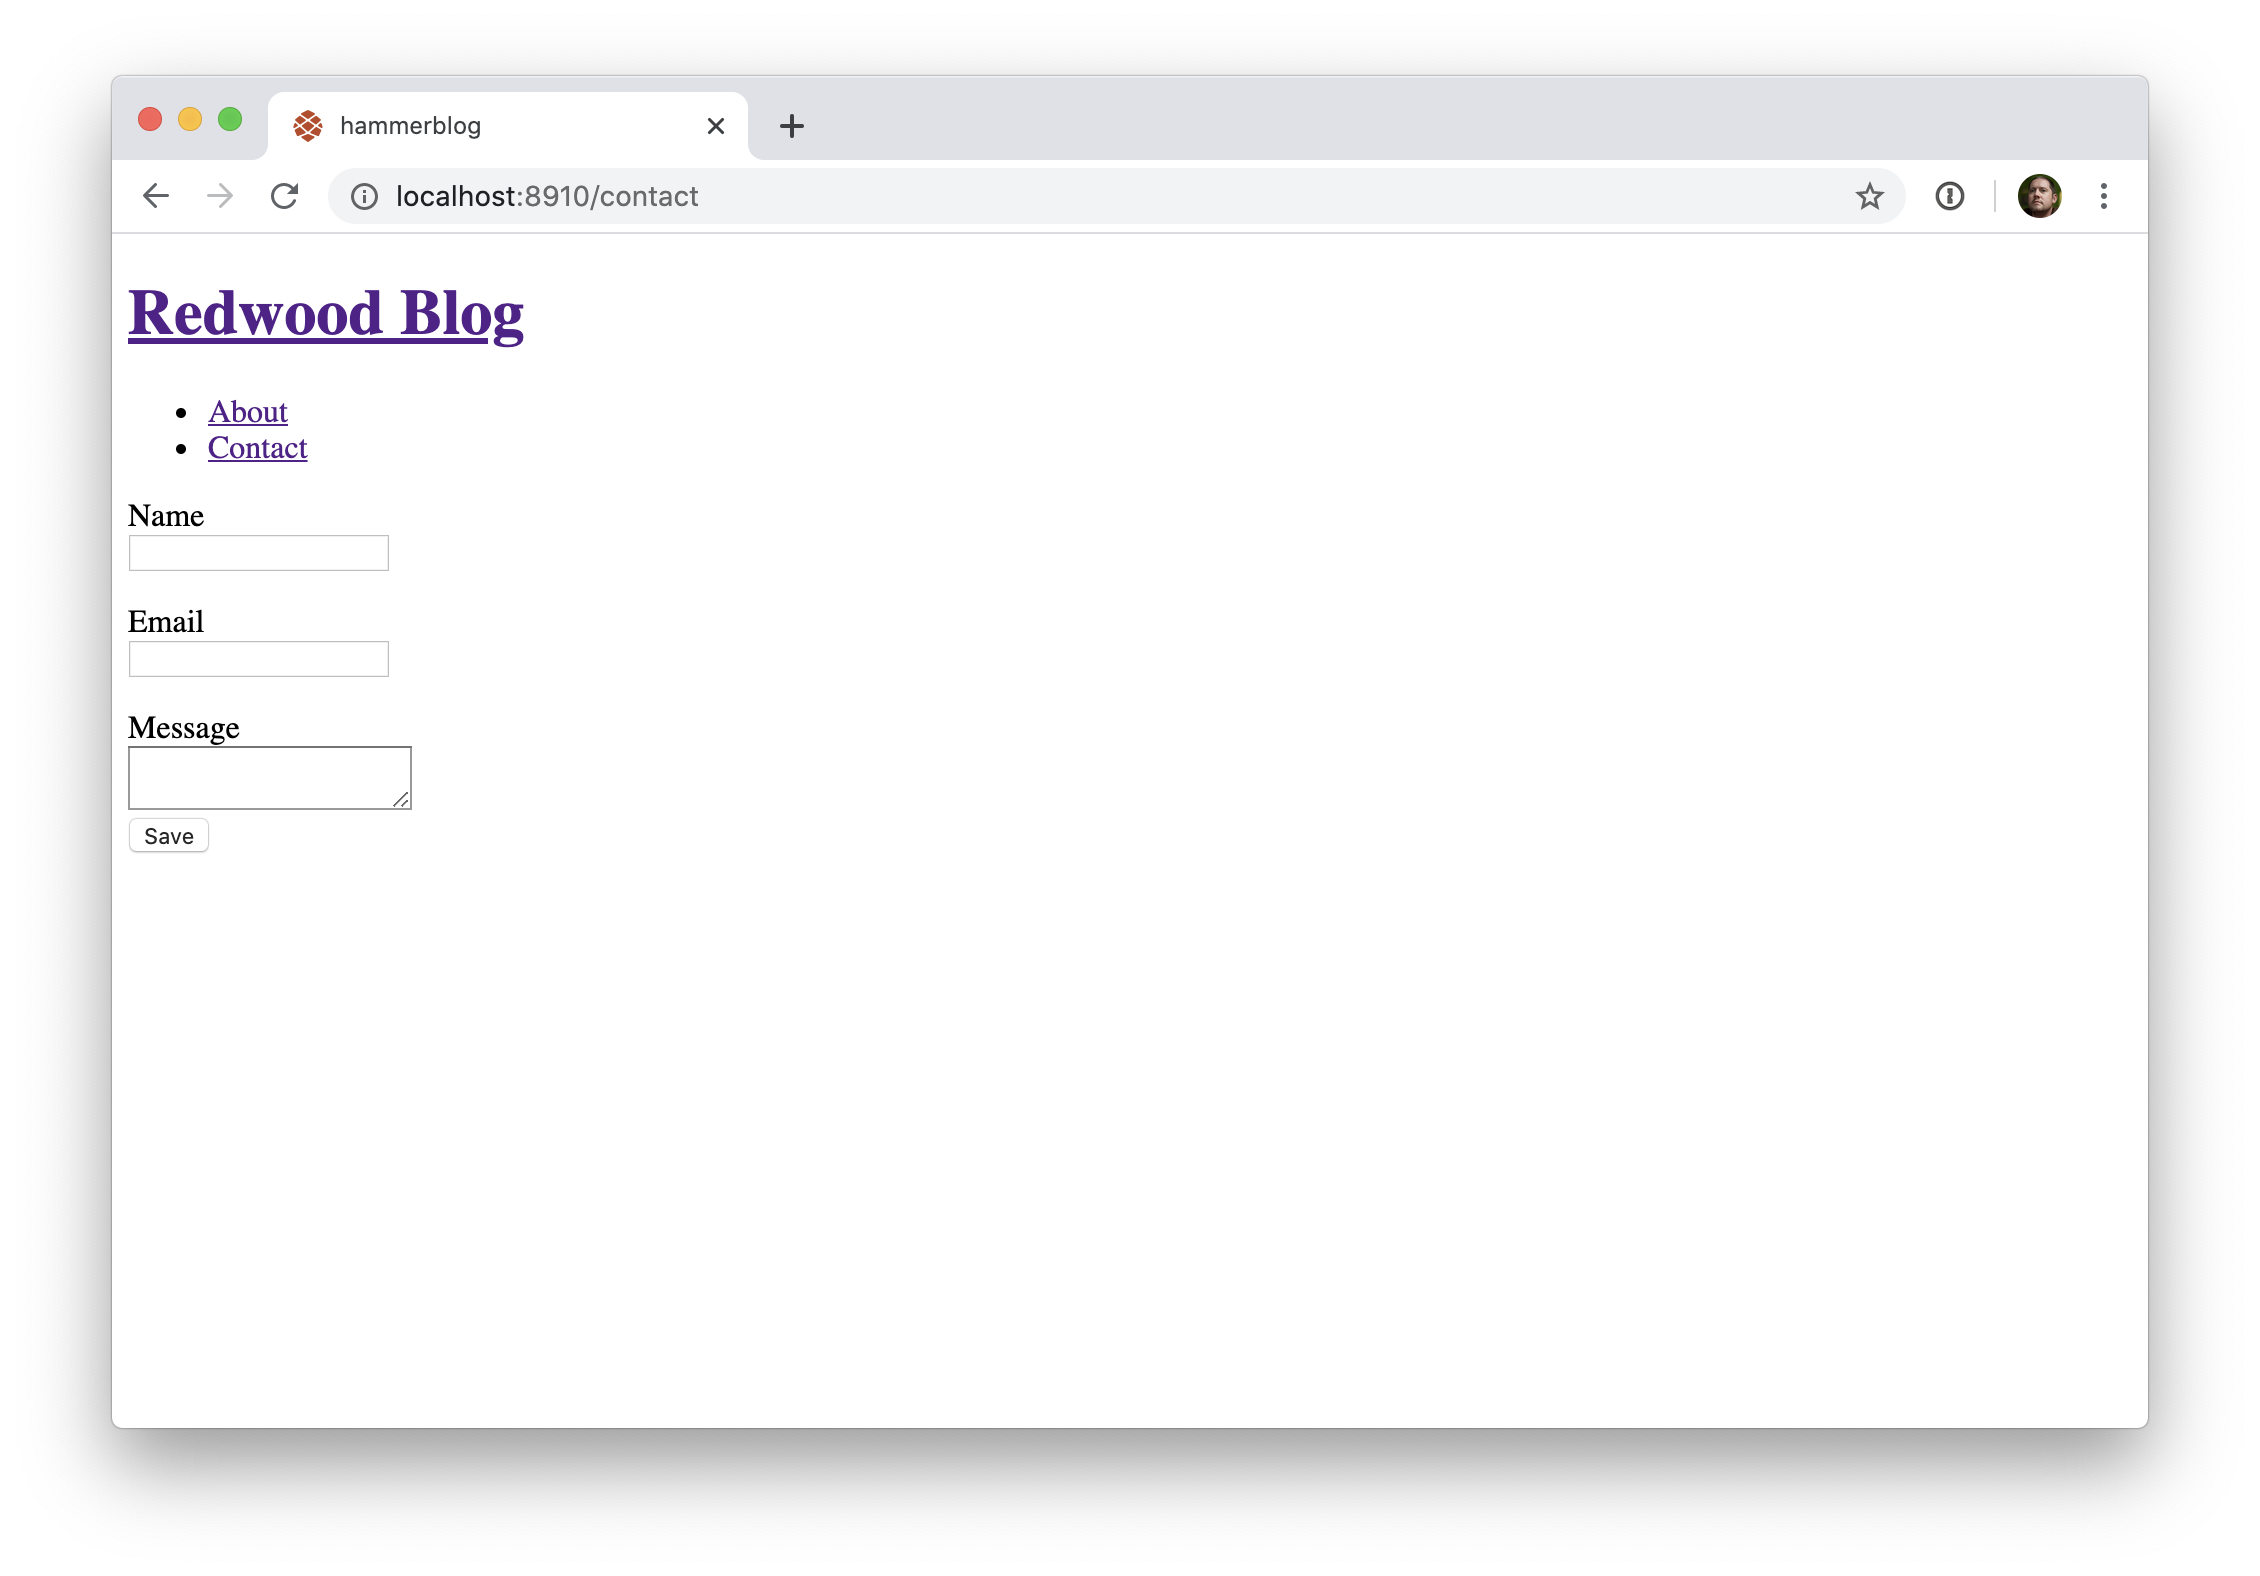
Try filling out the form and submitting and you should get a console message with all three fields now.
"Okay, Redwood tutorial author," you're saying, "what's the big deal? You built up Redwood's form helpers as The Next Big Thing but there are plenty of libraries that will let me skip creating controlled inputs manually. So what?" And you're right! Anyone can fill out a form correctly (although there are plenty of QA folks who would challenge that statement), but what happens when someone leaves something out, or makes a mistake, or tries to haxorz our form? Now who's going to be there to help? Redwood, that's who!
All three of these fields should be required in order for someone to send a message to us. Let's enforce that with the standard HTML required attribute:
// web/src/pages/ContactPage/ContactPage.js

return (
  <BlogLayout>
    <Form onSubmit={onSubmit}>
      <label htmlFor="name">Name</label>
      <TextField name="name" required />

      <label htmlFor="email">Email</label>
      <TextField name="email" required />

      <label htmlFor="message">Message</label>
      <TextAreaField name="message" required />

      <Submit>Save</Submit>
    </Form>
  </BlogLayout>
)
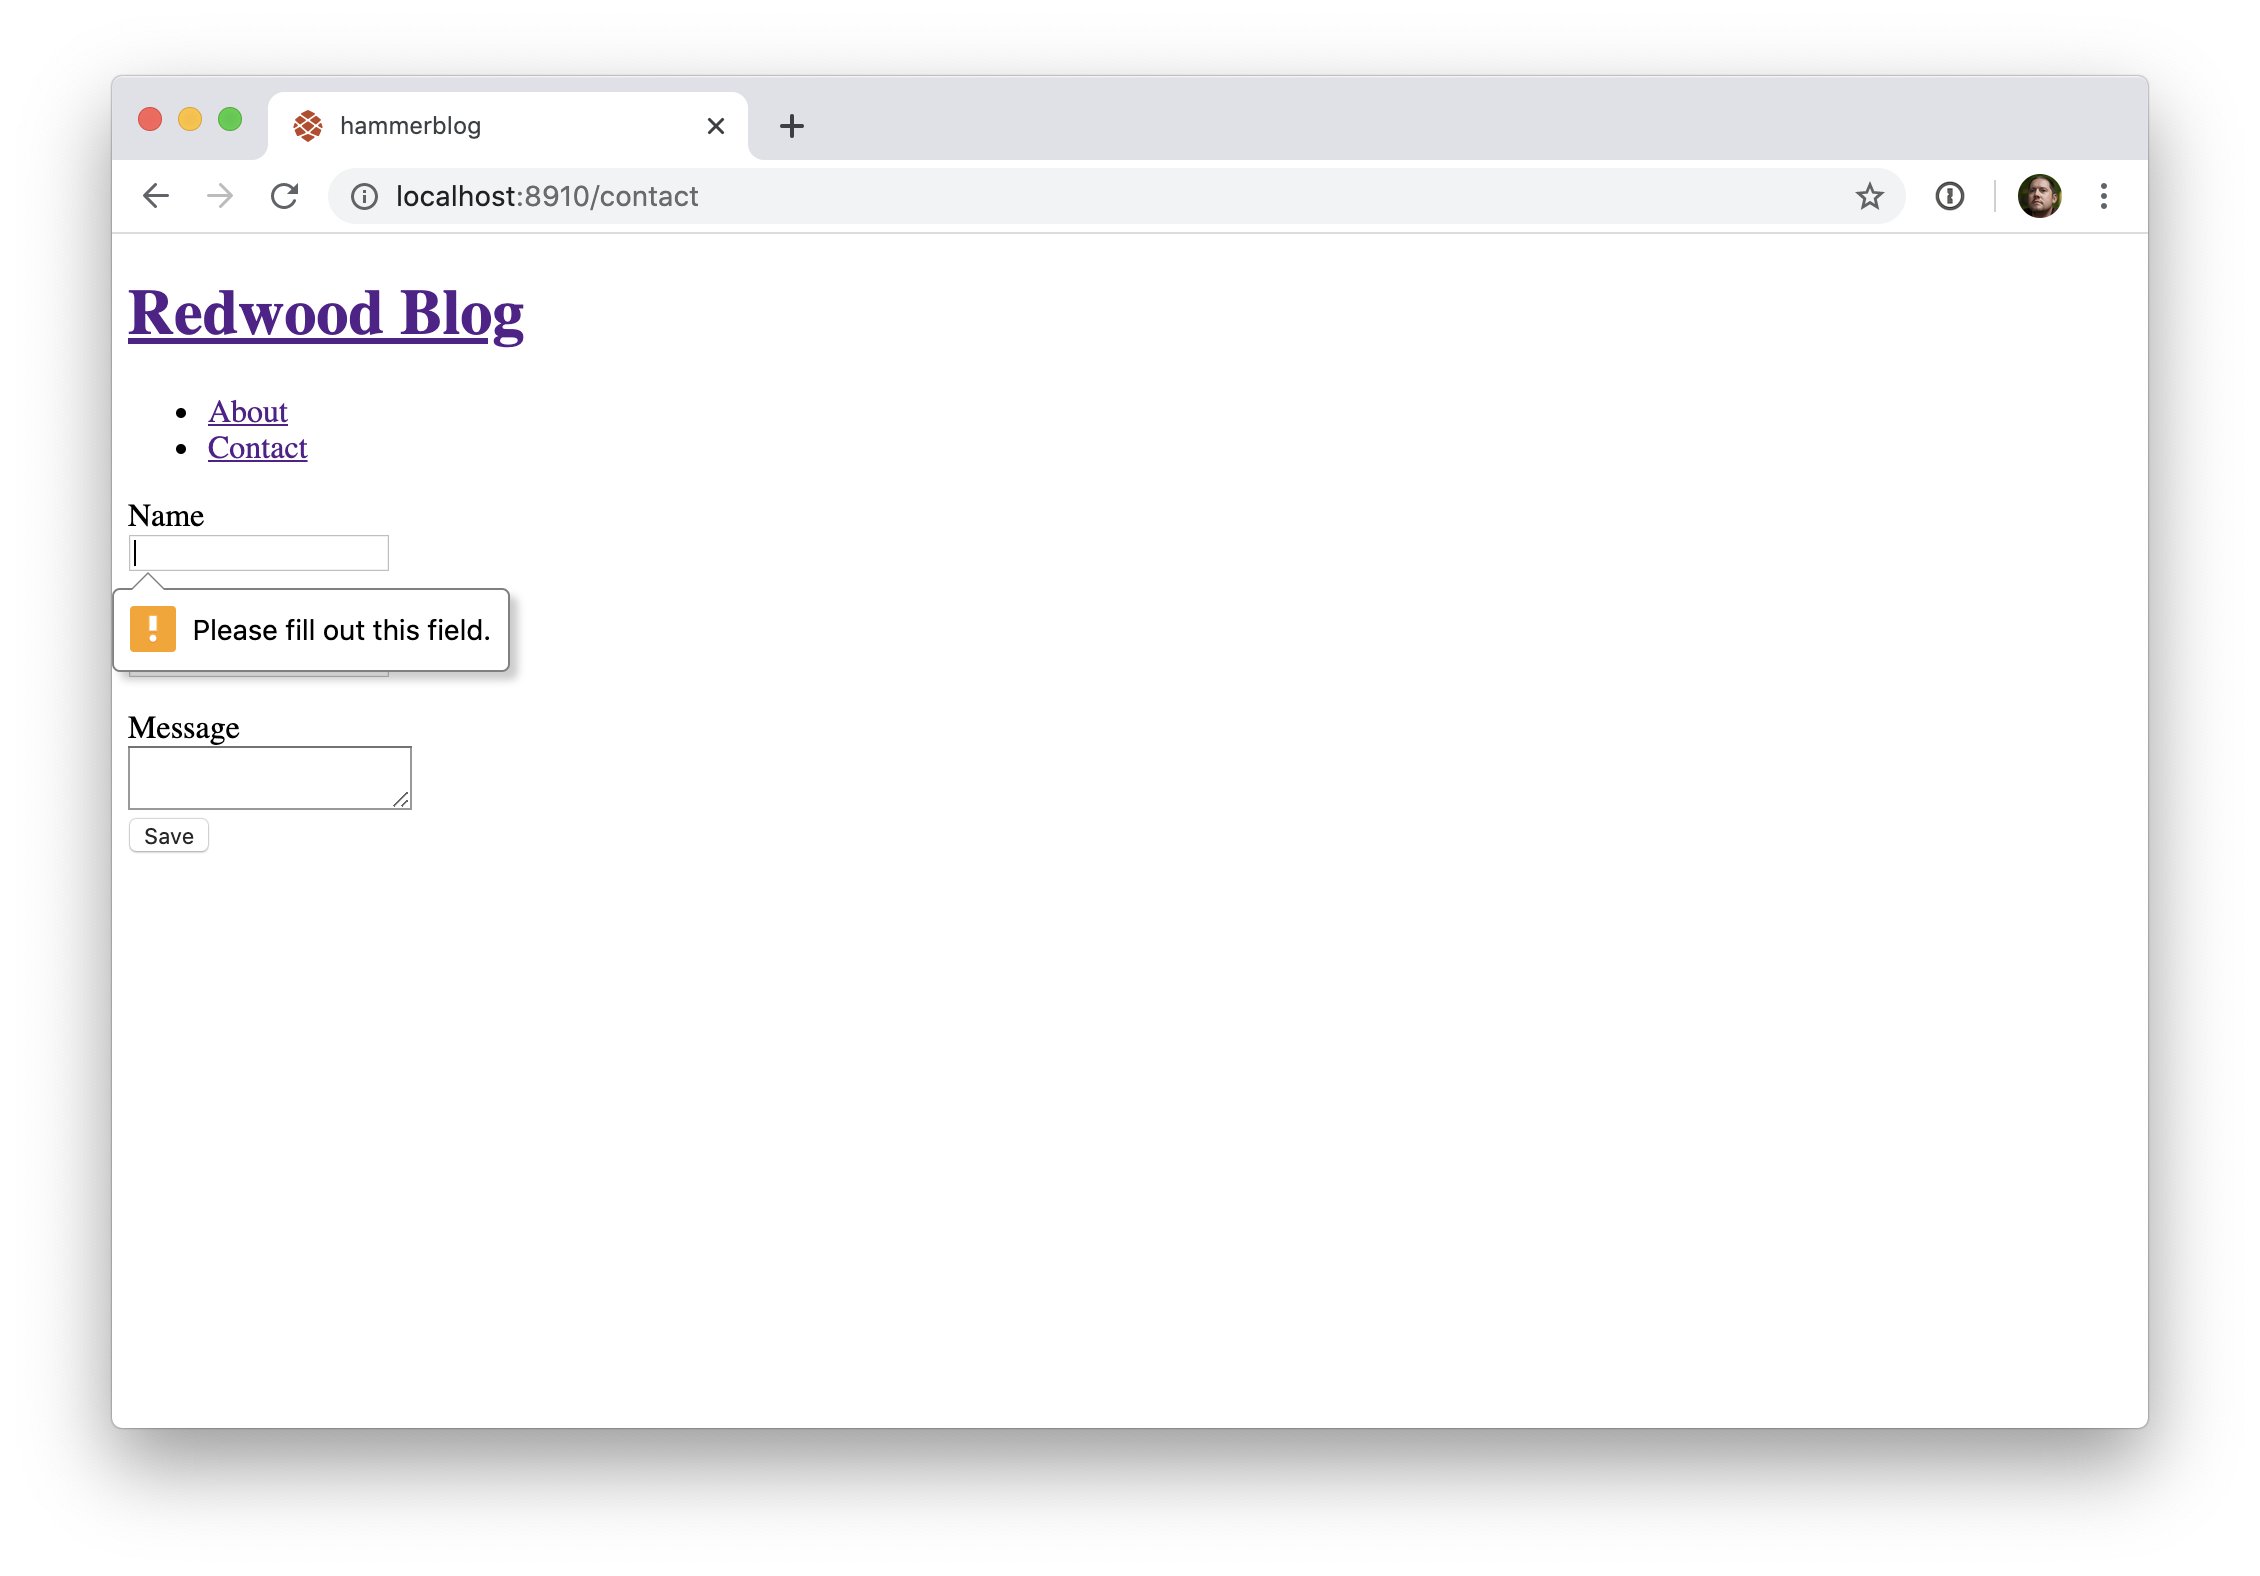
Now when trying to submit there'll be message from the browser noting that a field must be filled in. This is better than nothing, but these messages can't be styled. Can we do better?
Yes! Let's update that required call to instead be an object we pass to a custom attribute on Redwood form helpers called validation:
// web/src/pages/ContactPage/ContactPage.js

return (
  <BlogLayout>
    <Form onSubmit={onSubmit}>
      <label htmlFor="name">Name</label>
      <TextField name="name" validation={{ required: true }} />

      <label htmlFor="email">Email</label>
      <TextField name="email" validation={{ required: true }} />

      <label htmlFor="message">Message</label>
      <TextAreaField name="message" validation={{ required: true }} />

      <Submit>Save</Submit>
    </Form>
  </BlogLayout>
)
And now when we submit the form with blank fields...the Name field gets focus. Boring. But this is just a stepping stone to our amazing reveal! We have one more form helper component to add—the one that displays errors on a field. Oh, it just so happens that it's plain HTML so we can style it however we want!
Introducing <FieldError> (don't forget to include it in the import statement at the top):
// web/src/pages/ContactPage/ContactPage.js

import {
  Form,
  TextField,
  TextAreaField,
  Submit,
  FieldError,
} from '@redwoodjs/forms'
import BlogLayout from 'src/layouts/BlogLayout'

const ContactPage = () => {
  const onSubmit = (data) => {
    console.log(data)
  }

  return (
    <BlogLayout>
      <Form onSubmit={onSubmit}>
        <label htmlFor="name">Name</label>
        <TextField name="name" validation={{ required: true }} />
        <FieldError name="name" />

        <label htmlFor="email">Email</label>
        <TextField name="email" validation={{ required: true }} />
        <FieldError name="email" />

        <label htmlFor="message">Message</label>
        <TextAreaField name="message" validation={{ required: true }} />
        <FieldError name="message" />

        <Submit>Save</Submit>
      </Form>
    </BlogLayout>
  )
}

export default ContactPage
Note that the name attribute matches the name of the input field above it. That's so it knows which field to display errors for. Try submitting that form now.
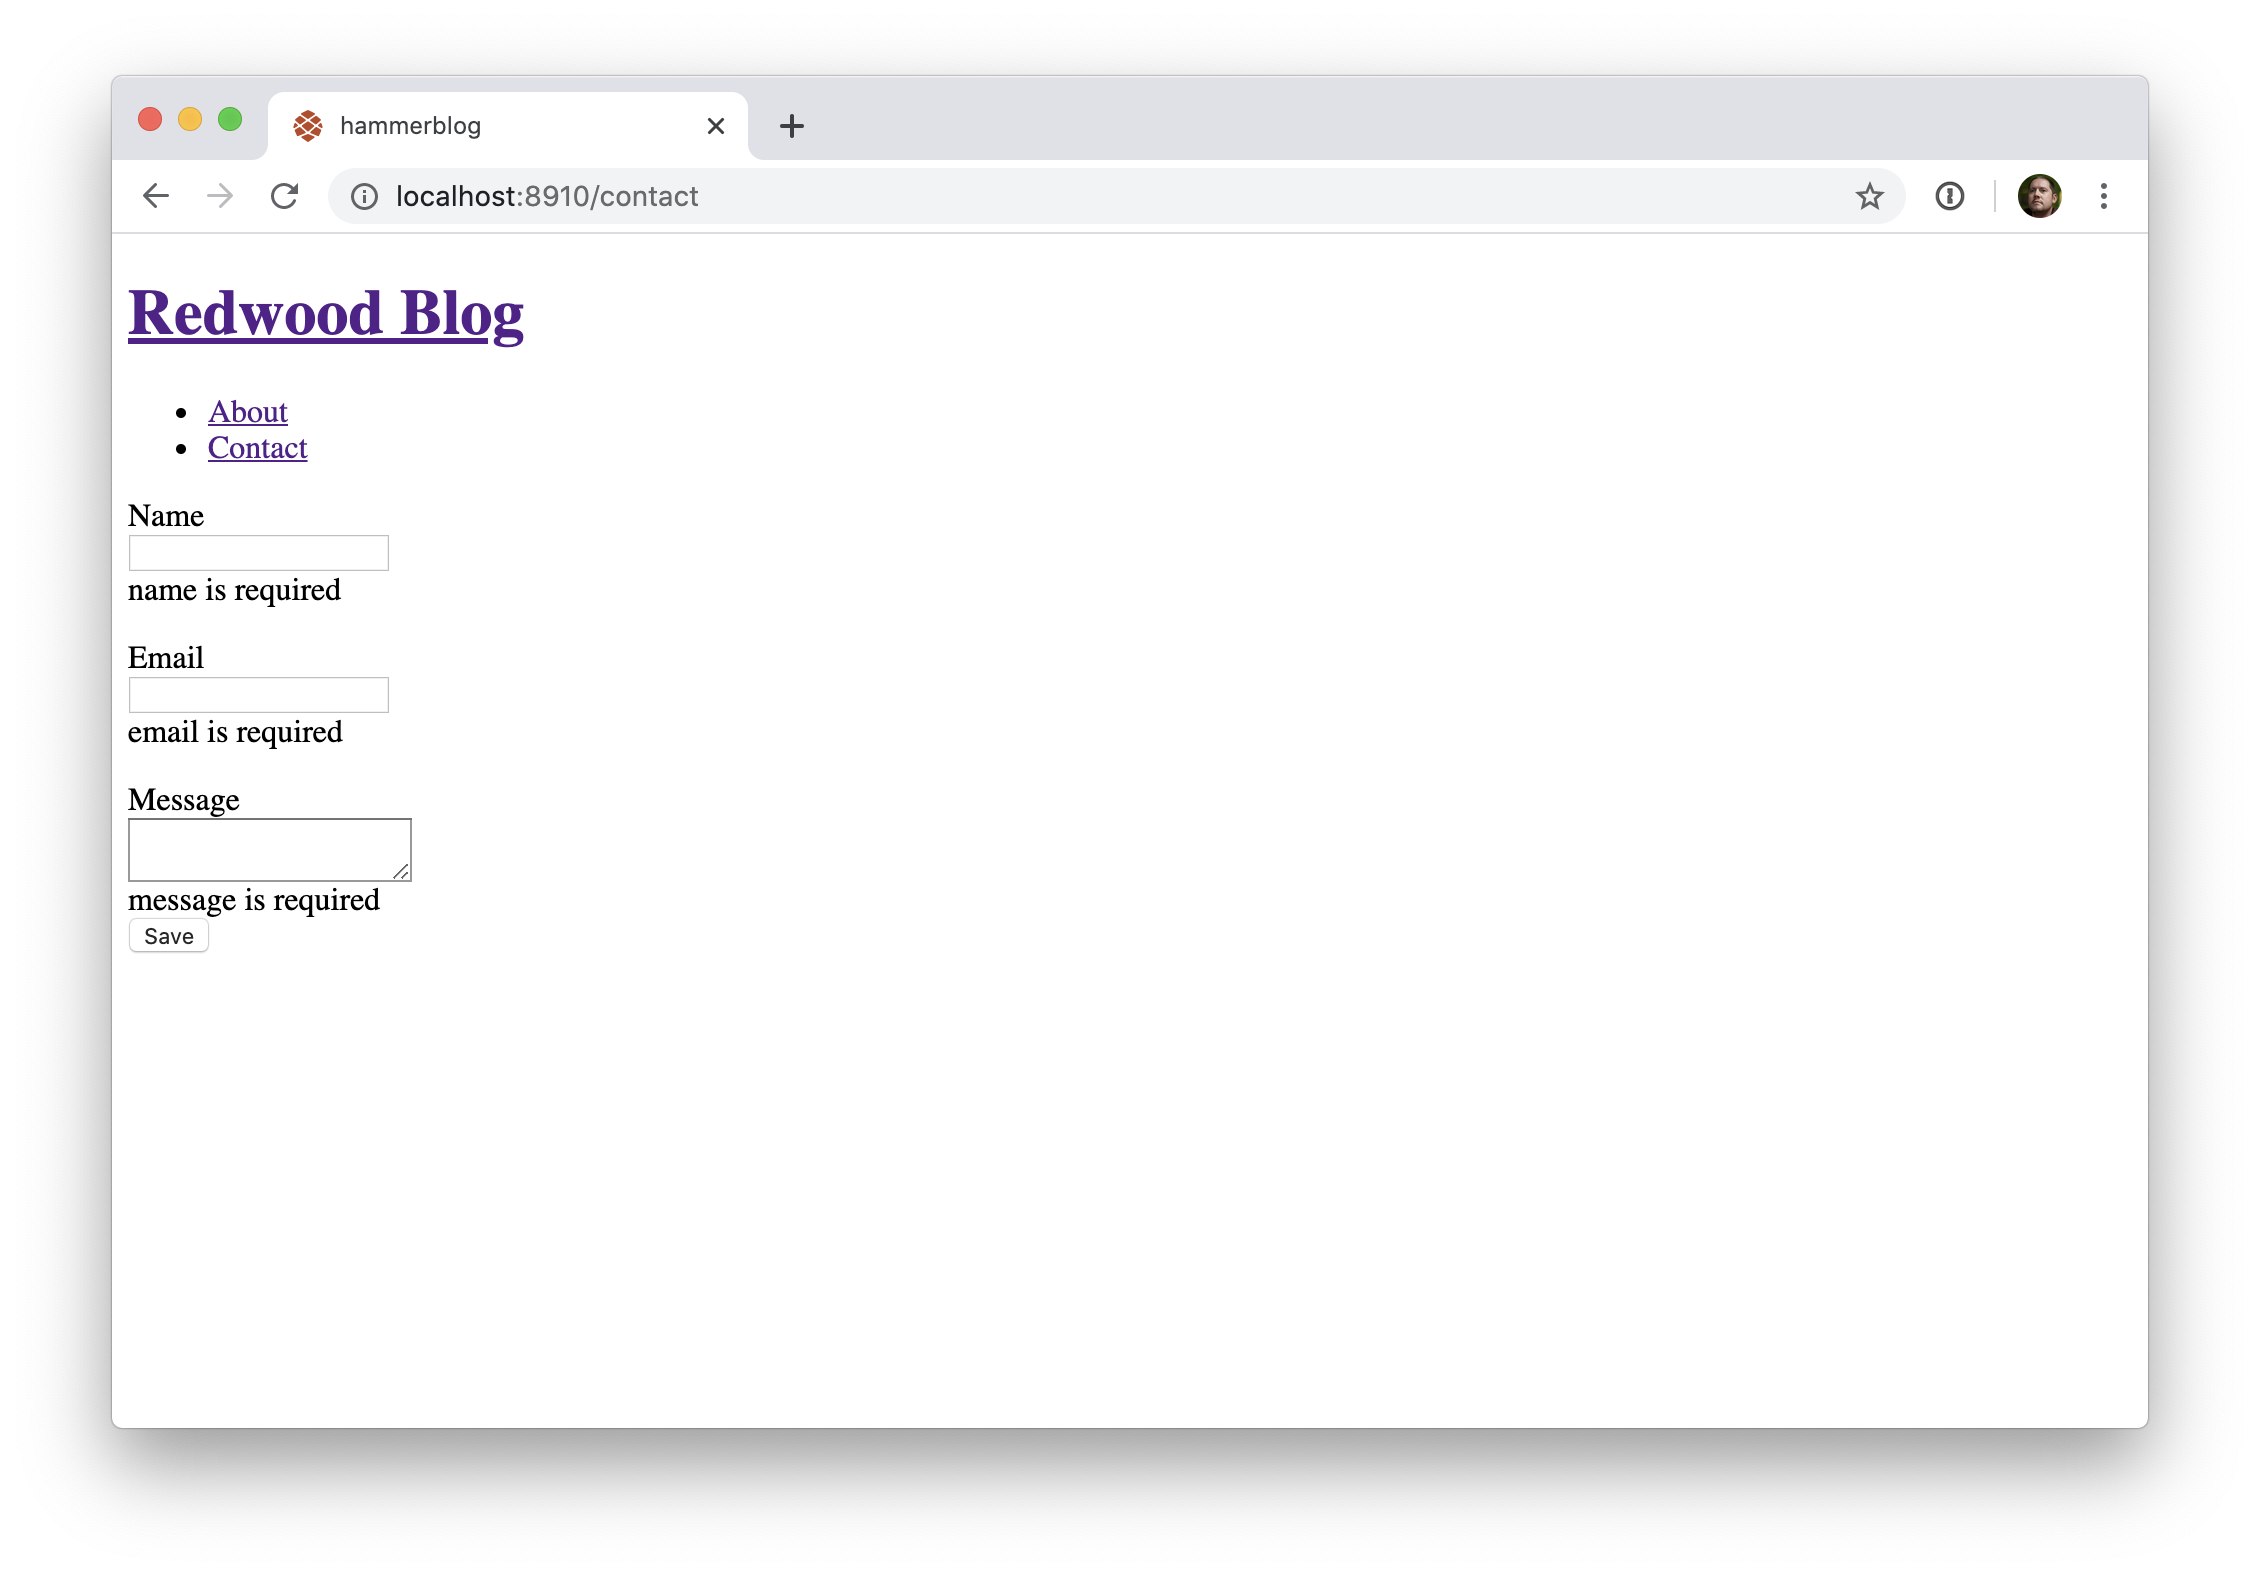
But this is just the beginning. Let's make sure folks realize this is an error message. Remember the .error class we defined in index.css? Check out the className attribute on <FieldError>:
// web/src/pages/ContactPage/ContactPage.js

return (
  <BlogLayout>
    <Form onSubmit={onSubmit}>
      <label htmlFor="name">Name</label>
      <TextField name="name" validation={{ required: true }} />
      <FieldError name="name" className="error" />

      <label htmlFor="email">Email</label>
      <TextField name="email" validation={{ required: true }} />
      <FieldError name="email" className="error" />

      <label htmlFor="message">Message</label>
      <TextAreaField name="message" validation={{ required: true }} />
      <FieldError name="message" className="error" />

      <Submit>Save</Submit>
    </Form>
  </BlogLayout>
)
You know what would be nice? If the input itself somehow displayed the fact that there was an error. Check out the errorClassName attributes on the inputs:
// web/src/pages/ContactPage/ContactPage.js

return (
  <BlogLayout>
    <Form onSubmit={onSubmit}>
      <label htmlFor="name">Name</label>
      <TextField
        name="name"
        validation={{ required: true }}
        errorClassName="error"
      />
      <FieldError name="name" className="error" />

      <label htmlFor="email">Email</label>
      <TextField
        name="email"
        validation={{ required: true }}
        errorClassName="error"
      />
      <FieldError name="email" className="error" />

      <label htmlFor="message">Message</label>
      <TextAreaField
        name="message"
        validation={{ required: true }}
        errorClassName="error"
      />
      <FieldError name="message" className="error" />

      <Submit>Save</Submit>
    </Form>
  </BlogLayout>
)
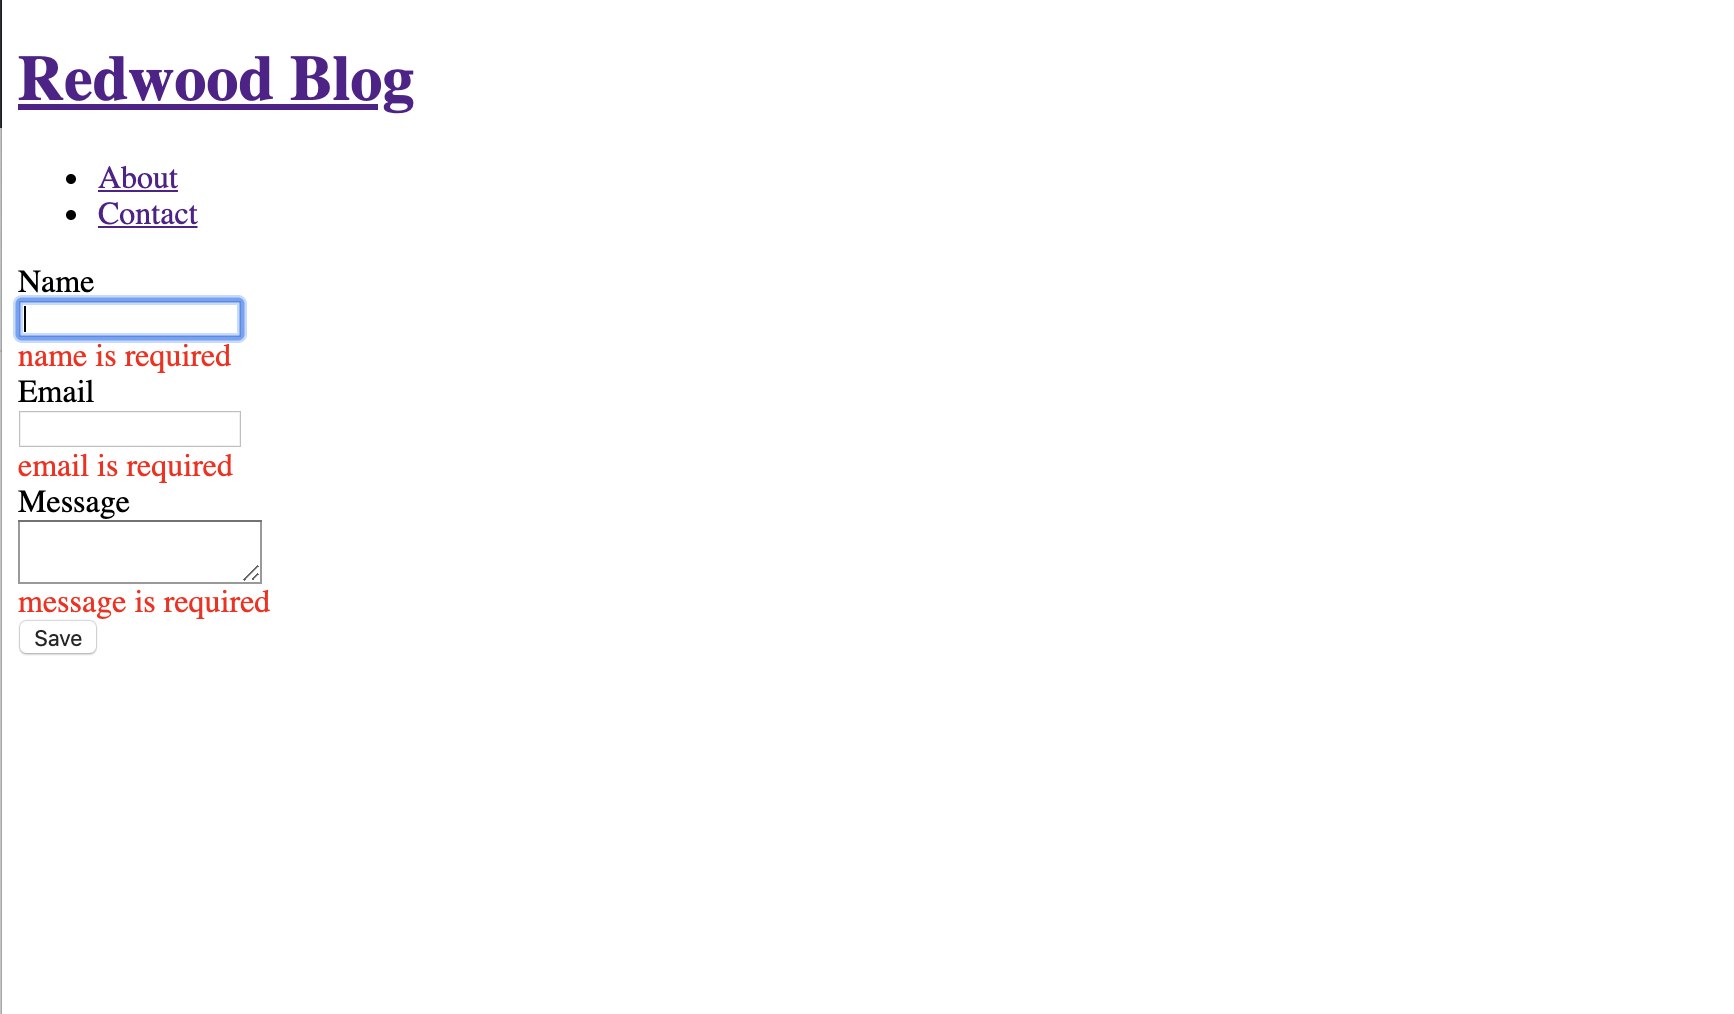
Oooo, what if the label could change as well? It can, but we'll need Redwood's custom <Label> component for that. Note that the for attribute of <label> becomes the name prop on <Label>, just like with the other Redwood form components. And don't forget the import:
// web/src/pages/ContactPage/ContactPage.js

import {
  Form,
  TextField,
  TextAreaField,
  Submit,
  FieldError,
  Label,
} from '@redwoodjs/forms'
import BlogLayout from 'src/layouts/BlogLayout'

const ContactPage = () => {
  const onSubmit = (data) => {
    console.log(data)
  }

  return (
    <BlogLayout>
      <Form onSubmit={onSubmit}>
        <Label name="name" errorClassName="error">
          Name
        </Label>
        <TextField
          name="name"
          validation={{ required: true }}
          errorClassName="error"
        />
        <FieldError name="name" className="error" />

        <Label name="email" errorClassName="error">
          Email
        </Label>
        <TextField
          name="email"
          validation={{ required: true }}
          errorClassName="error"
        />
        <FieldError name="email" className="error" />

        <Label name="message" errorClassName="error">
          Message
        </Label>
        <TextAreaField
          name="message"
          validation={{ required: true }}
          errorClassName="error"
        />
        <FieldError name="message" className="error" />

        <Submit>Save</Submit>
      </Form>
    </BlogLayout>
  )
}

export default ContactPage
Error styling
In addition to
classNameanderrorClassNameyou can also usestyleanderrorStyle. Check out the Form docs for more details on error styling.
We should make sure the email field actually contains an email:
// web/src/pages/ContactPage/ContactPage.js

<TextField
  name="email"
  validation={{
    required: true,
    pattern: {
      value: /[^@]+@[^.]+\..+/,
    },
  }}
  errorClassName="error"
/>
That is definitely not the end-all-be-all for email address validation, but pretend it's bulletproof. Let's also change the message on the email validation to be a little more friendly:
// web/src/pages/ContactPage/ContactPage.js

<TextField
  name="email"
  validation={{
    required: true,
    pattern: {
      value: /[^@]+@[^.]+\..+/,
      message: 'Please enter a valid email address',
    },
  }}
  errorClassName="error"
/>
You may have noticed that trying to submit a form with validation errors outputs nothing to the console—it's not actually submitting. That's a good thing! Fix the errors and all is well.
Instant client-side field validation
When a validation error appears it will disappear as soon as you fix the content of the field. You don't have to click "Submit" again to remove the error messages.
Finally, you know what would really be nice? If the fields were validated as soon as the user leaves each one so they don't fill out the whole thing and submit just to see multiple errors appear. Let's do that:
// web/src/pages/ContactPage/ContactPage.js

<Form onSubmit={onSubmit} validation={{ mode: 'onBlur' }}>
Well, what do you think? Was it worth the hype? A couple of new components and you've got forms that handle validation and wrap up submitted values in a nice data object, all for free.
Learn more about Redwood Forms
Redwood's forms are built on top of React Hook Form so there is even more functionality available than we've documented here. Visit the Form docs to learn more about all form functionalities.
Redwood has one more trick up its sleeve when it comes to forms but we'll save that for when we're actually submitting one to the server.
Having a contact form is great, but only if you actually get the contact somehow. Let's create a database table to hold the submitted data and create our first GraphQL mutation.
Let's add a new database table. Open up api/db/schema.prisma and add a Contact model after the Post model that's there now:
// api/db/schema.prisma

model Contact {
  id        Int @id @default(autoincrement())
  name      String
  email     String
  message   String
  createdAt DateTime @default(now())
}
Prisma syntax for optional fields
To mark a field as optional (that is, allowing
NULLas a value) you can suffix the datatype with a question mark, e.g.name String?. This will allowname's value to be bothStringorNULL.
Next we create a migration file:
yarn rw db save create contact
Finally we execute the migration to run the DDL commands to upgrade the database:
yarn rw db up
Now we'll create the GraphQL interface to access this table. We haven't used this generate command yet (although the scaffold command did use it behind the scenes):
yarn rw g sdl contact
Just like the scaffold command, this will create two new files under the api directory:
api/src/graphql/contacts.sdl.js: defines the GraphQL schema in GraphQL's schema definition languageapi/src/services/contacts/contacts.js: contains your app's business logic.
Open up api/src/graphql/contacts.sdl.js and you'll see the Contact, CreateContactInput and UpdateContactInput types were already defined for us—the generate sdl command introspected the schema and created a Contact type containing each database field in the table, as well as a Query type with a single query contacts which returns an array of Contact types:
// api/src/graphql/contacts.sdl.js

export const schema = gql`
  type Contact {
    id: Int!
    name: String!
    email: String!
    message: String!
    createdAt: DateTime!
  }

  type Query {
    contacts: [Contact!]!
  }

  input CreateContactInput {
    name: String!
    email: String!
    message: String!
  }

  input UpdateContactInput {
    name: String
    email: String
    message: String
  }
`
What's CreateContactInput and UpdateContactInput? Redwood follows the GraphQL recommendation of using Input Types in mutations rather than listing out each and every field that can be set. Any fields required in schema.prisma are also required in CreateContactInput (you can't create a valid record without them) but nothing is explictly required in UpdateContactInput. This is because you could want to update only a single field, or two fields, or all fields. The alternative would be to create separate Input types for every permutation of fields you would want to update. We felt that only having one update input, while maybe not pedantically the absolute correct way to create a GraphQL API, was a good compromise for optimal developer experience.
Redwood assumes your code won't try to set a value on any field named
idorcreatedAtso it left those out of the Input types, but if your database allowed either of those to be set manually you can updateCreateContactInputorUpdateContactInputand add them.
Since all of the DB columns were required in the schema.prisma file they are marked as required in the GraphQL Types with the ! suffix on the datatype (e.g. name: String!).
).
GraphQL syntax for required fields
GraphQL's SDL syntax requires an extra
!when a field is required. Remember:schema.prismasyntax requires an extra?character when a field is not required.
As described in Side Quest: How Redwood Deals with Data, there are no explicit resolvers defined in the SDL file. Redwood follows a simple naming convention: each field listed in the Query and Mutation types in the sdl file (api/src/graphql/contacts.sdl.js) maps to a function with the same name in the services file (api/src/services/contacts/contacts.js).
In this case we're creating a single Mutation that we'll call createContact. Add that to the end of the SDL file (before the closing backtick):
// api/src/graphql/contacts.sdl.js

export const schema = gql`
  type Contact {
    id: Int!
    name: String!
    email: String!
    message: String!
    createdAt: DateTime!
  }

  type Query {
    contacts: [Contact!]!
  }

  input CreateContactInput {
    name: String!
    email: String!
    message: String!
  }

  input UpdateContactInput {
    name: String
    email: String
    message: String
  }

  type Mutation {
    createContact(input: CreateContactInput!): Contact
  }
`
The createContact mutation will accept a single variable, input, that is an object that conforms to what we expect for a CreateContactInput, namely { name, email, message }.
That's it for the SDL file, let's define the service that will actually save the data to the database. The service includes a default contacts function for getting all contacts from the database. Let's add our mutation to create a new contact:
// api/src/services/contacts/contacts.js

import { db } from 'src/lib/db'

export const contacts = () => {
  return db.contact.findMany()
}

export const createContact = ({ input }) => {
  return db.contact.create({ data: input })
}
Thanks to Prisma Client JS it takes very little code to actually save something to the database! This is an asynchronous call but we didn't have to worry about resolving Promises or dealing with async/await. Apollo will do that for us!
Before we plug this into the UI, let's take a look at a nifty GUI you get just by running yarn redwood dev.
Often it's nice to experiment and call your API in a more "raw" form before you get too far down the path of implementation only to find out something is missing. Is there a typo in the API layer or the web layer? Let's find out by accessing just the API layer.
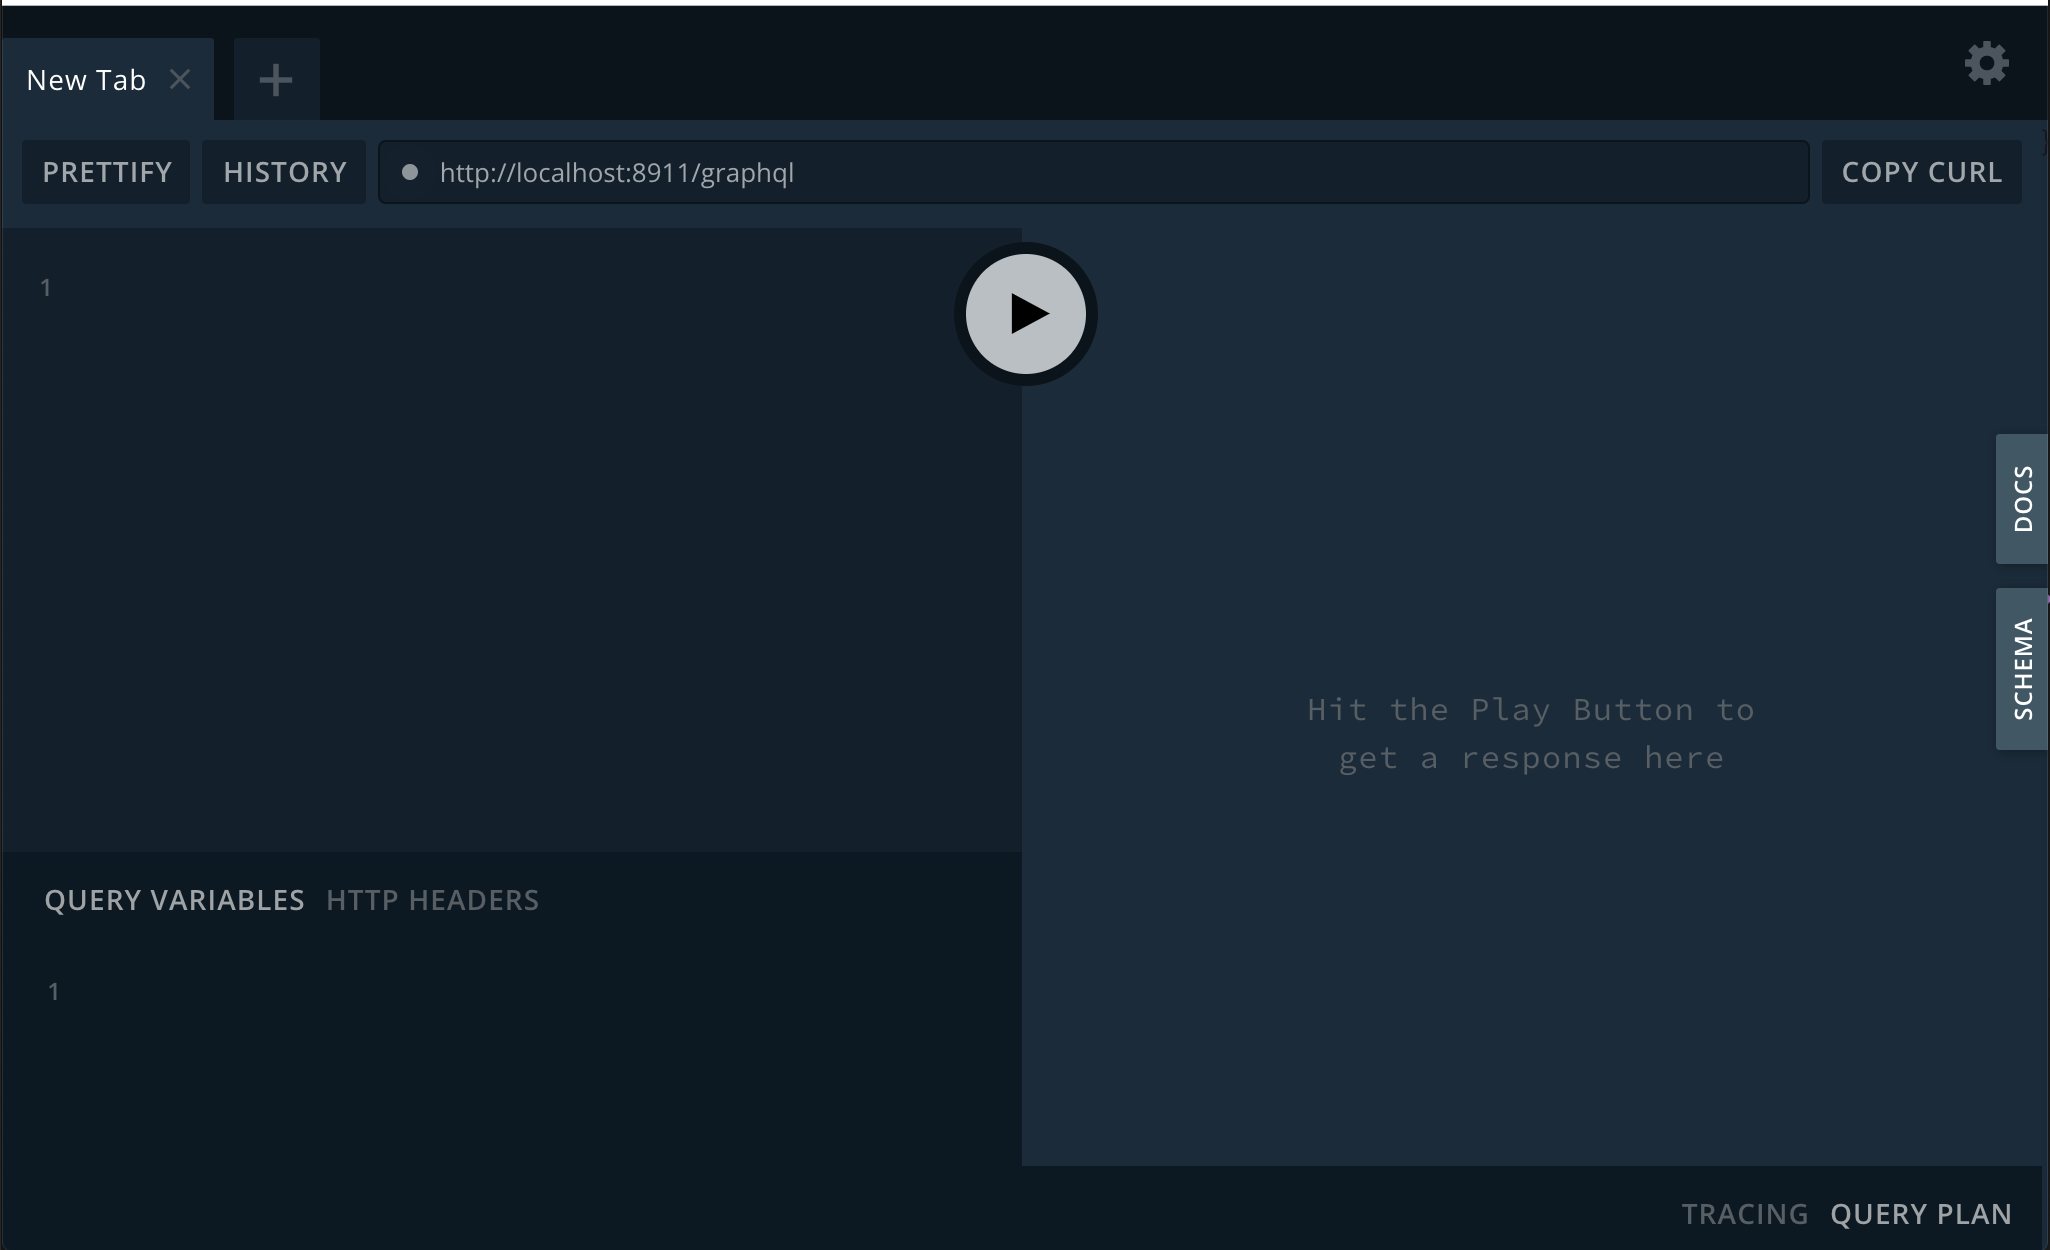
When you started development with yarn redwood dev you actually started a second process running at the same time. Open a new browser tab and head to http://localhost:8911/graphql This is Prisma's GraphQL Playground, a web-based GUI for GraphQL APIs:
Not very exciting yet, but check out that "Docs" tab on the far right:
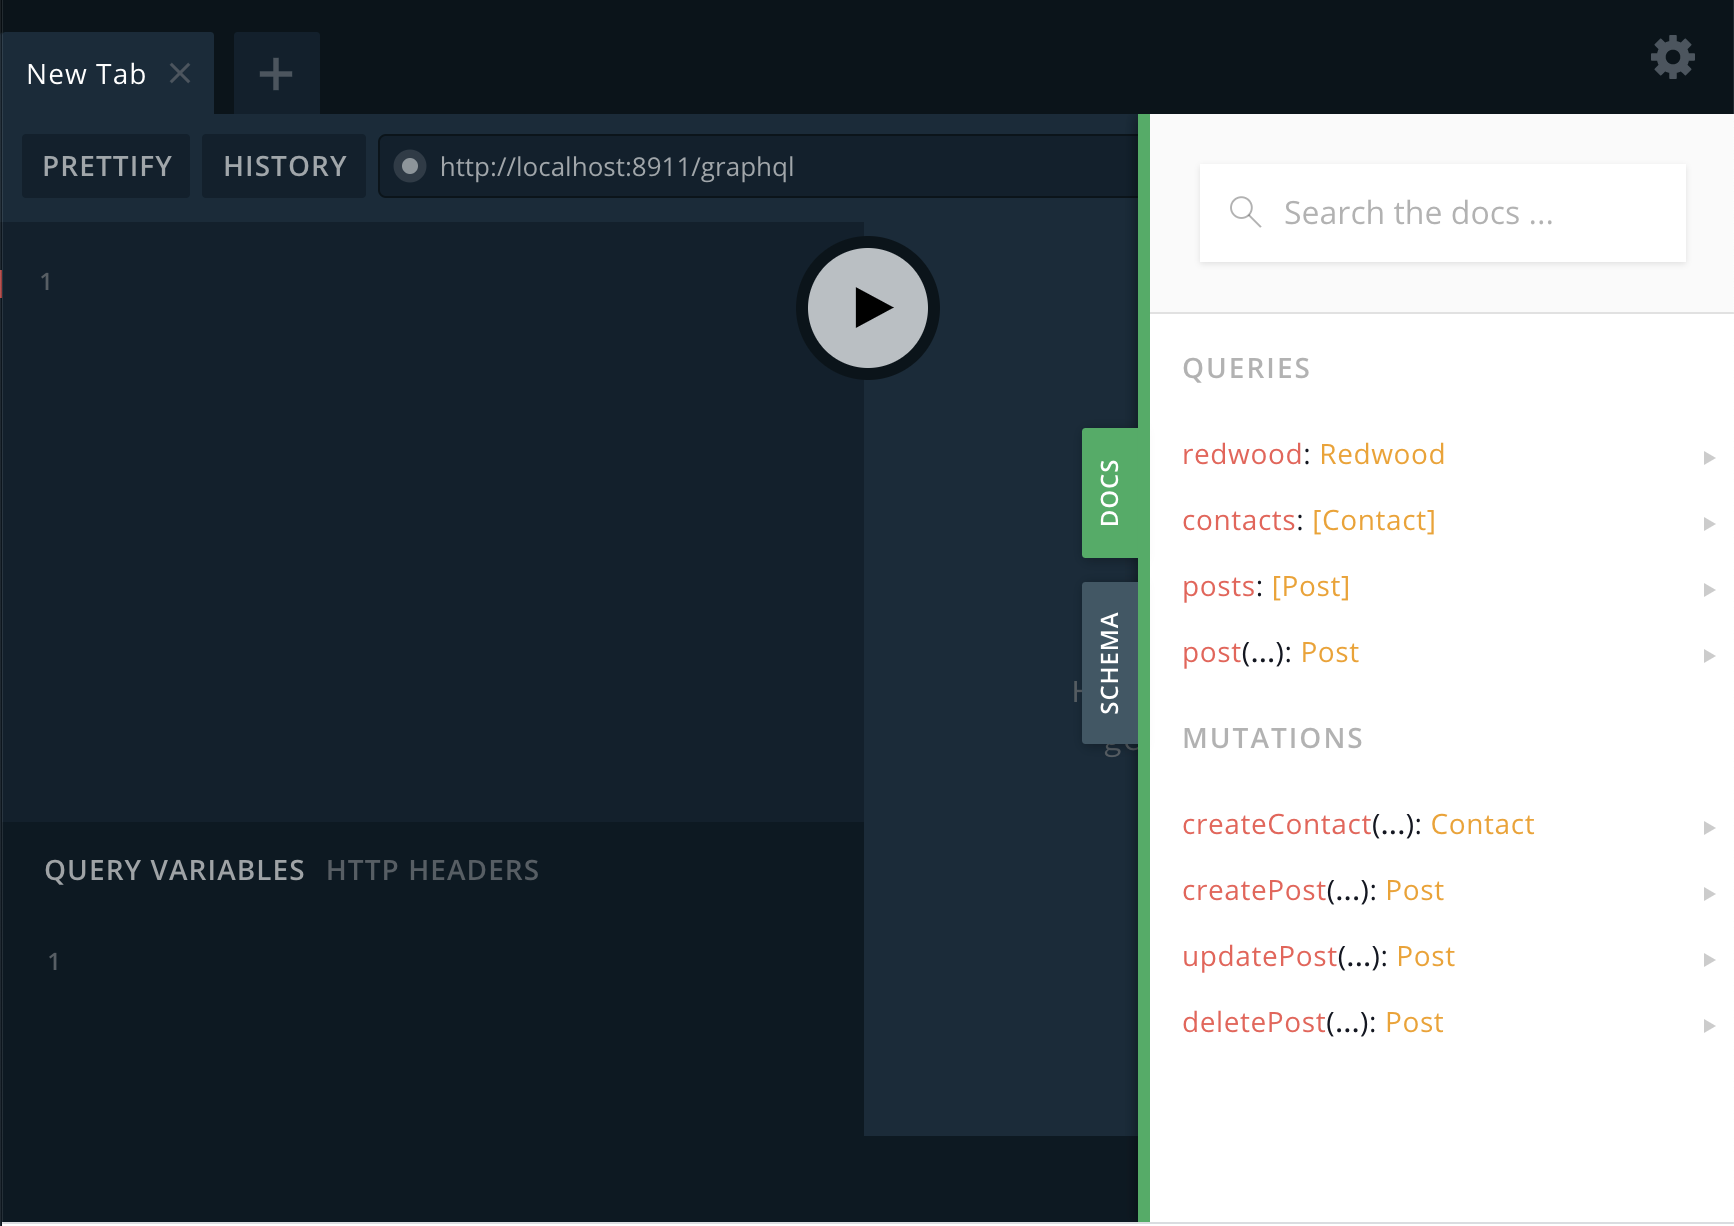
It's the complete schema as defined by our SDL files! The Playground will ingest these definitions and give you autocomplete hints on the left to help you build queries from scratch. Try getting the IDs of all the posts in the database; type the query at the left and then click the "Play" button to execute:
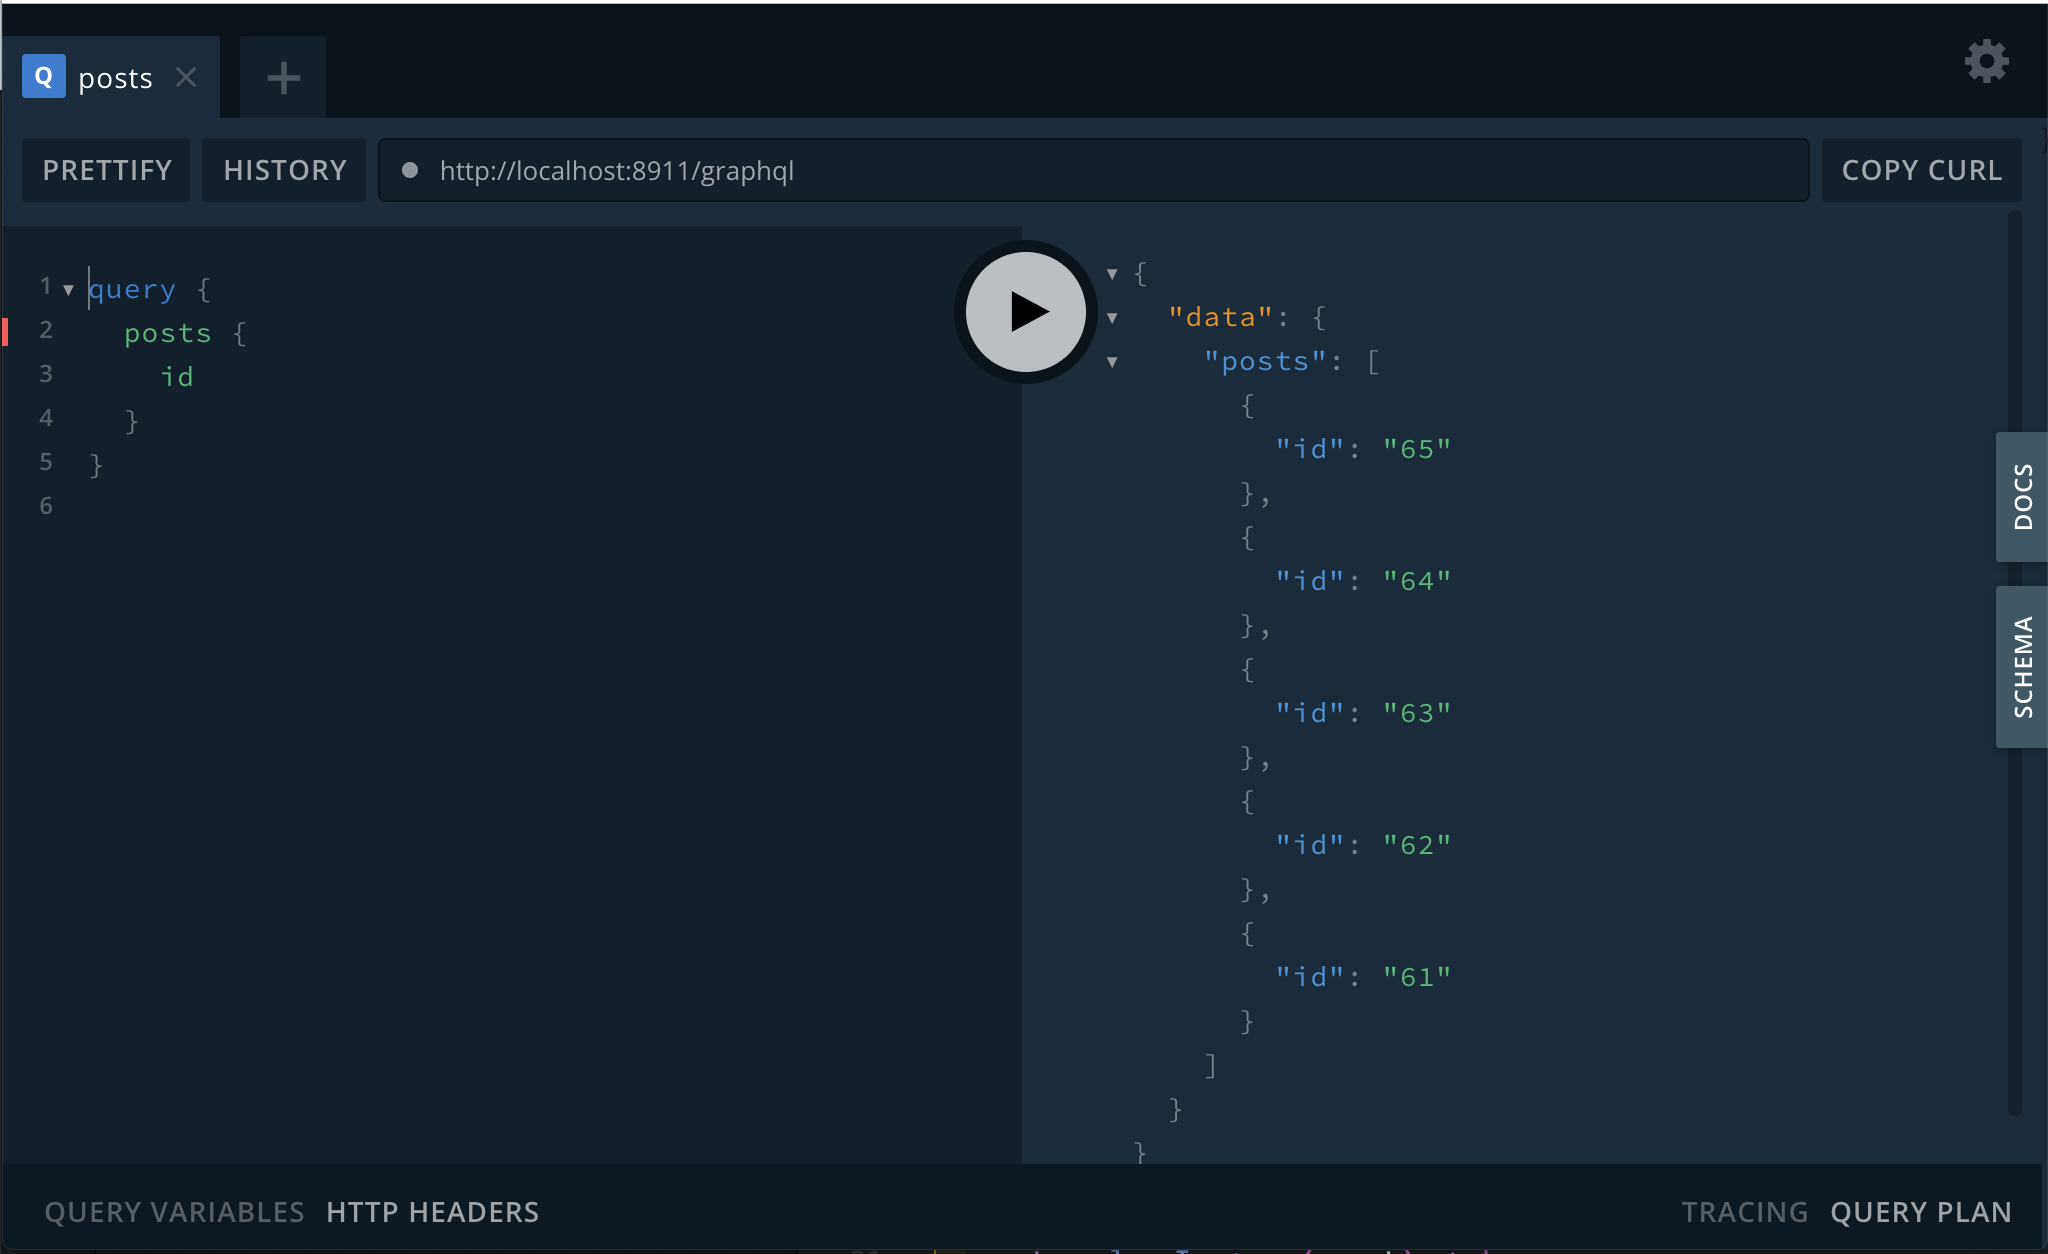
The GraphQL Playground is a great way to experiment with your API or troubleshoot when you come across a query or mutation that isn't behaving in the way you expect.
Our GraphQL mutation is ready to go on the backend so all that's left is to invoke it on the frontend. Everything related to our form is in ContactPage so that's the logical place to put the mutation call. First we define the mutation as a constant that we call later (this can be defined outside of the component itself, right after the import statements):
// web/src/pages/ContactPage/ContactPage.js

const CREATE_CONTACT = gql`
  mutation CreateContactMutation($input: CreateContactInput!) {
    createContact(input: $input) {
      id
    }
  }
`
We reference the createContact mutation we defined in the Contacts SDL passing it an input object which will contain the actual name, email and message fields.
Next we'll call the useMutation hook provided by Apollo which will allow us to execute the mutation when we're ready (don't forget the import statement):
// web/src/pages/ContactPage/ContactPage.js

import {
  Form,
  TextField,
  TextAreaField,
  Submit,
  FieldError,
  Label,
} from '@redwoodjs/forms'
import { useMutation } from '@redwoodjs/web'
import BlogLayout from 'src/layouts/BlogLayout'

const ContactPage = () => {
  const [create] = useMutation(CREATE_CONTACT)

  const onSubmit = (data) => {
    console.log(data)
  }

  return (...)
}
create is a function that invokes the mutation and takes an object with a variables key, containing another object with an input key. As an example, we could call it like:
create({
  variables: {
    input: {
      name: 'Rob',
      email: 'rob@redwoodjs.com',
      message: 'I love Redwood!',
    },
  },
})
If you'll recall <Form> gives us all of the fields in a nice object where the key is the name of the field, which means the data object we're receiving in onSubmit is already in the proper format that we need for the input!
Now we can update the onSubmit function to invoke the mutation with the data it receives:
// web/src/pages/ContactPage/ContactPage.js

const ContactPage = () => {
  const [create] = useMutation(CREATE_CONTACT)

  const onSubmit = (data) => {
    create({ variables: { input: data }})
    console.log(data)
  }

  return (...)
}
Try filling out the form and submitting—you should have a new Contact in the database! You can verify that with the GraphQL Playground if you were so inclined:

Our contact form works but it has a couple of issues at the moment:
- Clicking the submit button multiple times will result in multiple submits
- The user has no idea if their submission was successful
- If an error was to occur on the server, we have no way of notifying the user
Let's address these issues.
The useMutation hook returns a couple more elements along with the function to invoke it. We can destructure these as the second element in the array that's returned. The two we care about are loading and error:
// web/src/pages/ContactPage/ContactPage.js

const ContactPage = () => {
  const [create, { loading, error }] = useMutation(CREATE_CONTACT)

  const onSubmit = (data) => {
    create({ variables: { input: data } })
    console.log(data)
  }

  return (...)
}
Now we know if the database call is still in progress by looking at loading. An easy fix for our multiple submit issue would be to disable the submit button if the response is still in progress. We can set the disabled attribute on the "Save" button to the value of loading:
// web/src/pages/ContactPage/ContactPage.js

return (
  // ...
  <Submit disabled={loading}>Save</Submit>
  // ...
)
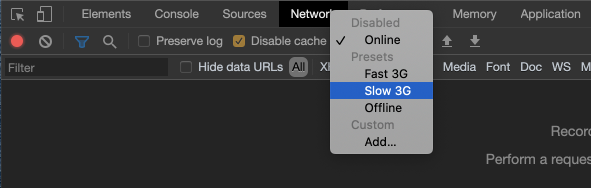
It may be hard to see a difference in development because the submit is so fast, but you could enable network throttling via the Network tab Chrome's Web Inspector to simulate a slow connection:
You'll see that the "Save" button become disabled for a second or two while waiting for the response.
Next, let's use Redwood's Flash system to let the user know their submission was successful. useMutation accepts an options object as a second argument. One of the options is a callback function, onCompleted, that will be invoked when the mutation successfully completes. We'll use that callback to add a message for the Flash component to display. Add the Flash component to the page and use the timeout prop to schedule the message's dismissal. (Read the full documentation about Redwood's Flash system.)
// web/src/pages/ContactPage/ContactPage.js

// ...
import { Flash, useFlash, useMutation } from '@redwoodjs/web'
import BlogLayout from 'src/layouts/BlogLayout'

// ...

const ContactPage = () => {
  const { addMessage } = useFlash()

  const [create, { loading, error }] = useMutation(CREATE_CONTACT, {
    onCompleted: () => {
      addMessage('Thank you for your submission!', {
        style: { backgroundColor: 'green', color: 'white', padding: '1rem' }
      })
    },
  })

  // ...

  return (
    <BlogLayout>
      <Flash timeout={2000} />
      // ...
Next we'll inform the user of any server errors. So far we've only notified the user of client errors: a field was missing or formatted incorrectly. But if we have server-side constraints in place <Form> can't know about those, but we still need to let the user know something went wrong.
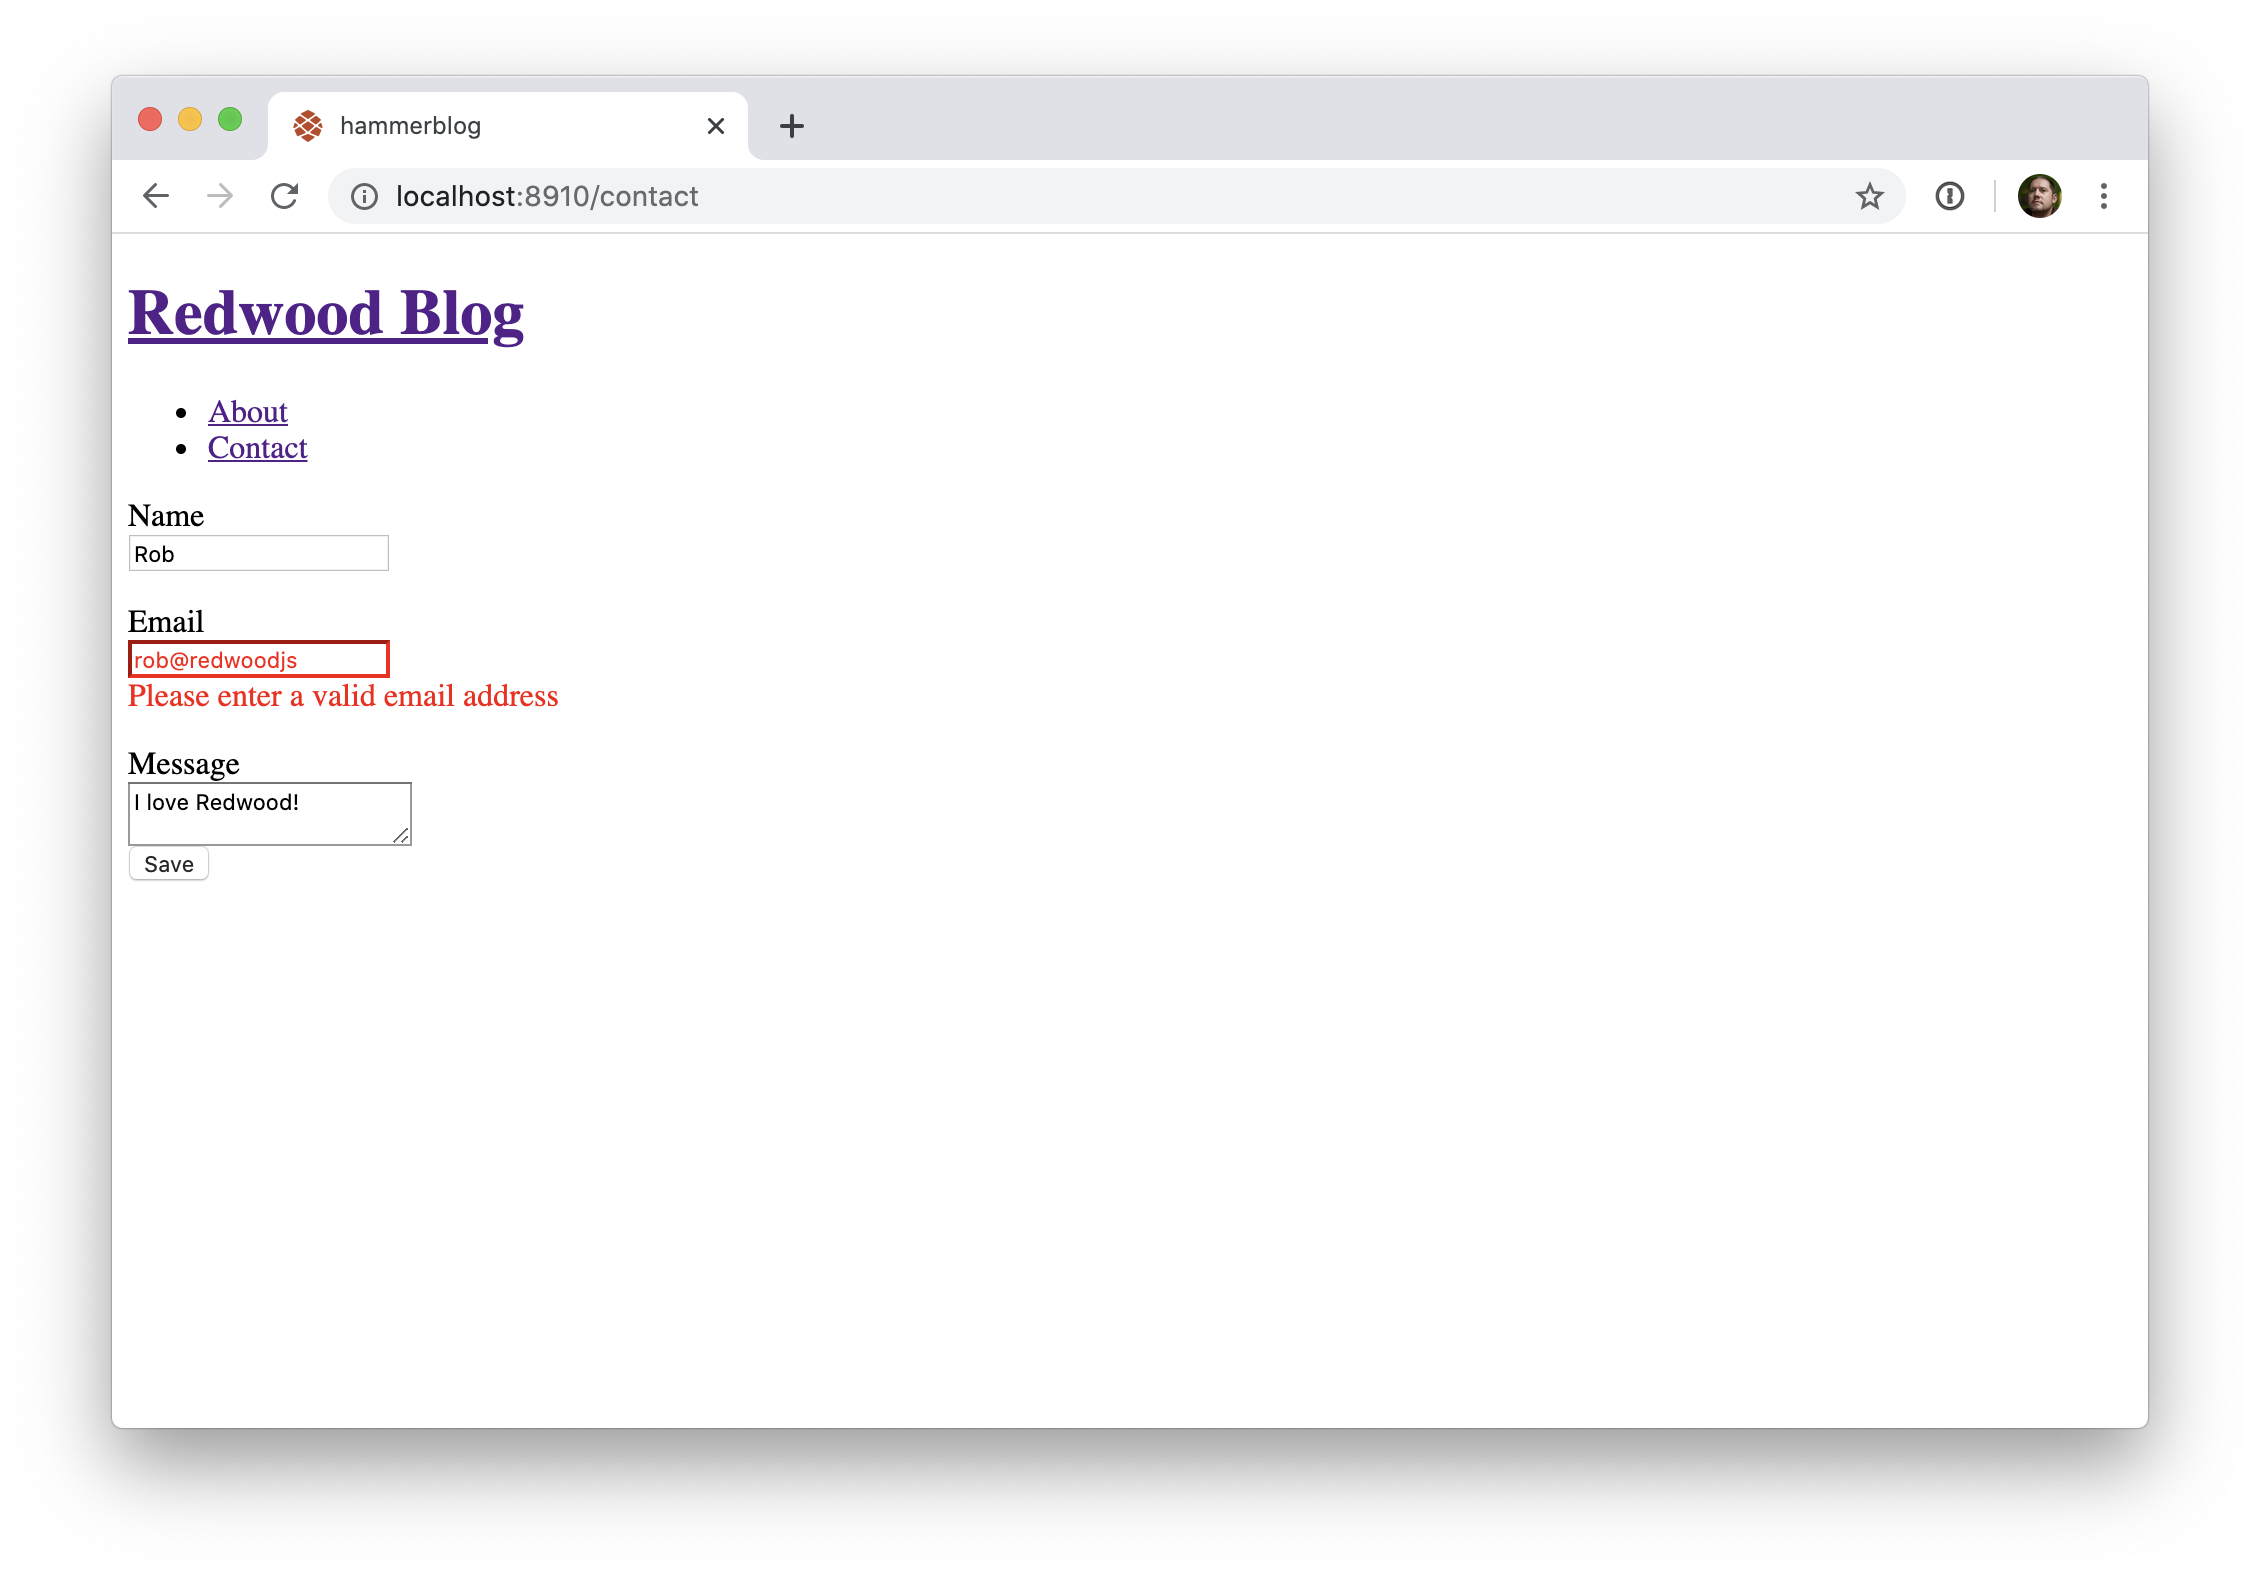
We have email validation on the client, but any good developer knows never trust the client. Let's add the email validation on the API as well to be sure no bad data gets into our database, even if someone somehow bypassed our client-side validation.
No server-side validation?
Why don't we need server-side validation for the existence of name, email and message? Because the database is doing that for us. Remember the
String!in our SDL definition? That adds a constraint in the database that the field cannot benull. If anullwas to get all the way down to the database it would reject the insert/update and GraphQL would throw an error back to us on the client.There's no
Email!datatype so we'll need to validate that on our own.
We talked about business logic belonging in our services files and this is a perfect example. Let's add a validate function to our contacts service:
// api/src/services/contacts/contacts.js

import { UserInputError } from '@redwoodjs/api'

import { db } from 'src/lib/db'

const validate = (input) => {
  if (input.email && !input.email.match(/[^@]+@[^.]+\..+/)) {
    throw new UserInputError("Can't create new contact", {
      messages: {
        email: ['is not formatted like an email address'],
      },
    })
  }
}

export const contacts = () => {
  return db.contact.findMany()
}

export const createContact = ({ input }) => {
  validate(input)
  return db.contact.create({ data: input })
}
So when createContact is called it will first validate the inputs and only if no errors are thrown will it continue to actually create the record in the database.
We already capture any existing error in the error constant that we got from useMutation, so we could manually display an error box on the page somewhere containing those errors, maybe at the top of the form:
// web/src/pages/ContactPage/ContactPage.js

<Form onSubmit={onSubmit} validation={{ mode: 'onBlur' }}>
  {error && (
    <div style={{ color: 'red' }}>
      {"We couldn't send your message: "}
      {error.message}
    </div>
  )}
  // ...
If you need to handle your errors manually, you can do this:
// web/src/pages/ContactPage/ContactPage.js
const onSubmit = async (data) => {
  try {
    await create({ variables: { input: data } })
    console.log(data)
  } catch (error) {
    console.log(error)
  }
}
To get a server error to fire, let's remove the email format validation so that the client-side error isn't shown:
// web/src/pages/ContactPage/ContactPage.js

<TextField
  name="email"
  validation={{
    required: true,
  }}
  errorClassName="error"
/>
Now try filling out the form with an invalid email address:

It ain't pretty, but it works. It would be nice if the field itself was highlighted like it was when the inline validation was in place...
Remember when we said that <Form> had one more trick up its sleeve? Here it comes!
Remove the inline error display we just added ({ error && ...}) and replace it with <FormError>, passing the error constant we got from useMutation and a little bit of styling to wrapperStyle (don't forget the import). We'll also pass error to <Form> so it can setup a context:
// web/src/pages/ContactPage/ContactPage.js

import {
  Form,
  TextField,
  TextAreaField,
  Submit,
  FieldError,
  Label,
  FormError,
} from '@redwoodjs/forms'
import { Flash, useFlash, useMutation } from '@redwoodjs/web'
// ...

return (
  <BlogLayout>
    <Flash timeout={1000} />
    <Form onSubmit={onSubmit} validation={{ mode: 'onBlur' }} error={error}>
      <FormError
        error={error}
        wrapperStyle={{ color: 'red', backgroundColor: 'lavenderblush' }}
      />

      //...
)
Now submit a message with an invalid email address:
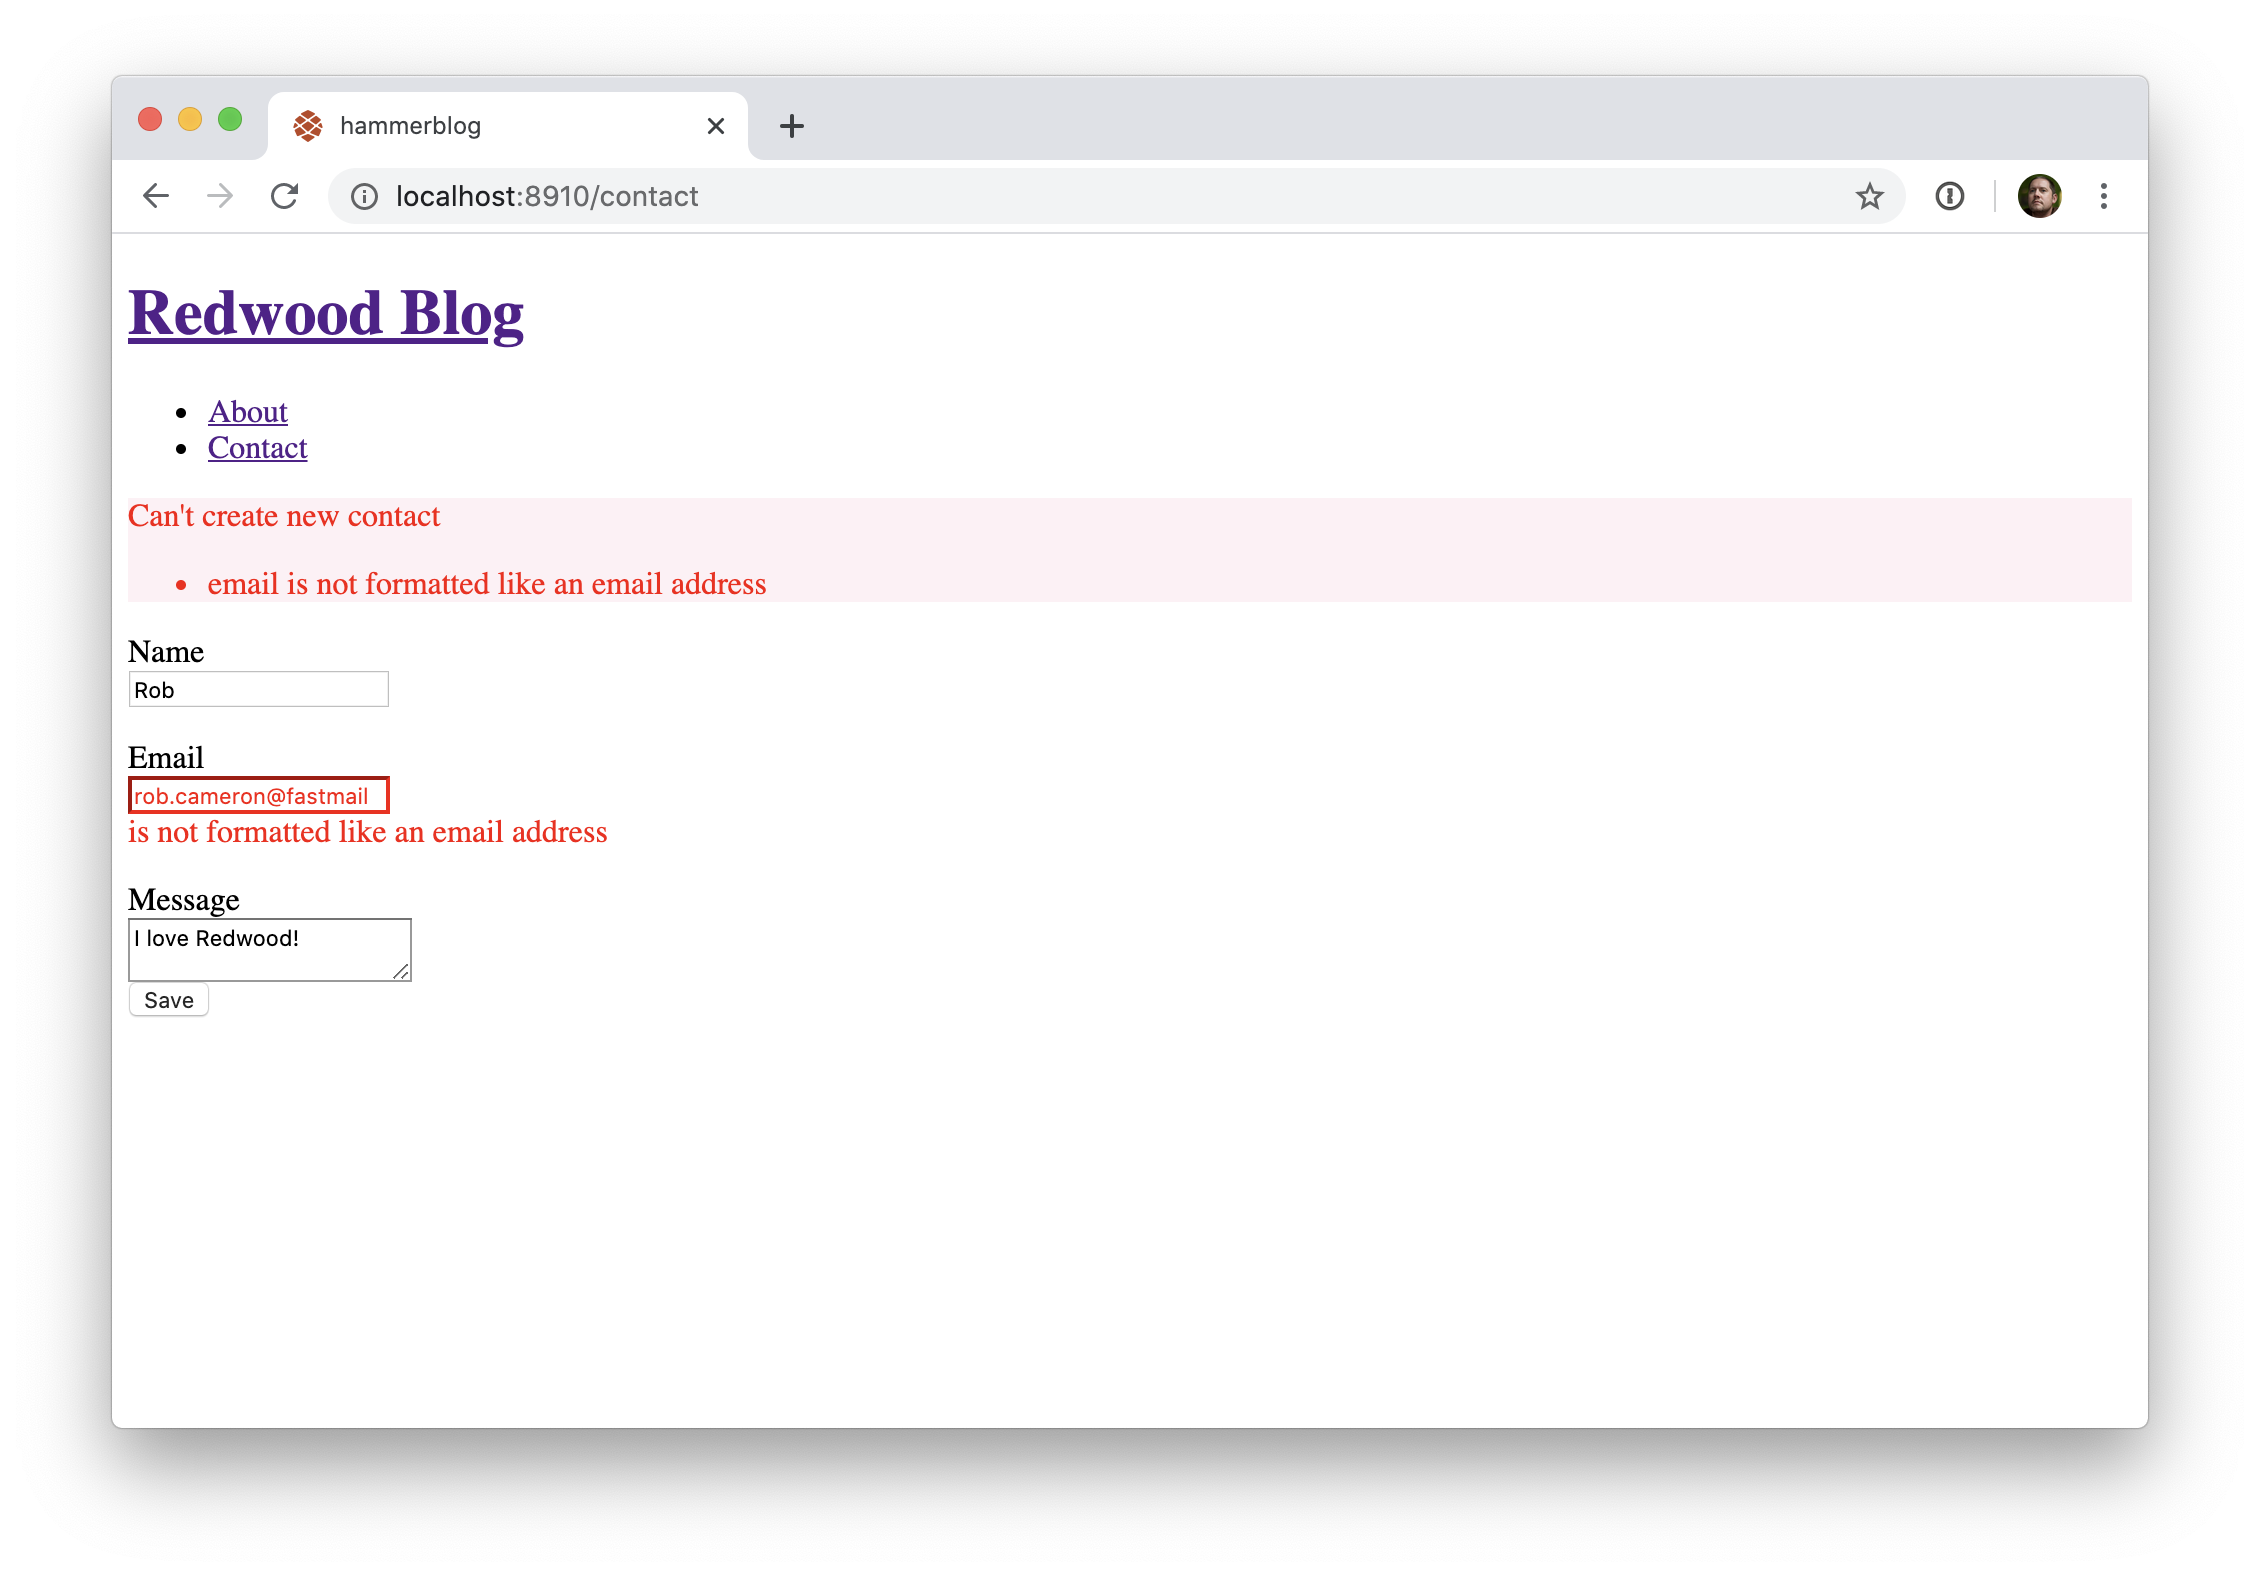
We get that error message at the top saying something went wrong in plain English and the actual field is highlighted for us, just like the inline validation! The message at the top may be overkill for such a short form, but it can be key if a form is multiple screens long; the user gets a summary of what went wrong all in one place and they don't have to resort to hunting through a long form looking for red boxes. You don't have to use that message box at the top, though; just remove <FormError> and the field will still be highlighted as expected.
<FormError>styling options
<FormError>has several styling options which are attached to different parts of the message:
wrapperStyle/wrapperClassName: the container for the entire messagetitleStyle/titleClassName: the "Can't create new contact" titlelistStyle/listClassName: the<ul>that contains the list of errorslistItemStyle/listItemClassName: each individual<li>around each error
Since we're not redirecting after the form submits we should at least clear out the form fields. This requires we get access to a reset() function that's part of react-hook-form but we don't have access to it when using the simplest usage of <Form> (like we're currently using).
react-hook-form has a hook called useForm() which is normally called for us within <Form>. In order to reset the form we need to invoke that hook ourselves. But the functionality that useForm() provides still needs to be used in Form. Here's how we do that.
First we'll import useForm:
// web/src/pages/ContactPage/ContactPage.js

import { useForm } from 'react-hook-form'
And now call it inside of our component:
// web/src/pages/ContactPage/ContactPage.js

const ContactPage = () => {
  const formMethods = useForm()
  //...
Finally we'll tell <Form> to use the formMethods we just instantiated instead of doing it itself:
// web/src/pages/ContactPage/ContactPage.js

return (
  <BlogLayout>
    <Flash timeout={1000} />
    <Form
      onSubmit={onSubmit}
      validation={{ mode: 'onBlur' }}
      error={error}
      formMethods={formMethods}
    >
    // ...
Now we can call reset() on formMethods after the success message is added to the Flash system:
// web/src/pages/ContactPage/ContactPage.js

const [create, { loading, error }] = useMutation(CREATE_CONTACT, {
  onCompleted: () => {
    // addMessage...
    formMethods.reset()
  },
})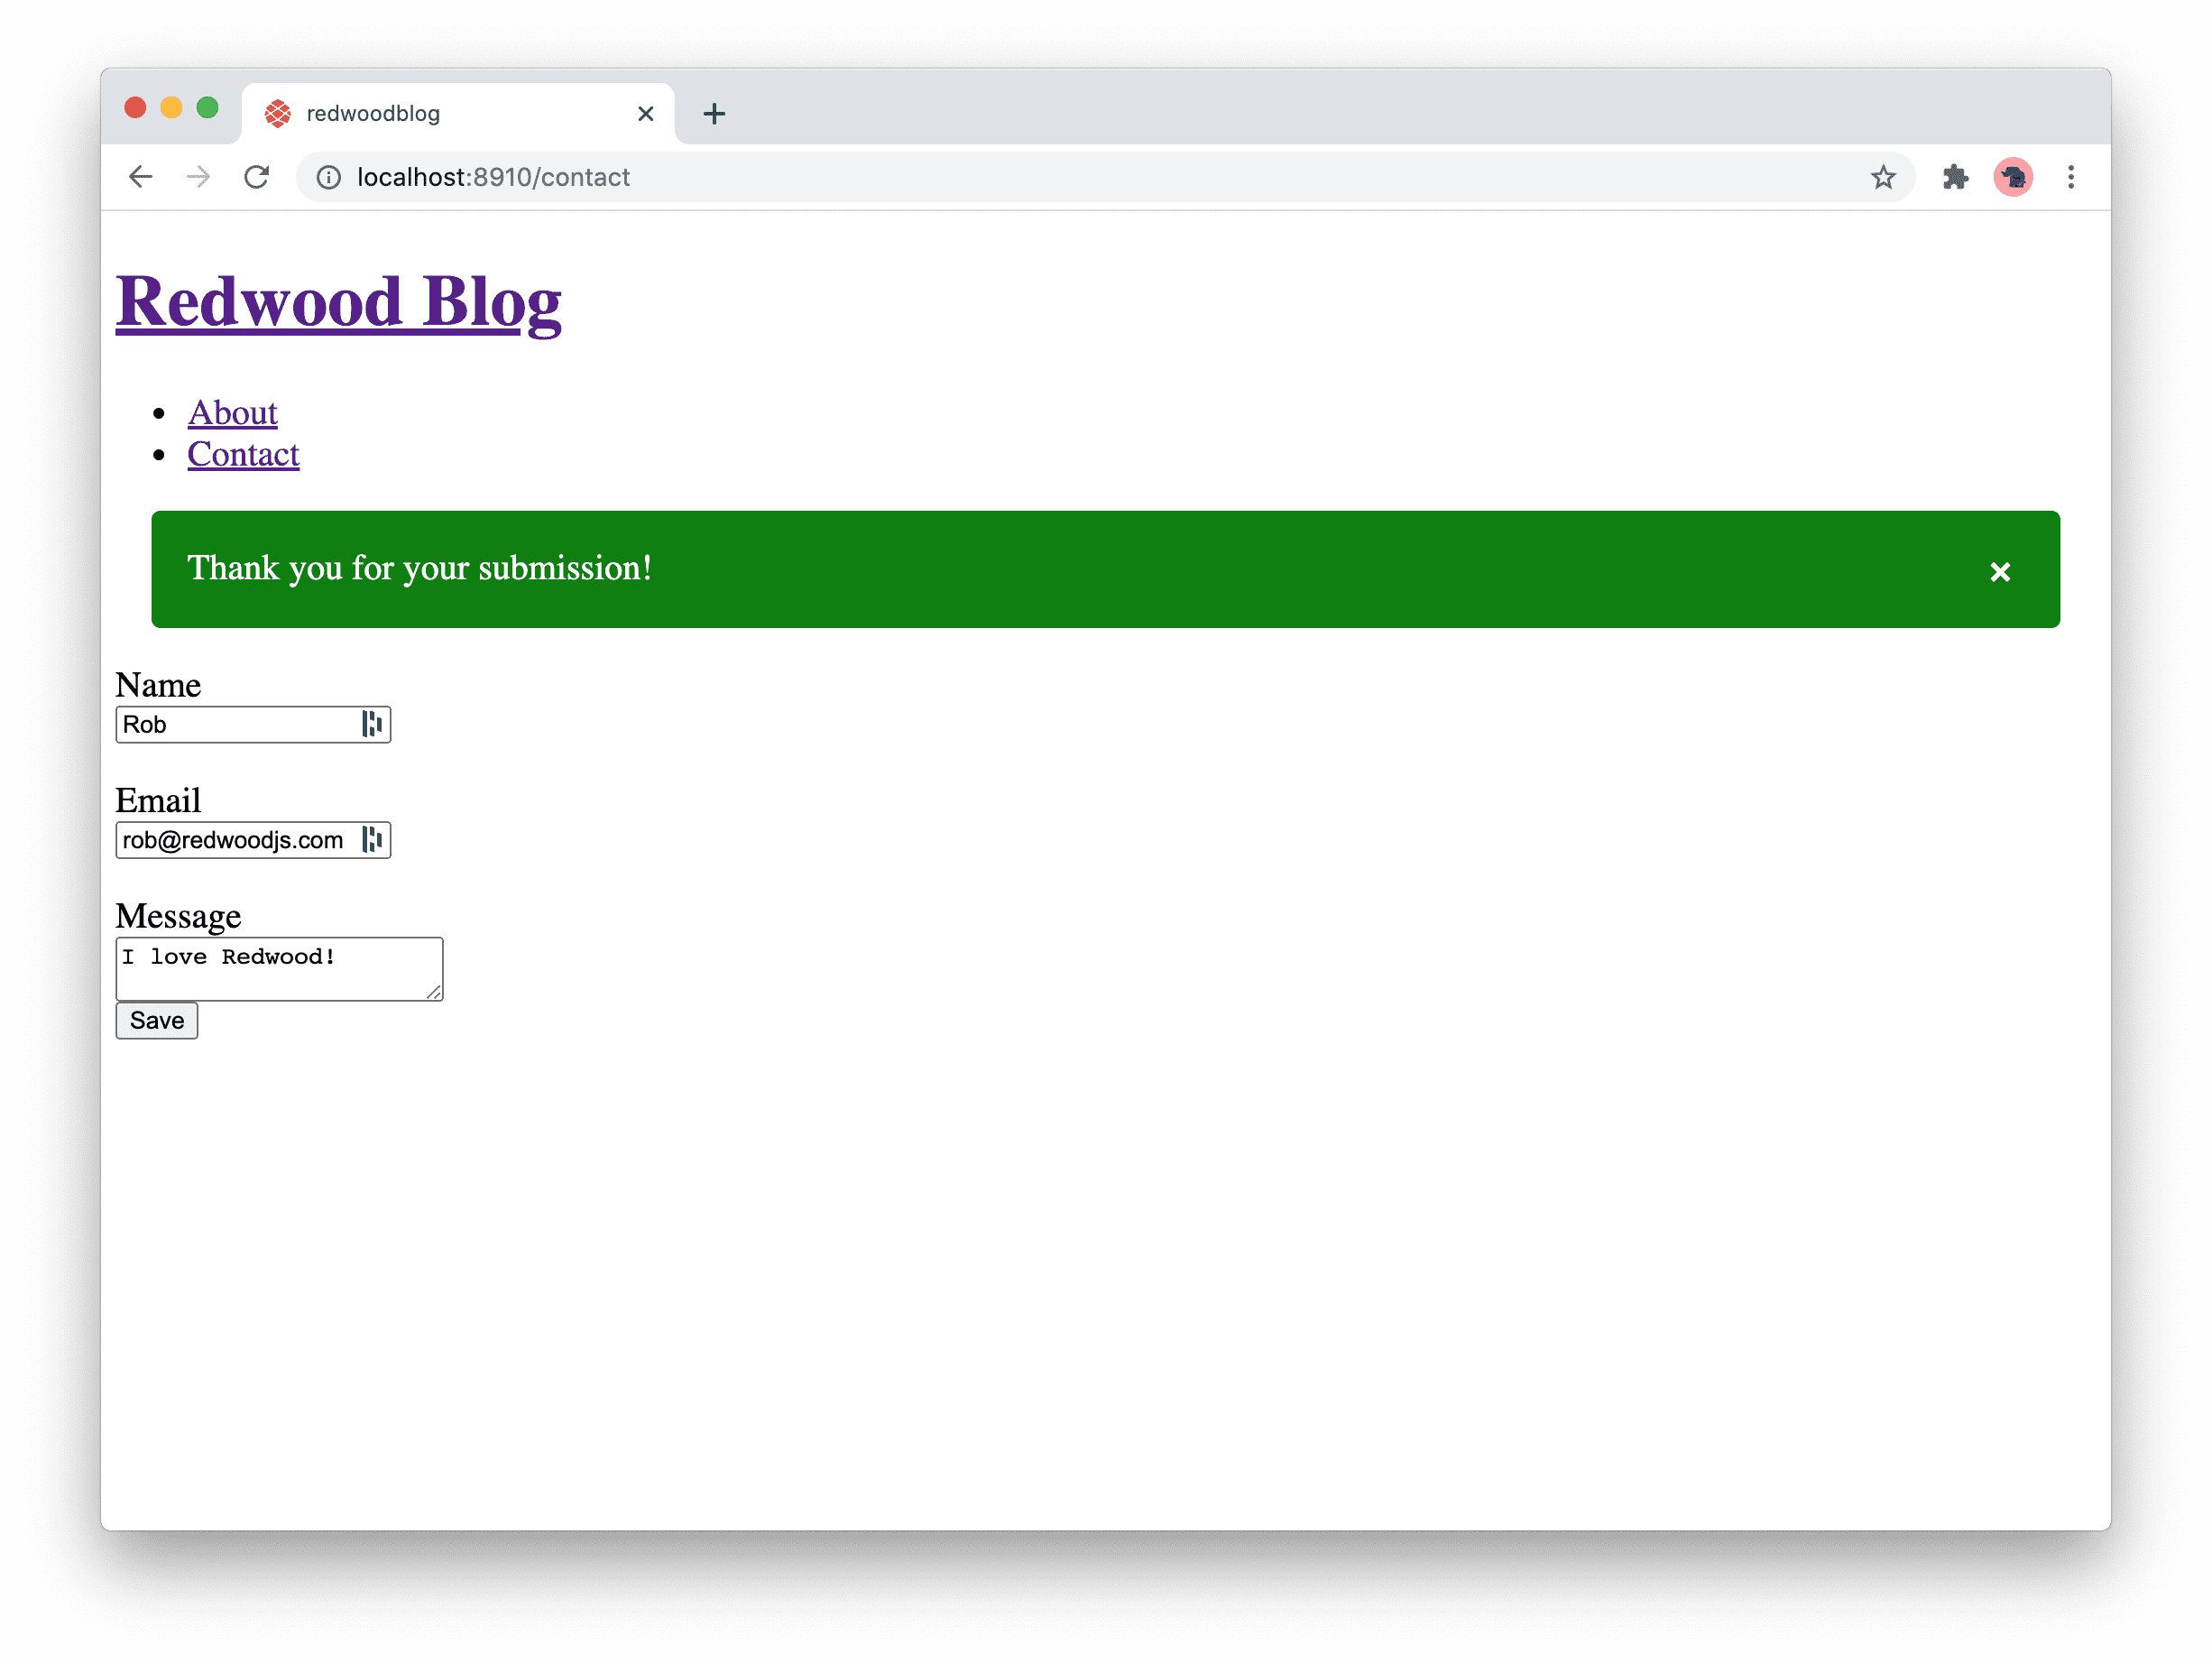
You can put the email validation back into the
<TextField>now, but you should leave the server validation in place, just in case.
Here's the final ContactPage.js page:
import {
  Form,
  TextField,
  TextAreaField,
  Submit,
  FieldError,
  Label,
  FormError,
} from '@redwoodjs/forms'
import { Flash, useFlash, useMutation } from '@redwoodjs/web'
import { useForm } from 'react-hook-form'
import BlogLayout from 'src/layouts/BlogLayout'

const CREATE_CONTACT = gql`
  mutation CreateContactMutation($input: CreateContactInput!) {
    createContact(input: $input) {
      id
    }
  }
`

const ContactPage = () => {
  const formMethods = useForm()
  const { addMessage } = useFlash()

  const [create, { loading, error }] = useMutation(CREATE_CONTACT, {
    onCompleted: () => {
      addMessage('Thank you for your submission!', {
        style: { backgroundColor: 'green', color: 'white', padding: '1rem' }
      })
      formMethods.reset()
    },
  })

  const onSubmit = (data) => {
    create({ variables: { input: data } })
    console.log(data)
  }

  return (
    <BlogLayout>
      <Flash timeout={1000} />
      <Form
        onSubmit={onSubmit}
        validation={{ mode: 'onBlur' }}
        error={error}
        formMethods={formMethods}
      >
        <FormError
          error={error}
          wrapperStyle={{ color: 'red', backgroundColor: 'lavenderblush' }}
        />
        <Label name="name" errorClassName="error">
          Name
        </Label>
        <TextField
          name="name"
          validation={{ required: true }}
          errorClassName="error"
        />
        <FieldError name="name" className="error" />

        <Label name="email" errorClassName="error">
          Email
        </Label>
        <TextField
          name="email"
          validation={{
            required: true,
          }}
          errorClassName="error"
        />
        <FieldError name="email" className="error" />

        <Label name="message" errorClassName="error">
          Message
        </Label>
        <TextAreaField
          name="message"
          validation={{ required: true }}
          errorClassName="error"
        />
        <FieldError name="message" className="error" />

        <Submit disabled={loading}>Save</Submit>
      </Form>
    </BlogLayout>
  )
}

export default ContactPage
That's it! React Hook Form provides a bunch of functionality that <Form> doesn't expose. When you want to get to that functionality you can: just call useForm() yourself but make sure to pass the returned object (we called it formMethods) as a prop to <Form> so that the validation and other functionality keeps working.
You may have noticed that the onBlur form validation stopped working once you started calling
useForm()yourself. That's because Redwood callsuseForm()behind the scenes and automaticaly passes it thevalidationprop that you gave to<Form>. Redwood is no longer callinguseForm()for you so if you need some options passed you need to do it manually:const formMethods = useForm({ mode: 'onBlur' })
The public site is looking pretty good. How about the administrative features that let us create and edit posts? We should move them to some kind of admin section and put them behind a login so that random users poking around at URLs can't create ads for discount pharmaceuticals.
Having the admin screens at /admin is a reasonable thing to do. Let's update the routes to make that happen by updating the four routes starting with /posts to start with /admin/posts instead:
// web/src/Routes.js

<Route path="/admin/posts/new" page={NewPostPage} name="newPost" />
<Route path="/admin/posts/{id:Int}/edit" page={EditPostPage} name="editPost" />
<Route path="/admin/posts/{id:Int}" page={PostPage} name="post" />
<Route path="/admin/posts" page={PostsPage} name="posts" />
Head to http://localhost:8910/admin/posts and our generated scaffold page should come up. Thanks to named routes we don't have to update any of the <Link>s that were generated by the scaffolds since the names of the pages didn't change!
What about authentication?
On the last page we said we were going to set up an admin section and put it behind a login. So far, all we've done is updated the routes. Don't worry, we haven't forgotten! We will be setting up authentication in a future step.
How about getting this thing out into the real world?
Part 4 of the video tutorial picks up here:
The whole reason we started building Redwood was to make full-stack web apps easier to build and deploy on the Jamstack. You've seen what building a Redwood app is like, how about we try deploying one?
We've only got one change to make to the codebase to get it ready for deployment and we've got a generator to do it for us:
yarn rw g deploy netlify
This creates a file at /netlify.toml which contains the commands and file paths that Netlify needs to know about to build a Redwood app.
Before we continue, make sure your app is fully committed and pushed to GitHub, GitLab, or Bitbucket. We're going to link Netlify directly to our git repo so that a simple push to main will re-deploy our site. If you haven't worked on the Jamstack yet you're in for a pleasant surprise!
NOTE: Git initializes with
master. Don't know how to renamemastertomain? If you're pushing to GitHub, you can follow these steps:git init git add . git commit -m 'First commit' git branch -m main git remote add origin ... git push -u origin main
Redwood officially supports multiple hosting providers (with even more on the way). Although this Tutorial continues with a focus on Netlify deployment and authentication with Netlify Identity, you can deploy to Vercel instead. To do this, first complete the "The Database" section below, but then use this Vercel deploy walkthrough in place of the following "Netlify" instructions. Note: Netlify Identity, used in upcoming "Authentication" section, won’t work on the Vercel platform.
We'll need a database somewhere on the internet to store our data. We've been using SQLite locally, but that's a file-based store meant for single-user. SQLite isn't really suited for the kind of connection and concurrency requirements a production website will require. For this part of this tutorial, we will use Postgres. (Prisma currently supports SQLite, Postgres and MySQL.) Don't worry if you aren't familiar with Postgres, Prisma will do all the heavy lifting. We just need to get a database available to the outside world so it can be accessed by our app.
First we'll let Prisma know that we intend to use Postgres in addition to SQLite so it will build client libraries for both. Update the provider entry in schema.prisma:
provider = ["sqlite", "postgresql"]If you are deploying to Netlify and using Prisma version
< 2.11.0, you will need to addrhel-openssl-1.0.xto yourbinaryTargets:// api/db/schema.prisma generator client { provider = "prisma-client-js" binaryTargets = ["native", "rhel-openssl-1.0.x"] }
If you'd like to develop locally with Postgres, see the Local Postgres Setup guide.
For now, you need to set up your own database, but we are working with various infrastructure providers to make this process simpler and more Jamstacky. Stay tuned for improvements in that regard!
There are several hosting providers where you can quickly start up a Postgres instance:
We're going to go with Heroku for now because it's a) free and b) easier to get started from scratch than AWS.
Head over to Heroku and create an account or log in. Then click that Create a new app button:
Give it a name like "redwoodblog" if it's available. Go to the Resources tab and then click Find more add-ons in the Add-ons section:
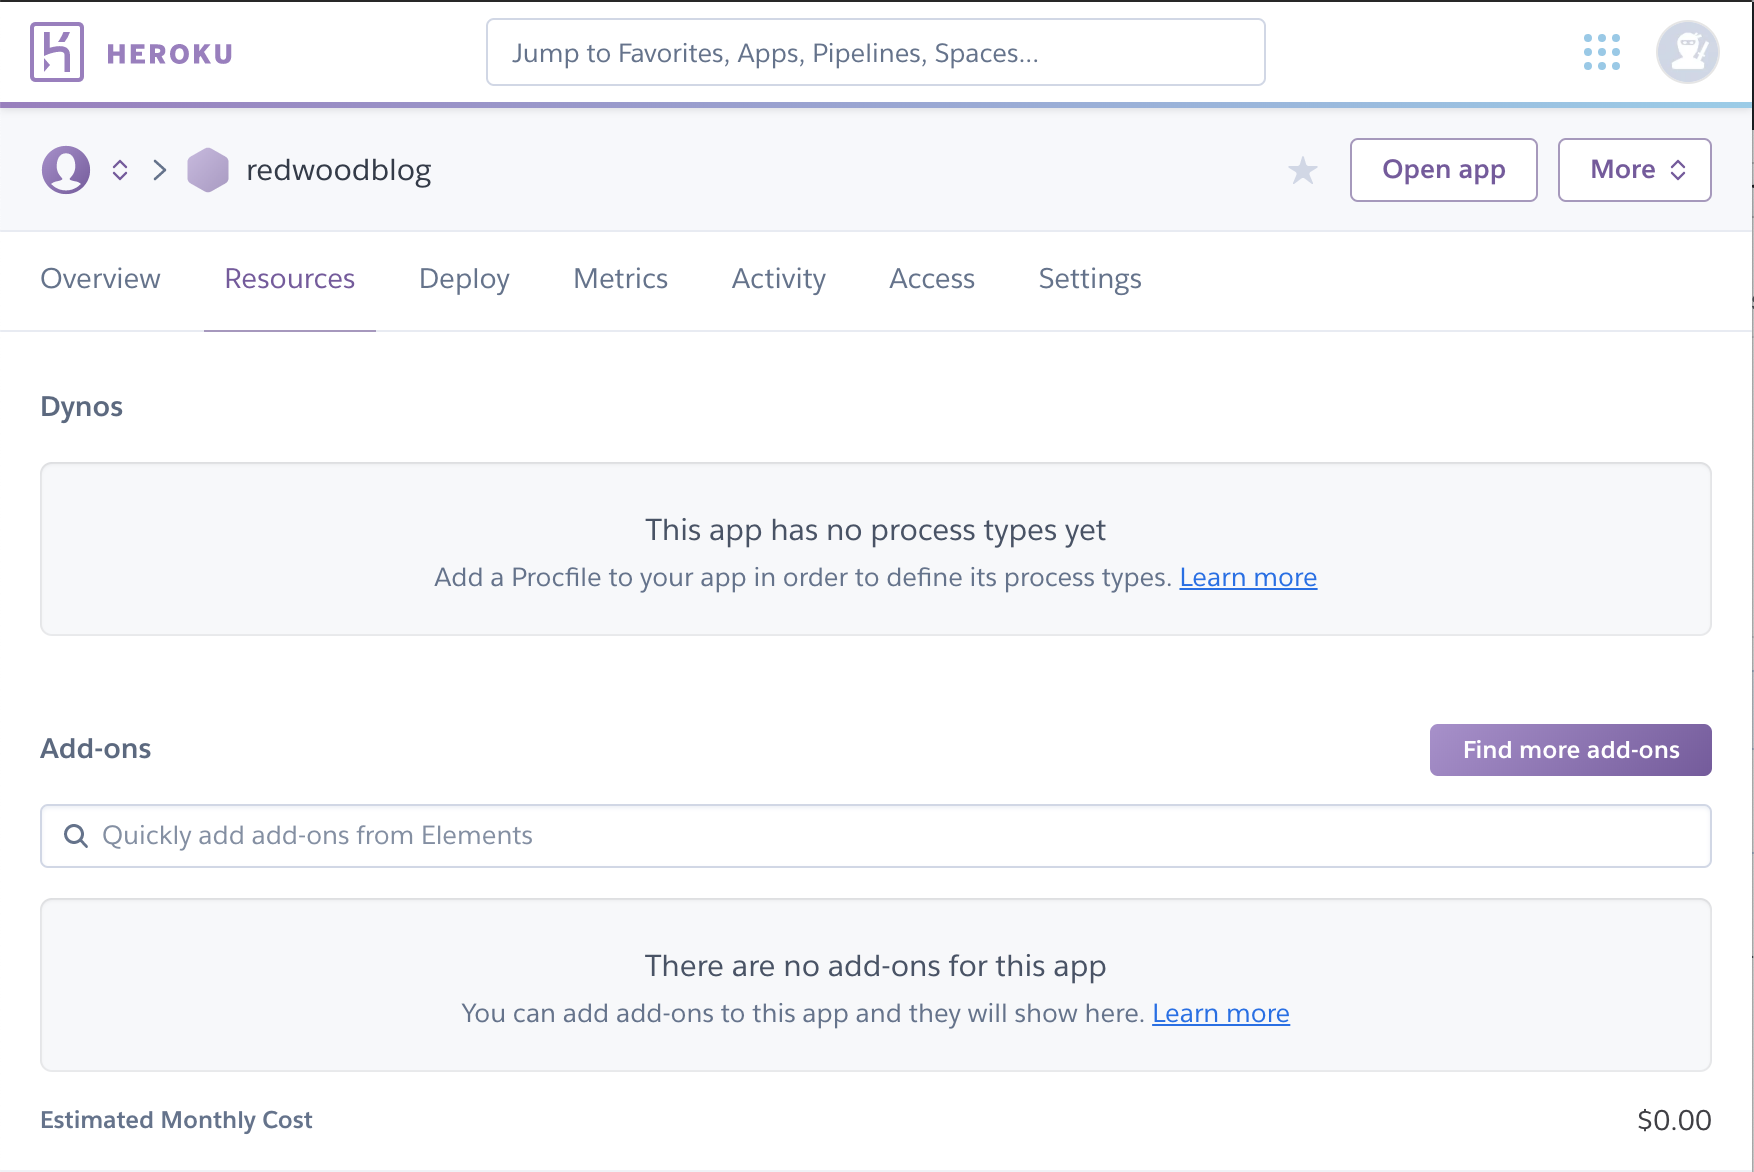
And scroll down to Heroku Postgres:
Click that and then on the detail page that comes up, click the Install Heroku Postgres button that's at the top right. On the next screen tell it you want to connect it to the app you just created, then click Submit Order Form:

You'll be returned to your app's detail page. You should be on the Resources tab and see the Heroku Postgres add-on ready to go:
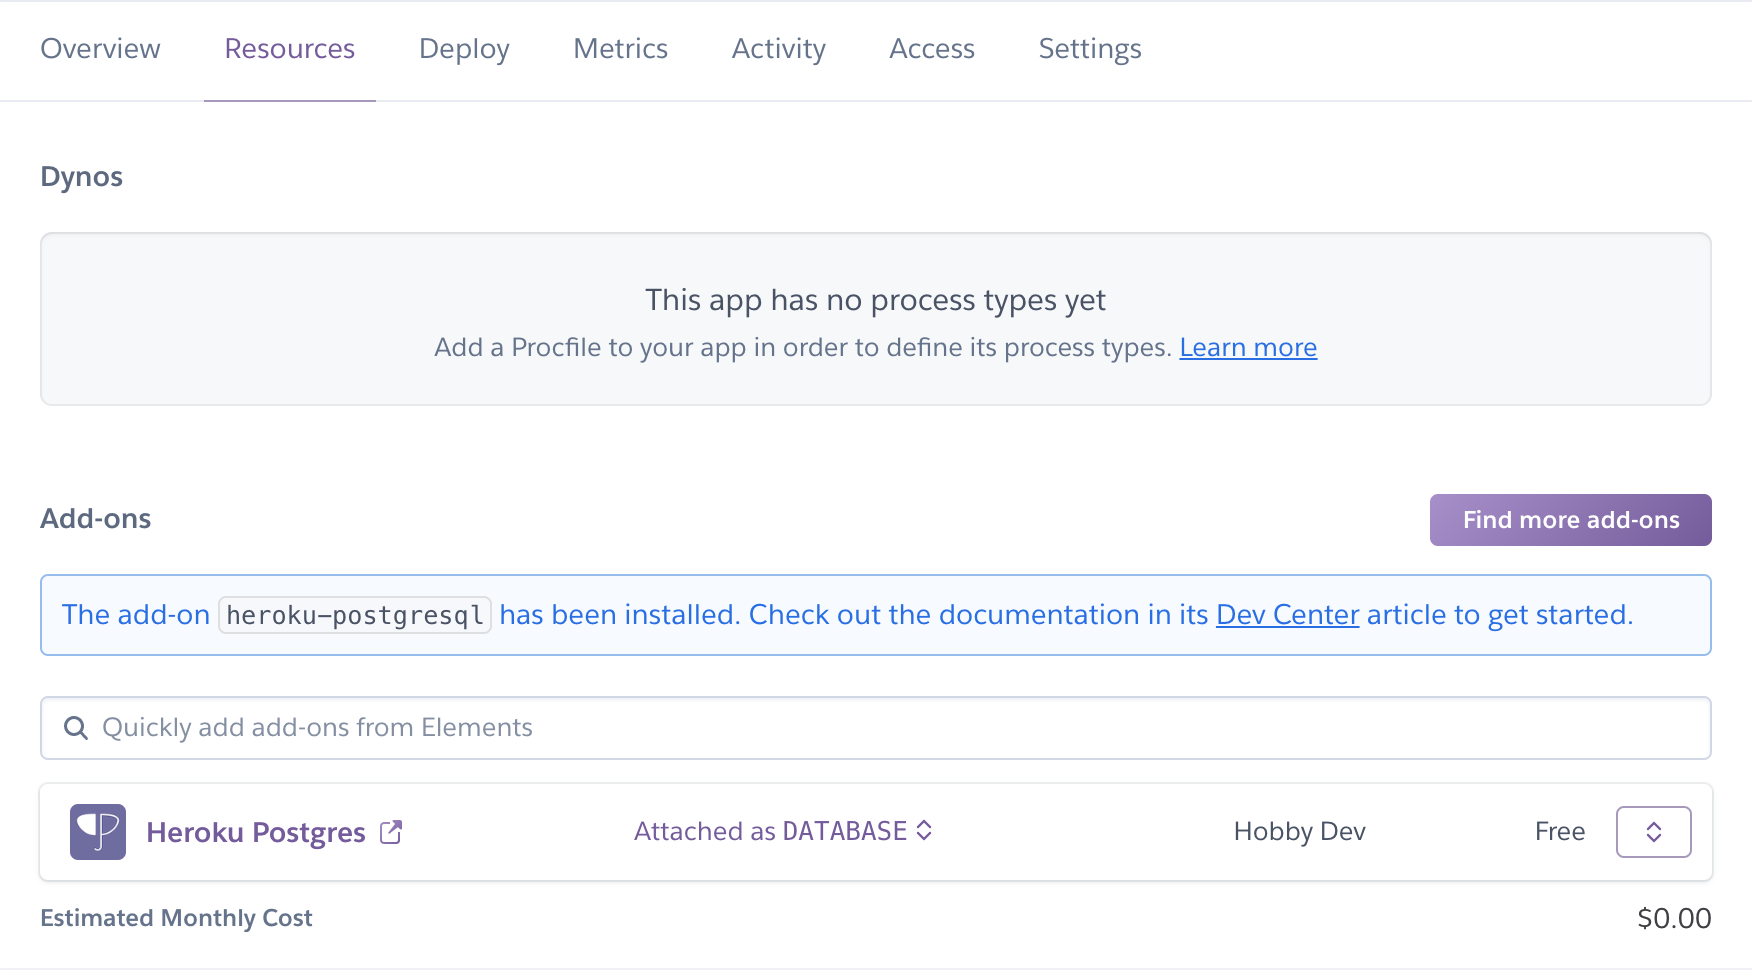
Click the Heroku Postgres link to get to the detail page, then the Settings tab and finally the View Credentials... button. We did all the steps above so that we could copy the URI listed at the bottom:
It will be really long and scroll off the right side of the page so make sure you copy the whole thing!
Now we're going to create a Netlify account if you don't have one already. Once you've signed up and verified your email done just click the New site from Git button at the upper right:

Now just authorize Netlify to connect to your git hosting provider and find your repo. When the deploy settings come up you can leave everything as the defaults and click Deploy site.
Netlify will start building your app (click the Deploying your site link to watch the logs) and it will say "Site is live", but nothing will work. Why? We haven't told it where to find our database yet.
Go back to the main site page and then to Site settings at the top, and then Build & Deploy > Environment. Click Edit Variables and this is where we'll paste the database connection URI we got from Heroku (note the Key is "DATABASE_URL"). After pasting the value, append ?connection_limit=1 to the end. The URI will have the following format: postgres://<user>:<pass>@<url>/<db>?connection_limit=1.

Connection limit
When configuring a database, you'll want to append
?connection_limit=1to the URI. This is recommended by Prisma when working with relational databases in a Serverless context.
Make sure to click the Save button. Now go over to the Deploys tab in the top nav and open the Trigger deploy dropdown on the right, then finally choose Deploy site:
With a little luck (and SCIENCE) it will complete successfully! You can click the Preview button at the top of the deploy log page, or go back and click the URL of your Netlify site towards the top:

Did it work? If you see "Empty" under the About and Contact links then it did! Yay! You're seeing "Empty" because you don't have any posts in your brand new production database so head to /admin/posts and create a couple, then go back to the homepage to see them.
If you view a deploy via the Preview button notice that the URL contains a hash of the latest commit. Netlify will create one of these for every push to
mainbut will only ever show this exact commit, so if you deploy again and refresh you won't see any changes. The real URL for your site (the one you get from your site's homepage in Netlify) will show the latest deploy. See branch deploys below for more info.
If the deploy failed, check the log output in Netlify and see if you can make sense of the error. If the deploy was successful but the site doesn't come up, try opening the web inspector and look for errors. Are you sure you pasted the entire Postgres connection string correctly? If you're really, really stuck head over to the Redwood Community and ask for help.
Another neat feature of Netlify is Branch Deploys. When you create a branch and push it up to your repo, Netlify will build that branch at a unique URL so that you can test your changes, leaving the main site alone. Once your branch is merged to main then a deploy at your main site will run and your changes will show to the world. To enable Branch Deploys go to Site settings > Build & deploy > Continuous Deployment and under the Deploy contexts section click Edit settings and change Branch deploys to "All". You can also enable Deploy previews which will create them for any pull requests against your repo.

You also have the ability to "lock" the
mainbranch so that deploys do not automatically occur on every push—you need to manually tell Netlify to deploy the latest, either by going to the site or using the Netlify CLI.
In this tutorial, your lambda functions will be connecting directly to the Postgres database. Because Postgres has a limited number of concurrent connections it will accept, this does not scale very well. The proper solution is to put a connection pooling service in front of Postgres and connect to that from your lambda functions. To learn how to do that, see the Connection Pooling guide.
We are working on making this process much easier, but keep it in mind before you deploy a Redwood app to production and announce it to the world.
"Authentication" is a blanket term for all of the stuff that goes into making sure that a user, often identified with an email address and password, is allowed to access something. Authentication can be famously fickle to do right both from a technical standpoint and developer happiness standpoint.
But you know Redwood has your back! Login isn't something we have to write from scratch—it's a solved problem and is one less thing we should have to worry about. Today Redwood includes integrations to:
We're going to demo a Netlify Identity integration in this tutorial since we're already deployed there and it's very easy to add to a Netlify site.
Authentication vs. Authorization
There are two terms which contain a lot of letters, starting with an "A" and ending in "ation" (which means you could rhyme them if you wanted to) that become involved in most discussions about login:
- Authentication
- Authorization
Here is how Redwood uses these terms:
- Authentication deals with determining whether someone is who they say they are, generally by "logging in" with an email and password, or a third party OAuth provider like Google.
- Authorization is whether a user (who has usually already been authenticated) is allowed to do something they want to do. This generally involves some combination of roles and permission checking before allowing access to a URL or feature of your site.
This section of the tutorial focuses on Authentication only. We're currently working on integrating a simple and flexible role-based authorization system and once we release it we'll update the tutorial to include a walkthrough!
Assuming you've been following along, you already have a Netlify account and a site set up. If you'd be so kind, head to the Identity tab and click the Enable Identity button:

When the screen refreshes click the Invite users button and enter a real email address (they're going to send a confirmation link to it):

We'll need to get that email confirmation link soon, but for now let's set up our app for authentication.
There are a couple of places we need to add some code for authentication and lucky for us Redwood can do it automatically with a generator:
yarn rw g auth netlify
The generator adds one file and modifies a couple others.
Are you on the latest Redwood?
For this to work you must be on version
0.7.0or greater of Redwood. If you don't see any file changes, try upgrading your Redwood packages withyarn rw upgrade.
Take a look at the newly created api/src/lib/auth.js (usage comments omitted):
// api/src/lib/auth.js

import { AuthenticationError } from '@redwoodjs/api'

export const getCurrentUser = async (decoded, { token, type }) => {
  return decoded
}

export const requireAuth = () => {
  if (!context.currentUser) {
    throw new AuthenticationError("You don't have permission to do that.")
  }
}
By default the authentication system will return only the data that the third-party auth handler knows about (that's what's inside the jwt object above). For Netlify Identity that's an email address, an optional name and optional array of roles. Usually you'll have your own concept of a user in your local database. You can modify getCurrentUser to return that user, rather than the details that the auth system stores. The comments at the top of the file give one example of how you could look up a user based on their email address. We also provide a simple implementation for requiring that a user be authenticated when trying to access a service: requireAuth(). It will throw an error that GraphQL knows what to do with if a non-authenticated person tries to get to something they shouldn't.
The files that were modified by the generator are:
web/src/index.js—wraps the router in<AuthProvider>which makes the routes themselves authentication aware, and gives us access to auseAuth()hook that returns several functions for logging users in and out, checking their current logged-inness, and more.api/src/functions/graphql.js—makescurrentUseravailable to the api side so that you can check whether a user is allowed to do something on the backend. If you add an implementation togetCurrentUser()inapi/src/lib/auth.jsthen that is what will be returned bycurrentUser, otherwise it will return just the details the auth system has for the user. If they're not logged in at all thencurrentUserwill benull.
We'll hook up both the web and api sides below to make sure a user is only doing things they're allowed to do.
First let's lock down the API so we can be sure that only authorized users can create, update and delete a Post. Open up the Post service and let's add a check:
// api/src/services/posts/posts.js

import { db } from 'src/lib/db'
import { requireAuth } from 'src/lib/auth'

export const posts = () => {
  return db.post.findMany()
}

export const post = ({ id }) => {
  return db.post.findOne({
    where: { id },
  })
}

export const createPost = ({ input }) => {
  requireAuth()
  return db.post.create({
    data: input,
  })
}

export const updatePost = ({ id, input }) => {
  requireAuth()
  return db.post.update({
    data: input,
    where: { id },
  })
}

export const deletePost = ({ id }) => {
  requireAuth()
  return db.post.delete({
    where: { id },
  })
}

export const Post = {
  user: (_obj, { root }) => db.post.findOne({ where: { id: root.id } }).user(),
}
Now try creating, editing or deleting a post from our admin pages. Nothing happens! Should we show some kind of friendly error message? In this case, probably not—we're going to lock down the admin pages altogether so they won't be accessible by a browser. The only way someone would be able to trigger these errors in the API is if they tried to access the GraphQL endpoint directly, without going through our UI. The API is already returning an error message (open the Web Inspector in your browser and try that create/edit/delete again) so we are covered.
Services as Containers for Your Business Logic
Note that we're putting the authentication checks in the service and not checking in the GraphQL interface (in the SDL files). Redwood created the concept of services as containers for your business logic which can be used by other parts of your application besides the GraphQL API.
By putting authentication checks here you can be sure that any other code that tries to create/update/delete a post will fall under the same authentication checks. In fact, Apollo (the GraphQL library Redwood uses) agrees with us!
Now we'll restrict access to the admin pages completely unless you're logged in. The first step will be to denote which routes will require that you be logged in. Enter the <Private> tag:
// web/src/Routes.js

import { Router, Route, Private } from '@redwoodjs/router'

const Routes = () => {
  return (
    <Router>
      <Route path="/contact" page={ContactPage} name="contact" />
      <Route path="/about" page={AboutPage} name="about" />
      <Route path="/" page={HomePage} name="home" />
      <Route path="/blog-post/{id:Int}" page={BlogPostPage} name="blogPost" />
      <Private unauthenticated="home">
        <Route path="/admin/posts/new" page={NewPostPage} name="newPost" />
        <Route path="/admin/posts/{id:Int}/edit" page={EditPostPage} name="editPost" />
        <Route path="/admin/posts/{id:Int}" page={PostPage} name="post" />
        <Route path="/admin/posts" page={PostsPage} name="posts" />
      </Private>
      <Route notfound page={NotFoundPage} />
    </Router>
  )
}

export default Routes
Surround the routes you want to be behind authentication and optionally add the unauthenticated attribute that lists the name of another route to redirect to if the user is not logged in. In this case we'll go back to the homepage.
Try that in your browser. If you hit http://localhost:8910/admin/posts you should immediately go back to the homepage.
Now all that's left to do is let the user actually log in! If you've built authentication before then you know this part is usually a drag, but Redwood makes it a walk in the park. Most of the plumbing was handled by the auth generator, so we get to focus on the parts the user actually sees. First, let's add a Login link that will trigger a modal from the Netlify Identity widget. Let's assume we want this on all of the public pages, so we'll put it in the BlogLayout:
// web/src/layouts/BlogLayout/BlogLayout.js

import { Link, routes } from '@redwoodjs/router'
import { useAuth } from '@redwoodjs/auth'

const BlogLayout = ({ children }) => {
  const { logIn } = useAuth()

  return (
    <div>
      <h1>
        <Link to={routes.home()}>Redwood Blog</Link>
      </h1>
      <nav>
        <ul>
          <li>
            <Link to={routes.about()}>About</Link>
          </li>
          <li>
            <Link to={routes.contact()}>Contact</Link>
          </li>
          <li>
            <button onClick={logIn}>
              Log In
            </button>
          </li>
        </ul>
      </nav>
      <main>{children}</main>
    </div>
  )
}

export default BlogLayout
Try clicking the login link:

We need to let the widget know the URL of our site so it knows where to go to get user data and confirm they're able to log in. Back over to Netlify, you can get that from the Identity tab:

You need the protocol and domain, not the rest of the path. Paste that into the modal and click that Set site's URL button. The modal should reload and now show a real login box:

Before we can log in, remember that confirmation email from Netlify? Go find that and click the Accept the invite link. That will bring you to your site live in production, where nothing will happen. But if you look at the URL it will end in something like #invite_token=6gFSXhugtHCXO5Whlc5V. Copy that (including the #) and appened it to your localhost URL: http://localhost:8910/#invite_token=6gFSXhugtHCXO5Whlc5Vg Hit Enter, then go back into the URL and hit Enter again to get it to actually reload the page. Now the modal will show Complete your signup and give you the ability to set your password:

Once you do that the modal should update and say that you're logged in! It worked! Click the X in the upper right to close the modal.
We know that invite acceptance flow is less than ideal. The good news is that once you deploy your site again with authentication, future invites will work automatically—the link will go to production which will now have the code needed to launch the modal and let you accept the invite.
We've got no indication on our actual site that we're logged in, however. How about changing the Log In button to be Log Out when you're authenticated:
// web/src/layouts/BlogLayout/BlogLayout.js

import { Link, routes } from '@redwoodjs/router'
import { useAuth } from '@redwoodjs/auth'

const BlogLayout = ({ children }) => {
  const { logIn, logOut, isAuthenticated } = useAuth()

  return (
    <div>
      <h1>
        <Link to={routes.home()}>Redwood Blog</Link>
      </h1>
      <nav>
        <ul>
          <li>
            <Link to={routes.about()}>About</Link>
          </li>
          <li>
            <Link to={routes.contact()}>Contact</Link>
          </li>
          <li>
            <button onClick={isAuthenticated ? logOut : logIn}>
              {isAuthenticated ? 'Log Out' : 'Log In'}
            </button>
          </li>
        </ul>
      </nav>
      <main>{children}</main>
    </div>
  )
}

export default BlogLayout
useAuth() provides a couple more helpers for us, in this case isAuthenticated which will return true or false based on your login status, and logOut() which will log the user out. Now clicking Log Out should log you out and change the link to Log In which you can click to open the modal and log back in again.
When you are logged in, you should be able to access the admin pages again: http://localhost:8910/admin/posts
If you start working on another Redwood app that uses Netlify Identity you'll need to manually clear out your Local Storage which is where the site URL is stored that you entered the first time you saw the modal. Local Storage is tied to your domain and port, which by default will be the same for any Redwood app when developing locally. You can clear your Local Storage in Chrome by going to the Web Inspector, the Application tab, and then on the left open up Local Storage and click on http://localhost:8910. You'll see the keys stored on the right and can delete them all.
One more touch: let's show the email address of the user that's logged in. We can get the currentUser from useAuth() and it will contain the data that our third party authentication library is storing about the currently logged in user:
// web/src/layouts/BlogLayout/BlogLayout.js

import { Link, routes } from '@redwoodjs/router'
import { useAuth } from '@redwoodjs/auth'

const BlogLayout = ({ children }) => {
  const { logIn, logOut, isAuthenticated, currentUser } = useAuth()

  return (
    <div>
      <h1>
        <Link to={routes.home()}>Redwood Blog</Link>
      </h1>
      <nav>
        <ul>
          <li>
            <Link to={routes.about()}>About</Link>
          </li>
          <li>
            <Link to={routes.contact()}>Contact</Link>
          </li>
          <li>
            <button onClick={isAuthenticated ? logOut : logIn}>
              {isAuthenticated ? 'Log Out' : 'Log In'}
            </button>
          </li>
          {isAuthenticated && <li>{currentUser.email}</li>}
        </ul>
      </nav>
      <main>{children}</main>
    </div>
  )
}

export default BlogLayout

More on Netlify Identity
Check out the settings (or docs) for Identity over at Netlify for more options, including allowing users to create accounts rather than having to be invited, add third party login buttons for Bitbucket, GitHub, GitLab and Google, receive webhooks when someone logs in, and more!
Believe it or not, that's it! Authentication with Redwood is a breeze and we're just getting started. Expect more magic soon!
If you inspect the contents of
currentUseryou'll see it contains an array calledroles. On the Netlify Identity dashboard you can give your user a collection of roles, which are just strings like "admin" or "guest". Using this array of roles you could create a very rudimentary role-based authentication system. Unless you are in dire need of this simple role checking, we recommend waiting for the Redwood solution, coming soon!
You made it! If you really went through the whole tutorial: congratulations! If you just skipped ahead to this page to try and get a free congratulations: tsk, tsk!
That was potentially a lot of new concepts to absorb all at once so don't feed bad if all of it didn't fully sink in. React, GraphQL, Prisma, serverless functions...so many things! Even those of us working on the framework are heading over to Google multiple times per day to figure out how to get these things to work together.
As an anonymous Twitter user once mused: "If you enjoy feeling like both the smartest person on earth and the dumbest person in history within a span of 24 hours, programming may be the career for you!"
Want to add some more features to your app? Check out some of our Cookbook recipies like calling to a third party API and deploying an app without an API at all. Have you grown out of SQLite and want to install Postgres locally? We've also got lots of guides for more info on Redwood's internals.
Check out our Roadmap to see where we're headed and how we're going to get there.
If you're interested in helping with anything you see, just let us know over on the RedwoodJS Forum and we'll be happy to get you set up.
We want to hit 1.0 by the end of the year. And with your help, we think we can do it!
What did you think of Redwood? Is it the Next Step for JS frameworks? What can it do better? We've got a lot more planned. Want to help us build these upcoming features?
Thanks for following along. Now go out and build something amazing!