2019 11 07 Spring Cloud(七)《基于RabbitMQ消息总线方式刷新配置服务》
作者:小傅哥
博客:https://bugstack.cn - 原创系列专题
沉淀、分享、成长,让自己和他人都能有所收获!
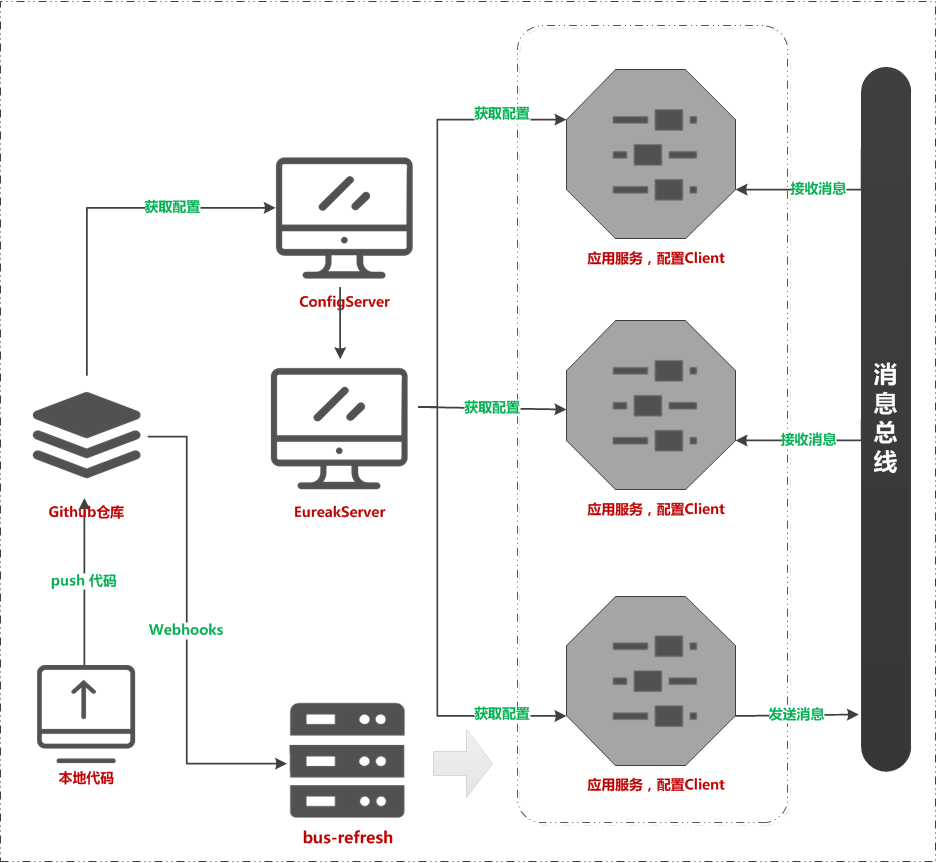
在微服务架构中,为了更方便的向微服务实例广播消息,我们通常会构建一个消息中心,让所有的服务实例都连接上来,而该消息中心所发布的消息都会被微服务实例监听和消费,我们把这种机制叫做消息总线(SpringCloud Bus)
当我们的微服务达到是几个到百个以上,在更新配置时,不太可能一个个刷新或者重启,这样既不能保证效率也容易导致遗漏造成事故。因此我们需要SpringCloud Bus 提供总线服务,在我们push代码到Git的时候,通过Webhooks(http://localhost:port/actuator/bus-refresh/)执行刷新,消息总线会通知各个实例更新配置,以达到自动更新全服务配置。
- jdk 1.8、idea2018、Maven3
- Spring Boot 2.0.6.RELEASE
- Spring Cloud Finchley.SR2
- 需要有一个Git帐号,用来创建配置中心以及开启Webhooks服务,添加回调
- RabbitMQ服务端环境安装
- 下载Erlang;http://www.erlang.org/downloads {安装后配置环境变量:D:\Program Files\erl10.5}
- 下载rabbitMQ;http://www.rabbitmq.com/download.html {安装后CMD依次执行}
- cd D:\Program Files\RabbitMQ Server\rabbitmq_server-3.8.1\sbin
- rabbitmq-plugins.bat enable rabbitmq_management
- rabbitmq-service.bat stop
- rabbitmq-service.bat start
- 浏览器访问;http://127.0.0.1:15672
- 服务端口5672
itstack-demo-springcloud-07
├── itstack-demo-springcloud-config-client
│   └── src
│       └── main
│           ├── java
│           │   └── org.itstack.demo
│           │        ├── web
│           │        │   └── ConfigClientController.java
│           │        └── ConfigClientApplication.java
│           └── resources
│               ├── application.yml
│               └── bootstrap.yml
├── itstack-demo-springcloud-config-server
│   └── src
│       └── main
│           ├── java
│           │   └── org.itstack.demo
│           │        └── ConfigServerApplication.java
│           └── resources
│               └── application.yml
└── itstack-demo-springcloud-eureka-server
     └── src
        └── main
            ├── java
            │   └── org.itstack.demo
            │        └── EurekaServerApplication.java
            └── resources
                └── application.yml
完整代码欢迎关注公众号:bugstack虫洞栈 回复“SpringCloud专题”进行下载
web/ConfigClientController.java & 添加注解@RefreshScope自动刷新配置
/**
 * 微信公众号:bugstack虫洞栈 | 沉淀、分享、成长,专注于原创专题案例
 * 论坛:http://bugstack.cn
 * Create by 付政委 on @2019
 */
@RestController
@RefreshScope
public class ConfigClientController {

    @Value("${info.profile:error}")
    private String profile;

    @GetMapping("/config")
    public Mono<String> config() {
        return Mono.justOrEmpty(profile);
    }

}
ConfigClientApplication.java & 普通配置即可
/**
 * 微信公众号:bugstack虫洞栈 | 沉淀、分享、成长,专注于原创专题案例
 * 论坛:http://bugstack.cn
 * Create by 付政委 on @2019
 */
@SpringBootApplication
public class ConfigClientApplication {

    public static void main(String[] args) {
        SpringApplication.run(ConfigClientApplication.class, args);
    }

}
application.yml & 需要配置endpoints,这样才可以暴漏刷新服务
spring:
  application:
    name: itstack-demo-springcloud-config-client
  cloud:
    bus:
      trace:
        enabled: true
      enabled: true
server:
  port: 9001

# 如果不使用消息总线,则开启如下配置 /actuator/refresh 这个 Endpoint 暴露出来
#management:
#  endpoints:
#    web:
#      exposure:
#        include: refresh
bootstrap.yml & 配置中心服务配置,http://localhost:7397 添加配置服务
spring:
  cloud:
    config:
      name: config-client         # 对应 {application} 部分,例如;config-client-dev = 只取最后一个符号'-'之前的
      profile: dev                # 对应 {profile} 部分
      label: master               # 对应 {label} 部分,即 Git 的分支。如果配置中心使用的是本地存储,则该参数无用
      discovery:
        enabled: true             # 开启 config 服务发现支持
        service-id: itstack-demo-springcloud-config-server        # 配置服务name

#配置文件会被转换成 Web,访问规则如下;
#/{application}/{profile}[/{label}]
#/{application}-{profile}.yml
#/{label}/{application}-{profile}.yml
#/{application}-{profile}.properties
#/{label}/{application}-{profile}.properties

eureka:
  client:
    service-url:
defaultZone: http://localhost:7397/eureka/ConfigServerApplication.java & 添加注解@EnableConfigServer设置成配置服务中心
/**
 * 微信公众号:bugstack虫洞栈 | 沉淀、分享、成长,专注于原创专题案例
 * 论坛:http://bugstack.cn
 * Create by 付政委 on @2019
 */
@SpringBootApplication
@EnableConfigServer
public class ConfigServerApplication {

    public static void main(String[] args) {
        SpringApplication.run(ConfigServerApplication.class, args);
    }

}
application.yml & 配置信息,消息总线刷新
server:
  port: 8080

spring:
  application:
    name: itstack-demo-springcloud-config-server
  cloud:
    config:
      server:
        git:
          uri: https://github.com/fuzhengwei/itstack-demo-config  # 换成自己的配置Git仓库的地址,如果没有可以新建工程地址,也可以克隆我的;https://github.com/fuzhengwei/itstack-demo-config
          search-paths: config-repo                               # Git仓库地址下的底层配置文件名称,如果配置多个用逗号','分割。

# 如果配置中心需要访问权限,则开启配置
# spring.cloud.config.server.git.username:Github账户
# spring.cloud.config.server.git.password:Github密码

eureka:
  client:
    service-url:
      defaultZone: http://localhost:7397/eureka/
management:
  endpoints:
    web:
      exposure:
include: bus-refreshEurekaServerApplication.java & 添加注解@EnableEurekaServer启动服务发现
/**
 * 微信公众号:bugstack虫洞栈 | 沉淀、分享、成长,专注于原创专题案例
 * 论坛:http://bugstack.cn
 * Create by 付政委 on @2019
 */
@SpringBootApplication
@EnableEurekaServer
public class EurekaServerApplication {

    public static void main(String[] args) {
        SpringApplication.run( EurekaServerApplication.class, args );
    }

}
application.yml & 配置信息
server:
  port: 7397

eureka:
  instance:
    hostname: localhost
  client:
    registerWithEureka: false
    fetchRegistry: false
    serviceUrl:
      defaultZone: http://${eureka.instance.hostname}:${server.port}/eureka/

spring:
  application:
name: itstack-demo-springcloud-eureka-server-
准备好自己Github的配置仓库,也可以克隆我的Git;https://github.com/fuzhengwei/itstack-demo-config {有一组配置配置文件}
-
配置Webhooks,在https://github.com/换你自己的fuzhengwei/换你自己的itstack-demo-netty/settings/hooks/new
-
分别启动服务
- 启动RabbitMQ服务;http://127.0.0.1:15672/#/
- itstack-demo-springcloud-eureka-server 服务注册发现
- itstack-demo-springcloud-config-server 配置Server
- itstack-demo-springcloud-config-client 配置Client
-
访问配置服务,端口7397;http://localhost:8080/config-client/dev
- 访问结果
{ "name": "config-client", "profiles": [ "dev" ], "label": null, "version": "ea0b1a1017595d542aa01b8b2bda68f9620dd81a", "state": null, "propertySources": [ { "name": "https://github.com/fuzhengwei/itstack-demo-config/config-repo/config-client-dev.yml", "source": { "info.profile": "dev bus" } } ] }- 访问规则{配置文件会被转换成 Web 接口,规则如下}
- /{application}/{profile}[/{label}]
- /{application}-{profile}.yml
- /{label}/{application}-{profile}.yml
- /{application}-{profile}.properties
- /{label}/{application}-{profile}.properties
- 访问配置文件;http://localhost:8080/config-client-dev.yml {可以直接访问查看配置信息}
info:
	profile: dev bus
-
访问使用配置的客户端
- 访问端口9001;http://localhost:9001/config
dev bus
- 更改配置,POST请求刷新配置总线;http://localhost:8080/actuator/bus-refresh/ {如果配置Git的Webhooks则更新代码自动刷新}
- 访问端口9001;http://localhost:9001/config
dev
- 访问端口9001;http://localhost:9001/config
- Spring Cloud Bus 可以更加方便的控制全局信息,用于统一刷新并通过MQ方式通过客户端
- 如果你的内网想进行Git的Webhooks配置,可以使用http://natapp.cn进行内网穿透映射,他会给你提供免费外网调用服务
- 消息总线方式不只是应用于配置刷新,在一起同步信息请求中都可以使用,以及自己的项目架设上
上一篇:Spring Cloud(六)《基于github webhook动态刷新服务配置》
下一篇:Spring Cloud(八)《服务网关路由 Zuul1》
微信搜索「bugstack虫洞栈」公众号,关注后回复「SpringCloud专题」获取本文源码&更多原创专题案例!
🌏 知识星球:码农会锁

实战项目:「DDD+RPC分布式抽奖系统」、专属小册、问题解答、简历指导、架构图稿、视频课程
🐲 头条
-
💥
🎁 Lottery 抽奖系统- 基于领域驱动设计的四层架构的互联网分布式开发实践 -
小傅哥的《重学 Java 设计模式》- 全书彩印、重绘类图、添加内容 -
⭐小傅哥的《Java 面经手册》- 全书5章29节,417页11.5万字,完稿&发版 -
小傅哥的《手撸 Spring》- 通过带着读者手写简化版 Spring 框架,了解 Spring 核心原理 -
🌈小傅哥的《SpringBoot 中间件设计和开发》- 小册16个中间件开发30个代码库
⛳ 目录
💋 精选
🐾 友链
建立本开源项目的初衷是基于个人学习与工作中对 Java 相关技术栈的总结记录,在这里也希望能帮助一些在学习 Java 过程中遇到问题的小伙伴,如果您需要转载本仓库的一些文章到自己的博客,请按照以下格式注明出处,谢谢合作。
作者:小傅哥
链接:https://bugstack.cn
来源:bugstack虫洞栈2021年10月24日,小傅哥 的文章全部开源到代码库 CodeGuide 中,与同好同行,一起进步,共同维护。
这里我提供 3 种方式:
-
提出
Issue:在 Issue 中指出你觉得需要改进/完善的地方(能够独立解决的话,可以在提出 Issue 后再提交PR)。 -
处理
Issue: 帮忙处理一些待处理的Issue。 -
提交
PR: 对于错别字/笔误这类问题可以直接提交PR,无需提交Issue确认。
详细参考:CodeGuide 贡献指南 - 非常感谢你的支持,这里会留下你的足迹
- 加群交流 本群的宗旨是给大家提供一个良好的技术学习交流平台,所以杜绝一切广告!由于微信群人满 100 之后无法加入,请扫描下方二维码先添加作者 “小傅哥” 微信(fustack),备注:加群。

- 公众号(bugstack虫洞栈) - 沉淀、分享、成长,专注于原创专题案例,以最易学习编程的方式分享知识,让自己和他人都能有所收获。

感谢以下人员对本仓库做出的贡献或者对小傅哥的赞赏,当然不仅仅只有这些贡献者,这里就不一一列举了。如果你希望被添加到这个名单中,并且提交过 Issue 或者 PR,请与我联系。