IPT2ManualNotes.wiki
This IPT wiki is no longer maintained. Please refer to the IPT User Manual.
IPT Versions: 2.3.3, 2.3.4, 2.3.5, 2.3.6, 2.4.0
For the IPT user manual corresponding to version 2.3.2, please go here.
The sections Manage Resources Menu and Administration Menu have been moved to their own pages, unfortunately it's not possible for the links to redirect on this GitHub wiki.
- Introduction
- Getting Started Guide
-
Quick Reference Guide
- Introduction
- Common features
- Home Menu (visible to all users)
- Manage Resources Menu
- Administration Menu
- About Menu
- About the IPT
- Resources
- References
- Glossary
The GBIF Integrated Publishing Toolkit (IPT) is a freely available open source web application that makes it easy to share four types of biodiversity-related information:
- primary taxon occurrence data
- taxon checklists
- sampling event data
- general metadata about data sources.
An IPT instance as well as the data and metadata registered through the IPT are connected to the GBIF Registry, are indexed for consultation via the GBIF network and portal, and are made accessible for public use. More information about the GBIF IPT can be found at the IPT website.
Founded and funded by governments in 2001, The Global Biodiversity Information Facility (GBIF) is the world's largest multi-lateral initiative for enabling free access to biodiversity data via the Internet. GBIF's diverse Participants include primarily countries and international organisations. GBIF also has formal partnerships with relevant international treaty bodies. GBIF's mission is to promote and enable free and open access to biodiversity data worldwide via the Internet to underpin science, conservation and sustainable development. More information about GBIF can be found at https://www.gbif.org/.
Several factors have provided motivation for GBIF to lead the development of the IPT:
- limitations of previous publishing tools (DiGIR, TAPIR, BioCASe) to easily publish and transfer large datasets;
- the need to reduce the load on both the publisher's server, and GBIF's server during indexing. The reason being that indexing from DiGIR, TAPIR, or BioCASe caused heavy loads due to repeated HTTP request-response interactions.
- the need to speed up the process of indexing biodiversity occurrence datasets;
- the need to offer additional benefits and services to the data publishers to encourage data publication;
- the lack of appropriate tools to publish certain types of biodiversity data, such as names checklists and data set metadata.
This manual has three main components: an introduction with background information, a number of step-by-step tutorials and a complete reference guide including a "getting started" section and sections describing in detail the different elements of the tool.
All users are encouraged to review this introductory part and then refer to the different specific sections depending on their role(s) regarding the IPT installation. The IPT (and this manual) differentiates three type of users:
- Administrators: in charge of installing and configuring the IPT. They can make changes to all aspects of an instance of the IPT. Administrators should refer to the "Getting Started" and the "Administration Menu" sections of the reference guide.
- Resource Managers: they are able to create, edit, remove and manage resources (data sets and metadata). Depending on the settings they may have or not registration rights to publish resources through the GBIF Network. Resource managers should refer to the different tutorials depending on the type of data that they need to deal with (metadata, occurrences, special data types through extensions, etc.). The "Manage Resources Menu" section in the reference guide will also be very helpful for resource managers.
- Basic users: They can only browse the resources published in an IPT installation. In future releases of the IPT they will acquire further rights. For basic users the IPT works as a simple web application so no further explanation is included in this manual.
This Getting Started Guide is meant for those wishing to install and run an IPT instance for the first time. If you would like to see a functional installation of the IPT in action, you may use the public test instance of the latest general release version at https://ipt.gbif.org/. If you do so, refer to Quick Reference Guide for details on how to use the screens you will see. Developers who wish to work with the latest revision of the source code should consult the How to Contribute section of the GBIF IPT wiki.
The IPT is designed under the assumption that the server on which it is run has consistent Internet connectivity. Though many functions of the IPT work even when offline, some aspects of the IPT (GBIF registration, extension installation, controlled vocabularies, and external databases for source data), require communication with external Internet resources. From the perspective of IPT administration and management, the speed of the Internet connection affects only such communications. Access to the IPT web application and its services from beyond a local intranet also requires consistent connectivity, and slow connectivity may have an adverse affect on these aspects, especially when transferring large data sets.
Though it can be used simply as a tool to generate Darwin Core Archives (see http://rs.tdwg.org/dwc/terms/guides/text/), the IPT is meant to be a discoverable and accessible Internet-based application and service. To support this functionality, the server on which the IPT is installed must be able to support access to the application and services through a stable URL.
Although not required by the IPT GBIF recommends to run the IPT over secure HTTPS (TLS, which replaced SSL) if possible.
The server hosting the IPT installation must make at least 256 MB RAM memory available to the application.
The space required by the IPT application is less then 20MB. The contents of the IPT data directory after installation require less than 1MB of disk storage, writable by the IPT. However, the content of the data directory will grow as resources are created, and will require space roughly equal to the size of the files or tables containing the imported data sets. A reasonable estimate for the size of a relatively rich occurrence data set is one kilobyte per record. Normal usage of the IPT appends information to the log files, which will grow over time, but which generally require minimal disk space.
The server hosting the IPT must have a version no less than Java 8 installed and functional prior to the installation of the IPT.
The IPT application is distributed as a web application archive (WAR) file and can be deployed in any servlet container (e.g., Tomcat) that is already in use. Information about how to use various servlet containers with the IPT, and how to setup a virtual host name for your IPT can be found here.
Before installing the IPT, be sure that the intended hosting server meets the minimum specifications described in the sections under "Requirements", above.
The latest release of the IPT software is available for download as a WAR file (or Web application ARchive) from the IPT website. Download this file to the server on which the IPT will run. Developers or those wishing to use the latest revision of the source code should consult the How to Contribute section of the GBIF IPT wiki.
Follow the normal process for deploying a web application to a servlet container. A wiki page with further information about specific installations can be found here.
Successful deployment of the IPT to the servlet container will make the IPT accessible through a web browser at a URL determined by the servlet's base URL followed by /ipt (e.g., http://localhost:8080/ipt). If the installation was successful, the initial IPT setup page will appear in a web browser using the IPT's URL.
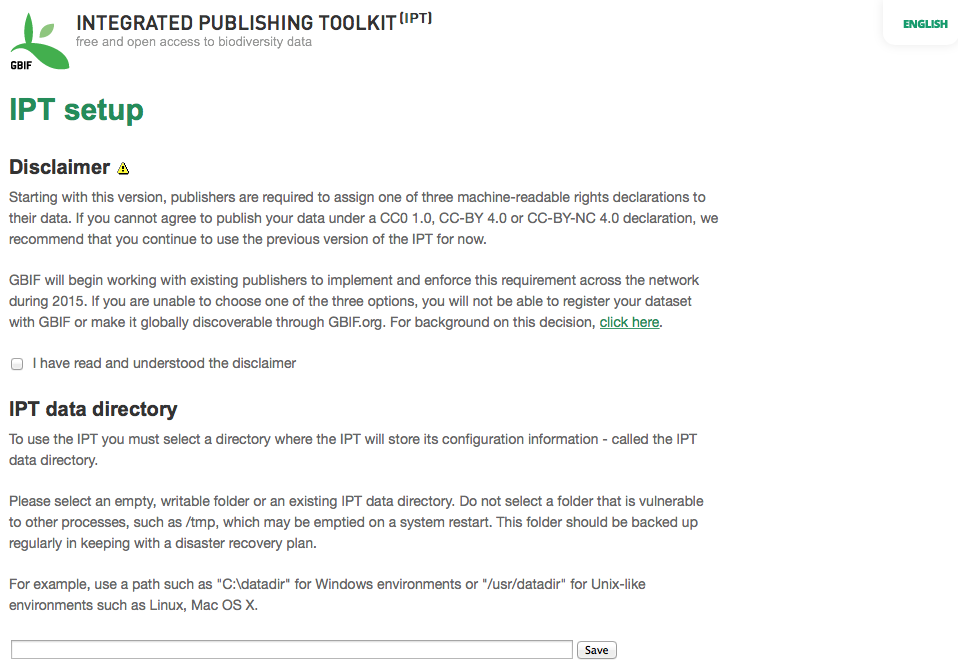
The first time the IPT is run, you will be presented with a few simple steps to prepare the IPT for use. The IPT setup page (see screen image, below) is the first of two setup pages. It requires publishers to confirm that they have read and understand a disclaimer regarding data licensing. Next it requires a location where the data for the IPT installation can be stored. The format of the location entered on the page must conform with the standard for an absolute path to a directory on the operating system where the IPT is installed; relative paths are not supported. For example, use a path such as C:\datadir for Windows environments or /srv/datadir for Unix and Mac OS X environments. The IPT must have write permission to the selected location. If it does, the path can be entered in the text box provided and then click on the button labeled "Save" - the directory will be created if it doesn't already exist. It is permissible to create the data directory first with the appropriate write permissions, then enter the absolute path to the directory in the text box and click on the "Save" button.
Note 1: Do not select a data directory that is vulnerable to inadvertent changes or removal. Do not use /tmp, for example, on systems where this folder may be emptied on a system restart. The data directory should be backed up regularly in keeping with an appropriate disaster recovery plan. Loss of the contents of the data directory will result in the loss of resource, user, and other configuration information and customizations to the IPT installation.
Note 2: If you have a data directory from a previously running IPT of the same version and want to use that previous configuration (including users and resources), you can enter the absolute path of that data directory in this first step of the IPT setup (see also the "Starting Over" section of this Getting Started Guide). Clicking on "Save" in this case will bypass the page titled IPT setup II and present the IPT Administration page (see the screen image in the "Administration Menu" section of the Quick Reference Guide).
Note 3: If you receive an error stating the location is not writeable, see the FAQ item on this.
Note 4: Click on the language name in the upper right hand corner to see whether your preferred language is available to use the IPT in.
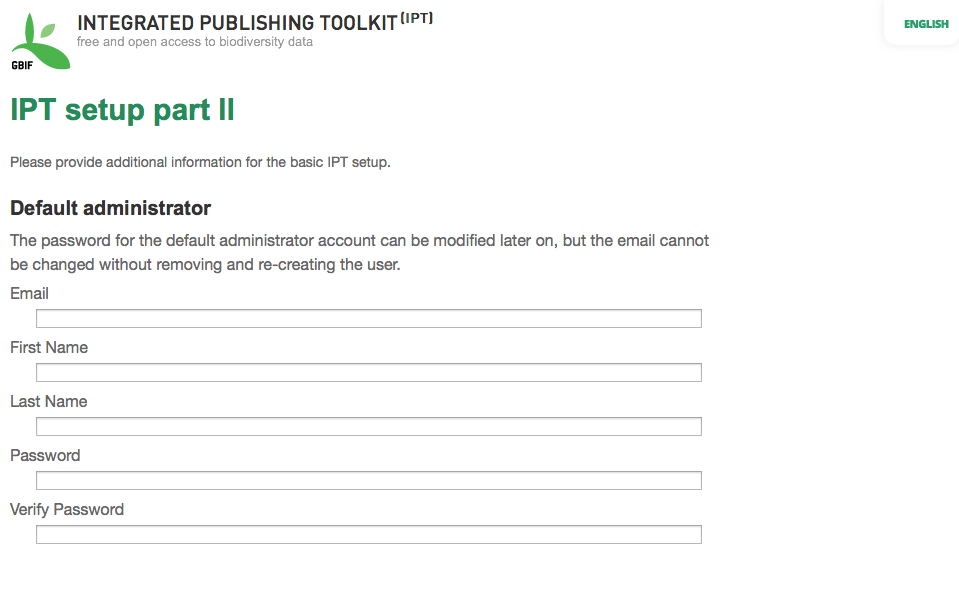
If the initial data directory assignment step was successful, the IPT will present a second setup page (see screen image, below) on which the information about the default administrator of the IPT must be entered, along with the information about what mode the IPT should run in, and how the IPT will be accessed from the Internet. Following are explanations of the fields encountered on the second setup page:
- Default administrator - The default administrator will have a distinct login and the authority to make changes to all aspects of the IPT installation. The default administrator will be able to make additional user accounts, including other administrators having the same authority to make changes. Though administrators can be added and removed, the IPT must always have at least one.
- Email - the full, active email address of the default administrator of the IPT installation.
- First name - the first name of the default administrator.
- Last name - the last name of the default administrator.
- Password - a password for the default administrator. Note: The password should be made secure and safe from loss, as it is not recoverable from the IPT application.
- Verify password - an exact copy of the password as entered in the Password text box to confirm that it was entered as intended.
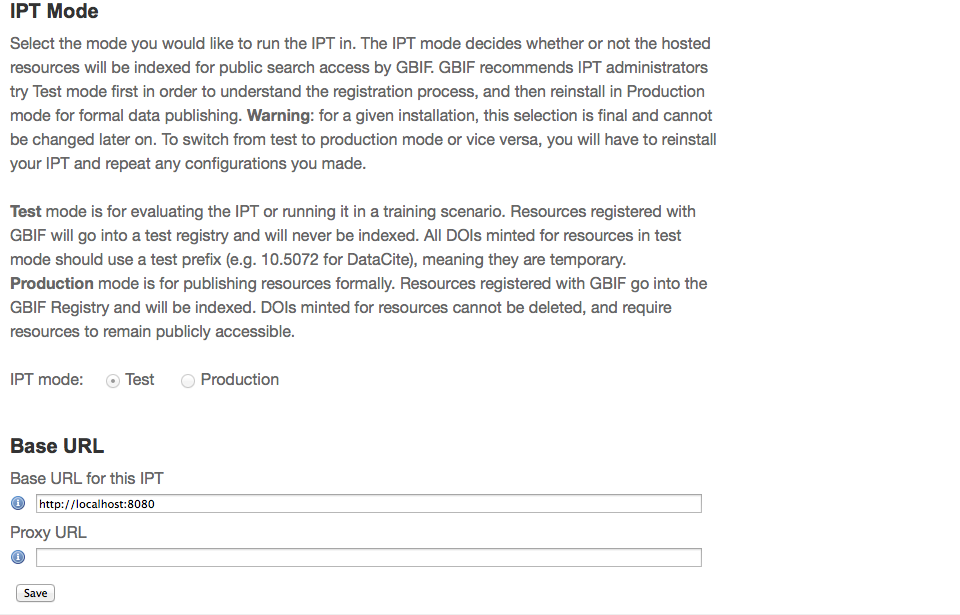
- IPT Mode - The IPT mode decides whether or not the hosted resources will be indexed for public search access by GBIF. GBIF recommends IPT administrators try Test mode first in order to understand the registration process, and then reinstall in Production mode for formal data publishing. Warning: for a given installation, this selection is final and cannot be changed later on. To switch from test to production mode or vice versa, you will have to reinstall your IPT and repeat any configurations you made. (see the "Starting Over" section in this Getting Started Guide).
- IPT mode - Choose between Test mode and Production mode. Test mode is for evaluating the IPT or running it in a training scenario, and registrations will go into a test registry and resources will never be indexed. All DOIs minted for resources in test mode should use a test prefix (e.g. 10.5072 for DataCite), meaning they are temporary. Production mode, on the other hand, is for publishing resources formally, and resources are registered into the GBIF Registry and will be indexed. DOIs minted for resources cannot be deleted, and require resources to remain publicly accessible.
- Base URL
-
Base URL for this IPT - the URL that points to the root of this IPT installation. The URL is detected automatically if possible, but should be changed in production systems to be accessible via the Internet in order for the IPT to function fully. Configuring the IPT Base URL to use localhost, for example, will not allow the instance of the IPT to be registered with GBIF, will not allow the IPT to be associated with an organisation, and will not allow resources to be publicly accessible.
-
Proxy URL - if the server on which the IPT is installed is routed through a proxy server or virtual host, enter the host address and port number through which the IPT will be accessible via the Internet as a URL in the format protocol:host:port, for example,
http://proxy.gbif.org:8080.
-
Proxy URL - if the server on which the IPT is installed is routed through a proxy server or virtual host, enter the host address and port number through which the IPT will be accessible via the Internet as a URL in the format protocol:host:port, for example,
-
Base URL for this IPT - the URL that points to the root of this IPT installation. The URL is detected automatically if possible, but should be changed in production systems to be accessible via the Internet in order for the IPT to function fully. Configuring the IPT Base URL to use localhost, for example, will not allow the instance of the IPT to be registered with GBIF, will not allow the IPT to be associated with an organisation, and will not allow resources to be publicly accessible.
When all of the information on the page is complete and correct, click on the button labeled "Save" to complete the IPT setup process. If a problem occurs, an error message will appear at the top of the page with recommendations about how to resolve the issue. Provided the issue has been resolved, restarting the web server will make it disappear. If the setup is successful, a page confirming the success of the setup will appear.
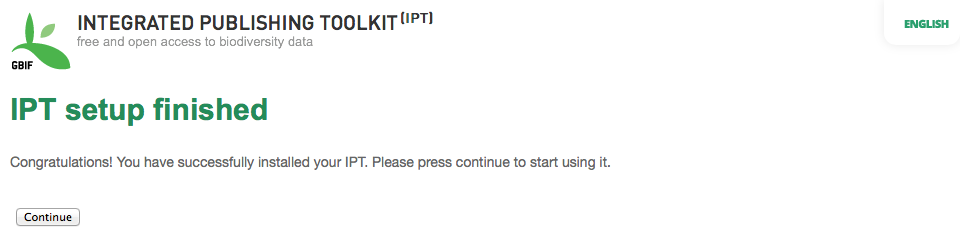
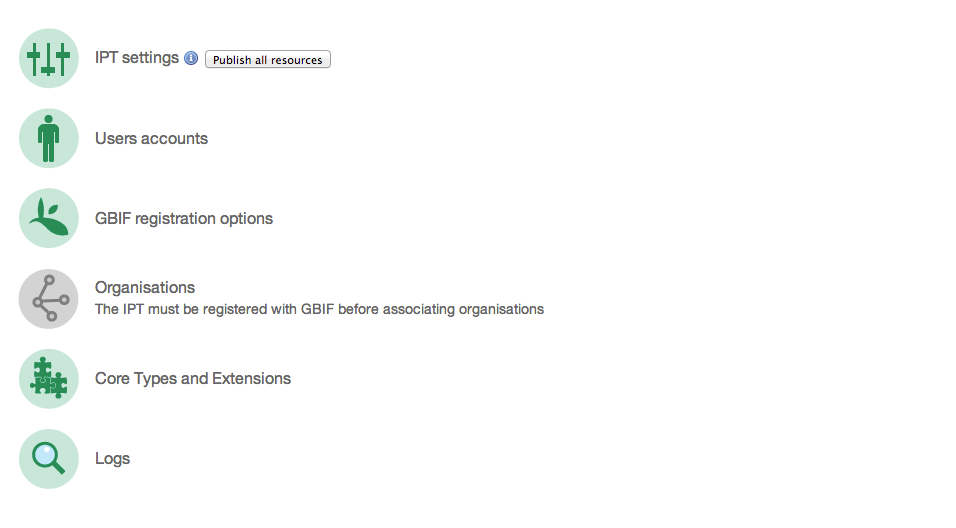
Click on the button labeled "Continue" to open the IPT Administration page (see the screen image, below), from which further configuration of the IPT can be accomplished. Please review the explanations of all of the Administration functions before continuing. Details about the options presented on this screen are given in the "Administration Menu" section of the Quick Reference Guide. Before adding data resources to the IPT, the administrator must, at a minimum, verify the IPT settings, set the GBIF registration options, and associate the IPT with an organisation. The Organisations button is disabled by default until the GBIF registration options have been set.
Once you have completed the steps in this Getting Started Guide, your IPT is ready to add resources (data sets and metadata). You may want to complete one or more of the tutorials to understand how common IPT tasks are accomplished. For detailed explanations of any further aspects of the IPT, consult the Quick Reference Guide of this user manual.
It is relatively easy to re-initiate the IPT and begin again with the first setup page by doing the following:
- Every user who is logged in to the IPT should first log out.
- Remove the file called datadir.location from the folder where it was created by the IPT (normally WEB-INF within the IPT base installation directory - not within the IPT data directory configured in the first setup step).
- The person having the default administrator information and knowledge of the IPT installation should open the IPT in a web browser. This will show the initial IPT setup page again (see the "IPT setup" section in this Getting Started Guide).
- If the user enters the same absolute path to the data directory as before, the previous configuration will be completely restored, assuming that there has been no incompatible upgrade in IPT versions between the time when the data directory was last used and when it is used to re-initiate the IPT.
- If the same data directory location is desired, but without the previous IPT configuration, then the contents of that data directory should be moved to a different location or removed entirely before clicking on "Save" in the initial IPT setup page.
- If an entirely new data directory is used, then the setup will proceed exactly as described in the "IPT setup" section of this Getting Started Guide.
This Quick Reference Guide explains in detail the capabilities of an IPT instance that has been installed, run for the first time, and tested to be functional as explained in the Getting Started Guide. The details of this guide are presented in four sections corresponding to the four "menus" available in the IPT user interface. Some tabs are only visible when a user having the appropriate rights to see them is logged in.
Most user interface controls have both enabled and disabled modes. If the control is enabled, it will either commit an action when clicked (a button, for example), or it will allow changes to be made to the value bound to the control (a text, check, or select box, for example). In the latter case the changes will be saved, if possible, when the form on which they appear is saved, which is generally accomplished on a given page by clicking on a button labeled "Save". Disabled controls show the value of the associated information, but do not allow that information to be saved under the conditions in effect at the time they appear. The purpose for most user interface controls is indicated by an associated label that appears above and/or to the left of the control. Sometimes supplemental information is also accessible from an associated information icon.
Menus - in the IPT, a menu bar appears below the GBIF logo on nearly every page. The menu bar is populated with menus that guide users to fundamental topics. Menu items appear based on the what the current user is authorized to see based on their role. The currently active menu is colored brightly, while inactive menus are grey. Click on a menu to open and activate the page for that topic.
Menu bar before login or after a user having no special role logs in, with the Home menu active:

Menu after a user having a Manager role logs in, with the Manage Resources menu active:

Menu after a user having the Admin role logs in, with the Administration menu active:

Text boxes - allow textual information to be viewed or entered.
Example text box and label for an email address:

Check boxes - allow a value to viewed or set to true (when checked) or false (when unchecked).
Example check box and label to indicate that the IPT can publish resources:

Select boxes - allows a value to be viewed or selected from a list of predefined values. A select box may contain explanatory text about the selection in place of a selectable value. In this case the selection will begin with "Select " (e.g., "Select a country, territory, or island"). Click on the select box to open it and see the list of possible values. Click on one of the choices to set that value.
Example select box and label for the user role, with Admin selected:

Links - opens a page other than the one on which the link occurs. Links may open the new page in the same browser window (or tab) or in a separate window (or tab).
Example link to the account information page for the logged in user:

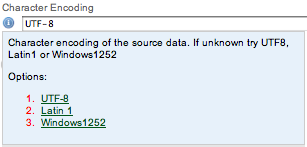
Information icon - shows a message explaining the intention of the control next to which it appears. Click on the icon next to any field to see a help message about that control. Click on it again to make the message disappear. Some information messages include a link, which, if selected, will populate the control with the appropriate value for the selection.
Example information icon for character encoding after the UTF-8 link was selected:
Documentation icon  - this icon indicates that there is a detailed information page about the subject with which the icon is associated. Click on the icon to open the page in a new browser window.
Trash icon  - this icon is associated with other controls on the page. Clicking on the icon will delete the associated data.
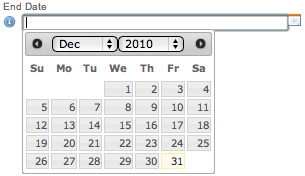
Calendar icon  - this icon is associated with a text field meant to contain a date. Clicking on the icon opens a small calendar with controls that allow the user to scroll forward and backward from the currently selected month and year, select boxes to choose a different month or year, and days of the week arranged in a standard New Era calendar. Selecting a specific day will place the date in the correct format into the associated text box.
Example calendar associated with an text box labeled "End Date" in which 31 Dec 2010 is the current date but not yet selected:
Sortable Table - a table that allows the rows to be sorted by the values of a selected column in ascending or descending order. The column headers are the labels for the columns, which appear as links. Click on a column header to sort the table using the values in that column. Click again on the same column header to sort the table in the opposite direction.
Example table sorted in ascending order by the column labeled "Name".

Example table sorted in descending order by the column labeled "Type".

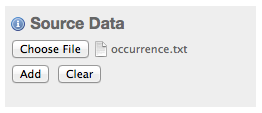
Files can be uploaded in the IPT during two actions: when creating a new resource, or when adding new source data files.

The IPT has an upload size limit of 100MB. There is no limit to the size of Darwin Core Archive the IPT can export/publish though. For loading datasets larger than 100MB in size into the IPT, the following work-arounds are recommended:
- compressing the file (with zip or gzip)
- loading the data into one of the many databases supported by the IPT
- splitting the file up (when the dataset is published the IPT will concatenate the files in the order they are mapped)
This section describes several features that are accessible in the header and footer of most of the pages of the IPT.
The header section of the IPT appears in the upper right of most pages and allows basic control over the IPT, including who is using it, and in what language. Following are two screen images showing the two possible states in which the header may be found - logged in, and not logged in.
Header, not logged in, English language chosen for the user interface:

Header, logged in, English language chosen for the user interface:

- Login - A user who has already been created in this IPT instance can log in by entering the email address and password in the upper right-hand corner of the page, and then click on the "Login" link. Only an existing user having the Admin role can create new users. The process for creating new users is explained under the "Configure User accounts" heading in the "Administration Menu" section. The process of initializing the IPT creates the first user having the Admin role.
- Logout - If someone is logged in to the IPT, the email address of the person who is logged in is given in the upper right-hand corner of the page along with a "Logout" link.
- Account - To see this link and the page to which it leads, you must be logged into the IPT. The page shows the details of the account information for the person who is logged in to the IPT and allows them to be changed. The details of the fields found on this page can be found under the "Configure User accounts" heading in the "Administration Menu" section.
- Language selection - In the upper right-hand corner of the page is a name depicting the language in which the IPT is currently being presented. The default language for the IPT is English. The language of the user interface can be changed by selecting a name for the desired language, if available. GBIF actively seeks translations for the IPT into additional languages. For more information, consult the How to Translate page of the GBIF IPT wiki.
The footer section of the IPT appears along the bottom of most pages and contains information about the IPT version and links to important resources.

- Version - At the left of the footer at bottom of the page is the version of the IPT that is currently running. The version information can be used to determine which features are included in the IPT and what bugs are known to exist. This is the version information that is requested when making bug reports.
- About the IPT - This link leads to the IPT website, where further information about the IPT can be found, including the version history, roadmap, uptake statistics, and further related documentation.
- User Manual - This link opens the most recently released online version of the IPT User Manual.
- Report a bug - This link opens the list of known open issues for the IPT. If you think you have encountered a bug, look at the list of known issues first to see if the bug has already been reported. If it has, you may add new information as a comment to the existing bug report that might help engineers to diagnose the problem and get it fixed. If no bug similar to the one you have encountered in the IPT appears on the list, you can create a new bug report by clicking on the "New issues" link. When entering a bug report, it is useful to include the version of the IPT you are using (see the explanation for "Version", above).
- Request new feature - This link opens a specific form in the IPT issue tracker that can be filled in to request a capability that the IPT does not currently have.
- Copyright - The copyright for the IPT software is held by the Global Biodiversity Information Facility. A link to the home page for GBIF is provided. Details of the copyright and licensing can be seen in the "About the IPT" section of this user manual.
This page allows users to view a list of public resources, if any, and to look at the detailed metadata of any resource on the list.
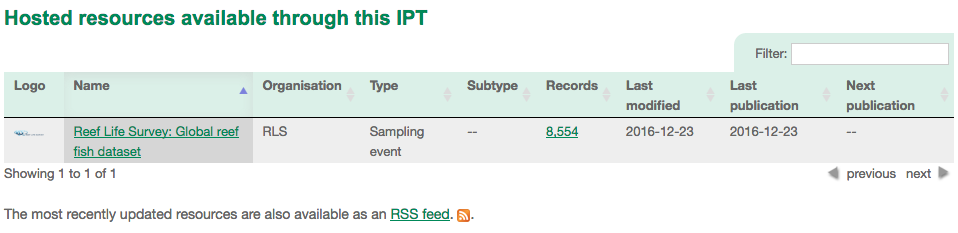
If there are any public resources, they will appear in a table having the following columns:
- Logo - the resource logo (configurable in Additional Metadata page of the resource metadata)
- Name - the title of the resource as given in the Title entry of the resource metadata. The Name appears as a link, which will open the resource's homepage (see below).
- Organisation - the organisation under which the resource has been registered, if any. If the resource is not registered, the value in the Organisation column will be "Not registered". Review the information under the "Organisations" heading in the "Administration Menu" section for more information about registering organisations and registering a resource under an organisation.
- Type - the type of the resource as given in the Type drop down on the Basic Metadata page of the resource metadata
- Subtype - the subtype of the resource as given in the Subtype drop down on the Basic Metadata page of the resource metadata
- Records - the number of rows of data in the core data file of the last published Darwin Core Archive for the resource. For resources having data in one or more extension files, the number links to the Data Records page on the resource homepage showing a breakdown of record counts by extension.
- Last modified - either the date the resource was created or the date on which the data or metadata were last modified, whichever is more recent.
- Last publication - the date the resource was last published.
- Next publication - the date the resource will be published next.
The IPT supports syndication via RSS for those who wish to monitor when new resource versions get published, and how resources change over time. In fact each time a new resource version is broadcast, it will include a summary of what changed since the last version (assuming the publisher entered a change summary, otherwise it defaults to the resource description). The RSS feed is accessible by clicking on the link provided below the list of public hosted resources. The RSS feed can be read in any standard RSS client.
The IPT provides a simple JSON inventory of all registered resources. This feature isn't shown on the user interface. To view simply append /inventory/dataset to the IPT base URL, e.g. https://ipt.gbif.org/inventory/dataset. GBIF uses this inventory to monitor whether it is properly indexing resources by comparing the target and indexed record counts.
The resource homepage is aimed at external users of a resource. The homepage lists all the metadata about a selected version of a resource, provides links to download the version's data/metadata, and displays the resource's version history.
To view the resource homepage, user can click on the name link in the list of resources on the Home page. Another way to get to the resource's homepage is using its DOI: when a resource is assigned a DOI via the IPT, it always resolves to its homepage.
Please note only a user having the Admin role or one of the Manager roles can edit a resource's metadata. To learn more, please refer to the information under the "Edit an existing resource" heading in the "Manage Resources Menu" section.
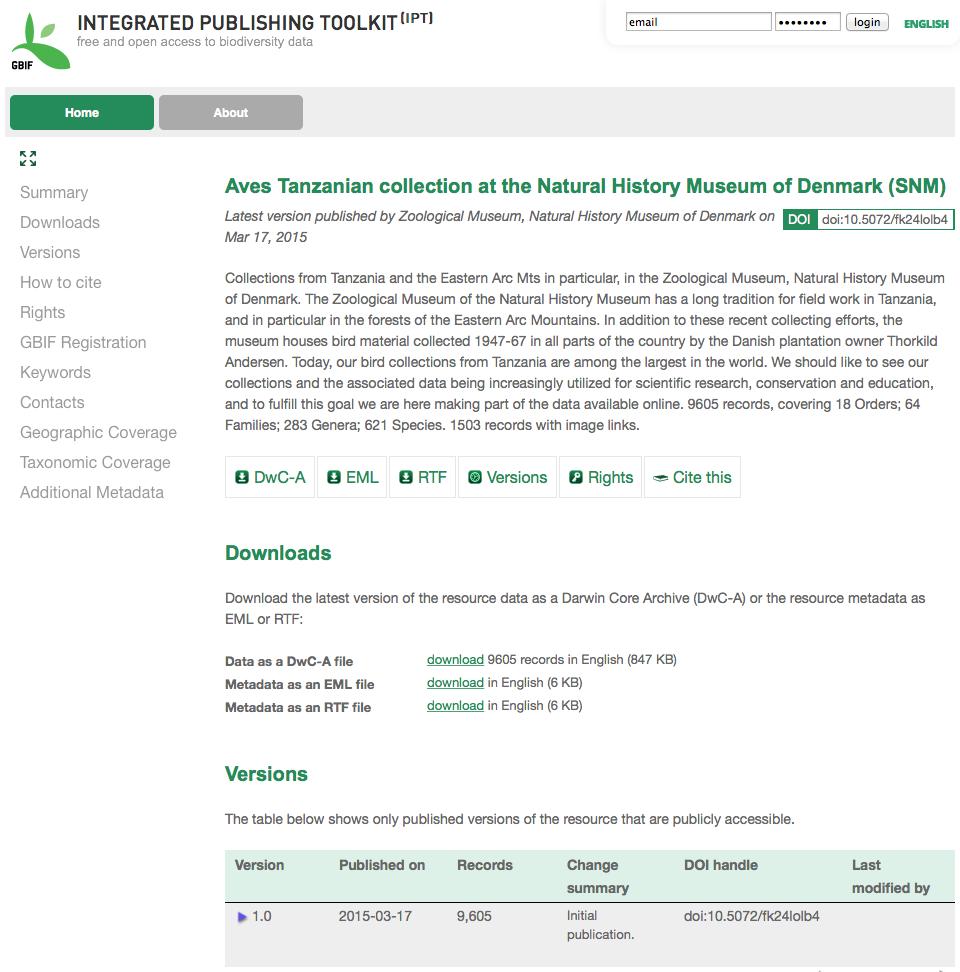
The version history table lists all published versions of the resource, enabling users to track changes to the resource over time and download previous versions' data/metadata. Please note, the IPT's Archival Mode must be turned on in order for old versions of DWCA to be stored (see Configure IPT settings section). Only versions that are publicly accessible can be viewed by external users, whereas admins and resource managers can see all versions. For explanations of the table columns, refer to the information below.
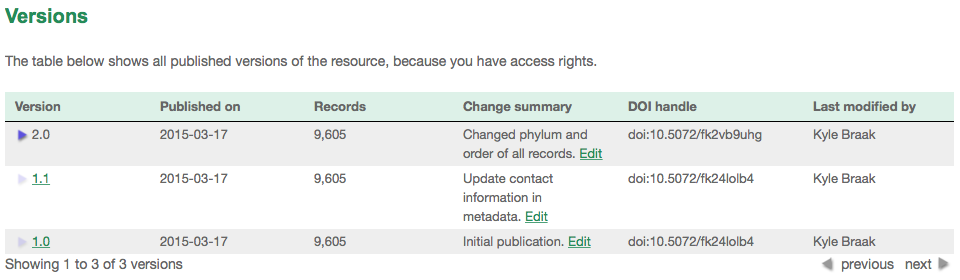
Following are explanations of the table columns:
- Version - the published version's version number, which uses the major_version.minor_version format. The version of the resource homepage currently being viewed is clearly indicated. To open a specific version's homepage, click on the version number. Note: A major version change compared to the last published version indicates that a scientifically significant change has taken place.
- Published on - the date the published version was released.
- Records - the number of records the published version contains.
- Change summary - a summary of what has changed since the last published version.
- DOI handle - the DOI handle assigned to the published version. Note: If the DOI is different from the DOI of the last published version, this indicates that a scientifically significant change has been done to the resource.
- Last modified by - the IPT user that last modified the published version.
Section moved to Manual – Manage Resources.
Section moved to Manual – Administration.
The default About page gives information about the current IPT installation, including information about the hosting organisation, if that has been registered. This page is meant to be customized for the individual IPT instance by editing the file called about.ftl in the directory called "config" within the IPT data directory (see the information under the "IPT Settings" heading in the "Administration Menu" section). The about.ftl file is a Freemarker template that can contain a combination of HTML and variable references of the form ${host.variable!"alternate value if null"}. After making changes to the about.ftl file, the About page will have to be restarted to show the changes. Look at the default about.ftl file for examples of variables that can be included.
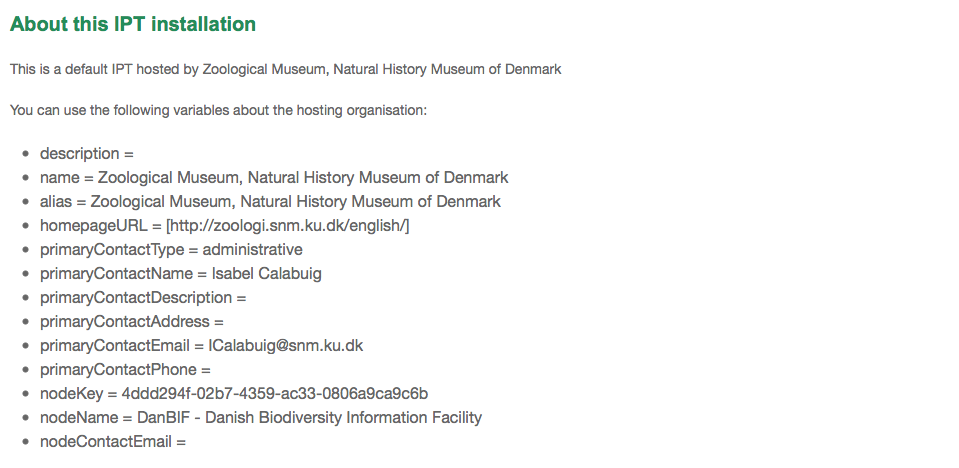
Here is the content of the about.ftl file resulting in the page as viewed above.
<h1>About this IPT installation</h1>

<#if host.name??>

<p>This is a default IPT hosted by ${host.name}</p>


<p>You can use the following variables about the hosting organisation:</p>

<ul>

  <li>description = ${host.description!}</li>

  <li>name = ${host.name!}</li>

  <li>alias = ${host.alias!}</li>

  <li>homepageURL = ${host.homepageURL!}</li>

  <li>primaryContactType = ${host.primaryContactType!}</li>

  <li>primaryContactName = ${host.primaryContactName!}</li>

  <li>primaryContactDescription = ${host.primaryContactDescription!}</li>

  <li>primaryContactAddress = ${host.primaryContactAddress!}</li>

  <li>primaryContactEmail = ${host.primaryContactEmail!}</li>

  <li>primaryContactPhone = ${host.primaryContactPhone!}</li>

  <li>nodeKey = ${host.nodeKey!}</li>

  <li>nodeName = ${host.nodeName!}</li>

  <li>nodeContactEmail = ${host.nodeContactEmail!}</li>

</ul>

<#else>

This IPT installation has not been registered yet.

</#if>
This user manual adapts and builds upon the previous IPT User Manual (Réveillon 2009). The recommended citation for this user Manual is as follows:
Wieczorek & Braak (2016). The GBIF Integrated Publishing Toolkit User Manual, version 2.3.4 Copenhagen: Global Biodiversity Information Facility.
The GBIF Integrated Publishing Toolkit and this user manual are Copyright 2016 by the Global Biodiversity Information Facility Secretariat.
The GBIF Integrated Publishing Toolkit is open source software released under the Apache License Version 2.0. You may obtain a copy of this License at http://www.apache.org/licenses/LICENSE-2.0. Unless required by applicable law or agreed to in writing, software distributed under this License is distributed on an "as is" basis, without warranties of conditions of any kind, either express or implied. See the License for the specific language governing rights and limitations under the License.
This user manual is released under the Creative Commons Attribution-Non-commercial-Share Alike 3.0 Unported License. You may obtain a copy of this license at http://creativecommons.org/licenses/by-nc-sa/3.0/. Though you should consult the actual license document for details, in general terms the license states that you are free to copy, distribute, transmit, remix and adapt the work, under the following conditions:
- you must cite the work in the manner specified on this page (but not in a way that suggests that GBIF or the GBIF Secretariat endorses you or your use of the work);
- you may not use this work for commercial purposes;
- if you alter, transform, or build upon this work, you may distribute the resulting work only under the same or similar license to this one.
Details about the structure of a Darwin Core Archive, abbreviated DWCA, can be found in the "Text Guide" section of the Darwin Core web site: http://rs.tdwg.org/dwc/terms/guides/text/. Further information about the IPT's use of DWCAs can be found on this wiki page.
Send email messages to helpdesk@gbif.org to report problems with GBIF services, such as the GBIF Registry. Do not send IPT-specific help question to the Help Desk. Instead send them to the IPT mailing list (see below).
Use this online application to find information about organisations, IPT instances, and resources registered with GBIF: https://www.gbif.org/dataset.
This GitHub site is the project repository for all of the open source code, management, and documentation of the IPT.
Developers who wish to contribute, or to use the latest revision of the source code for their installation should consult the How to Contribute section of the IPT wiki.
The issue tracker is the bug report and feature request management system for the IPT software and documentation.
All IPT Administrators should sign up to the IPT Mailing List to be notified of new releases and best practices for maintaining their IPT. Have a question about how to maintain the IPT that you can't find the answer to in the FAQ or User Manaual? Then send your question to the list to get it answered!
The IPT Mailing List can also be used by IPT users to support each other. Have a question about how to use the IPT that you can't find the answer to in the FAQ or User Manaual? Then send your question to the list to get it answered!
This wiki page gives details about preparing a server to run the IPT and can be found on the IPT project code site wiki here.
This wiki page gives details about the database management systems to which the IPT can connect for a data source. The page can be found on the IPT project code site here.
GBIF provides a functional installation of the IPT for evaluation and testing purposes. The test installation of the latest release can be found at https://ipt.gbif.org.
Réveillon, A. 2009. The GBIF Integrated Publishing Toolkit User Manual, version 1.0. Copenhagen: Global Biodiversity Information Facility. 37 pp.
- Checklist Resource - a resource having information about one of many types of taxon-related lists.
- Core Type - a category of predefined sets of data properties (Taxon, Occurrence, and Event) used as the basis of a resource. Additional extensions might be linked to these Core Types when mapping data in the IPT.
- CSV file - a text file that contains data in the Comma-separated Value format.
- Data directory - the full (rather than relative) path (location) in the file structure where the data associated with the IPT instance are located.
- Darwin Core - a standard consisting of terms and classes of terms used to share biodiversity data.
- Darwin Core Archive - a single zipped archive for a data set consisting of one or more text files of data, an XML file (meta.xml) describing the contents of the text files and how they relate to each other, and an XML file (eml.xml) containing the metadata in EML about the data set.
- EML - the Ecological Markup Language is an XML-based profile used to encode metadata about a data set.
- Extension - in this user manual, an extension is a set of terms corresponding to a specific category of data. An extension should be thought of as an extension of the capabilities of the IPT rather than as an extension of any particular standard.
- GBIF Registry - a registry that manages the nodes, organisations, resources, and IPT installations registered with GBIF, making them discoverable and interoperable.
- Metadata - in this user manual, metadata refers to the information about a data set as opposed the primary data in the data set.
- Metadata Resource - a resource having information about a data set, but without having the actual primary data. A metadata resource might give information about a collection that has not yet been digitized, for example.
- Occurrence Resource - a resource having information about Occurrences as defined in the Darwin Core.
- Private - a state of a resource in which only the creator, invited managers, and IPT administrators can view it.
- Public - a state of a resource in which anyone can view it.
- Published Release - a version of the resource that has been produced by the IPT.
- Registered - a state of a public resource or of an IPT instance in which anyone can discover it through the GBIF Registry.
- Resource - in this user manual, resource refers to a data set and the metadata about it.
- Resource Managers - IPT users having a role that allows them to create, change, and remove resources.
- RowType - the category of information represented in an extension. The RowType is generally the URI of the Class that best fits the information contained in the extension.
- RSS - the acronym for Really Simple Syndication, a type of subscription format for tracking changes to a web site.
- Sampling Event Resource - A resource where the basis of the resource is sampling events as defined in the Darwin Core.
- Shortname - a short unique name used for resource identification within the IPT and services that access the IPT.
- Source Data - in this user manual, the source data are the data that are mapped to core types and extensions within a resource and may consist of text files or a database.
- Visibility - a term describing how a resource may be viewed (private, public, or registered).
This IPT wiki is no longer maintained. Please refer to the IPT User Manual.
© 2021 Global Biodiversity Information Facility
The content on this site is licensed under
