Most computer communication protocols are based on combinations of low-level TCP and UDP connections. For example, the HTTP protocol is implemented using a single TCP socket that is opened by the client which sends its request up to the server, waits until it receives one blob of data (usually a webpage) back from the server, and then closes the connection.
Many platforms (eg Windows executables, iOS, and Android apps) provide access to these low-level TCP and UDP systems, which makes it possible to implement higher level protocols based on them. The exception is HTML5 (ie things that run in the browser) that, for security and compatibility reasons, does not provide access to these low-level transport layers. Therefore we are limited to the few high-level protocols that are implemented in its standard. These are, in order of invention, HTTP, WebSockets, and WebRTC.
HTTP is simple and familiar, WebSockets work just like TCP sockets and were originally developed as a hack on top of HTTP to provide realtime text chat functionality, but WebRTC is the most difficult and powerful because it is designed to carry moving images and sound (video conferencing) in realtime from one computer to another without going via a server.
This App is designed to show how to set up a WebRTC connection in the Godot engine (which can deploy to HTML5 as well as other platforms) using the MQTT protocol as the signalling server.
MQTT is chosen because it is a simple and transparent publish-and-subscribe protocol based on TCP (or WebSockets if operated from HTML5) requiring no setup and where you can see the messages (signals) being communicated between the two computers as they occur during the initiation of the WebRTC connection. This makes it easier to learn about the process enough to understand what is going on in other signalling (connection initiation) implementations.
We will be using test.mosquitto.org. If you are using Linux, try the following command in one window:
mosquitto_sub -h test.mosquitto.org -t "crumble77/#" -v
Then type the following command in another window:
mosquitto_pub -h test.mosquitto.org -t "crumble77/teacake" -m 'hi there'
As you can see, we have published the message 'hi there' to the topic 'crumble77/teacake' having subscribed to all topics beginning with 'crumble77/' using the wildcard '#'.
We use the two other features of MQTT: retain for leaving a message on a topic that is sent whenever another client newly subscribes to it, and last_will for automatically sending a final message when the client disconnects. These are useful for recording the connection status of the client for other clients to read.
Clone this repository, then download the pre-compiled WebRTC releases from godotengine/webrtc-native/releases and unzip and copy the top level directory 'webrtc' into the project. Then run.
For experimentation purposes, an HTML5 version has been deployed to: goatchurchprime.github.io/godot_webrtc_mqtt_html5/webrtcmqtt.html Note, this is HTTP, not HTTPS
Here is what the app looks like when it is fully operating:
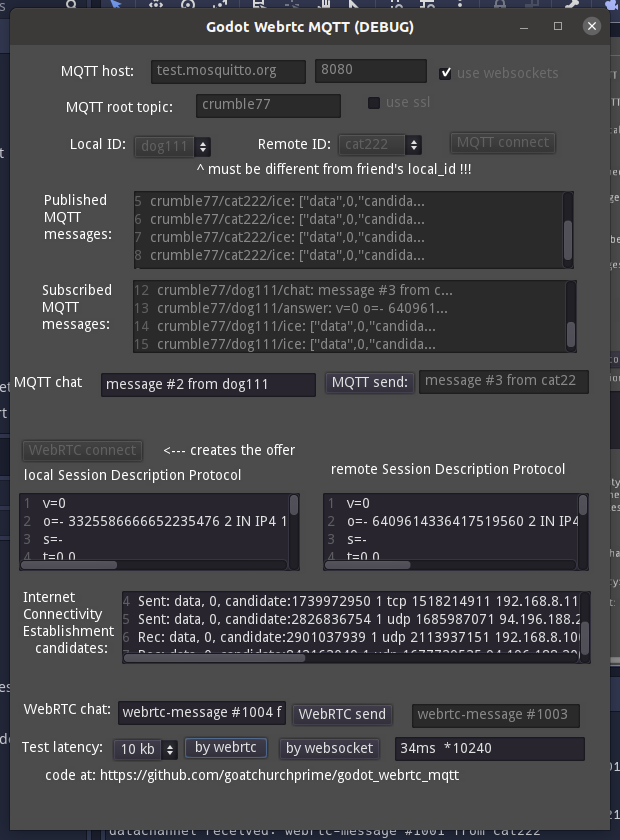
Step 1: Make sure two versions of this app are running on different computers. (It does work on the same computer, but what's the point?)
Step 2: Make sure the 'MQTT root topic' is the same for both computers that want to talk to each other.
Step 3: Make sure the Local_id is 'dog111' on one computer and 'cat222' on the other computer.
Step 4: Click on the 'MQTT connect' on both computers
Step 5: All going well, the two computers are able to send messages between themselves over MQTT using the public broker test.mosquitto.org Use the 'MQTT send:' button to send chat messages back and forth, or test the latency for various sized packets 'by websocket'.
Step 6: Click the button 'WebRTC connect' on one of the two computers to kick off the WebRTC connecting process.
This creates a local SDP (usually several hundred
bytes describing how the computer relates to the internet). This is block of text is sent to the other computer
as an MQTT message, and the other computer returns with an answer of its SDP.
Both these blocks of information are given to the corresponding
WebRTCPeerConnections
Step 7: The WebRTC system exchanges a number of ICE packets through the MQTT until one of them works as a route through the internet between the two computers that they can use.
Step 8: The WebRTC data connection channel is now ready. You can see all the messages sent over the MQTT network using the command:
mosquitto_sub -h test.mosquitto.org -t "crumble77/#" -v
Step 9: You can send chat messages between the computers using WebRTC or testing the latency with different sized packets of data.