We are going to explore how to integrate Prismic in a React application step by step and then deploy it on Netlify to exploit the Prerender feature for SEO purpose.
For this tutorial, we'll consider that you're starting from a simple React application built with create-react-app.
All the examples below come from this sample.
Don't hesitate to go through the code to put these example in context.
So lets dive right into it!
- Installation
- How to connect to your Prismic API
- How to create a Prismic client
- Link Resolving
- How to query your content from Prismic
- How to integrate your content in your templates
- Setup the Prismic preview
- Deploy on Netlify and optimize SEO
- Want more?
Install prismic-javascript to make queries.
npm install --save prismic-javascript@2.0.0-beta.0Install prismic-reactjs to quickly render structured content from Prismic API.
npm install --save prismic-reactjsPrismic offers an API which you can contact by specifying an endpoint but also an access token if you want your API to be private.
We'll create a configuration file to declare these:
Configuration:
prismic-configuration.json
{
	"apiEndpoint": "https://your-repo-name.cdn.prismic.io/api/v2",
	"accessToken": "123456789"
}The Prismic client is a JavaScript object coming from the library prismic-javascript that helps you build queries to retrieve your content from your Prismic API.
It provides multiple ways to retrieve it, by custom type, by a specific UID, by multiple predicates etc.
We're gonna create a module to export the Prismic client for the whole application.
prismic.js
import  PrismicLib  from  'prismic-javascript'
import  PrismicConfig  from  './prismic-configuration.json'

options = {
	accessToken:  PrismicConfig.accessToken
}
export const Prismic = PrismicLib.client(PrismicConfig.apiEndpoint, options)Another major concept in Prismic is the link resolver. It helps you resolve the url of a Prismic document.
It's useful for the Prismic preview but also when you have a link from one document to another.
The API is going to return all the metadata of the linked document and your link resolver will be able to convert this to a url for your website.
In the following code snippet, we are going to export the link resolver in the same module above:
prismic.js
export  const  linkResolver = doc  => {
	if (doc.type === 'homepage') return  '/'
	else  if (doc.type === 'products') return  '/products'
	else  if (doc.type === 'product') return  '/products/' + doc.uid
	else  if (doc.type === 'blog_home') return  '/blog'
	else  if (doc.type === 'blog_post') return  '/blog/' + doc.uid
	else  return  '/'
}The Prismic client contains a few helpers to get your content. For example, you can retrieve a single document, a list of documents, a document based on its UID, etc.
Let's discover this with a basic example that gets a product from the UID that we get dynamically from our routing system:
product.js
import  React  from  'react'
import { Client } from  './prismic'

export  default  class  extends  React.Component {
	constructor(props) {
		super(props)
		this.state  = {}
	}

	componentDidMount() {
		Client.getByUID('product', this.props.computedMatch.params.uid)
		.then(product  => this.setState({ product }))
		.catch(error  => console.error(error))
	}

	render() {
		return  <div>{this.state.product.id}</div>
	}
}
If you want to know more about querying Prismic, you can refer to [
the official Prismic documentation for React](https://prismic.io/docs/reactjs/query-the-api/how-to-query-the-api).
Now that you have your content, what's left to do is to render it.
Let's take a basic example with a couple of Rich Text fields (styled text fields in Prismic) and an Image field.
First let's you need to install prismic-reactjs. You can refer to the installation guide for reactjs.
product.js
import  React  from  'react'
import {RichText, Date, Link} from  'prismic-reactjs'
import { Client, linkResolver } from  './prismic'

export  default  class  extends  React.Component {
	constructor(props) {
		super(props)
		this.state  = {}
	}

	componentDidMount() {
		Client.getByUID('product', this.props.computedMatch.params.uid)
		.then(product  => this.setState({ product }))
		.catch(error  => console.error(error))
	}

	render() {
		return  (
			<div>
				{RichText.render(this.state.product.data.product_name, linkResolver)}
				{RichText.render(this.state.product.data.product_description, linkResolver)}
				<img src={this.state.product.data.product_illustration.url}  />
			</div>
		)
	}
}
If you want to know more about Prismic integration in your templates, you can refer to the official Prismic documentation for React.
The Prismic preview allows you to write a draft on Prismic and preview it on your website without publishing it. It's useful to see your content in place without having to publish and make it available to all your users.
The preview can also be shared with anybody using a generated link.
If you want to know more about the preview, you can refer to the official documentation about the preview.
For this you can rely on the Node.js documentation which is also based on Express.
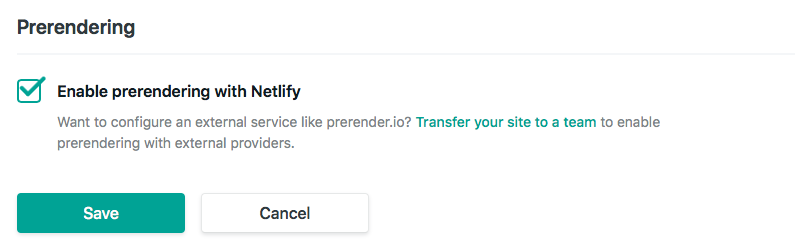
There is now one step left before having your website deployed and pre-rendered for good SEO results. First, create your account on Netlify. Create a new application and link a GitHub repository to it.

As soon as everything is up and running, go to the settings and activate the Prerender feature.
You have one more thing to do in your code, simply notify Netlify when your pages are ready to be cached, to be sure that your content is there and make sure that crawlers see it.
To do so, you need to set the window variable prerenderReady to true and Netlify will handle the rest.
Let's take an example with our product page.
Considering that we render the component and then query Prismic, we need to use the componentDidUpdate hook which will be trigger on the next setState called on the callback from the Prismic request.
product.js
import  React  from  'react'
import {RichText, Date, Link} from  'prismic-reactjs'
import { Client, linkResolver } from  './prismic'

export  default  class  extends  React.Component {
	constructor(props) {
		super(props)
		this.state  = {}
	}

	componentDidUpdate() {
		if(this.state.product) window.prerenderReady  =  true
	}

	componentDidMount() {
		Client.getByUID('product', this.props.computedMatch.params.uid)
		.then(product  => this.setState({ product }))
		.catch(error  => console.error(error))
	}

	render() {
		return  (
			<div>
				{RichText.render(this.state.product.data.product_name, linkResolver)}
				{RichText.render(this.state.product.data.product_description, linkResolver)}
				<img src={this.state.product.data.product_illustration.url}  />
			</div>
		)
	}
}We went through different steps to integrate Prismic in a React project and deploy it on Netlify to benefit from the easy deployment process and the Prerender feature for SEO. But Prismic offers much more than what you discovered here so if you want more examples, documentation, ressources, you can take a look at the official document.