Compiling grblHAL
Some drivers can now be built using the Web Builder.
This has a user interface where driver features can be selected and the generated firmware can be downloaded from.
How to flash the firmware is dependent on the driver and the board, some supports flashing via a SD card, some via a dedicated programmer and some via USB. I plan to add documentation for how to flash along the downloaded firmware in a zip file.
Here is an overview:
-
ESP32: Either Flash Download Tool (Windows only - how to use) or python utility.
-
iMXRT1062 (Teensy 4.x): Use the Teensy Loader App.
-
STM32Fxxx: Use a debug probe such as ST-Link, upload via virtual drive (Nucleo boards), SD card or USB depending on the board.
-
SAM3X8E (Due): Bossa flash programming utility. How to use the utility.
-
RP2040 (Pi Pico & Pi Pico W): Press and hold BOOTSEL while plugging in the USB cable. This will mount a virtual drive, just drop the image (firmware.uf2) on it to flash.
The default build environment is listed in the last row of the driver lists.
- Download the grblHAL driver for the processor of choice (and unpack if as a .zip file) to somewhere, if for an Eclipse based IDE typically outside your project workspace - if for Arduino it has to be somewhere outside of your sketchbook folder.
The best way to download is to use git or Github desktop as this will automatically fetch the required submodules.
The repository URL or Download ZIP button will appear when clicking on the green Code button in the driver repository page.

An example for the iMXRT1062 driver (for Teensy 4.x boards):
Using git command line
Open a command window/console and cd to the directory to download to then for the initial download issue:
git clone --recurse-submodules https://github.com/grblHAL/iMXRT1062.git
This will create a directory for the driver and fetch the driver and all required and optional submodules.
For later updates cd to the driver directory and issue:
git pull --recurse-submodules
Using Github desktop (Windows and MacOS)
Select File > Clone repository... and then the URL tab, paste or type the URL in the Repository URL field and select the directory (Local path) to download to if somewhere else that the default suggested. Then press Clone to download.
AFAIKT Github desktop does not fetch the latest submodules when fetching updates so either command line git has to be used or the local copy has to be deleted and then cloned anew.
Using Tortoise git (Windows only)
I have not installed this yet but should be possible to use.
The zip-file downloaded for a driver sadly does not contain the submodule code, only empty folders for it, so this has to be downloaded separately and copied to the correct ones.
As a bare minimum the core has to downloaded and copied to the grbl folder, other submodules are dependent on the configuration in my_machine.h.
Some drivers "hide" the linked submodules down in the source tree - for the iMXRT1062 driver they can be seen, and opened from, the grblHAL_Teensy4/src folder, for most they are visible from the root.
Submodules are shown as a link (typically in a blue color) and has a @ character followed by an id after the folder name.
NOTE: It is best to follow submodule links provided in the driver for download as this may lead to code that could be different from the one downloaded directly from the core or a plugin repository. If different compile or run time errors are likely to surface.
Note that changing the configuration files after a driver is loaded into the IDE must be done by editing the files in their new location.
For Eclipse based IDEs this can be done by opening the files from the Project Explorer and edit them in the in-built editor.
For the Arduino IDEs this is a bit more involved as the files cannot be seen from the in-built editor. See below for where they can be found.
Files involved are:
-
my_machine.h- for driver specific options such as which board to compile for and for enabling driver features. Note that a few drivers do not have this file available. -
grbl/config.h- for options common to all drivers.
These two are normally the files most end users need to modify, at least my_machine.h should be checked and possibly changed for which board map to use as a minimum.
-
*_map.h- files for board pin assignments etc.
These files should normally not be changed by end users, it is recommended to to create a new one instead should the need arise.
-
driver.h- used for driver specific options, handles the selected options inmy_machine.hor from compiler command line options. -
grbl/grbl.h- used for basic settings. Changing settings in this file may break senders. -
grbl/defaults.h- for default values for the$<n>settable options. Do not change these unless adding new settings. Override ingrbl/config.hinstead or use$<n>commands at run time to set values.
These files should normally not be changed by end users.
NOTE: Before starting, delete prior grblHAL library installations from the Arduino IDE. Otherwise, you'll have compiling issues!
On a Mac, Arduino libraries are located in ~/My Documents/Arduino/libraries/.
On Windows, it's in My Documents\Arduino\libraries.
On Linux (Ubuntu), it's in /usr/share/arduino/libraries
In the examples below replace xxx with the driver name you want to compile for.
- Launch the Arduino IDE
- Make sure you are using the most recent version of the Arduino IDE!
- Load the selected
grblHAL_xxxfolder into the Arduino IDE as a Library.
- Select the Sketch > Include Library > Add .ZIP Library menu. Add .ZIP Library supports both a .ZIP file or a folder. In our case, there is no .ZIP file.
You can confirm that the library has been added by checking the File > Examples menu, scroll to the bottom of the list where you should see grblHAL for xxx.
IMPORTANT: Select the grblHAL_xxx folder inside the driver folder, which only contains the source files and an example directory.
If you accidentally select the .zip file or the wrong folder, you will need to navigate to your Arduino library, delete the mistake, and re-do Step 2.
- Open the grblHAL_xxx_Upload example.
- Select File > Examples > grblHAL for xxx > grblHAL_xxx_Upload.
- Compile and upload Grbl to your Arduino.
- Connect your board to your computer. Make sure your board is set to the correct one in the Tools > Board: xxx menu and the port is selected correctly by Tools > Port.
Select the Skecth > Upload menu, and grblHAL should compile and flash to your board!
The STM32F4xx driver is used in the example below, substitute this with your choice of driver. Note that there may be slight differences between the different IDEs in how this is done.
- In the STM32CubeIDE select File > Import > General > Existing projects into workspace.
- Select your
drivers/STM32F4xxfolder for Select root directory. - Check Copy projects into workspace if you want it added to your current workspace. It is recommended that you do so.
- Click Finish.
- Right click the project and select Build project to build.
How to flash will vary for the different IDEs and also for what kind of board. Some will require an external debug probe, some has an on board debug probe and some even allow copying the binary file to a flash drive that the board may present.
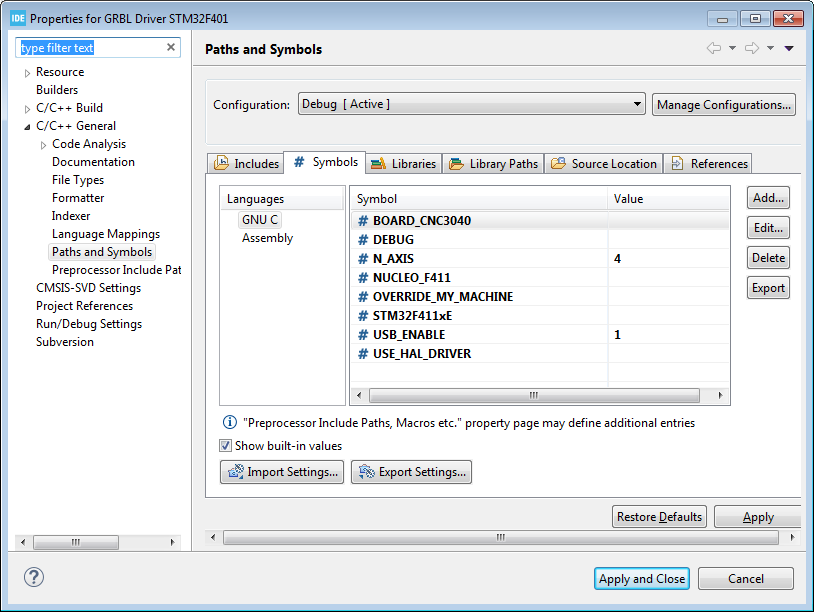
Compile time configuration can be done from the IDE by adding symbols via the UI. An example for the STM32CubeIDE:
We want to use the CNC3040 board map for a four axis machine with native serial over USB communication.
To set this up right click on the project root in Project Explorer and select Properties > C/C++ General > Paths and Symbols > Symbols.
Add OVERRIDE_MY_MACHINE, this will disable any options selected in my_machine.h.
Add BOARD_CNC3040, this to select the board pin mappings file.
Add N_AXIS and set the value to 4.
Add USB_ENABLE and set the value to 1.
Apply and Close and then rebuild - there is no need to change source files if this option is used. :-)
Note: All options in grbl/config.h can also be set like this.
Note: Do not change or delete existing symbols unless told so in the driver ReadMe.
The default build environment for Pi Pico (RP2040) is VSCode, see the driver readme for link to information on how to.
Other drivers may also be built using VSCode, but this is not supported by the project for the time beeing.
2023-02-23