Unraid
Start a Discussion or join our Discord for support and to help out. Also, check out the Unraid Support forum.
Machinaris provides a full WebUI with fork farming, plotting management, monitoring and remote control.
- A recent version of Unraid such as 6.11.x Machinaris will not run on old Unraid versions like 6.7 and 6.8 from way back.
- Recommend a minimum of 16 GB memory for a Machinaris controller (full-node). May need 32 GB+ if you add many forks. Machinaris harvesters will use less memory than full-nodes, even 2 GB can work on some hardware.
- Ensure you have at least 150 GB of free space to hold the Chia blockchain... more required for forks.
- Use a SSD to hold the Machinaris appdata (including blockchains) as a HDD will be too slow. HDDs are great to hold plots though!
Unraid is a great solution to serve up both storage and applications throughout your house 24/7. This combination makes it a particularly good choice to run the CHIA™ cryptocurrency network, both for farming and plotting.
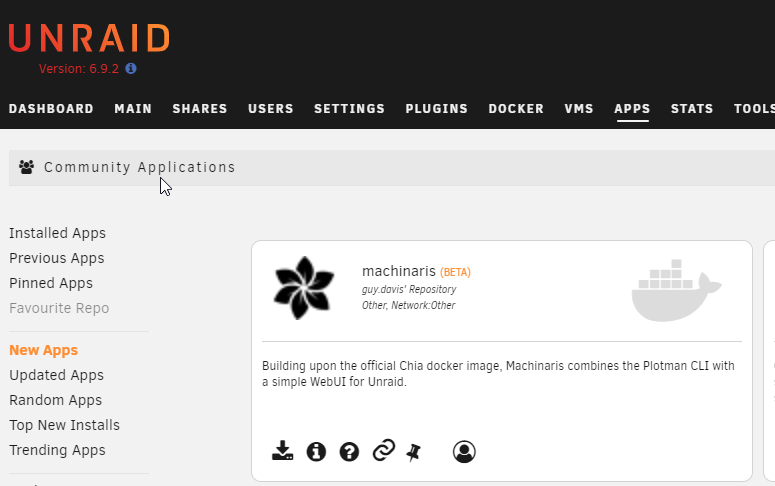
The application is listed in the Unraid Community Applications (aka 'Apps' tab) on Unraid. Just search for Machinaris (or Chia™):
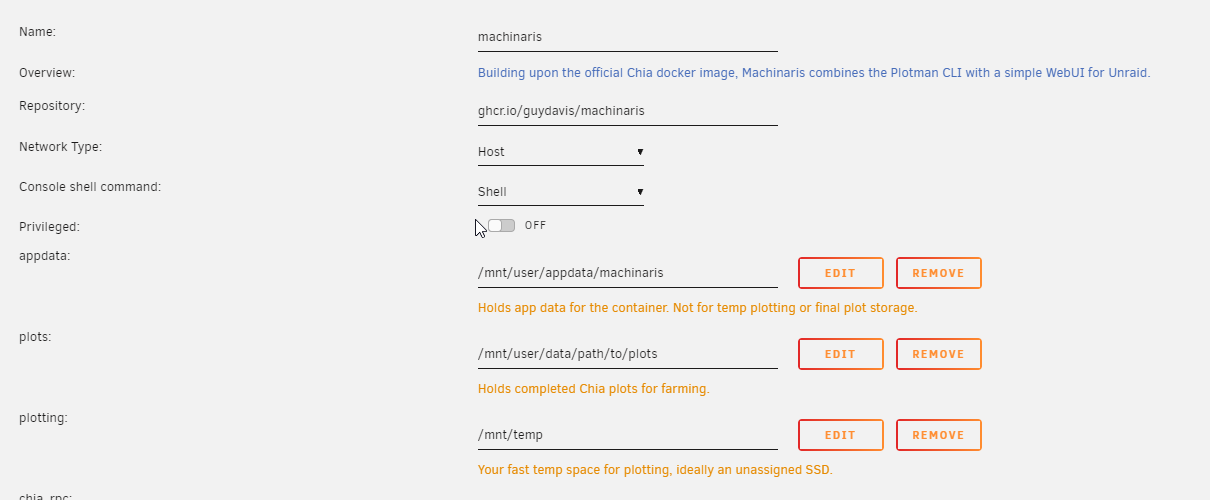
On the install screen, you must change the following paths to suit your system:
- /mnt/user/data/path/to/plots: Will hold the finished plot files after plotting and when farming. Can be on a parity-less array or on an unassigned disk.
- /mnt/path/to/temp: Should be your fast temporary plotting space, likely SSDs. Can be unassigned disks or an extra Raid-0 cache pool. Don't use your Unraid array!
Also, you can choose to download a recent Chia database checkpoint, by setting blockchain_db_download to true on this Unraid container settings screen.
If you have an existing private key mnemonic or need to create a brand new one, please follow the Setup steps.
Check out this great video from Digital Spaceport for installing Machinaris on Unraid:

If plotting with Bladebit or Madmax, a RAM disk is very useful. On Unraid to create a ram disk, first install the "User Scripts" plugin from Community Apps. Then go to Settings tab, "User Scripts" and create a new script, named 'ram_disk_plotting' or similar:
#!/bin/bash
mkdir -p /tmp/plotting2
chmod -R 777 /tmp/plotting2
mount -t tmpfs -o size=110g tmpfs /tmp/plotting2
echo 'Completed mount of RAM disk at /tmp/plotting2'
Run the script directly once and verify the path is created on your Unraid. Set this script to run "At First Array Start Only", as you only need to have this RAM disk mounted immediately after boot of our Unraid server.
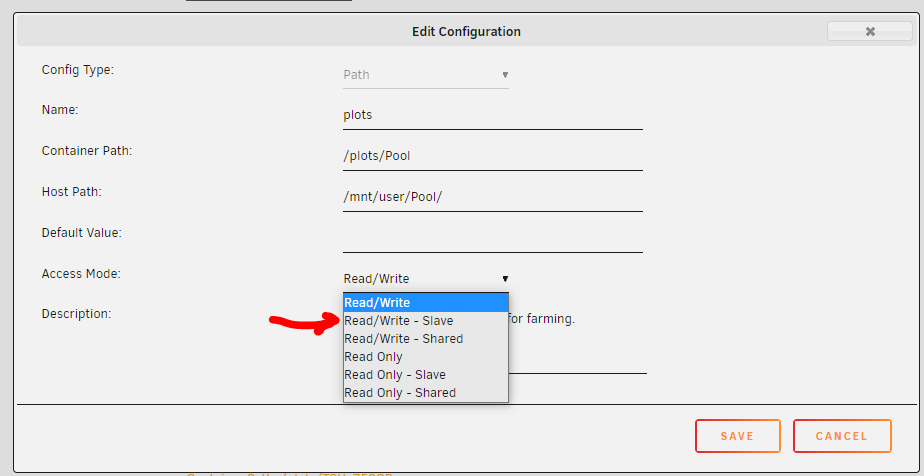
Then edit the Machinaris docker configuration in Unraid Docker tab, add new Path configuration like this:
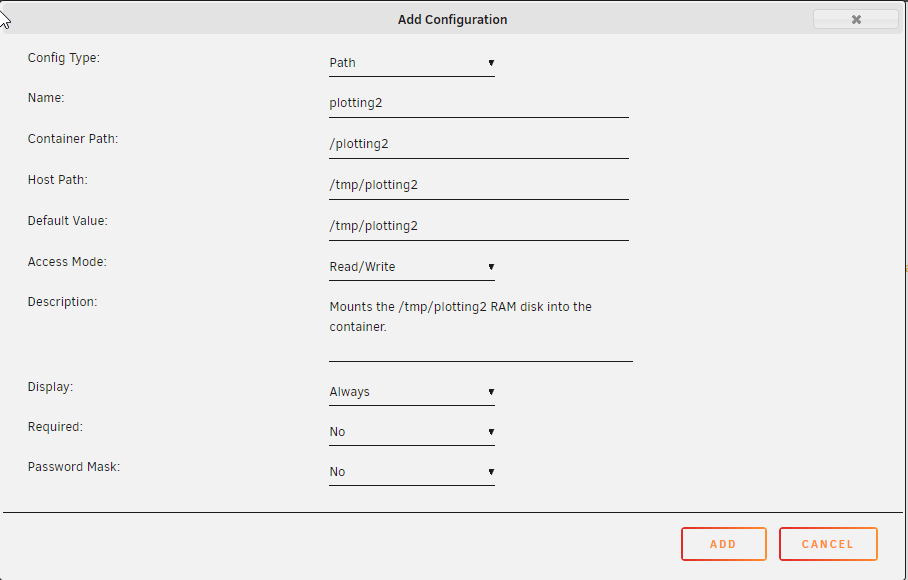
This will map the /tmp/plotting2 RAM disk to the /plotting2 path inside the container. Restart Machinaris (Chia or Chives) container(s).
Then in Machinaris WebUI, switch to Settings | Plotting page, find the config for your plotting system (either Chia or Chives), scroll down to the line:
# tmp2: /plotting2
and uncomment (remove the hash character) to tell Madmax or Bladebit to use this /plotting RAM disk path for the temp2 location during plotting. Save the settings, switch to Plotting page, and start plotting.
You can specify more than one directory/drive holding plots by following this guide.
NOTE: By default, Machinaris is configured to run as a full-node with all services. I strongly recommend the majority of users to run using the default fullnode mode unless you have other Machinaris systems running on your LAN. If that is the case however, you may optionally specify a mode environment variable to launch as only a farmer, harvester, or just plotter. To do this, toggle 'Advanced View' when editing the Machinaris docker config to reveal advanced settings:
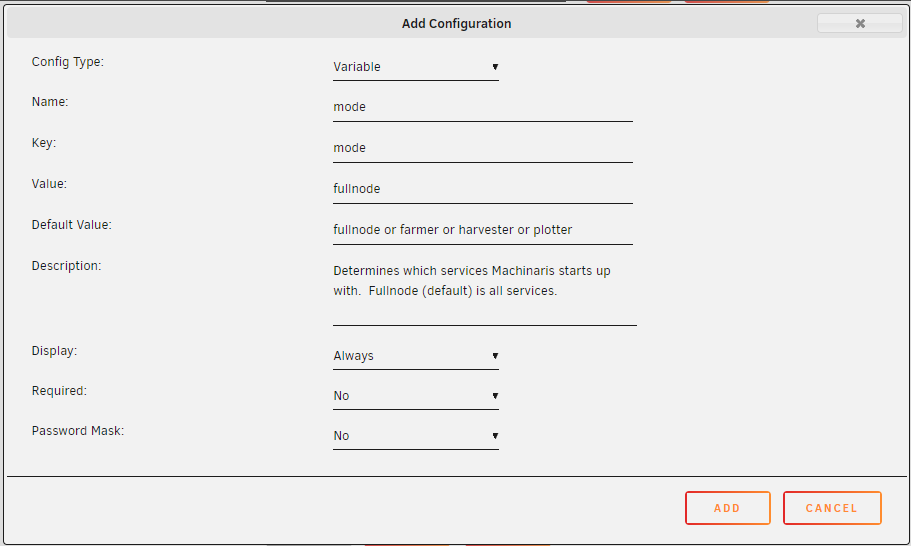
To obtain the values needed for the manual configuration below, visit the Workers page of your Machinaris WebUI and click the 'New Worker' button. Complete the form to generate a docker-compose.yml. While the Unraid Community Apps approach can't use a docker-compose.yml directly, you can see the environment ==> Variable, the volumes ==> Path, and ports ==> Port mappings that will be needed.
If you wish to run as a Harvester worker, please use the blockchain's harvester template from Unraid Community Apps. Please ensure you add/edit the following in the Docker configuration:
- VARIABLE: mode: must be 'harvester' all lower-case
- VARIABLE: farmer_address: must be the IP of your fullnode farming system
- VARIABLE: farmer_port: must be the farming port on your fullnode system. For example, Chia is 8447, each fork is different.
- VARIABLE: controller_host: must be the IP of your controller system (Chia fullnode), probably the same as farmer_address
- VARIABLE: worker_address: must be the IP of the new Harvester worker system
- VARIABLE: worker_api_port: must be the API port of the new Harvester worker system (8927 for Chia, each for is different).
- PORT: worker_port: must the actual PORT ingress allowed so Unraid binds the
worker_api_portfor listening.
- VARIABLE: mode: must be 'plotter' all lower-case
- VARIABLE: farmer_pk: should be your farming key from Keys page.
- VARIABLE: pool_pk OR pool_contract_adddress: should be your plotting key. See Keys or "Settings | Pools" page.
- VARIABLE: controller_host: must be the IP of your controller system (Chia fullnode), probably the same as farmer_address
- VARIABLE: worker_address: must be the IP of the new Harvester worker system
- VARIABLE: worker_api_port: must be the API port of the new Harvester worker system (8927 for Chia, each for is different).
- PORT: worker_port: must the actual PORT ingress allowed so Unraid binds the
worker_api_portfor listening.
A worker can be both a harvester and plotter at the same time, combining all Variables and Ports above:
- VARIABLE: mode: should be 'harvester,plotter' all lower-case
Once you have Machinaris installed on your Unraid server, you should follow these generic post-install setup steps.
Please learn from my mistakes, regarding disks, shares, and hardware:
DO's:
- Use SSD drives and/or RAM disks for your temporary plotting space.
- Use Unraid HDD array or unassigned HDD devices to store your completed plots.
- Manage your cores and memory. Syncing blockchains (just installed Machinaris) will take much more CPU.
DON'T's:
- Don't use the Unraid HDD array for temporary plotting space. This is super slow!
- Don't store your plots on the main Array, with Parity. Parity is wasted space for plots. You can always re-plot, don't back them up.
Upgrading Machinaris on Unraid is the same process as for other Docker container. In the Unraid Admin UI, click on the Docker tab. At the bottom of the page, click 'Check for Updates'. If updates are available for the latest stream of Machinaris, then you can choose to apply them.
You can definitely perform a fresh-install of Machinaris as above, but if you're already running the official Docker, there is a quick way to copy the configuration over to Machinaris:
mkdir -p /mnt/user/appdata/machinaris && cp -r /mnt/user/appdata/chia/* /mnt/user/appdata/machinaris/ This has the benefit of copying both your existing mnemonic.txt and also all the GBs of blockchain you have probably already downloaded.
Be sure to set your mainnet/config/config.yaml to have logging -> log_stdout: false and logging -> log_level: INFO as both Chiadog and Machinaris need detailed logging to go to the mainnet/log/debug.log file from Chia.
type in your Unraid-Terminal
curl -L "https://github.com/docker/compose/releases/download/1.29.2/docker-compose-$(uname -s)-$(uname -m)" -o /usr/local/bin/docker-compose
sudo chmod +x /usr/local/bin/docker-compose
To get docker-compose persist (after reboot) in Unraid
create a file here
/boot/config/bash_extra.cfg
with this content
#docker-compose as container
alias docker-compose='docker run --rm \
    -v /var/run/docker.sock:/var/run/docker.sock \
    -v "$PWD:$PWD" \
    -w="$PWD" \
    docker/compose:1.29.2'
then add to your /boot/config/go
# Customise bash
cat /boot/config/bash_extra.cfg >> /root/.bash_profile
this will make an alias when you are booting up and if you need docker-compose it will download it...
Archiving is useful for automatically transferring new plot files from a Machinaris plotter system to a Machinaris farmer or harvester. If your Machinaris fullnode/farmer/harvester is running on Unraid, here is how to configure the rsync daemon to run on the host OS:
- First upgrade Unraid to latest, at least 6.11.x. Don't run very old versions of Unraid.
- Install the 'User Scripts' Unraid application. Go to the Settings tab of Unraid admin UI. Click on 'User Scripts' under 'User Settings' heading.
- Create a new 'User Script' named 'start_rysnc', to start 'At first array start only'. Use this script:
#!/bin/bash
#
# Start rsyncd on first boot only
#

cp /boot/custom/etc/rsyncd.conf /etc/rsyncd.conf
/usr/bin/rsync --daemon
- Using Unraid admin UI, open a Console, then change to
/boot/custom/etc/folder (create if needed) and create/edit file:rsyncd.conf. Change the path/mnt/disksbelow to another root directory on Unraid host OS if you want to expose that instead.
uid             = root
gid             = root
use chroot      = no
max connections = 4
pid file        = /var/run/rsyncd.pid
timeout         = 600
port            = 12000

[plots]
    path = /mnt/disks
    comment = plots
    read only = FALSE
- Back on 'User Scripts' page, click the 'Run in Background' button for the 'start_rsync' script. This will launch the
rsyncdaemon. On next Unraid OS reboot, it will start automatically.
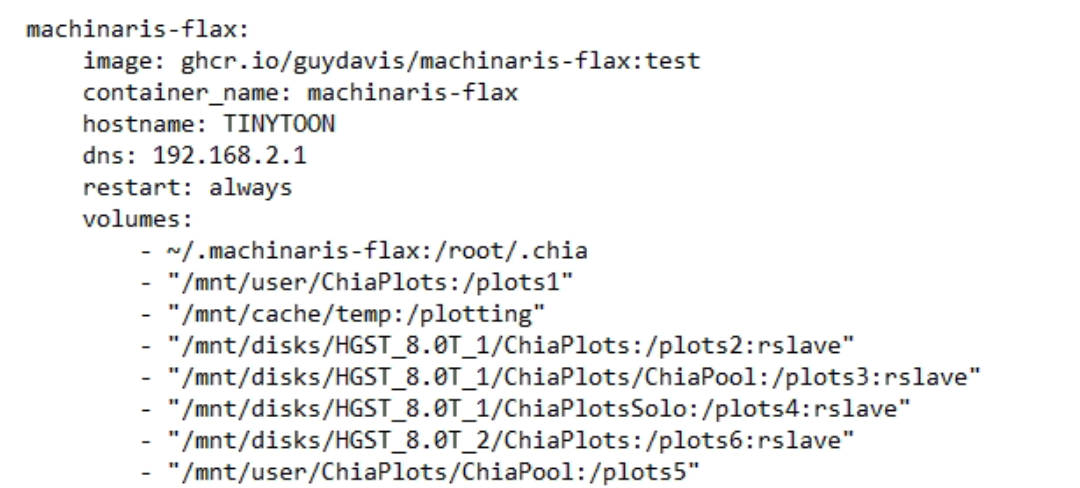
Recent versions of the Unassigned Devices plugin and Common Problems plugin for Unraid suggest that you choose "Read/Write - Slave" mode for your particular volume mount points. If you want to use this setting, go ahead.
If you get a message that the chia_plot plotter has not built and you have waited 15 minutes after launching Machinaris, then you are likely running an older version of Unraid than 6.9.2. Please upgrade to the current release of Unraid.
If you choose to mount the same host path (such as a parent folder and also a child folder) as two different volume mounts, you are doing bind propogation and should append :rslave to the volume mount in the docker-compose.yml or Unraid Docker configuration.
This is the recommended configuration generally in Unraid for disks mounted via Unassigned Devices. If you have Fix Common Problems plugin installed, it will give you a warning to change to the slave option.
NOTE: There is no need to actually add a second volume mount for a descendent child folder of a parent folder already mounted. Just mount the parent folder and modify the plots_dir environment variable to point to each child-folder in the container.