This is a fork of a fork, so many thanks to egemenertugrul for porting jehervy's web application to the Windows platform. This version enables XInput gamepad input on Windows machines via the Node.js ViGEmClient package. I have since taken the liberty to add support for up to 10 virtual gamepads, up from 4, by integrating the necessary bits from upstream in jehervy's main branch of the project. Earlier vestiges of the virtual keyboard and touchpad components of the project have been removed but based on demand, they can be readded at a later date. For those interested in contributing, RobotJS would likely be the best candidate for reintegrating virtual touchpad and keyboard support.
Prequisites:
Download and install ViGEmBus (tested through 1.17.333). Download and install Node.js 14. The "Automatically install the necessary tools" option must also be checked to include the Visual Studio Build Tools (required).
Major changes:
- Downgraded
forever-monitorto 1.0.0 from 2.0.0, see this. - Dependencies:
- Added:
vigemclient: 1.1.2 - Removed:
ioctl,ref,ref-structandref-array
- Added:
- Added
virtual_gamepad_hub_vigem.jsandvirtual_gamepad_vigem.js. - Edited
server.js. - Added support for up to 10 controllers, up from 4, as implemented in the main branch of this project.
TODO: Implement keyboard and touchpad input if demand warrants it.
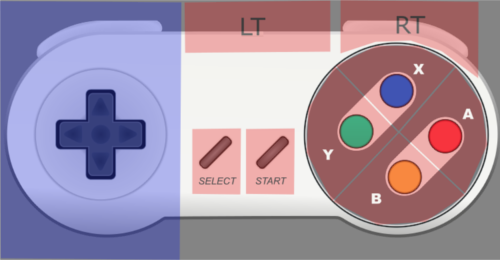
Ever have friends over and was shy in the controller department? Have them connect to your local Wi-Fi network and access this handy dandy application! This Node.js application instantly transforms any smartphone, tablet, or other Internet browsing touchscreen device into a full-fledged gamepad controller simply by reaching a local web address. You can plug in up to 10 virtual gamepad controllers.
Demo video of 1 player in game here
Demo video of 3 players in EmulationStation here
NOTE: This application is tested with Node.js 14.
git clone https://github.com/hifihedgehog/node-virtual-gamepads
cd node-virtual-gamepads
npm install
You can now configure the server to your needs. Just open config.json
with the editor of you choice and adjust the values.
port: sets the port the web-server is listening on.useGamepadByDefault: if set tofalse, the/will redirect to a landing page where you can access a gamepad link to then plug in the gamepad. If set totrue,/redirects directly to the gamepad page and instantly plugs in the gamepad. The landing page can still be accessed via/index.html.analog: if set totruethe the above mentioned redirection will append?analogto the address. This flag will cause the gamepad's d-pad to act like an analog stick instead of a d-pad.logLevel: set it to"debug"to get a lot more logging output, to"warning"to only get critical output, or even to"error"if you want to only get errors logged (not recommended).
To start the server run
node main.js
Once the Node.js application is launched, you just have to plug in your virtual gamepad controller by connecting your device on the same local network by reaching the address http://node_server_address
In Windows, your device/computer name would be what you type into the browser for "node_server_address." You can modify your device/computer name by going to the Settings app and clicking on "Advanced system settings" and from the pop-up, switching to the tab "Computer Name" and selecting "Change." Replace the name in the computer name field to whatever you want. Then press OK twice to apply and reboot as required. For your computer to be seen by other devices, you may also need to set your network to private with at least network discovery on and perhaps printer and file sharing on as well.
Also included is a Visual Basic startup script ("startup script.vbs") so the application can be made to start automatically in an invisible window (in the background) at login. You would adjust the path in the file from "C:\node-virtual-gamepads-windows" to the path where you are running the application on your machine. Then for it to run automatically at startup for all users, you would copy this file to the folder C:\ProgramData\Microsoft\Windows\Start Menu\Programs\StartUp.
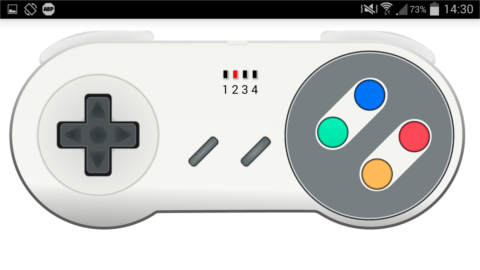
The application will automatically plug in a new controller when the web application is launched and unplug it at disconnection. 10 slots are available so 10 virtual gamepads can be created. You can see your current slot on the indicator directly on the virtual gamepad.
With the add to homescreen Chrome feature, you can easily use virtual gamepads application without launching the browser each time you want to play.
With only three clicks, this virtual gamepad web application becomes a standalone application.
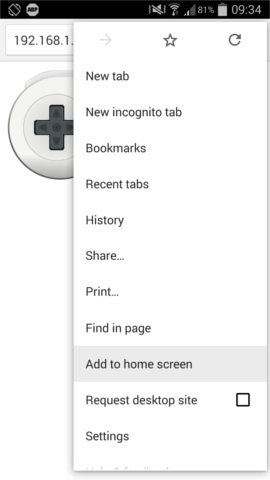
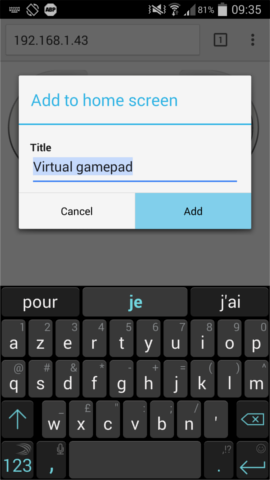
Then a shortcut is added onto your homescreen and the application will be launched outside the browser.
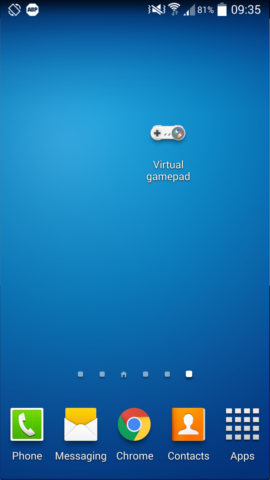

You would follow a similar process with Safari on iOS to pin this to your homescreen there as well.
Because it it difficult to spot the right place in a touch screen without looking at it, the touch zone of each button was increased. LT button was moved at the center of the screen to let as much space as possible for the joystick and avoid touch mistakes.
To know if a button has been pressed successfully, the web application provides haptic feedback which can be easily deactivated by turning off the vibrations of the phone.