-
Notifications
You must be signed in to change notification settings - Fork 0
Programming the FPGA Board using OpenOCD on a Pi
This page contains notes on programming the eepizza FPGA board using a Raspberry Pi.
(I'm using a Raspberry Pi 1B. See notes at the end for other Pi Models)
Start with a recent release of Raspbian, logged in as the pi user.
(I'm using 2020-02-13-raspbian-buster-full.img)
Install openocd version 0.10.0-5:
sudo apt-get update
sudo apt-get install openocd=0.10.0-5
Create a file in the current directory called local.cfg with the following contents:
interface bcm2835gpio
bcm2835gpio_trst_num 7
adapter_khz 250
FPGA board:     Pi GPIO Header:
Pin 1 (TMS) <=> Pin 22 (GPIO 25)
Pin 2 (TDI) <=> Pin 19 (GPIO 10)
Pin 3 (TDO) <=> Pin 21 (GPIO 9)
Pin 4 (TCK) <=> Pin 23 (GPIO 11)
Pin 5 (0V)  <=> Pin 20 (0V)
Pin 6 (3V3)     NOT CONNECTED
On the FPGA board, pin 1 of the JTAG connector has a square pad.
Here is a the pin numbering of the Pi GPIO connector.
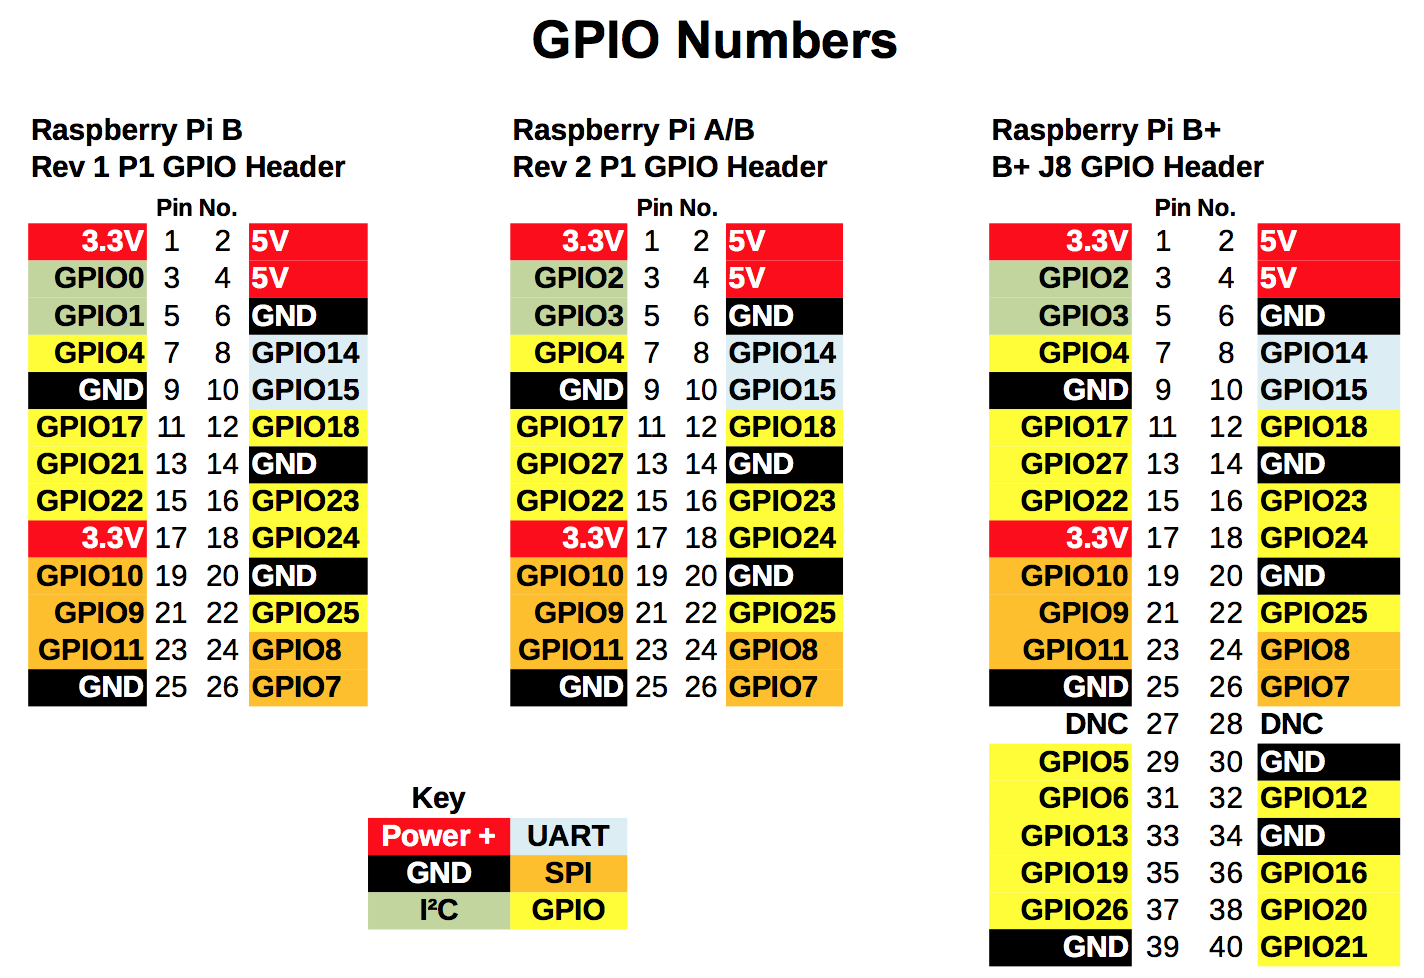
IMPORTANT: DO NOT CONNECT PIN 6 (3V3)
IMPORTANT: If you are doing this "hot" (i.e. with both boards powered), connect the 0V wire first.
Download the .bit file you want to program:
wget https://github.com/hoglet67/Beeb1MHzBusFpga/raw/master/frame_buffer/releases/v1/frame_buffer.bit
Run openocd with the following options:
sudo openocd -f local.cfg -f /usr/share/openocd/scripts/interface/raspberrypi-native.cfg -f /usr/share/openocd/scripts/cpld/xilinx-xc6s.cfg -c "init; xc6s_program xc6s.tap; pld load 0 frame_buffer.bit; exit"
You should see the following output:
Open On-Chip Debugger 0.10.0
Licensed under GNU GPL v2
For bug reports, read
	http://openocd.org/doc/doxygen/bugs.html
BCM2835 GPIO config: tck = 11, tms = 25, tdi = 10, tdo = 9
BCM2835 GPIO config: trst = 7
adapter speed: 250 kHz
Info : auto-selecting first available session transport "jtag". To override use 'transport select <transport>'.
xc6s_print_dna
Info : BCM2835 GPIO JTAG/SWD bitbang driver
Info : JTAG only mode enabled (specify swclk and swdio gpio to add SWD mode)
Info : clock speed 250 kHz
Info : JTAG tap: xc6s.tap tap/device found: 0x24001093 (mfg: 0x049 (Xilinx), part: 0x4001, ver: 0x2)
Warn : gdb services need one or more targets defined
loaded file frame_buffer.bit to pld device 0 in 11s 54987us
At the end of this process, the FPGA should be running the new bitstream.
Download the bscan file you need for indirect programming:
wget https://github.com/quartiq/bscan_spi_bitstreams/raw/single-tap/bscan_spi_xc6slx9.bit
Download the .bin file you want to program:
wget https://github.com/hoglet67/Beeb1MHzBusFpga/raw/master/frame_buffer/releases/v1/frame_buffer.bin
Run openocd with the following options:
sudo openocd -f local.cfg -f /usr/share/openocd/scripts/interface/raspberrypi-native.cfg -f /usr/share/openocd/scripts/cpld/xilinx-xc6s.cfg -f /usr/share/openocd/scripts/cpld/jtagspi.cfg -c "init; jtagspi_init 0 bscan_spi_xc6slx9.bit; jtagspi_program frame_buffer.bin 0; xc6s_program xc6s.tap; shutdown"
You should see the following output:
Open On-Chip Debugger 0.10.0
Licensed under GNU GPL v2
For bug reports, read
	http://openocd.org/doc/doxygen/bugs.html
BCM2835 GPIO config: tck = 11, tms = 25, tdi = 10, tdo = 9
BCM2835 GPIO config: trst = 7
adapter speed: 250 kHz
Info : auto-selecting first available session transport "jtag". To override use 'transport select <transport>'.
xc6s_print_dna
jtagspi_program
Info : BCM2835 GPIO JTAG/SWD bitbang driver
Info : JTAG only mode enabled (specify swclk and swdio gpio to add SWD mode)
Info : clock speed 250 kHz
Info : JTAG tap: xc6s.tap tap/device found: 0x24001093 (mfg: 0x049 (Xilinx), part: 0x4001, ver: 0x2)
loaded file bscan_spi_xc6slx9.bit to pld device 0 in 4s 26385us
Info : JTAG tap: xc6s.tap tap/device found: 0x24001093 (mfg: 0x049 (Xilinx), part: 0x4001, ver: 0x2)
Info : Found flash device 'win w25q32fv' (ID 0x001640ef)
flash 'jtagspi' found at 0x00000000
auto erase enabled
Info : Found flash device 'win w25q32fv' (ID 0x001640ef)
Info : Found flash device 'win w25q32fv' (ID 0x001640ef)
Info : Found flash device 'win w25q32fv' (ID 0x001640ef)
Info : sector 0 took 136 ms
Info : sector 1 took 141 ms
Info : sector 2 took 137 ms
Info : sector 3 took 139 ms
Info : sector 4 took 144 ms
Info : sector 5 took 141 ms
wrote 393216 bytes from file frame_buffer.bin in 17.330067s (22.158 KiB/s)
Info : Found flash device 'win w25q32fv' (ID 0x001640ef)
read 340604 bytes from file frame_buffer.bin and flash bank 0 at offset 0x00000000 in 11.499943s (28.924 KiB/s)
contents match
shutdown command invoked
At the end of this process, the FPGA should reconfigure and be running the new bitstream.
If you get the following error, then you have a mismatch between openocd and the bscan file.
Error: Unknown flash device (ID 0x00ffffff)
For the Pi0 or Pi1, use the following config file:
/usr/share/openocd/scripts/interface/raspberrypi-native.cfg
For the Pi 2, use the following config file:
/usr/share/openocd/scripts/interface/raspberrypi2-native.cfg
For the Pi 3, you could try using the config file for the Pi 2.
For the Pi 4, you need to copy the one of the above files, and change the following lines:
bcm2835gpio_peripheral_base 0xFE000000
bcm2835gpio_speed_coeffs 236181 60
(I've only tested an Pi 1B myself)
A more comprehensive guide to using the Pi 4 as a programmer has been written by cyberbarter. It was originally posted to a thread on stardot. There is a local copy in PDF format here.
The above instructions were written for Open OCD 0.10.0-5.
For later versions of Open OCD a couple of things are different:
- a different bscan file is needed
- the local.cfg file contents are different
The bscan file version from the master branch (not the single-tap branch) should be used:
wget https://github.com/quartiq/bscan_spi_bitstreams/raw/master/bscan_spi_xc6slx9.bit
The local.cfg file needs to contain just a single line:
adapter speed 200
Note, I experienced FLASH Write Errors and readback errors when the speed was 250 KHz, hence I've reduced it to 200 KHz. That seemed to resolve the issue. I didn't observe these issues with the old version. It's also possible it's my cable connections being slightly dodgy.