Views better using the README.md here
The currciulum for this course is at maker100-curriculum
Note: the 2024 economy version of this course is at maker100-eco
Reminder all code examples are in the Portenta Pro Community Solutions Library that can be installed onto the Arduino IDE, search for "community" then install "portenta-pro-community-solutions". Check out the new online-maker100 for fully online learning without in person teacher support. It is closely matched to the materials cost price-list-individuals.md, and follows steps 0-6, from beginner setup to presentation / startup. (Draft mode Jan 2022)
The examples are here. My original Portenta Research github is here
Note: To edit this table use https://www.tablesgenerator.com/markdown_tables File-->Paste Table Data --> Generate --> Copy to Clipboard--> paste back here
As such many safety and extra resource information will not be listed here. These videos are as short as possible to get the sketch working. For an online experience hopefully the online-maker100 course will be ready and student tested by 2023. If you are working online expect to research a lot of microcontroller safety videos on your own.
Really good connected devices slideshow https://pascalbod.github.io/iot-en-presentation/#/ (watch for the arrows bottom right)
The big brother to this course will be Maker101 which should be more about Machine Learning and for general University Students.
Follow your teachers requirements, but for my class I expect diagrams that guarantee accurate connections. If your diagrams are not helping you make
accurate connections you might want to try diagram makers like frizing and cirkitstudio

https://everycircuit.com/app/
| Topic | Example Code | Video | Instructions |
|---|---|---|---|
0. Login to edgeimpulse.com and make a vision machine learning model using your cell phone, or laptop camera of 0-unknown, 1-pencil (or something of your choice) |
docs.edgeimpulse.com | This is a full playlist so many other videos here might help 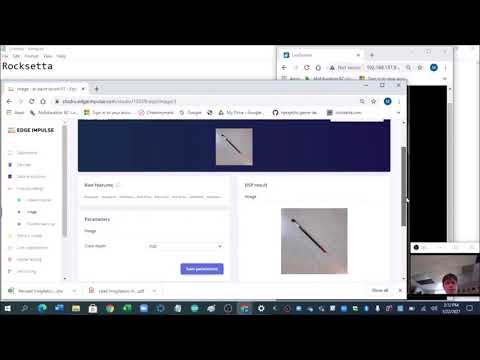 |
This website is a good starting point https://hpssjellis.github.io/multi-language-edgeimpulse-tutorial-vision-cell-phone/ Like all our assignments make a very short video proving you did the work. For Edge Impulse you would show your confusion matrix, feature explorer and an example classification of a pencil or not a pencil. (Or whatever you were testing) |
1. Auto Blink and Serial Print |
dot11-hello-blink.ino | 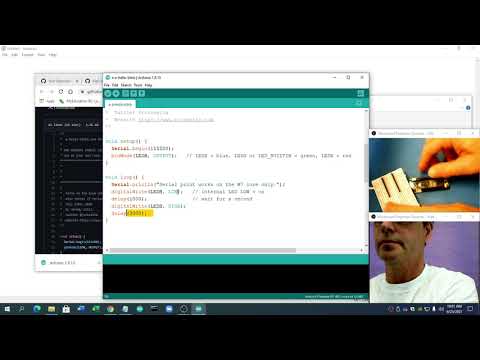 |
Print other things and change the pattern of blinking using different colors LEDR, LEDG, LEDB, LED_BUILTIN (which is green). Note: I stay away from LEDR as red is used to show errors |
2. Button causes LED to blink |
dot228-button-control-led.ino |  |
 Control the LED with the button, then control multiple LED's with Multiple Buttons. Note: Can't control large current flow devices, WHY? Could you make the external LED interact like the internal LED? |
3. Analog Read (Voltage divider for various 2 prong sensors (variable resistors: flex sensor, photoresistor, touch/pressure sensor)) |
dot211-any-variable-resistor-sensor.ino | 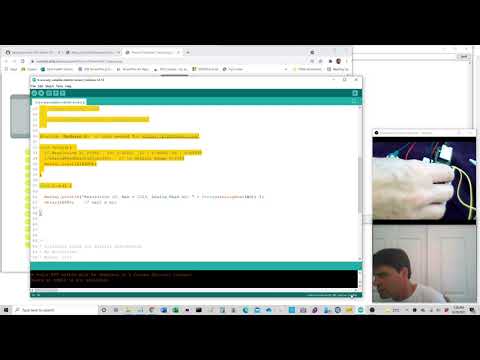 |
Change the Resistor amount and which resistor is attached to 3V3 to get the largest most sensible range of readings. |
4. DAC to ADC |
dot1a-DAC-to-ADC.ino | 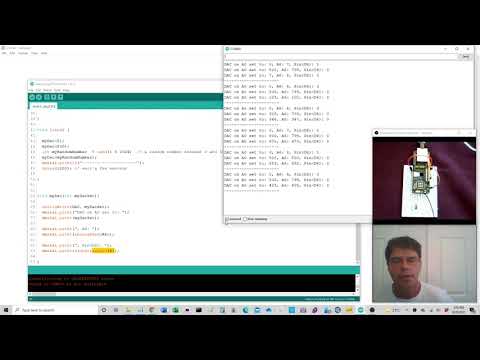 |
Estimate the Voltage that the digital pin converts from 0 to 1, it should be close to half of 3V3 |
5. Flash SOS |
dot71-sos | 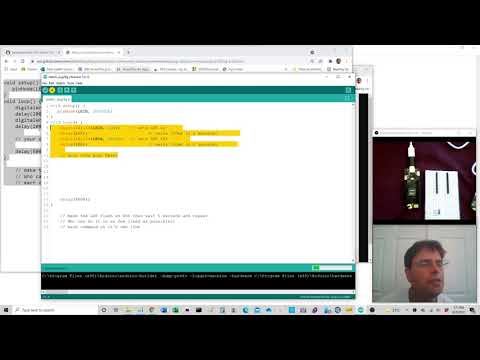 |
Get the code running to flash the LED_BUILTIN, then have it flash an SOS. 3 short flashes, 3 long flashes, 3 short flashes then a 5 second rest. |
6. Web WiFi (need router acces to make global) |
dot181-wifi-webserver.ino | 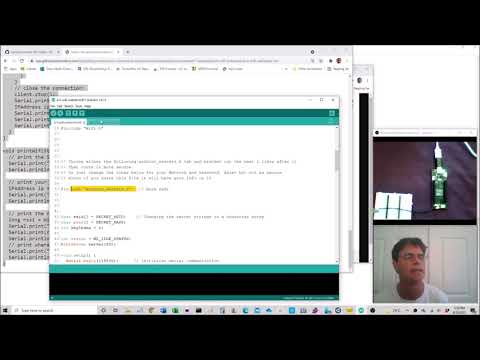 |
Several layers to this project. Often easier to use your cell phone hot spot as a school's WiFi often has several layers of security. I will still need to work with my School IT department to: A. get the WiFi working and B. get an outside port. Probably wont happen. Change the buttons on the webpage to control some Actuator other than an LED |
7. Servo |
dot221-servo.ino |  |
MUST HAVE AN EXTERIOR BATTERY TO RUN THE 6 VOLT SERVO! I have the Pololu Servo Product number 1057, Power HD High-Torque Servo 1501MG here. To connect Portenta D5 (orange wire) GND (brown wire) to servo, 6 volt battery positive (red) and Negative (brown) to servo. |
8. Transistor |
dot224-pwm-transistor.ino | 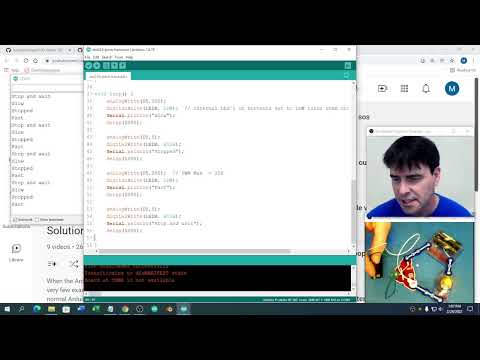 |
  Make either the PNP transistor with small motor or the NPN transistor. For higher marks do both. |
9. Small Dual DC Motor Driver |
dot226-small-dual-dc-motor-driver.ino | 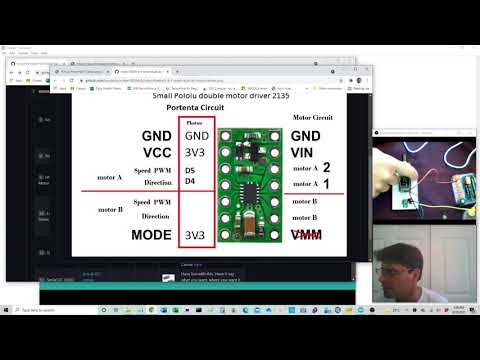 |
 Get a small motor working using it's own power supply and change the code so it does what you want. Pololu #2135 DRV8835 Dual Motor Driver Carrier here |
10. Large DC Motor Driver |
dot227-big-dc-motor-driver.ino | 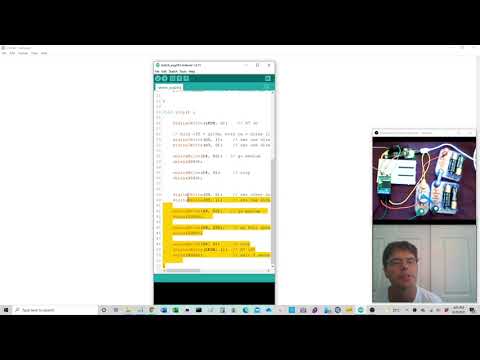 |
 Get a 6V motor running and change code for it to do what you want. Protect the Phton from the 6 Volt motor side. Check Pololu 1451 VNH5019 Motor Driver Carrier here |
11. Stepper Motor |
dot225-stepper-motor.ino | 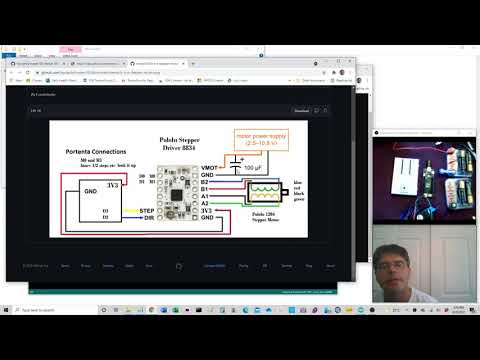 |
 Note: This stepper needs 6V, Change code to do what you want. Pololu 2134 DRV8834 Low-Voltage Stepper Motor Driver Carrier here |
12. Serial I2C OLED |
dot222-I2C-grove-OLED.ino |  |
 Have fun with this. Have it say what you want, where you want it and for how long. |
13. Serial SPI Pixy2 |
dot212-pixy2-SPI.ino Note: Dot212 Pixy example using the Portenta pro community solutions library will be pre-setup with the pixy include files! | 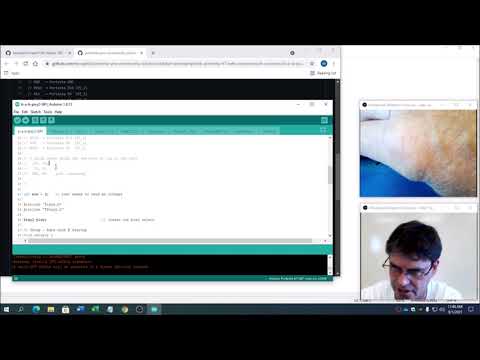 |
 The Pixy2 is so cool students will have no problem coming up with things to detect. The Pixy2 is really good for a final project since students just need to connect an actuator. Example: when you see the "orange" cat have a servo open a lever to feed it. |
14. Serial UART FingerPrintScanner-FPS (Video not ready) |
dot216-fingerprint-scanner | Ask the teacher about this sensor | |
15. GPS |
dot215-grove-gps-air530.ino Only proof of connection. | Try https://www.gpsvisualizer.com/ with the data saved with .GPS extension Real Assignment: Parse the output for Latitude, Longitude, date time and height, perhaps use: TinyGPS, TinyGPS++, TinyGPSPLUS, NeoGPS libraries. Then paste your latitude, longnitude into this url /maps?q=lat,lon example: http://maps.google.com/maps?q=62.44,-114.4 for Yellowknife Canada | |
16. Accelerometer |
Just load MKRIMU library and run the accelerometer example. Note bend the reset pin on the MKR IMU, When that is working login to edgeimpulse and make a motion model using your cell phone, to detect a wave. Then download it to the Portenta and get the onboard LED working when you wave. | You can do this all on your own. connect the MKR IMU to the portenta then lookup how to do the example. Note: bend the reset pin of the MKR IMU away from connecting to the Portenta. Causes issues. | |
17. FSLP-Touch (Video not ready) |
dot217-FSLP.ino | Room for research here. This sensor has always given students problems. This chart helps |
|
18. Range-Finder |
dot214-RangeFinder.ino | 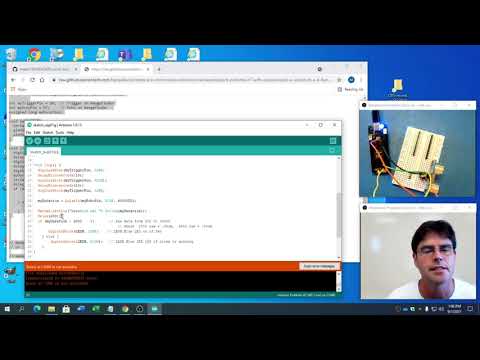 |
For this assignment a variable in the code can be changed to make the range finder work at a greater distance. |
19. Serial-putty |
This is a program to load on your computer that replaces the arduino serial monitor | Fairly easy once putty is installed. Load power shell and type mode with your Portenta programmed with a serial monitor program find the port. Then switch to Serial on Putty and Correct the COM port. Open and see if you can see serial output from the Portenta | |
20. Web-AdafruitIO-Connectivity |
adafruit login Record your user name and access key. Both the browser web socket and the Arduino MQTT program use those values. MQTT-Websocket ada-websocket02.html With Arduino MQTT Portenta code dot184-mqtt-client-to-adafruit.ino The MQTT library to install was written by Joel Gaehwiler is is way down on the list Arduino https uses webhooks but might not work due to changes in the arduino code dot183-https-to-adafruit.ino |
Everything will be at this website Adafruit-Connectivity | This is a good but large project. A lot for students to learn here |
21. Ethernet-Vision-Shield (need router acces to make global) |
dot311-ethernet-webServer.ino |  |
Same as WiFi might be difficult to get an outside line. While on the same local network things should work great. At home will have to configure your router to allow outside access. At school good luck. |
22. SD-card-Vision-Shield |
A great bit of code to run is here-dot362-png-to-sd-card which allows pictures in PNG format to be loaded onto the SD card based on a user set delay. | This is another one students can probably do themselves using the default programs for the Portenta. You will need a micro SD card. Portenta examples it is called Portenta_SDCARD | |
23. Microphone-Vision-Shield |
Example PDM then use your cell phone to make a sound model on EdgeImpulse. Such as your name. The download the arduino file and get your Portenta recognizing your name by lightening the onboard LED. | This is another one students can probably do themselves using the default programs for the Portenta called the PDM. Instead of the serial monitor load the Serial Plotter to see your voice when you speak. Then make the edge impulse sound model and load it on your Portenta. | |
24. Camera-Vision-Shield with Grayscale OLED |
Get the Portenta Camera working with the Grayscale Waveform 128x128 OLED dot351-camera-oled-regular.ino This is another one students can probably do themselves using the default programs for the Portenta. | ||
25. Rocksetta-Machine-Learning-Sine-Wave or e-ink display |
TensorflowLite seems to be deprecated so try doing the e-ink display. See Ambrose until he has a solution. preesently use the Waveshare e-ink libraries. File here Must edit the epdif.h file to list which pins to use Pin definition #define RST_PIN 5 #define DC_PIN 4 #define CS_PIN 3 #define BUSY_PIN 2 The tensorflowlite code is dot521-rocksetta-hello-ml-sine.ino |
||
26. Edge-Impulse-Sound-Yes-No |
Follow the wizard on Edgeimpulse to make a verbal Machine Learning model using your cell phone. Then download the Arduino deployment, install the zipped Arduino library and choose the default Portenta Sound example. Then talk into your Portenta and view the Serial Monitor. Then get the onboard LED to respond to your voice. | ||
27. Edge-Impulse-Vision-FOMO |
Use the Vision grayscale OLED from above and the dot5148-advanced-fomo-individual-count Note: Use the Portenta Pro Library as the include file will auto load. Then just change the deployed Edgeimpulse include file to the correct name. | Like the original classification model, just now with bounding boxes and you label each object to detect | |
28. LoRaWan-Helium-MQTT-Adafruit (easier) |
dot334-us915-helium-mqtt-adafruit-connect.ino | mqtts://username:myKey@adafruit.io:8883 Give your integration a number |
|
29. TFT Touch Screen or 128x128 Grayscale Fast refresh OLED |
dot218-TFTV2-touchScreen.ino or dot229-128x128-gray-oled.ino | 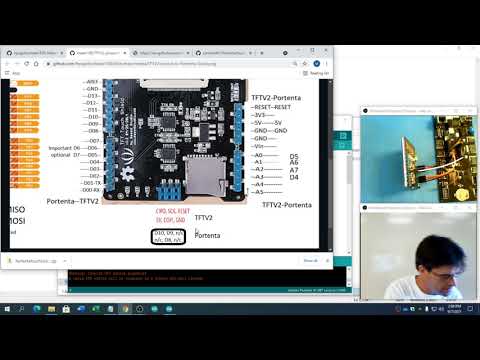 |
 Real Assignment: Presently the Touch Screen sensor is not reading completly to the edges of the screen, see if you can figure out why? Is it just the mapping of raw values to real values, the main resistor amount set at 300 ohms, the wire length. What is it? Fix it. |
30. LVGL Portenta Viewer on Full HD Screen (Needs USB-C to HDMI adaptor) Not yet working for my schools computer screens. |
Ambrose got this working wth both library versions 0.7 and 0.8 see code at portenta-lvgl-8.3.6-ambrose.ino | ||
31. PCB Board Build using easyEDA |
Great starter tutorial to make a PCB with a battery holder, resistor and ligtht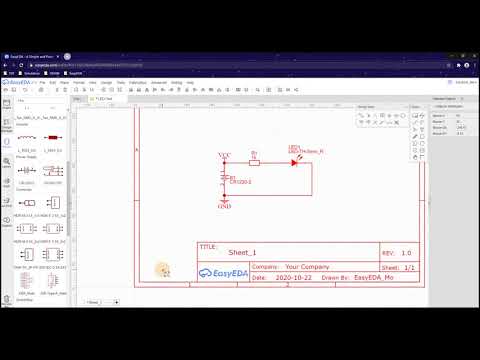 |
I have found lots of PCB design videos that are either to complex or just long and boring. The video pressented here was not made by me but is very short and many of my animation students can follow it very quickly to make their own board using easyEDA | |
32. JLCPCB order board for Printing (Has a cost for 5 small boards ~$20 USD including shipping) |
Take the edit file from the above PCB build using easyEDA and produce the Gerber file ready for printing using JLCPCB My public school students do not have to do this step. |
Elecrow Starter Kit with Seeeduino XIAO (Need a USB-C cable!) For students doing Stage 2 of the self learning process.
| Elecrow Starter Kit | Example Code | Youtube Video | Resource Link 1 | Setup Image | To Do |
|---|---|---|---|---|---|
stage2A01. |
LED with resistor on and off. Any Pin --> resistor -->LED --> Ground Like #5 SOS above dot22a-blink-an-led.ino |
Not really this video as it blinks the onboard LED |
|||
stage2A02. |
Touch Sensor Not much different from #3 above dot211-any-variable-resistor-sensor.ino A wire from GND-->resistor-->A0 and another from 3V3 --> touch sensor --> A0 |
|
|||
stage2A03. |
Temperature Sensor Similar to dot11-hello-blink.ino just need to connect the Signal to A0, VIN to 5V and GND to ground |
||||
stage2A04. |
Range Finder Same as maker100 #18 above. Code at dot214-RangeFinder.ino |
|
|||
stage2A05. |
Joy Stick | ||||
stage2A06. |
LCD | ||||
stage2A07. |
IR-Automation |
More Helium topics if time permits
| More Helium Portenta Topics | Example Code | Youtube Video | Resource Link 1 | Setup Image | To Do |
|---|---|---|---|---|---|
helium1. LoRaWan-Helium-HTTP-Decoder-Adafruit (Harder but more flexible) |
dot335-helium-http-adafruit-connect.ino | This is the best most flexible Helium to HTTP example, also shows how to write a decoder  |
Helium Official Documentation | ||
helium2. |
|||||
helium3. |
|||||
helium4. |
|||||
helium5. |
|||||
helium6. |
More Edge Impulse Machine Learning topics if time permits
| More Machine Learning Portenta Topics | Example Code | Youtube Video | Resource Link 1 | Setup Image | To Do |
|---|---|---|---|---|---|
ml1. (All my Portenta with LoRa Vision Shield examples are in the dot511 area of the Portenta-pro-community-examples arduino library) |
dot511-vision-shield | ||||
ml2. |
|||||
ml3. |
|||||
ml4. |
|||||
ml5. |
|||||
ml6. |
| Advanced Topic | Example Code | Youtube Video | Resource Link 1 | Setup Image | To Do |
|---|---|---|---|---|---|
advanced0. Dual Core Programming |
|||||
advanced1. WebSocket-Gitpod (Not Yet Fully Working) |
|||||
advanced2. Local-cpp-Compile-Gitpod (Not Yet Fully Working) |
|||||
advanced3. LoRa using GrumpOldPizza-Tlera-board |
|||||
advanced4. MQTT server (Not ready for video) |
|||||
advanced5. SerialtTransfer with Breakout Board |
dot44-serialTransfer-UART.ino | ||||
advanced6. ArduinoJSON with Breakout Board |
dot43-ArduinoJSON-UART.ino | ||||
advanced7. |
|||||
advanced8. |
|||||
advanced9. |
|||||
advanced10. |
| Advanced Topic | Example Code | Youtube Video | Resource Link 1 | Setup Image | To Do |
|---|---|---|---|---|---|
community1. By Ryan McMullen Lidar Sensor (Not yet purchased) |
Arduino capable Lidar Sensor or Robot Shop Lidar | ||||
community2. By @HuffmanLabDU CO2 Monitor |
Thermal Array For the XIAO board xiao-thermal.ino | Connect a CO2 monitor perhaps with a GPS device and or a thermo array to the Arduino Portenta and perhaps send the information over WiFi or the Helium Network | |||
community3. |
|||||
community4. |
|||||
community5. |
Started Jun 23rd, 2021
By: Jeremy Ellis, Technology Teacher, BC, Canada
Why, because I teach things as simply as possible but not necessarily the correct way. (Although soon to be Engineers are welcome to blast through the course. Seriously, these capable pre-engineering students have sometimes finished my semester long course in under 2 weeks!)
All University Undergrads, except Engineers and Computer Scientists, should take a simplified Robotics and Machine Learning course. Quote by Jeremy Ellis July 10th, 2021
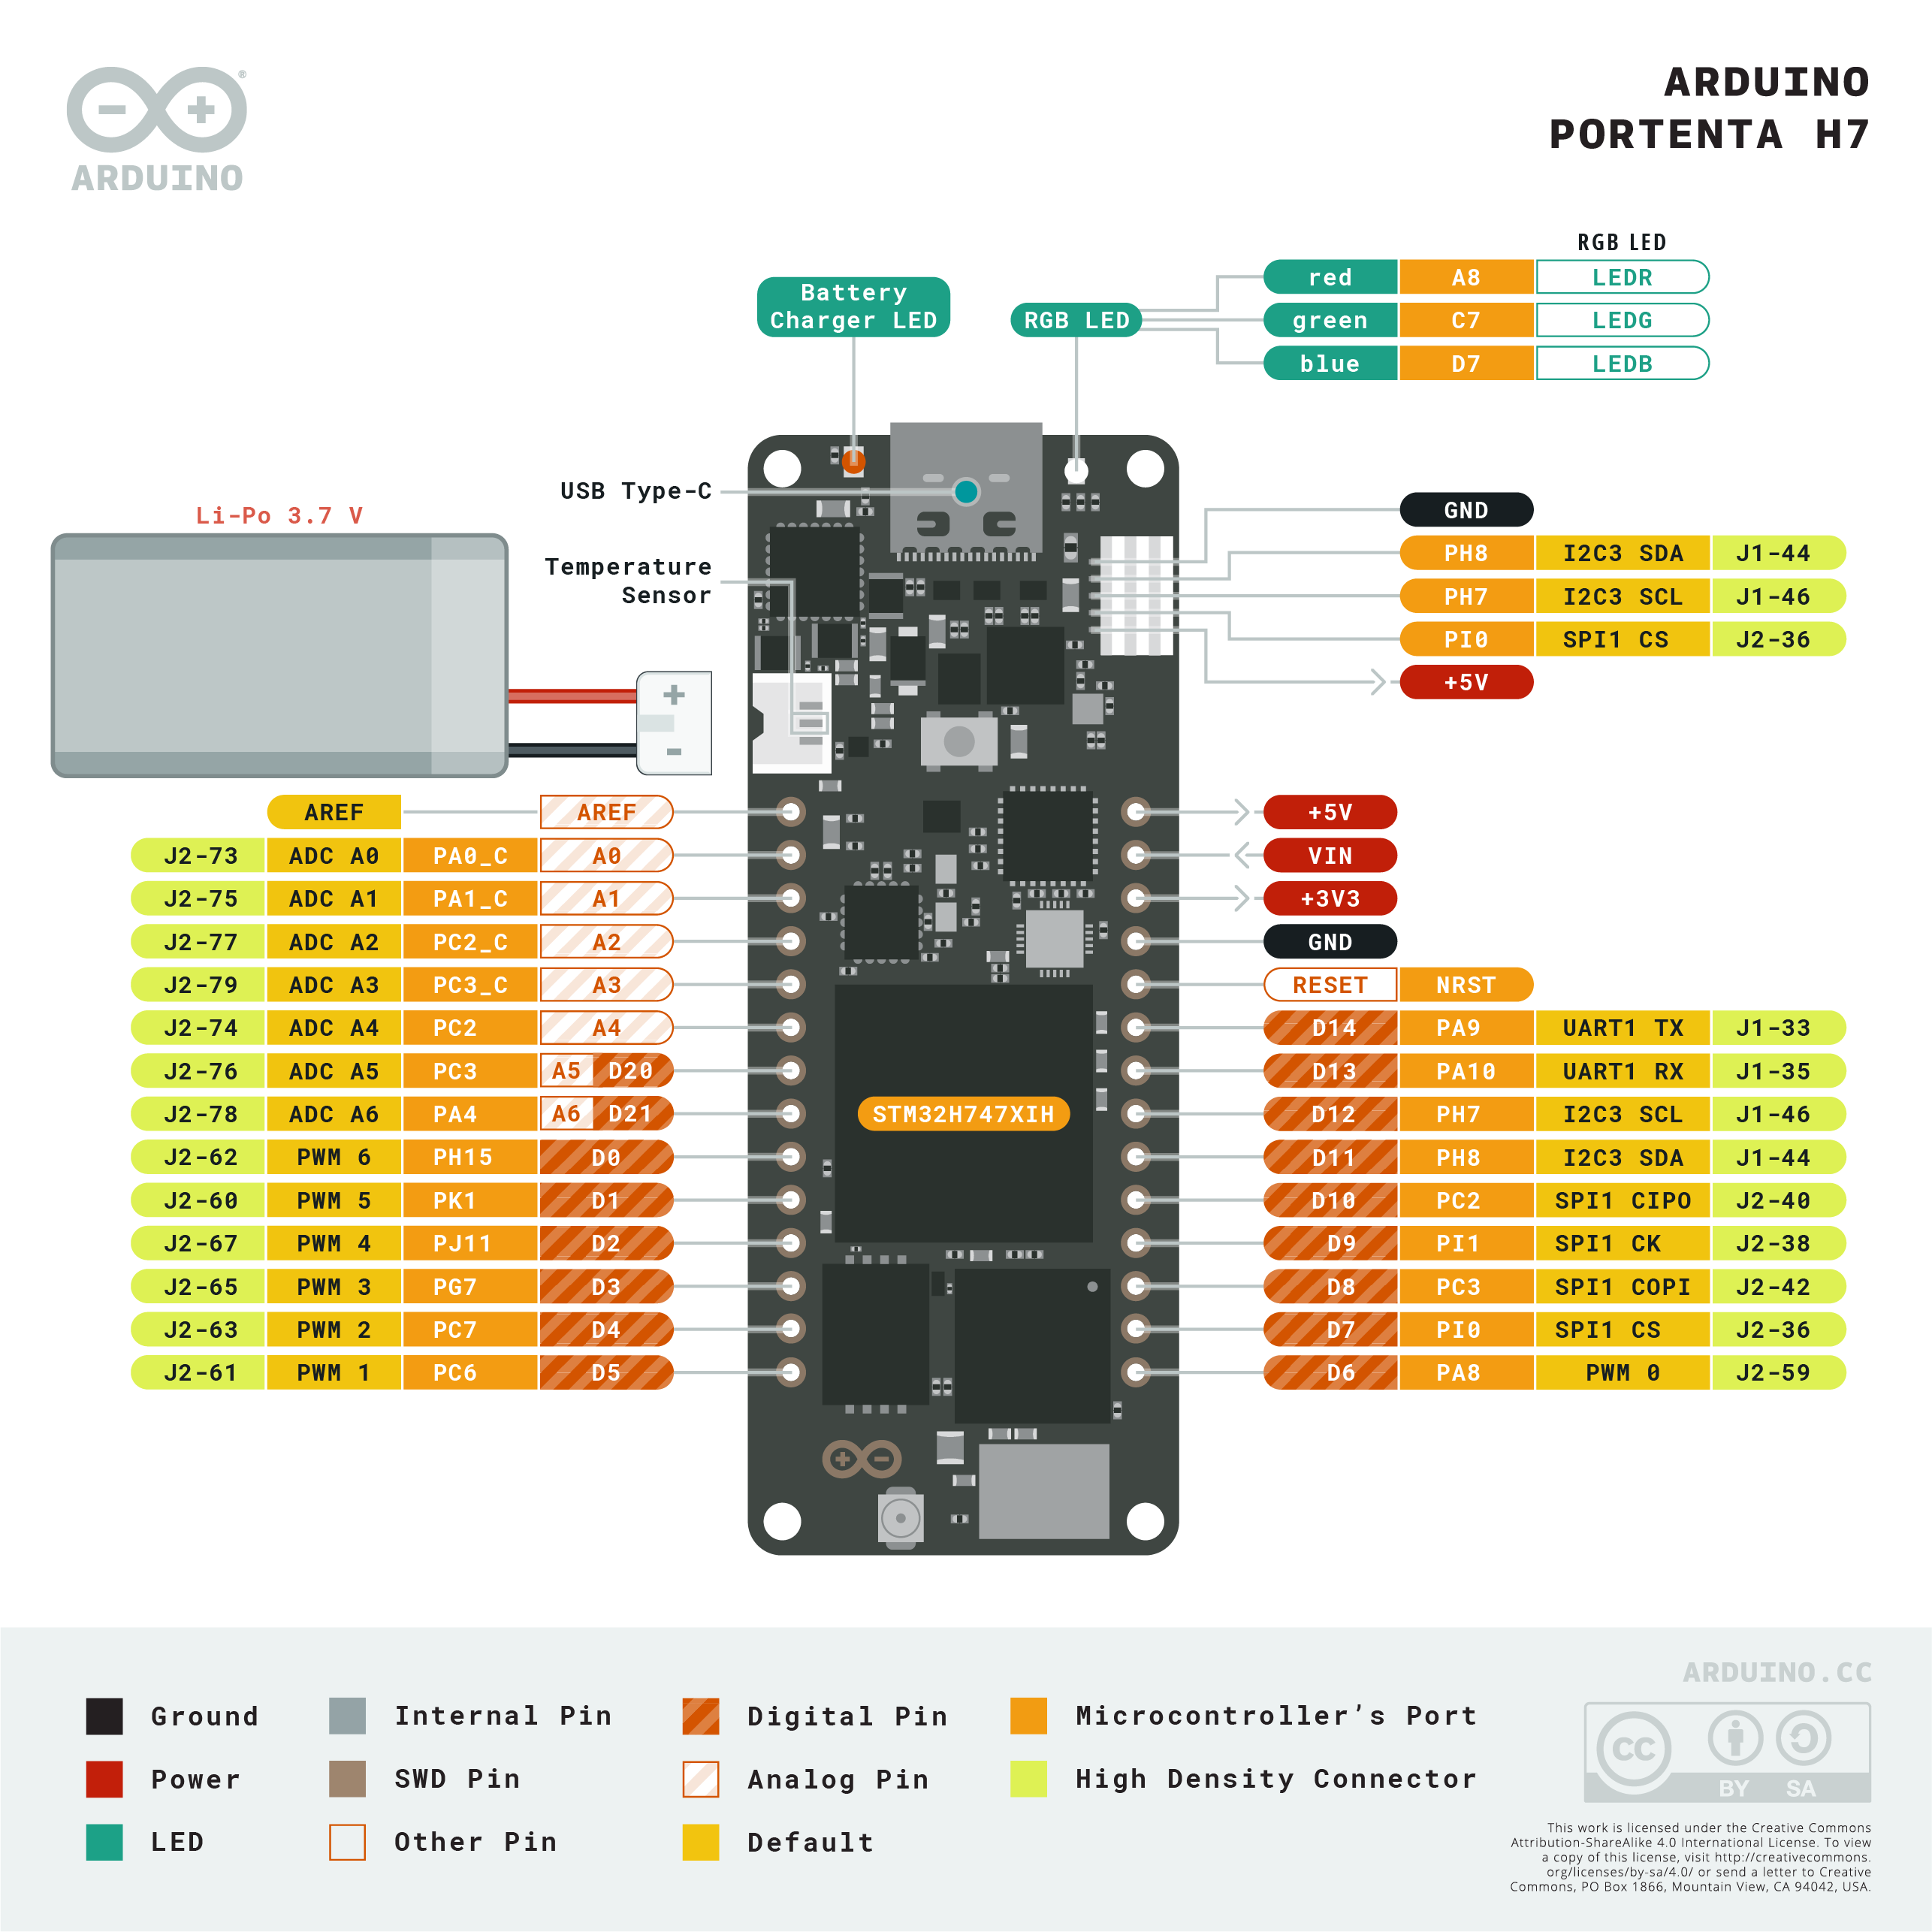
I use the $ 103.40 USD Arduino Pro PortentaH7 Dual Core Micro-Controller with the $45.99 USD Breakout Board and $63.00 USD LoRa Vision Shield and/or $47.15 USD Ethernet Vision Shield, possibly more shields later.

Yes they are expensive, ask any teacher (music, shop, sewing, science) why they don't purchase cheap equipment. See other boards below for cheaper, not as good, options. When your Administrator says "Why don't you get the $4 RPI Pico", have an answer ready.
Post Understanding Activities:
Circuit basics, Micro-controller basics (LED's buttons, wiring, breadboards), Platforms, Languages, simple sensors and actuators(screens/motors:DC, Servo, Stepper), connectors: I2C, SPI, Uart/Serial, connecting:WiFi, BLE, Ethernet, LoRaWan (Helium, TTN The Things Network, Adafruit.io, ArduinoCreate), possibly webSockets, Protocols:(IFTTT, MQTT, JSON, Bluetooth, ...), Machine Learning: (Edge Impulse, My TensorFlowJS ), TinyML:Vision, Sound, Possibly Acceleration, Single object detection , Possibly Multiple object detection, Possibly Sensor ML, Final Project ( Proof of Concept, then with 3D printing structure, working Prototype ) Possible Javascript Machine Learning with Cell phones, web socket micro-controller connectivity.
Blast through all first year assignments, multiple sensor and Actuators: ie: robot Arm, toy car, etc, concentrate on more Machine learning, with LoRa, WiFi, BLE and Ethernet connectivity, Sensor Machine Learning controlling Actuators, Product Prototyping.
- Circuits as multiple serial and parallel loops
- Microcontroller Max current, Max voltage
- Ohms Law V=IxR and Power equations
- Electrical Safety https://www.rugged-circuits.com/10-ways-to-destroy-an-arduino
- Non-microcontroller electric circuits: switch on a motor etc. I use Snapcircuits 750 I use the old version that comes in a box, this case version would be good, but any circuit toys would be fine including online circuit visualizers.
- My six Circuit components: Resistor, Diode, Transistor, Coil, Capacitor, Chip. 2021 bumped this up to 12 PCB components
- Soldering: I don't teach it, all my examples are breadboard plug and play, also by grade 11 most of my students who are fully interested in tech have taught themselves how to solder. (I get them to do my soldering since those kids are better at it than I am!)
- Coding: Many of my students take a Game Development Javascript programming class pre-robotics. It is a huge asset, but strangely some students take to programming like a fish to water and other students still have a hard time, even after several courses. I basically only teach 9 concepts: 1.Input/Output, 2.Variables, 3.Decisions (if statements), 4.Loops(for), 5.Functions, 6.Events, 7.Arrays, 8.Objects/Struct, 9.Classes(just using other peoples classes)
- 3D printing: Many of my students take a 3D printing course before or during taking robotics. Huge help for their final projects that need any structure: Most servo assignments need a structure around the servo to do something useful.
- Marking: My students make videos and save to the school network. The video steps are: View a student name tag(s), then their wiring diagram they drew, the code flashed to the Portenta, then the Portenta fully wired and running, often back to the computer to show the Serial monitor or a webpage. These videos are very short as I can pause to have a longer look. Marking can also be done in person.
See main price list on the Portenta Pro Community Solutions Library Github mainly for classroom teachers here
New price list price-list-individuals.md mainly for individuals trying the course.
Arduino Regular IDE Version 1.8.?? Download Decade long tested, works great
Arduino New IDE Version 2.?.? Download Has some advantages, but still fairly Beta
Arduinio Cloud Has online advantages, very powerful with Paid version but also has issues
Platformio Easy install of Visual Studio Code has lots of advantages, bit of a learning curve
Draft My Gitpod of Edge impulse Huge learning curve, but has the benefit of complete control of cloud setup for students, loads here
Some students just need to use cheaper equipment. Not everyone should be playing around with a $100 board who can't connect it properly.
I have a class set of 15 of each of the Portenta Series 
Following are a few cheaper boards that could do parts of this course although the pins may be different.
I also have a class set of 15 Seeeduino Seeeduino XIAO, for testing if a circuit is going to fry your board, you can't beat a $5 microcontroller.
Hot off the press. The NiclaVision is a contender for this course, has all the capabilities and cheaper than the Portenta, with Vision shield and MKR IMU.
-
The $115.00 USD NiclaVision is very good for Color Vision, sound and accelerometer Machine Learning

-
The $33.40 USD Nano 33 Ble Sense is very good for sound and accelerometer Machine Learning

-
The $19.65 USD Particle Photon 6 year student tested Curriculum is here with videos here. I still start my students on this very easy to use platform!

-
The $5.40 USD Seeeduino XIAO Only a limited number of pins to use

-
The $129 USD Sony Spresense Kit with Breakout Board and Camera and now works on the Arduino IDE. Absolutely nothing wrong with this board, I have just not yet got it doing Machine Learning on the Arduino IDE yet. Note: uses LED0, LED1, LED2, LED4 instead of LEDB, LEDG, LEDR

-
The $25.50 USD Arduino Nano-RP2040-Connect Is very new but has lots of potential over the RPI Pico as it has WiFi and BLE onboard.

-
The $4 USD Raspberry Pi Pico Amazing board, see above.
-
The $25.00 USD ArducamPico-4ML This board looks like it would be perfect for machine learning with a mini screen and camera but I have never got it properly working on the Arduino IDE.


I use the Arduino MBED core Arduino's on going attempt to simplify the MBED Arm programming OS, but there are other options:
-
micro-Python The Portenta actually runs micro-python through the OpenMV platform For Python lovers this is another. Note: Python is very fast to run, whereas Arduino code (C++) must be compiled and can take a long time for each compile, theoretically the Arduino code is faster on the board.
-
Circuit-Python Another version of Python for micro-controllers by Adafruit which is a very maker friendly company. Does not support the Portenta but supports lots of other boards
-
Javascript: I have not really seen a Javascript language that looks any easier than C++ yet for a micro-controller. I am open to suggestions, there are lots of attempts. (For web pages, Javascript is awesome. Note: Websockets is a way for micro-controllers to interact with wewpages in realtime)
-
Visuino A Visual programming drag and drop code creator for the Arduino may soon have Portenta compatibility, probably the future of Makers using micro-controllers as the actual coding is minimal
- I have students try to stay away from final projects using Water or AC home 120/240 volts for obvious electrical safety precautions. I also have them stay away from drones as the commercial ones are very good and student testing their software with drones is too easy to smash your entire project.
- Individual Final Project with at least one sensor and one actuator
- Proof of Concept (POC) Sensor Actuator working
- Useful and/or fun
- Structure designed (3d Printed if needed)
- Final Project Prototype ready
- Can it be sold? If so how much. Is it worth it?
- If time, final project with more sensors and actuators
- If time, Group Project
- Made for Makers not for future Mechatronic Engineers: Why? This course is to inspire Makers and future engineers, but to simplify the teaching I teach some things different than an Engineer would prefer. Few students I see have the: Drive, Ability and Finances to become Engineers. The students who could become an Engineer typically ignores me and get their assignments done really fast. Example: I code Javascript using Notepad.exe on windows, I don't even use Notepad++ a soon to be engineer might load a different editor like "Atom" and I am fine with that, I just don't want to waste my teaching time getting editors installed on school and student home computers, and then waste another 3 weeks teaching how to effectively use the editor.
Examples of things I do that drive Engineers crazy:
- Itterators: say in a "for" loop. I use "myCount" (I put "my" before every funciton or variable we create, so students know not to google them), Software Engineer "i"
- Engineers will make a pin variable say called
pin12and assign it to a pin say 6. And then throughout the program refer topin12, which confuses average students. I just useD6throughout the code so students know that this is digital pin 6. If they have to change it they just search and replace, but that drives Engineers crazy. - Files: I put everything that does one thing into one file, Software Engineer: multiple files in multiple folders because they have the IQ to keep track of them.
- I use Notepad as an editor, Engineer's typically would use anything but Notepad.
- I don't comment anything that can be googled, as the more writing stresses students out I also use camelCase long names to describe variables. Engineers, should comment everything.
- I try to get things working without a ton of theory, since interested students can lookup the theory. Engineers, theory first.
- I really should use fritzing diagrams for all my videos, but I have students make their own diagrams in anyway they like, and then they use their own diagram to connect the circuit. I find they have then thought more about it. Also I prefer students to read the top of the sketch as the connection information is often there and no diagram is available.
New version of Arduino MBED core v2.5.2 now allows memory splitting between the cores.

.
.

.
.
https://github.com/hpssjellis/my-examples-for-the-arduino-portentaH7
By: Jeremy Ellis, Tech Teacher, BC, Canada
My Github: hpssjellis , My twitter: @rocksetta , my Website rocksetta.com My Arduino Forum jerteach my Edge Impulse Forum rocksetta
.