Welcome to the Flax/JAX community week! The goal of this week is to make compute-intensive NLP and CV projects (like pre-training BERT, GPT2, CLIP, ViT) practicable for a wider audience of engineers and researchers. To do so, we will try to teach you how to effectively use JAX/Flax on TPU and help you to complete a fun NLP and/or CV project in JAX/Flax during the community week.
Free access to a TPUv3-8 will kindly be provided by the Google Cloud team!
In this document, we list all the important information that you will need during the Flax/JAX community week.
Don't forget to sign up here!
- Organization
- Important dates
- Communication
- Projects
- Tips & Tricks for project
- How to install flax, jax, optax, transformers, datasets
- Quickstart Flax/JAX
- Quickstart Flax/JAX in 🤗 Transformers
- Talks
- How to use the 🤗 Hub for training
- How to setup TPU VM
- How to build a demo
- Project evaluation
- General Tips & Tricks
- FAQ
Participants can propose ideas for an interesting NLP and/or CV project. Teams of 3 to 5 will then be formed around the most promising and interesting projects. Make sure to read through the Projects section on how to propose projects, comment on other participants' project ideas, and create a team.
To help each team successfully finish their project, we have organized talks by leading scientists and engineers from Google, Hugging Face, and the open-source NLP & CV community. The talks will take place before the community week from June 30th to July 2nd. Make sure to attend the talks to get the most out of your participation! Check out the Talks section to get an overview of the talks, including the speaker and the time of the talk.
Each team is then given free access to a TPUv3-8 VM from July 7th to July 14th. In addition, we will provide training examples in JAX/Flax for a variety of NLP and Vision models to kick-start your project. During the week, we'll make sure to answer any questions you might have about JAX/Flax and Transformers and help each team as much as possible to complete their project!
At the end of the community week, each team should submit a demo of their project. All demonstrations will be evaluated by a jury and the top-3 demos will be awarded a prize. Check out the How to submit a demo section for more information and suggestions on how to submit your project.
- 23.06. Official announcement of the community week. Make sure to sign-up in this google form.
- 23.06. - 30.06. Participants will be added to an internal Slack channel. Project ideas can be proposed here and groups of 3-5 are formed. Read this document for more information.
- 30.06. Release of all relevant training scripts in JAX/Flax as well as other documents on how to set up a TPU, how to use the training scripts, how to submit a demo, tips & tricks for JAX/Flax, tips & tricks for efficient use of the hub.
- 30.06. - 2.07. Talks about JAX/Flax, TPU, Transformers, Computer Vision & NLP will be held.
- 7.07. Start of the community week! Access to TPUv3-8 will be given to each team.
- 7.07. - 14.07. The Hugging Face & JAX/Flax & Cloud team will be available for any questions, problems the teams might run into.
- 15.07. Access to TPU is deactivated and community week officially ends.
- 16.07. Deadline for each team to submit a demo.
All important communication will take place in an internal Slack channel, called #flax-jax-community-week.
Important announcements of the Hugging Face, Flax/JAX, and Google Cloud team will be posted there.
Such announcements include general information about the community week (Dates, Rules, ...), release of relevant training scripts (Flax/JAX example scripts for NLP and Vision), release of other important documents (How to access the TPU), etc.
The Slack channel will also be the central place for participants to post about their results, share their learning experiences, ask questions, etc.
For issues with Flax/JAX, Transformers, Datasets or for questions that are specific to your project we would be very happy if you could use the following public repositories and forums:
- Flax: Issues, Questions
- JAX: Issues, Questions
- 🤗 Transformers: Issues, Questions
- 🤗 Datasets: Issues, Questions
- Project specific questions: Forum
- TPU related questions: TODO
Please do not post the complete issue/project-specific question in the Slack channel, but instead a link to your issue/question that we will try to answer as soon as possible. This way, we make sure that the everybody in the community can benefit from your questions - even after the community week - and that the same question is not answered twice.
To be invited to the Slack channel, please make sure you have signed up on the Google form.
Note: If you have signed up on the google form, but you are not in the Slack channel, please leave a message on (TODO) the official forum announcement and ping @Suzana and @patrickvonplaten.
During the first week after the community week announcement, 23.06. - 30.06., teams will be formed around the most promising and interesting project ideas. Each team can consist of 2 to 10 participants. Projects can be accessed here.
All officially defined projects can be seen here.
Some default project ideas are given by the organizers. However, we strongly encourage participants to submit their own project ideas! Check out the HOW_TO_PROPOSE_PROJECT.md for more information on how to propose a new project.
You can check out all existing projects ideas on the forum under Flax/JAX projects category.
Make sure to quickly check out each project idea and leave a ❤️ if you like an idea.
Feel free to leave comments, suggestions for improvement, or questions about more details directly on the discussion thread.
If you have found the project that you ❤️ the most, leave a message "I would like to join this project" on the discussion thread.
We strongly advise you to also shortly state who you are, which time zone you are in and why you would like to work on this project, how you can contribute to the project and what your vision is for the project.
For projects that see a lot of interest and for which enough participants have expressed interest in joining, an official team will be created by the organizers.
One of the organizers (@Suzana, @valhalla, @osanseviero, @patrickvonplaten) will leave a message "For this project the team: <team_name>, <team_members> , is officially created" on the thread and note down the teams on this google sheet.
Once created, the team can start refining their project:
- What is the goal of the project? E.g., Present a language model that writes poetry in Russian.
- What model will we use? E.g., FlaxGPT2
- What data will we use? E.g. Russian dataset of OSCAR & publicly available book on poetry
- Should we use a pre-trained model or train a model from scratch? E.g. Train a model from scratch
- What training scripts do we need? E.g.
transformers/examples/flax/run_clm_flax.pycan be used - What kind of demo would we like to present? E.g. Text-generation API of the 🤗 Hub in combination with a Streamlit demo that lets the user generate a poem of a given length
- How will the work be divided? E.g. Team member 1 works on data preprocessing, Team member 2 works on adapting the Flax script, ...
We highly recommend that each team discusses all relevant ideas for their project directly on the forum thread. This way valuable learning experiences are shared and accessible by the whole community in the future. Additionally, the organizers, other participants, or anybody in the community really can read through your discussions and leave comments/tips for improvement. Obviously, you can also create private chats, ... to discuss more sensitive topics, etc.
Important:
- For project ideas that see a lot of interest, we are more than happy to create more than one team.
- Participants are welcome to join multiple teams, even though we encourage them to only work on a single project.
- Under special circumstances, participants can change/create new teams. Please note that we would like to keep this the exception. If however, you would like to change/leave existing teams, please leave a post on the project's thread where you ping the corresponding organizer that created the group.
- It is often easy to propose/join a project that is done in your native language. Feel free to reach out to existing language-specific groups to look for community members that might be interested in joining your project.
This section gives you some tips on how to most efficiently & effectively work as a team to achieve your goal. It is by no means a strict recipe to follow, but rather a collection of tips from the 🤗 team.
Once your team is defined, you can start working on the project as soon as possible.
At first, it is always useful to get to know each other and to set up a means of communication. While we recommend that all technical aspects of work can be discussed directly on the forum under your project thread, it can be very helpful to have a more direct way of communicating, e.g. in a channel. For this we have created a discord that you can access here. This discord will not be managed by anybody and is just there so that you can communicate more effectively with your team members. Feel free to create a new channel for you and your team where you can discuss everything. If you and your team have already set up other ways of communicating, it is absolutely not required to make use of the discord. However, we do recommend each team to set up some kind of channel or group for quick discussions.
In the very beginning, you should make sure your project is well-defined and that everybody in the team understands the goal of the project and the work that needs to be done in order to achieve the goal. A well-defined project:
- has defined the task on which the model will be trained
- has defined the model that will be trained
- has defined the datasets that will be used for training
- has defined the type of training scripts that need to be written
- has defined the desired outcome of the project
- has defined the workflows
By "has defined" we don't meant that the corresponding code already has to be written and ready to be used, but that everybody in team is on the same page on what type of model, data and training script should be used.
To give an example, a well-defined project would be the following:
- task: summarization
- model: google-t5/t5-small
- dataset: CNN/Daily mail
- training script: run_summarization_flax.py
- outcome: t5 model that can summarize news
- work flow: adapt
run_summarization_flax.pyto work withgoogle-t5/t5-small.
This example is a very easy and not the most interesting project since a google-t5/t5-small
summarization model exists already for CNN/Daily mail and pretty much no code has to be
written.
A well-defined project does not need to have the dataset be part of
the datasets library and the training script already be pre-written, however it should
be clear how the desired dataset can be accessed and how the training script can be
written.
It is also important to have a clear plan regarding the workflow. Usually, the data processing is done in a first step. Once the data is in a format that the model can work with, the training script can be written, etc. These steps should be more detailed once the team has a clearly defined project. It can be helpful to set deadlines for each step.
To effectively work as a team, it is crucial to divide the workload among everybody. Some team members will be more motivated and experienced than others and some team members simply want to participate to learn more and cannot contribute that much to the team. This is totally fine! One cannot expect everybody in the team to have the same level of experience and time/motivation during the community week.
As a conclusion, being honest about one's expected involvement is crucial so that the workload can be divided accordingly. If someone doesn't think her/his tasks are feasible - let the team know early on so that someone else can take care of it!
It is recommended that the motivated and experienced team members take the lead in dividing the work and are ready to take over the tasks of another team member if necessary.
The workload can often be divided according to:
- data preprocessing (load the data and preprocess data in the correct format)
- data tokenization / data collator (process data samples into tokens or images)
- model configuration (writing the code that defines the model)
- model forward pass (make sure input / output work correctly)
- loss function (define the loss function)
- putting the pieces together in a training script
Many of the steps above require other steps to be finished, so it often makes sense to use dummy data in the expected format to start, e.g., with the model forward pass before the data preprocessing is done.
It is also very important to stay realistic with the scope of your project. Each team has access to a TPUv3-8 for only ca. 10 days, so it's important to keep the scope of the project reasonable. While we do want each team to work on interesting projects, each team should make sure that the project goals can be achieved within the provided compute time on TPU. For instance, pretraining a 11 billion parameters T5 model is not really a realistic task with just 10 days of TPUv3-8 compute. Also, it might be difficult to finish a project where the whole modeling, dataset and training code has to be written from scratch.
Having defined your project, feel free to reach out on Slack or the forum for feedback from the organizers. We can surely give you our opinion on whether the project is feasible and what can be done to improve it. the project is feasible.
Here is a collection of some more tips:
- We strongly recommend to work as publicly and collaboratively as possible during the week so that other teams and the organizers can best help you. This includes publishing important discussions on the forum and making use of the 🤗 hub to have a version control for your models and training logs.
- When debugging, it is important that the debugging cycle is kept as short as possible to be able to effectively debug. E.g. if there is a problem with your training script, you should run it with just a couple of hundreds of examples and not the whole dataset script. This can be done by either making use of datasets streaming or by selecting just the first X number of data samples after loading:
datasets["train"] = datasets["train"].select(range(1000))- Ask for help. If you are stuck, use the public Slack channel or the forum to ask for help.
In the following we will explain how to install all relevant libraries on your local computer and on TPU VM.
It is recommended to install all relevant libraries both on your local machine and on the TPU virtual machine. This way, quick prototyping and testing can be done on your local machine and the actual training can be done on the TPU VM.
The following libraries are required to train a JAX/Flax model with 🤗 Transformers and 🤗 Datasets:
You should install the above libraries in a virtual environment. If you're unfamiliar with Python virtual environments, check out the user guide. Create a virtual environment with the version of Python you're going to use and activate it.
You should be able to run the command:
python3 -m venv <your-venv-name>You can activate your venv by running
source ~/<your-venv-name>/bin/activateWe strongly recommend to make use of the provided JAX/Flax examples scripts in transformers/examples/flax even if you want to train a JAX/Flax model of another github repository that is not integrated into 🤗 Transformers.
In all likelihood, you will need to adapt one of the example scripts, so we recommend forking and cloning the 🤗 Transformers repository as follows.
Doing so will allow you to share your fork of the Transformers library with your team members so that the team effectively works on the same code base. It will also automatically install the newest versions of flax, jax and optax.
-
Fork the repository by clicking on the 'Fork' button on the repository's page. This creates a copy of the code under your GitHub user account.
-
Clone your fork to your local disk, and add the base repository as a remote:
$ git clone https://github.com/<your Github handle>/transformers.git
$ cd transformers
$ git remote add upstream https://github.com/huggingface/transformers.git
-
Create a new branch to hold your development changes. This is especially useful to share code changes with your team:
$ git checkout -b a-descriptive-name-for-my-project
-
Set up a flax environment by running the following command in a virtual environment:
$ pip install -e ".[flax]"(If transformers was already installed in the virtual environment, remove it with
pip uninstall transformersbefore reinstalling it in editable mode with the-eflag.)If you have already cloned that repo, you might need to
git pullto get the most recent changes in thedatasetslibrary.Running this command will automatically install
flax,jaxandoptax.
Next, you should also install the 🤗 Datasets library. We strongly recommend installing the library from source to profit from the most current additions during the community week.
Simply run the following steps:
$ cd ~/
$ git clone https://github.com/huggingface/datasets.git
$ cd datasets
$ pip install -e ".[streaming]"
If you plan on contributing a specific dataset during the community week, please fork the datasets repository and follow the instructions here.
To verify that all libraries are correctly installed, you can run the following command.
It assumes that both transformers and datasets were installed from main - otherwise
datasets streaming will not work correctly.
from transformers import FlaxRobertaModel, RobertaTokenizerFast
from datasets import load_dataset
import jax

dataset = load_dataset('oscar', "unshuffled_deduplicated_en", split='train', streaming=True)

dummy_input = next(iter(dataset))["text"]

tokenizer = RobertaTokenizerFast.from_pretrained("FacebookAI/roberta-base")
input_ids = tokenizer(dummy_input, return_tensors="np").input_ids[:, :10]

model = FlaxRobertaModel.from_pretrained("julien-c/dummy-unknown")

# run a forward pass, should return an object `FlaxBaseModelOutputWithPooling`
model(input_ids)VERY IMPORTANT - Only one process can access the TPU cores at a time. This means that if multiple team members are trying to connect to the TPU cores errors, such as:
libtpu.so already in used by another process. Not attempting to load libtpu.so in this process.
are thrown. As a conclusion, we recommend every team member to create her/his own virtual environment, but only one person should run the heavy training processes. Also, please take turns when setting up the TPUv3-8 so that everybody can verify that JAX is correctly installed.
The following libraries are required to train a JAX/Flax model with 🤗 Transformers and 🤗 Datasets on TPU VM:
You should install the above libraries in a virtual environment. If you're unfamiliar with Python virtual environments, check out the user guide. Create a virtual environment with the version of Python you're going to use and activate it.
You should be able to run the command:
python3 -m venv <your-venv-name>If this doesn't work, you first might to have install python3-venv. You can do this as follows:
sudo apt-get install python3-venvYou can activate your venv by running
source ~/<your-venv-name>/bin/activateNext you should install JAX's TPU version on TPU by running the following command:
$ pip install requestsand then:
$ pip install "jax[tpu]>=0.2.16" -f https://storage.googleapis.com/jax-releases/libtpu_releases.htmlNote: Running this command might actually throw an error, such as:
 Building wheel for jax (setup.py) ... error
  ERROR: Command errored out with exit status 1:
   command: /home/patrick/patrick/bin/python3 -u -c 'import sys, setuptools, tokenize; sys.argv[0] = '"'"'/tmp/pip-install-lwseckn1/jax/setup.py'"'"'; __file__='"'"'/tmp/pip-install-lwseckn1/jax/setup.py'"'"';f=getattr(tokenize, '"'"'open'"'"', open)(__file__);code=f.read().replace('"'"'\r\n'"'"', '"'"'\n'"'"');f.close();exec(compile(code, __file__, '"'"'exec'"'"'))' bdist_wheel -d /tmp/pip-wheel-pydotzlo
       cwd: /tmp/pip-install-lwseckn1/jax/
  Complete output (6 lines):
  usage: setup.py [global_opts] cmd1 [cmd1_opts] [cmd2 [cmd2_opts] ...]
     or: setup.py --help [cmd1 cmd2 ...]
     or: setup.py --help-commands
     or: setup.py cmd --help

  error: invalid command 'bdist_wheel'
  ----------------------------------------
  ERROR: Failed building wheel for jax
Jax should have been installed correctly nevertheless.
To verify that JAX was correctly installed, you can run the following command:
import jax
jax.device_count()
This should display the number of TPU cores, which should be 8 on a TPUv3-8 VM.
We strongly recommend to make use of the provided JAX/Flax examples scripts in transformers/examples/flax even if you want to train a JAX/Flax model of another github repository that is not integrated into 🤗 Transformers.
In all likelihood, you will need to adapt one of the example scripts, so we recommend forking and cloning the 🤗 Transformers repository as follows.
Doing so will allow you to share your fork of the Transformers library with your team members so that the team effectively works on the same code base. It will also automatically install the newest versions of flax, jax and optax.
-
Fork the repository by clicking on the 'Fork' button on the repository's page. This creates a copy of the code under your GitHub user account.
-
Clone your fork to your local disk, and add the base repository as a remote:
$ git clone https://github.com/<your Github handle>/transformers.git
$ cd transformers
$ git remote add upstream https://github.com/huggingface/transformers.git
-
Create a new branch to hold your development changes. This is especially useful to share code changes with your team:
$ git checkout -b a-descriptive-name-for-my-project
-
Set up a flax environment by running the following command in a virtual environment:
$ pip install -e ".[flax]"(If transformers was already installed in the virtual environment, remove it with
pip uninstall transformersbefore reinstalling it in editable mode with the-eflag.)If you have already cloned that repo, you might need to
git pullto get the most recent changes in thedatasetslibrary.Running this command will automatically install
flax,jaxandoptax.
Next, you should also install the 🤗 Datasets library. We strongly recommend installing the library from source to profit from the most current additions during the community week.
Simply run the following steps:
$ cd ~/
$ git clone https://github.com/huggingface/datasets.git
$ cd datasets
$ pip install -e ".[streaming]"
If you plan on contributing a specific dataset during the community week, please fork the datasets repository and follow the instructions here.
To verify that all libraries are correctly installed, you can run the following command.
It assumes that both transformers and datasets were installed from main - otherwise
datasets streaming will not work correctly.
from transformers import FlaxRobertaModel, RobertaTokenizerFast
from datasets import load_dataset
import jax

dataset = load_dataset('oscar', "unshuffled_deduplicated_en", split='train', streaming=True)

dummy_input = next(iter(dataset))["text"]

tokenizer = RobertaTokenizerFast.from_pretrained("FacebookAI/roberta-base")
input_ids = tokenizer(dummy_input, return_tensors="np").input_ids[:, :10]

model = FlaxRobertaModel.from_pretrained("julien-c/dummy-unknown")

# run a forward pass, should return an object `FlaxBaseModelOutputWithPooling`
model(input_ids)JAX is Autograd and XLA, brought together for high-performance numerical computing and machine learning research. It provides composable transformations of Python+NumPy programs: differentiate, vectorize, parallelize, Just-In-Time compile to GPU/TPU, and more. A great place for getting started with JAX is the JAX 101 Tutorial.
Flax is a high-performance neural network library designed for flexibility built on top of JAX. It aims to provide users with full control of their training code and is carefully designed to work well with JAX transformations such as grad and pmap (see the Flax philosophy). For an introduction to Flax see the Flax Basics Colab or the list of curated Flax examples.
Currently, we support the following models in Flax.
Note that some models are about to be merged to main and will
be available in a couple of days.
You can find all available training scripts for JAX/Flax under the official flax example folder. Note that a couple of training scripts will be released in the following week.
- Causal language modeling (GPT2)
- Masked language modeling (BERT, RoBERTa, ELECTRA, BigBird)
- Text classification (BERT, RoBERTa, ELECTRA, BigBird)
- Summarization / Seq2Seq (BART, MBART, T5)
- Masked Seq2Seq pret-training (T5)
- Contrastive Loss pretraining for Wav2Vec2
- Fine-tuning long-range QA for BigBird
- (TODO) Image classification (ViT)
- (TODO) CLIP pretraining, fine-tuning (CLIP)
This section will explain how Flax models are implemented in Transformers and how the design differs from PyTorch.
Let's first go over the difference between Flax and PyTorch.
In JAX, most transformations (notably jax.jit) require functions that are transformed to be stateless so that they have no side effects. This is because any such side-effects will only be executed once when the transformed function is run during compilation and all subsequent calls of the compiled function would re-use the same side-effects of the compiled run instead of the "actual" side-effects (see Stateful Computations in JAX). As a consequence, Flax models, which are designed to work well with JAX transformations, are stateless. This means that when running a model in inference, both the inputs and the model weights are passed to the forward pass. In contrast, PyTorch model are very much stateful with the weights being stored within the model instance and the user just passing the inputs to the forward pass.
Let's illustrate the difference between stateful models in PyTorch and stateless models in Flax.
For simplicity, let's assume the language model consists simply of a single attention layer [key_proj, value_proj, query_proj] and a linear layer logits_proj to project the transformed word embeddings to the output logit vectors.
In PyTorch, the weights matrices would be stored as torch.nn.Linear objects alongside the model's config inside the model class ModelPyTorch:
class ModelPyTorch:

  def __init__(self, config):
    self.config = config
    self.key_proj = torch.nn.Linear(config)
    self.value_proj = torch.nn.Linear(config)
    self.query_proj = torch.nn.Linear(config)
    self.logits_proj = torch.nn.Linear(config)
Instantiating an object model_pytorch of the class ModelPyTorch would actually allocate memory for the model weights and attach them to the attributes self.key_proj, self.value_proj, self.query_proj, and self.logits.proj. We could access the weights via:
key_projection_matrix = model_pytorch.key_proj.weight.dataVisually, we would represent an object of model_pytorch therefore as follows:
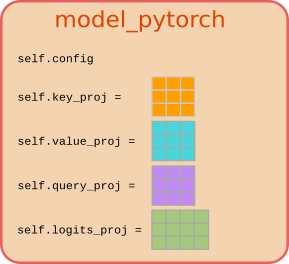
Executing a forward pass then simply corresponds to passing the input_ids to the object model_pytorch:
sequences = model_pytorch(input_ids)In a more abstract way, this can be represented as passing the word embeddings to the model function to get the output logits:

This design is called stateful because the output logits, the sequences, can change even if the word embeddings, the input_ids, stay the same. Hence, the function's output does not only depend on its inputs, but also on its state, [self.key_proj, self.value_proj, self.query_proj, self.logits_proj], which makes model_pytorch stateful.
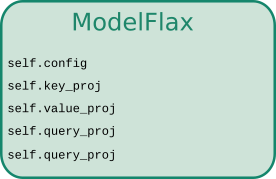
Now, let's see how the mathematically equivalent model would be written in JAX/Flax. The model class ModelFlax would define the self-attention and logits projection weights as flax.linen.Dense objects:
class ModelFlax:

  def __init__(self, config):
    self.config = config
    self.key_proj = flax.linen.Dense(config)
    self.value_proj = flax.linen.Dense(config)
    self.query_proj = flax.linen.Dense(config)
    self.logits_proj = flax.linen.Dense(config)
At first glance the linear layer class flax.linen.Dense looks very similar to PyTorch's torch.nn.Linear class. However, instantiating an object model_flax only defines the linear transformation functions and does not allocate memory to store the linear transformation weights. In a way, the attribute self.key_proj tell the instantiated object model_flax to perform a linear transformation on some input and force it to expect a weight, called key_proj, as an input.
This time we would illustrate the object model_flax without the weight matrices:
Accordingly, the forward pass requires both input_ids as well as a dictionary consisting of the model's weights (called state here) to compute the sequences:
To get the initial state we need to explicitly do a forward pass by passing a dummy input:
state = model_flax.init(rng, dummy_input_ids)and then we can do the forward pass.
sequences = model_flax.apply(state, input_ids)Visually, the forward pass would now be represented as passing all tensors required for the computation to the model's object:
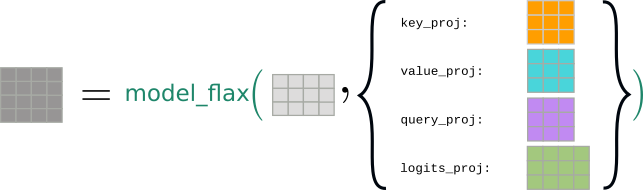
This design is called stateless because the output logits, the sequences, cannot change if the word embeddings, the input_ids, stay the same. Hence, the function's output only depends on its inputs, being the input_ids and the state dictionary consisting of the weights state, [key_proj, value_proj, query_proj, logits_proj].
Another term which is often used to describe the design difference between Flax/JAX and PyTorch is immutable vs mutable. A instantiated Flax model, model_flax, is immutable as a logical consequence of model_flax's output being fully defined by its input: If calling model_flax could mutate model_flax, then calling model_flax twice with the same inputs could lead to different results which would violate the "statelessness" of Flax models.
Now let us see how this is handled in Transformers. If you have used a Flax model in Transformers already, you might wonder how come you don't always have to pass the parameters to the function of the forward pass. This is because the FlaxPreTrainedModel class abstracts it away.
It is designed this way so that the Flax models in Transformers will have a similar API to PyTorch and Tensorflow models.
The FlaxPreTrainedModel is an abstract class that holds a Flax module, handles weights initialization, and provides a simple interface for downloading and loading pre-trained weights i.e. the save_pretrained and from_pretrained methods. Each Flax model then defines its own subclass of FlaxPreTrainedModel; e.g. the BERT model has FlaxBertPreTrainedModel. Each such class provides two important methods, init_weights and __call__. Let's see what each of those methods do:
-
The
init_weightsmethod takes the expected input shape and aPRNGKey(and any other arguments that are required to get initial weights) and callsmodule.initby passing it a random example to get the initial weights with the givendtype(for ex.fp32orbf16etc). This method is called when we create an instance of the model class, so the weights are already initialized when you create a model i.e., when you domodel = FlaxBertModel(config) -
The
__call__method defines forward pass. It takes all necessary model inputs and parameters (and any other arguments required for the forward pass). The parameters are optional; when no parameters are passed, it uses the previously initialized or loaded parameters which can be accessed usingmodel.params. It then calls themodule.applymethod, passing it the parameters and inputs to do the actual forward pass. So we can do a forward pass usingoutput = model(inputs, params=params)
Let's look at an example to see how this works. We will write a simple two-layer MLP model.
First, write a Flax module that will declare the layers and computation.
import flax.linen as nn
import jax.numpy as jnp

class MLPModule(nn.Module):
   config: MLPConfig
   dtype: jnp.dtype = jnp.float32

   def setup(self):
      self.dense1 = nn.Dense(self.config.hidden_dim, dtype=self.dtype)
      self.dense2 = nn.Desne(self.config.hidden_dim, dtype=self.dtype)

   def __call__(self, inputs):
      hidden_states = self.dense1(inputs)
      hidden_states = nn.relu(hidden_states)
      hidden_states = self.dense2(hidden_states)
      return hidden_states
Now let's define the FlaxPreTrainedModel model class.
from transformers.modeling_flax_utils import FlaxPreTrainedModel

class FlaxMLPPreTrainedModel(FlaxPreTrainedModel):
   config_class = MLPConfig
   base_model_prefix = "model"
   module_class: nn.Module = None

   def __init__(self, config: BertConfig, input_shape: Tuple = (1, 8), seed: int = 0, dtype: jnp.dtype = jnp.float32, **kwargs):
      # initialize the flax module
      module = self.module_class(config=config, dtype=dtype, **kwargs)
      super().__init__(config, module, input_shape=input_shape, seed=seed, dtype=dtype)

   def init_weights(self, rng, input_shape):
      # init input tensors
      inputs = jnp.zeros(input_shape, dtype="i4")

      params_rng, dropout_rng = jax.random.split(rng)
      rngs = {"params": params_rng, "dropout": dropout_rng}

      params = self.module.init(rngs, inputs)["params"]
      return params

   def __call__(self, inputs, params: dict = None):
      params = {"params": params or self.params}
      outputs = self.module.apply(params, jnp.array(inputs))
      return outputs
Now we can define our model class as follows.
class FlaxMLPModel(FlaxMLPPreTrainedModel):
   module_class = FlaxMLPModule
Now the FlaxMLPModel will have a similar interface as PyTorch or Tensorflow models and allows us to attach loaded or randomly initialized weights to the model instance.
So the important point to remember is that the model is not an instance of nn.Module; it's an abstract class, like a container that holds a Flax module, its parameters and provides convenient methods for initialization and forward pass. The key take-away here is that an instance of FlaxMLPModel is very much stateful now since it holds all the model parameters, whereas the underlying Flax module FlaxMLPModule is still stateless. Now to make FlaxMLPModel fully compliant with JAX transformations, it is always possible to pass the parameters to FlaxMLPModel as well to make it stateless and easier to work with during training. Feel free to take a look at the code to see how exactly this is implemented for ex. modeling_flax_bert.py
Another significant difference between Flax and PyTorch models is that, we can pass the labels directly to PyTorch's forward pass to compute the loss, whereas Flax models never accept labels as an input argument. In PyTorch, gradient backpropagation is performed by simply calling .backward() on the computed loss which makes it very handy for the user to be able to pass the labels. In Flax however, gradient backpropagation cannot be done by simply calling .backward() on the loss output, but the loss function itself has to be transformed by jax.grad or jax.value_and_grad to return the gradients of all parameters. This transformation cannot happen under-the-hood when one passes the labels to Flax's forward function, so that in Flax, we simply don't allow labels to be passed by design and force the user to implement the loss function oneself. As a conclusion, you will see that all training-related code is decoupled from the modeling code and always defined in the training scripts themselves.
Let's first see how to load, save and do inference with Flax models. As explained in the above section, all Flax models in Transformers have similar API to PyTorch models, so we can use the familiar from_pretrained and save_pretrained methods to load and save Flax models.
Let's use the base FlaxRobertaModel without any heads as an example.
from transformers import FlaxRobertaModel, RobertaTokenizerFast
import jax

tokenizer = RobertaTokenizerFast.from_pretrained("FacebookAI/roberta-base")
inputs = tokenizer("JAX/Flax is amazing ", padding="max_length", max_length=128, return_tensors="np")

model = FlaxRobertaModel.from_pretrained("julien-c/dummy-unknown")

@jax.jit
def run_model(input_ids, attention_mask):
   # run a forward pass, should return an object `FlaxBaseModelOutputWithPooling`
   return model(input_ids, attention_mask)

outputs = run_model(**inputs)
We use jax.jit to compile the function to get maximum performance. Note that in the above example, we set padding=max_length to pad all examples to the same length. We do this because JAX's compiler has to recompile a function everytime its input shape changes - in a sense a compiled function is not only defined by its code but also by its input and output shape. It is usually much more effective to pad the input to be of a fixed static shape than having to recompile every the function multiple times.
Now let's see how we can write a simple training loop to train Flax models, we will use FlaxGPT2ForCausalLM as an example.
A training loop for Flax models typically consists of
- A loss function that takes the parameters and inputs, runs the forward pass and returns the loss.
- We then transform the loss function using
jax.gradorjax.value_and_gradso that we get the gradients of all parameters. - An optimizer to update the paramteres using the gradients returned by the transformed loss function.
- A train step function which combines the loss function and optimizer update, does the forward and backward pass and returns the updated parameters.
Lets see how that looks like in code:
First initialize our model
import jax
import jax.numpy as jnp

from transformers import FlaxGPT2ForCausalLM

model = FlaxGPT2ForCausalLM(config)
As explained above we don't compute the loss inside the model, but rather in the task-specific training script. For demonstration purposes, we write a pseudo training script for causal language modeling in the following.
from flax.training.common_utils import onehot

def cross_entropy(logits, labels):
   return -jnp.sum(labels * jax.nn.log_softmax(logits, axis=-1), axis=-1)

# define a function which will run the forward pass return loss
def compute_loss(params, input_ids, labels):
   logits = model(input_ids, params=params, train=True)
   num_classes = logits.shape[-1]
   loss = cross_entropy(logits, onehot(labels, num_classes)).mean()
   return loss
Now we transform the loss function with jax.value_and_grad.
# transform the loss function to get the gradients
grad_fn = jax.value_and_grad(compute_loss)
We use the optax library to Initialize the optimizer.
import optax

params = model.params
tx = optax.sgd(learning_rate=3e-3)
opt_state = tx.init(params)
Now we define a single training step which will do a forward and a backward pass.
def _train_step(params, opt_state, input_ids, labels)
   # do the forward pass and get the loss and gradients
   loss, grads = grad_fn(params, input_ids, labels)

   # use the gradients to update parameters
   updates, opt_state = tx.update(grads, opt_state)
   updated_params = optax.apply_updates(params, updates)

   return updates_params, opt_state, loss

train_step = jax.jit(_train_step)
Finally, let's run our training loop.
# train loop
for i in range(10):
   params, opt_state, loss = train_step(params, opt_state, input_ids, labels)
Note how we always pass the params and opt_state to the train_step which then returns the updated params and opt_state. This is because of the staless nature of JAX/Flax models, all the state
like parameters, optimizer state is kept external.
We can now save the model with the trained parameters using
model.save_pretrained("awesome-flax-model", params=params)Note that, as JAX is backed by the XLA compiler any JAX/Flax code can run on all XLA compliant device without code change!
That menas you could use the same training script on CPUs, GPUs, TPUs.
To know more about how to train the Flax models on different devices (GPU, multi-GPUs, TPUs) and use the example scripts, please look at the examples README.
3 days of talks around JAX / Flax, Transformers, large-scale language modeling and other great topics during our community event!
| Speaker | Topic | Time | Video |
|---|---|---|---|
| Skye Wanderman-Milne, Google Brain | Intro to JAX on Cloud TPUs | 6.00pm-6.45pm CEST / 9.00am-9.45am PST |  |
| Marc van Zee, Google Brain | Introduction to Flax | 6.45pm-7.30pm CEST / 9.45am-10.30am PST | |
| Pablo Castro, Google Brain | Using Jax & Flax for RL with the Dopamine library | 7.30pm-8.00pm CEST / 10.30am-11.00am PST | |
| Speaker | Topic | Time | Video |
|---|---|---|---|
| Suraj Patil & Patrick von Platen, Hugging Face | How to use JAX/Flax with Transformers | 5.30pm-6.00pm CEST / 8.30am-9.00am PST | |
| Sabrina J. Mielke, Johns Hopkins University & HuggingFace | From stateful code to purified JAX: how to build your neural net framework | 6.00pm-6.30pm CEST / 9.00am-9.30am PST | |
| Mostafa Dehghani, Google Brain | Long Range Arena: Benchmarking Efficient Transformers | 6.30pm-7.00pm CEST / 9.30am-10.00am PST | |
| Rohan Anil, Google Brain | Scalable Second Order Optimization for Deep Learning | 7.00pm-7.30pm CEST / 10.00am-10.30am PST | |
| Speaker | Topic | Time | Video |
|---|---|---|---|
| Lucas Beyer, Google Brain | Vision Transformer | 5.00pm-5.30 CEST / 8.00am-8.30 PST | |
| Ben Wang, EleutherAI | Multihost Training in Mesh Transformer JAX | 5.30pm-6.00 CEST / 8.30am-9.00 PST | |
| Iurii Kemaev, Soňa Mokrá, Junhyuk Oh, DeepMind | DeepMind JAX Ecosystem | 6.00pm-6.30 CEST / 9.00am-9.30am PST | |
| Siddhartha Kamalakara, Joanna Yoo & João G M Araújo, Cohere | Training large scale language models | 6:30pm-7.00pm CEST / 9:30am-10.00am PST | |
- Talk: Intro to JAX on Cloud TPUs
- Abstract: JAX is a system for high-performance machine-learning research that combines the familiarity of Python + NumPy together with the power of hardware acceleration on CPUs, GPUs, and TPUs. It offers composable function transformations for automatic differentiation, automatic batching, end-to-end compilation, and both data and model parallelism. This talk will show you how to get up and running with JAX on a Cloud TPU VM.
- Speaker info: Skye Wanderman-Milne is a software engineer working on JAX. She has previously worked on TensorFlow and Apache Impala, a high-performance distributed database.
- Talk: Introduction to Flax
- Abstract: In this talk I will provide a high-level introduction to the neural network library Flax. I will discuss the Flax philosophy, talk about the ecosystem around Flax and provide a high-level introduction to the code. I explain the Module abstraction and how to use it to train your models.
- Speaker info: Marc is at Google Research for over 4 years. First he worked on conceptual AI, developing a next generation language understanding and reasoning prototype and he authored the CFQ dataset for compositional generalization. Currently, Marc works as a research software engineer in the Flax team.
- Talk: Using Jax & Flax for RL with the Dopamine library
- Abstract: The Dopamine library was launched with TensorFlow in 2018 and we added a Jax/Flax variant of it last year. Internally, Jax's flexibility has facilitated our RL research tremendously, and we are excited to demonstrate its potential.
- Speaker info: Pablo Samuel has been at Google for over 9 years, and is currently a researcher with the Brain team, focusing on fundamental reinforcement learning, as well as machine learning and creativity. Aside from his research, Pablo Samuel is an active musician (with a channel exploring the intersection of music and computer science), and is helping increase the representation of the LatinX community in the research world.
- Dopamine repo: https://github.com/google/dopamine
- Homepage: https://psc-g.github.io/
- Twitter: https://twitter.com/pcastr
- Talk: How to use JAX/Flax with Transformers
- Abstract: Transformers is one of the most popular open-source ML libraries and supports PyTorch, Tensorflow, and JAX/Flax. In this talk, we will explain how JAX/Flax models should be used in Transformers and compare their design in Transformers with the design of PyTorch models in Transformers. In the second part, we will give you a hands-on presentation of how a model can be trained end-to-end with the official JAX/Flax example scripts using Transformers & Datasets. Along the way, we want to give you some tips and tricks on how to best realize your project.
- Speaker info: Suraj and Patrick are part of Hugging Face’s open source team and lead the integration of JAX/Flax into Transformers.
- GitHub: https://github.com/patil-suraj & https://github.com/patrickvonplaten
Sabrina J. Mielke, PhD student at The Johns Hopkins University & Part-time research intern at HuggingFace
- Talk: From stateful code to purified JAX: how to build your neural net framework
- Abstract: Moving from object-oriented (and stateful) PyTorch- or TF2-code with tape-based backprop to JAX isn't easy---and while running grad() on numpy-oneliners is cool and all, you do wonder... how do I build actual big neural nets? Libraries like flax, trax, or haiku make it easy---but how could you build machinery like that yourself?
- Speaker info: Sabrina is a PhD student at the Johns Hopkins University and a part-time research intern at HuggingFace, researching open-vocabulary language models for segmentation and tokenization. She has published and co-organized workshops and shared tasks on these topics as well as on morphology and typological analysis in ACL, NAACL, EMNLP, LREC, and AAAI. You can find her reminisce for a time when formal language theory played a bigger role in NLP on Twitter at @sjmielke.
- Links: The 2020 blogpost this talk will be based on: https://sjmielke.com/jax-purify.htm, leading to our experiment Parallax and eventually Haiku
- Talk: Long Range Arena: Benchmarking Efficient Transformers
- Abstract: Transformers do not scale very well to long sequence lengths largely because of quadratic self-attention complexity. In the recent months, a wide spectrum of efficient, fast Transformers have been proposed to tackle this problem, more often than not claiming superior or comparable model quality to vanilla Transformer models. So, we now need a well-established consensus on how to evaluate this class of models. Moreover, inconsistent benchmarking on a wide spectrum of tasks and datasets makes it difficult to assess relative model quality amongst many models. I'll talk about a systematic and unified benchmark, LRA, specifically focused on evaluating model quality under long-context scenarios. LRA is a suite of tasks consisting of sequences ranging from 1K to 16K tokens, encompassing a wide range of data types and modalities such as text, natural, synthetic images, and mathematical expressions requiring similarity, structural, and visual-spatial reasoning. We systematically evaluate ten well-established long-range Transformer models (Reformers, Linformers, Linear Transformers, Sinkhorn Transformers, Performers, Synthesizers, Sparse Transformers, and Longformers) on LRA. LRA paves the way towards better understanding this class of efficient Transformer models, facilitates more research in this direction, and presents new challenging tasks to tackle.
- Speaker info: https://mostafadehghani.com/
- Talk: Scalable Second Order Optimization for Deep Learning
- Abstract: Optimization in machine learning, both theoretical and applied, is presently dominated by first-order gradient methods such as stochastic gradient descent. Second-order optimization methods, that involve second derivatives and/or second order statistics of the data, are far less prevalent despite strong theoretical properties, due to their prohibitive computation, memory and communication costs. In an attempt to bridge this gap between theoretical and practical optimization, we present a scalable implementation of a second-order preconditioned method (concretely, a variant of full-matrix Adagrad), that along with several critical algorithmic and numerical improvements, provides significant convergence and wall-clock time improvements compared to conventional first-order methods on state-of-the-art deep models. Our novel design effectively utilizes the prevalent heterogeneous hardware architecture for training deep models, consisting of a multicore CPU coupled with multiple accelerator units. We demonstrate superior performance compared to state-of-the-art on very large learning tasks such as machine translation with Transformers, language modeling with BERT, click-through rate prediction on Criteo, and image classification on ImageNet with ResNet-50.
- Speaker info: Rohan Anil is a software engineer at Google Research, Mountain View. Lately, he has been working on scalable and practical optimization techniques for efficient training of neural networks in various regimes.
- Resources:
- Talk: Vision Transformer
- Abstract: This talk will discuss the learning of general visual representations via large-scale pre-training and few-shot transfer, with a special focus on the Vision Transformer (ViT) architecture, which popularized transformers for the visual domain.
- Speaker info: Lucas Beyer is a self-taught hacker and studied engineer. He went on to do his PhD in robotic perception at RWTH Aachen and is currently on a quest to find the ultimate visual representation at Google Brain in Zürich
- Talk: Multihost Training in Mesh Transformer JAX
- Abstract: As models become larger, training must be scaled across multiple nodes. This talk discusses some design decisions and tradeoffs made for scaling to multiple nodes in Mesh Transformer JAX, a library for running model parallel transformers on TPU pods.
- Speaker info: Ben is an independent AI researcher who contributes to EleutherAI, an open source research collective centered around democratizing access to powerful AI models. Recently he has released GPT-J-6B, a 6 billion parameter transformer which is the most powerful autoregressive language model in terms of zero-shot performance with public weights.
- Website: https://www.eleuther.ai/
Iurii Kemaev, Research Engineer, Soňa Mokrá, Research Engineer, and Junhyuk Oh, Research Scientist, DeepMind
- Talk: DeepMind JAX Ecosystem
- Abstract: The DeepMind JAX Ecosystem is an effort to build a shared substrate of components to enable all aspects of AGI Research. In this talk, our researchers and engineers will give a high-level overview of our Ecosystem goals and design philosophies, using our Haiku (neural network), Optax (optimization) and RLax (reinforcement learning) libraries as examples. We will then deep dive on two examples of recent DeepMind research that have been enabled by JAX and these libraries: generative models and meta-gradient reinforcement learning.
- Speaker info:
- Iurii Kemaev is a Research Engineer at DeepMind. He has been using JAX for 2 years advancing RL research. Iurii is one of the DM JAX ecosystem leads.
- Soňa Mokrá is a Research Engineer at DeepMind. She has a background in machine translation and has been using JAX as the main ML framework for the past 6 months.
- Junhyuk Oh is a Research Scientist at DeepMind, working on reinforcement learning and meta-learning. More information is available at https://junhyuk.com/
- Talk: Training large scale language models
- Abstract: A journey through Cohere’s experiences with training large scale language models. Join us in our exploration of pipeline and model parallelism as strategies for efficient training of large language models. We will present and motivate our recent transition to JAX+Flax as our choice of internal tech stack.
- Speaker info:
- João G M Araújo is a Brazilian college student with a passion for mathematics and a fascination for Deep Learning. João conducted research on representation learning and spent 3 months in Japan working on NeuroEvolution. João likes reading fantasy books and spending quality time with family and friends, and also runs a YouTube series on theoretical understanding of Deep Learning where researchers talk about their findings
- Joanna Yoo is one of the founding engineers at Cohere, working on scaling language models for the last year and half. Joanna loves live concerts and rock climbing!
- Siddhartha Rao Kamalakara is an MLE at Cohere and a researcher at FOR.ai with research interests at the intersection of efficient training and empirical understanding of DL.
- Website: https://cohere.ai/
In this section, we will explain how a team can use the 🤗 hub to collaborate on a project. The 🤗 hub allows each team to create a repository with integrated git version control that should be used for their project. The advantages of using a repository on the 🤗 hub are:
- easy collaboration - each team member has write access to the model repository
- integrated git version control - code scripts as well as large model files are tracked using git version control
- easy sharing - the hub allows each team to easily share their work during and after the event
- integrated tensorboard functionality - uploaded tensorboard traces are automatically displayed on an integrated tensorboard tab
We highly recommend each team to make use of the 🤗 hub during the event. To better understand how the repository and the hub in general functions, please take a look at the documentation and the videos here.
Now let's explain in more detail how a project can be created on the hub. Having an officially defined project on this Google Sheet you should be part of the Flax Community organization on the hub. All repositories should be created under this organization so that write access can be shared and everybody can easily access other participants' work 🤗. Note that we are giving each team member access to all repositories created under flax-community, but we encourage participants to only clone and edit repositories corresponding to one's teams. If you want to help other teams, please ask them before changing files in their repository! The integrated git version control keeps track of all changes, so in case a file was deleted by mistake, it is trivial to re-create it.
Awesome! Now, let's first go over a simple example where most of the required we'll pre-train a RoBERTa model on a low-resource language. To begin with, we create a repository
under the Flax Community organization on the hub by logging in to the hub and going to "Add model". By default
the username should be displayed under "Owner", which we want to change to flax-community. Next, we give our repository a fitting name for the project - here we'll just call it
roberta-base-als because we'll be pretraining a RoBERTa model on the super low-resource language Alemannic (als). We make sure that the model is a public repository and create it!
It should then be displayed on the Flax Community organization on the hub.
Great, now we have a project directory with integrated git version control and a public model page, which we can access under flax-community/roberta-base-als. Let's create a short README so that other participants know what this model is about. You can create the README.md directly on the model page as a markdown file. Let's now make use of the repository for training.
We assume that the 🤗 Transformers library and git-lfs are correctly installed on our machine or the TPU attributed to us. If this is not the case, please refer to the Installation guide and the official git-lfs website.
At first we should log in:
$ huggingface-cli loginNext we can clone the repo:
$ git clone https://huggingface.co/flax-community/roberta-base-alsWe have now cloned the model's repository and it should be under roberta-base-als. As you can see,
we have all the usual git functionalities in this repo - when adding a file, we can do git add ., git commit -m "add file" and git push
as usual. Let's try it out by adding the model's config.
We go into the folder:
$ cd ./roberta-base-alsand run the following commands in a Python shell to save a config.
from transformers import RobertaConfig

config = RobertaConfig.from_pretrained("FacebookAI/roberta-base")
config.save_pretrained("./")
Now we've added a config.json file and can upload it by running
$ git add . && git commit -m "add config" && git pushCool! The file is now displayed on the model page under the files tab. We encourage you to upload all files except maybe the actual data files to the repository. This includes training scripts, model weights, model configurations, training logs, etc...
Next, let's create a tokenizer and save it to the model dir by following the instructions of the official Flax MLM README. We can again use a simple Python shell.
from datasets import load_dataset
from tokenizers import ByteLevelBPETokenizer

# load dataset
dataset = load_dataset("oscar", "unshuffled_deduplicated_als", split="train")

# Instantiate tokenizer
tokenizer = ByteLevelBPETokenizer()

def batch_iterator(batch_size=1000):
    for i in range(0, len(dataset), batch_size):
        yield dataset[i: i + batch_size]["text"]

# Customized training
tokenizer.train_from_iterator(batch_iterator(), vocab_size=50265, min_frequency=2, special_tokens=[
    "<s>",
    "<pad>",
    "</s>",
    "<unk>",
    "<mask>",
])

# Save files to disk
tokenizer.save("./tokenizer.json")
This creates and saves our tokenizer directly in the cloned repository.
Finally, we can start training. For now, we'll simply use the official run_mlm_flax
script, but we might make some changes later. So let's copy the script into our model repository.
$ cp ~/transformers/examples/flax/language-modeling/run_mlm_flax.py ./This way we are certain to have all the code used to train the model tracked in our repository. Let's start training by running:
./run_mlm_flax.py \
    --output_dir="./" \
    --model_type="roberta" \
    --config_name="./" \
    --tokenizer_name="./" \
    --dataset_name="oscar" \
    --dataset_config_name="unshuffled_deduplicated_als" \
    --max_seq_length="128" \
    --per_device_train_batch_size="4" \
    --per_device_eval_batch_size="4" \
    --learning_rate="3e-4" \
    --warmup_steps="1000" \
    --overwrite_output_dir \
    --num_train_epochs="8" \
    --push_to_hub
Since the dataset is tiny this command should actually run in less than 5 minutes. Note that we attach
the flag --push_to_hub so that both model weights and tensorboard traces are automatically uploaded to the hub.
You can see the tensorboard directly on the model page, under the Training metrics tab.
As you can see, it is pretty simple to upload model weights and training logs to the model hub. Since the repository
has git version control, you & your team probably already have the necessary skills to collaborate. Thanks
to git-lfs being integrated into the hub, model weights and other larger file can just as easily be uploaded
and changed. Finally, at Hugging Face, we believe that the model hub is a great platform to share your project
while you are still working on it:
- Bugs in training scripts can be found and corrected by anybody participating in the event
- Loss curves can be analyzed directly on the model page
- Model weights can be accessed and analyzed by everybody from the model repository
If you are not using a transformers model, don't worry - you should still be able to make use of the hub's functionalities!
The huggingface_hub allows you to upload essentially any JAX/Flax model to the hub with
just a couple of lines of code. E.g. assuming you want to call your model simply flax-model-dummy, you can upload it to the hub with
just three lines of code:
from flax import serialization
from jax import random
from flax import linen as nn
from huggingface_hub import Repository

model = nn.Dense(features=5)

key1, key2 = random.split(random.PRNGKey(0))
x = random.normal(key1, (10,))
params = model.init(key2, x)

bytes_output = serialization.to_bytes(params)

repo = Repository("flax-model", clone_from="flax-community/flax-model-dummy", token=True)
with repo.commit("My cool Flax model :)"):
    with open("flax_model.msgpack", "wb") as f:
        f.write(bytes_output)

# Repo is created and available here: https://huggingface.co/flax-community/flax-model-dummyNote: Make sure to have huggingface_hub >= 0.0.13 to make this command work.
For more information, check out this PR on how to upload any framework to the hub.
In this section we will explain how you can ssh into a TPU VM that has been given to your team. If your username is in one of the officially defined projects here, you should have received two emails:
- one that states that you have been granted the role "Community Week Participants" for the project hf-flax, and
- one (or more if you are in multiple projects) that gives you the TPU name and the TPU zone for the TPU of your team
You should click on "Open Cloud Console" on the first mail and agree to the pop up windows that follows. It will allow you to use a TPU VM. Don't worry if you cannot access the actual project hf-flax visually on the google cloud console and receive an error:
You don't have sufficient permission to view this page
- this is expected!
Great, now you and your team can access your TPU VM!
In the following, we will describe how to do so using a standard console, but you should also be able to connect to the TPU VM via IDEs, like Visual Studio Code, etc.
-
You need to install the Google Cloud SDK. Please follow the instructions on cloud.google.com/sdk.
-
Once you've installed the google cloud sdk, you should set your account by running the following command. Make sure that
<your-email-address>corresponds to the gmail address you used to sign up for this event.
$ gcloud config set account <your-email-address>- Let's also make sure the correct project is set in case your email is used for multiple gcloud projects:
$ gcloud config set project hf-flax- Next, you will need to authenticate yourself. You can do so by running:
$ gcloud auth loginThis should give you a link to a website, where you can authenticate your gmail account.
- Finally, you can ssh into the TPU VM! Please run the following command by setting to either
europe-west4-aorus-central1-a(depending on what is stated in the second email you received) and to the TPU name also sent to you in the second email.
$ gcloud alpha compute tpus tpu-vm ssh <tpu-name> --zone <zone> --project hf-flaxThis should ssh you into the TPU VM!
Now you can follow the steps of the section How to install relevant libraries to install all necessary
libraries. Make sure to carefully follow the explanations of the "IMPORTANT" statement to correctly install JAX on TPU.
Also feel free to install other python or apt packages on your machine if it helps you to work more efficiently!
Hugging Face has over 15 widgets for different use cases using 🤗 Transformers library. Some of them also support 3rd party libraries such as Sentence Similarity with Sentence Transformers and Text to Speech with ESPnet.
All the widgets are open sourced in the huggingface_hub repo. Here is a summary of existing widgets:
NLP
- Conversational: To have the best conversations!. Example.
- Feature Extraction: Retrieve the input embeddings. Example.
- Fill Mask: Predict potential words for a mask token. Example.
- Question Answering: Given a context and a question, predict the answer. Example.
- Sentence Simmilarity: Predict how similar a set of sentences are. Useful for Sentence Transformers.
- Summarization: Given a text, output a summary of it. Example.
- Table Question Answering: Given a table and a question, predict the answer. Example.
- Text Generation: Generate text based on a prompt. Example
- Token Classification: Useful for tasks such as Named Entity Recognition and Part of Speech. Example.
- Zero-Shot Classification: Too cool to explain with words. Here is an example
- (WIP) Table to Text Generation.
Speech
- Audio to Audio: For tasks such as audio source separation or speech enhancement.
- Automatic Speech Recognition: Convert audio to text. Example
- Text to Speech: Convert text to audio.
Image
- Image Classification: Given an image, predict its class. Example.
- (WIP) Zero Shot Image Classification
- (WIP) Image Captioning
- (WIP) Text to Image Generation
- (Proposed) Visual Question Answering
You can propose and implement new widgets by opening an issue. Contributions are welcomed!
Sometimes you might be using different libraries or a very specific application that is not well supported by the current widgets. In this case, Streamlit can be an excellent option to build a cool visual demo. Setting up a Streamlit application is straightforward and in Python!
A common use case is how to load files you have in your model repository in the Hub from the Streamlit demo. The huggingface_hub library is here to help you!
pip install huggingface_hubHere is an example downloading (and caching!) a specific file directly from the Hub
from huggingface_hub import hf_hub_download
filepath = hf_hub_download("flax-community/roberta-base-als", "flax_model.msgpack");
In many cases you will want to download the full repository. Here is an example downloading all the files from a repo. You can even specify specific revisions!
from huggingface_hub import snapshot_download
local_path = snapshot_download("flax-community/roberta-base-als");
Note that if you're using 🤗 Transformers library, you can quickly load the model and tokenizer as follows
from transformers import AutoTokenizer, AutoModelForMaskedLM

tokenizer = AutoTokenizer.from_pretrained("REPO_ID")
model = AutoModelForMaskedLM.from_pretrained("REPO_ID")
We'll provide more examples on Streamlit demos next week. Stay tuned!
You can also use Gradio to share your demos! Here is an example using the Gradio library to create a GUI for a Hugging Face model.
More to come!
For your project to be evaluated, please fill out this google form. Please make sure that your submitted project includes a demo as well as information about the model, data, training methods, etc.
- Demo. All projects are required to have a demo. It’s open ended, but we provide some ideas on how to build demos in the How to build a demo section.
- Technical difficulty. Difficulty has different aspects, such as working with complex architectures, obtaining better evaluation metrics than existing models, or implementing models for low-resource languages.
- Social impact. The project is expected to have a positive social impact, e.g. by tackling under-explored area of practical interest for minorities or under-represented group (low-ressources languages, specific focus on bias, fairness or ethical issues in ML) or by tackling general societal challenges, e.g. health or climate related challenges.
- Innovativeness. Projects that propose novel applications or bring new ideas will be rewarded more.
- Niki Parmar: Staff Research Scientist at Google.
- Ross Wightman: Angel Investor.
- Thomas Wolf: Co-founder and CSO at Hugging Face.
- Ashish Vaswani: Staff Research Scientist at Google Brain.
- July 17, 12h00 CEST: TPU VM access closes.
- July 19, 12h00 CEST: Project completition ends (including demo).
- July 19-21 A group of event organizers (Suraj, Patrick, Suzana, and Omar) will do an initial filter to find the top 15 projects.
- July 22-26 The jury will go over the 15 projects and pick the top three projects out of them.
- July 27. Winner projects are announced
TODO (will be filled continuously)...
TODO (will be filled continuously)...